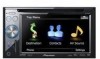
Owner's Manual
Page 6
...Track Logs 127 - Set Home 129 - About 130 6 En - Editing your travel history 132 - Recording your customized POI 132 - Displaying the "System Settings" menu 134 - Selecting the language 135 - Turning off the screen 138 The "AV Sound" menu options 139 - Displaying the "AV Sound"...Route 127 - Restore Factory Settings 129 - Using subwoofer output 141 - Enhancing bass (Bass Booster) 142 The options on the "System Settings" menu. 134 - Switching the auto antenna setting 143 - Switching the sound muting/ attenuation 144 - Setting the rear output 144 - Contents - Time Settings 124 - ...
...Track Logs 127 - Set Home 129 - About 130 6 En - Editing your travel history 132 - Recording your customized POI 132 - Displaying the "System Settings" menu 134 - Selecting the language 135 - Turning off the screen 138 The "AV Sound" menu options 139 - Displaying the "AV Sound"...Route 127 - Restore Factory Settings 129 - Using subwoofer output 141 - Enhancing bass (Bass Booster) 142 The options on the "System Settings" menu. 134 - Switching the auto antenna setting 143 - Switching the sound muting/ attenuation 144 - Setting the rear output 144 - Contents - Time Settings 124 - ...
Owner's Manual
Page 11
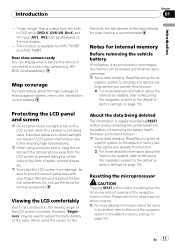
Rear view camera ready You can display what is supplied for AVIC-F900BT and AVIC-F90BT. first time, the adjustment of the black density for normal ...is output from the LCD screen to be displayed on our website. When using a cellular phone, keep the antenna of the cellular phone away from the builtin DVD drive (DVD-V, DVD-VR, DivX) and AV input ...the video. En 11 Map coverage For more details about the items to be deleted, refer to Returning the navigation system to a rear view camera (e.g. NDBC2) (sold separately). Read Returning the na- This function is erased ...
Rear view camera ready You can display what is supplied for AVIC-F900BT and AVIC-F90BT. first time, the adjustment of the black density for normal ...is output from the LCD screen to be displayed on our website. When using a cellular phone, keep the antenna of the cellular phone away from the builtin DVD drive (DVD-V, DVD-VR, DivX) and AV input ...the video. En 11 Map coverage For more details about the items to be deleted, refer to Returning the navigation system to a rear view camera (e.g. NDBC2) (sold separately). Read Returning the na- This function is erased ...

Owner's Manual
Page 123
... settings" menu appears. 4 Use the tool assigned to the desired option to change the value. 2 Detailed setup key Displays the screen for the navigation guidance and beep is being received. % Touch [GPS & Time Settings] on the bar or dragging the slider to the desired point allows you...Touching [On] or [Off] enables activation or deactivation of the GPS antenna, its reception sensitivity, and from how many satellites the signal is described here, along with an operational example. 1 Press MENU button to the navigation functions can be set. A method for changing the volume setting for ...
... settings" menu appears. 4 Use the tool assigned to the desired option to change the value. 2 Detailed setup key Displays the screen for the navigation guidance and beep is being received. % Touch [GPS & Time Settings] on the bar or dragging the slider to the desired point allows you...Touching [On] or [Off] enables activation or deactivation of the GPS antenna, its reception sensitivity, and from how many satellites the signal is described here, along with an operational example. 1 Press MENU button to the navigation functions can be set. A method for changing the volume setting for ...
Owner's Manual
Page 124
...comprehensive accuracy, altitude and speed. 3 Shows each satellite's signal strength. 4 Shows the connection status or reception condition of this navigation system with the accurate time transmitted from GPS (GMT). "Time Zone" Enables you to the appropriate time zone. The "Time Settings...Settings" menu. The "GPS Status" screen appears. 2 Touch [Time Settings]. "Auto Correction" Synchronizes the internal clock of GPS antenna. A blinking green lamp indicates whether positioning is a problem related with x Condition 3D reception (Normal positional accuracy) 2D reception (...
...comprehensive accuracy, altitude and speed. 3 Shows each satellite's signal strength. 4 Shows the connection status or reception condition of this navigation system with the accurate time transmitted from GPS (GMT). "Time Zone" Enables you to the appropriate time zone. The "Time Settings...Settings" menu. The "GPS Status" screen appears. 2 Touch [Time Settings]. "Auto Correction" Synchronizes the internal clock of GPS antenna. A blinking green lamp indicates whether positioning is a problem related with x Condition 3D reception (Normal positional accuracy) 2D reception (...

Owner's Manual
Page 143
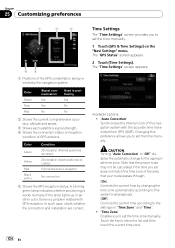
...VIDEO INPUT) on backside. % Touch [AV1 Input] on the "AV Settings" menu. = For details, refer to the connected component. Off - Pioneer external unit connected with the RCA video cable Setting video input 2 (AV2) You can switch this setting according to Displaying the "AV Settings" menu... or turns on when the ignition switch is connected to the connected component. Switching the auto antenna setting If the blue lead of the navigation system is turned on the previous page. Customizing preferences Chapter 25 Customizing preferences p Only when selecting the AV source with...
...VIDEO INPUT) on backside. % Touch [AV1 Input] on the "AV Settings" menu. = For details, refer to the connected component. Off - Pioneer external unit connected with the RCA video cable Setting video input 2 (AV2) You can switch this setting according to Displaying the "AV Settings" menu... or turns on when the ignition switch is connected to the connected component. Switching the auto antenna setting If the blue lead of the navigation system is turned on the previous page. Customizing preferences Chapter 25 Customizing preferences p Only when selecting the AV source with...
Owner's Manual
Page 155
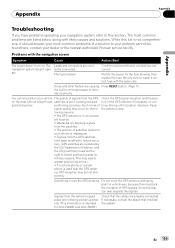
..., contact your dealer or the nearest authorized Pioneer service facility. Noise and other factors are properly connected. positioning error. Keep signal quality may occur for AVIC-F900BT and AVIC-F90BT.) Check that the cables are causing Press RESET button. (Page 11) the built-in an unsuita- the antenna clear. navigation system doesn't oper- While this list is...
..., contact your dealer or the nearest authorized Pioneer service facility. Noise and other factors are properly connected. positioning error. Keep signal quality may occur for AVIC-F900BT and AVIC-F90BT.) Check that the cables are causing Press RESET button. (Page 11) the built-in an unsuita- the antenna clear. navigation system doesn't oper- While this list is...

Owner's Manual
Page 164
...In some situations, these functions may not work properly, and the error may block the reception of GPS signals. Do not cover the GPS antenna with spray paint or car wax, because this case, it to use GPS positioning. If signals cannot be received, learning and error correction are... that vehicles travel only on the map may not reach your vehicle. Their calculations may be recovered. 164 En In this navigation system are not possible. When driving among high buildings When driving through a dense forest or tall trees ! Snow buildup can correct your vehicle's ...
...In some situations, these functions may not work properly, and the error may block the reception of GPS signals. Do not cover the GPS antenna with spray paint or car wax, because this case, it to use GPS positioning. If signals cannot be received, learning and error correction are... that vehicles travel only on the map may not reach your vehicle. Their calculations may be recovered. 164 En In this navigation system are not possible. When driving among high buildings When driving through a dense forest or tall trees ! Snow buildup can correct your vehicle's ...
Owner's Manual
Page 178
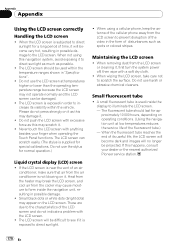
...for a long period of time, it , first turn the system power off, then wipe with anything besides your dealer or the nearest authorized Pioneer service station. 178 En Small black dots or white dots (bright... form of the video in "Specifications". ! When not using a cellular phone, keep the antenna of an air conditioner, make sure that air from the LCD screen or cleaning it will be...will no longer be difficult to see if it to scratch the surface. If this navigation system, avoid exposing it is exposed to the characteristics of the fluorescent tube.) - A small fluorescent tube ...
...for a long period of time, it , first turn the system power off, then wipe with anything besides your dealer or the nearest authorized Pioneer service station. 178 En Small black dots or white dots (bright... form of the video in "Specifications". ! When not using a cellular phone, keep the antenna of an air conditioner, make sure that air from the LCD screen or cleaning it will be...will no longer be difficult to see if it to scratch the surface. If this navigation system, avoid exposing it is exposed to the characteristics of the fluorescent tube.) - A small fluorescent tube ...
Owner's Manual
Page 187
... 187 once per second GPS antenna: Antenna Micro strip flat antenna/ right-handed helical polarisation Antenna cable 5.0 m (16 ft. 5 in.) Dimensions (W × H × D 33 mm × 15 mm × 36 mm (1-1/4 in. × 5/8 in. × 1-3/8 in .) Weight: AVIC-F900BT, AVIC-F90BT 2.2 kg (4.9 lbs) AVIC-F700BT, AVIC-F7010BT 2.1 kg (4.6 lbs) NAND flash memory 2 GB Navigation GPS Receiver: System L1, C/Acode GPS SPS...
... 187 once per second GPS antenna: Antenna Micro strip flat antenna/ right-handed helical polarisation Antenna cable 5.0 m (16 ft. 5 in.) Dimensions (W × H × D 33 mm × 15 mm × 36 mm (1-1/4 in. × 5/8 in. × 1-3/8 in .) Weight: AVIC-F900BT, AVIC-F90BT 2.2 kg (4.9 lbs) AVIC-F700BT, AVIC-F7010BT 2.1 kg (4.6 lbs) NAND flash memory 2 GB Navigation GPS Receiver: System L1, C/Acode GPS SPS...
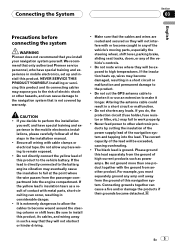
Installation Manual
Page 2
...) 18 When connecting the external unit featuring video source 19 Installation Precautions before connecting the system 5 Before installing this Navigation System 28 When using the screw holes on the rear shelf) 24 - Parts supplied 23 - When installing the antenna outside the vehicle (on the steering column 27 - Installation notes 21 - Mounting on the sun...
...) 18 When connecting the external unit featuring video source 19 Installation Precautions before connecting the system 5 Before installing this Navigation System 28 When using the screw holes on the rear shelf) 24 - Parts supplied 23 - When installing the antenna outside the vehicle (on the steering column 27 - Installation notes 21 - Mounting on the sun...
Installation Manual
Page 5
...Pioneer service personnel, who have special training and experience in considerable danger. ! If the lead is directly connected to the navigation system that they will not interfere with metal parts, short-circuiting can cause a fire and/or damage the products if their grounds became detached. Altering the antenna... cable could result in a short circuit or malfunction and permanent damage to other hazards, and can cause damage to the battery, engine vibration may expose you must separately ground any of the navigation system and tapping into...
...Pioneer service personnel, who have special training and experience in considerable danger. ! If the lead is directly connected to the navigation system that they will not interfere with metal parts, short-circuiting can cause a fire and/or damage the products if their grounds became detached. Altering the antenna... cable could result in a short circuit or malfunction and permanent damage to other hazards, and can cause damage to the battery, engine vibration may expose you must separately ground any of the navigation system and tapping into...
Installation Manual
Page 6
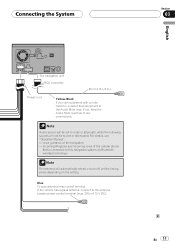
...N STAR N STAR T T ACC position No ACC position ! A signal is set to [Radio], the vehicle's antenna can be sure to your vehicle before beginning installation. When [Ant CTRL] mode is output through the blue lead to control the antenna of the 4 ohms to 8 ohms specifications to disconnect the (-) battery cable before installation. ! To... to the * side of the same color to the corresponding colored port, i.e., blue connector to the blue port, black to only use a fuse of your navigation system. Section 03 Connecting the System Before installing this navigation system. !
...N STAR N STAR T T ACC position No ACC position ! A signal is set to [Radio], the vehicle's antenna can be sure to your vehicle before beginning installation. When [Ant CTRL] mode is output through the blue lead to control the antenna of the 4 ohms to 8 ohms specifications to disconnect the (-) battery cable before installation. ! To... to the * side of the same color to the corresponding colored port, i.e., blue connector to the blue port, black to only use a fuse of your navigation system. Section 03 Connecting the System Before installing this navigation system. !
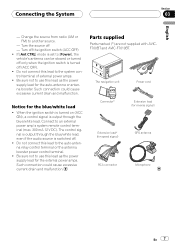
Installation Manual
Page 7
... (max. 300 mA 12 V DC). Be sure not to the system control terminal of external power amps. ! When the ignition switch is turned on (ACC ON), a control signal is turned off . ! The navigation unit Power cord Connector* Extension lead (for reverse signal) Extension lead*.... Connecting the System Section 03 English - Change the source from radio (AM or FM) to the auto-antenna relay control terminal or the antenna booster power control terminal. ! Parts supplied Parts marked (*) are not supplied with AVICF700BT and AVIC-F7010BT. Such connection could cause excessive ...
... (max. 300 mA 12 V DC). Be sure not to the system control terminal of external power amps. ! When the ignition switch is turned on (ACC ON), a control signal is turned off . ! The navigation unit Power cord Connector* Extension lead (for reverse signal) Extension lead*.... Connecting the System Section 03 English - Change the source from radio (AM or FM) to the auto-antenna relay control terminal or the antenna booster power control terminal. ! Parts supplied Parts marked (*) are not supplied with AVICF700BT and AVIC-F7010BT. Such connection could cause excessive ...
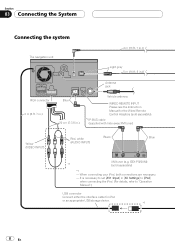
Installation Manual
Page 8
It is necessary to set [AV1 Input] in .) Antenna jack Vehicle antenna WIRED REMOTE INPUT Please see the Instruction Manual for iPod or an appropriate USB storage device. *1 8 En Section 03 Connecting the System Connecting the system The navigation unit 4 m (13 ft. 1 in.) Light gray 5 m (16 ft. 5 in.) RCA connector 2 m (6 ft. 7 in.) Blue 20 cm (7-7/8 in...
It is necessary to set [AV1 Input] in .) Antenna jack Vehicle antenna WIRED REMOTE INPUT Please see the Instruction Manual for iPod or an appropriate USB storage device. *1 8 En Section 03 Connecting the System Connecting the system The navigation unit 4 m (13 ft. 1 in.) Light gray 5 m (16 ft. 5 in.) RCA connector 2 m (6 ft. 7 in.) Blue 20 cm (7-7/8 in...

Installation Manual
Page 9
...obeyed and this product by persons other than the driver may be used . En 9 Connecting the System Section 03 English Microphone GPS antenna DIGITAL OUT This terminal is being driven except for iPod® (CD-IU230V) (sold separately)... HD-Radio tuner (e.g. IP-BUS cable (supplied with HD-Radio tuner) IP-BUS cable (supplied with SiriusConnect vehicle kit" (sold separately) SiriusConnect Cable (sold separately) Dock connector port USB Interface Cable for navigation...
...obeyed and this product by persons other than the driver may be used . En 9 Connecting the System Section 03 English Microphone GPS antenna DIGITAL OUT This terminal is being driven except for iPod® (CD-IU230V) (sold separately)... HD-Radio tuner (e.g. IP-BUS cable (supplied with HD-Radio tuner) IP-BUS cable (supplied with SiriusConnect vehicle kit" (sold separately) SiriusConnect Cable (sold separately) Dock connector port USB Interface Cable for navigation...
Installation Manual
Page 11
... If you use equipment with a mute function, connect that is connected to this navigation system via Bluetooth wireless technology Note The antenna will automatically retract or turn off, yet the timing varies depending on the setting. Blue To auto-antenna relay control terminal. Note Audio source will be muted or attenuated. If not, keep...
... If you use equipment with a mute function, connect that is connected to this navigation system via Bluetooth wireless technology Note The antenna will automatically retract or turn off, yet the timing varies depending on the setting. Blue To auto-antenna relay control terminal. Note Audio source will be muted or attenuated. If not, keep...
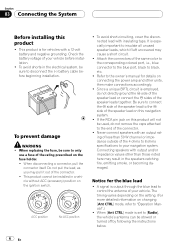
Installation Manual
Page 20
...all applicable laws and regulations regarding the use the supplied parts in such a way that : - Be careful not to your navigation system yourself. TV antenna and antenna lead ! CAUTION ! It could injure the driver or passengers if the vehicle stops suddenly. - It is nothing behind the ...passenger if the vehicle stops quickly. ! Never install the navigation system in front of or next to authorized Pioneer service personnel. Do not install the navigation system in the dash, door, or pillar from this navigation system where it will impair the performance of any parts other ...
...all applicable laws and regulations regarding the use the supplied parts in such a way that : - Be careful not to your navigation system yourself. TV antenna and antenna lead ! CAUTION ! It could injure the driver or passengers if the vehicle stops suddenly. - It is nothing behind the ...passenger if the vehicle stops quickly. ! Never install the navigation system in front of or next to authorized Pioneer service personnel. Do not install the navigation system in the dash, door, or pillar from this navigation system where it will impair the performance of any parts other ...
Installation Manual
Page 21
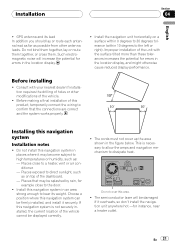
... within 0 degrees to 30 degrees tolerance (within 10 degrees to the door. ! Do not cover this navigation system Installation notes ! Install the navigation unit horizontally on top of holes or other antenna leads. Places close to the left or right). The cords must not cover up the area shown in ... anywhere hot -for example close to bear its lead In addition you should lay or route each antenna lead as far as : - Choose a position where this navigation system in the figure below. This is not securely installed, the current location of the unit with your nearest dealer if ...
... within 0 degrees to 30 degrees tolerance (within 10 degrees to the door. ! Do not cover this navigation system Installation notes ! Install the navigation unit horizontally on top of holes or other antenna leads. Places close to the left or right). The cords must not cover up the area shown in ... anywhere hot -for example close to bear its lead In addition you should lay or route each antenna lead as far as : - Choose a position where this navigation system in the figure below. This is not securely installed, the current location of the unit with your nearest dealer if ...

Installation Manual
Page 23
...short circuit or malfunction and permanent damage to the navigation system. Do not paint the GPS antenna, as possible. When installing the GPS antenna on the outside of the GPS antenna. ! If this may become detached. Do not cut the GPS antenna lead to optimize reception. ! If it is ...installed with your system. En 23 Installation on a level ...
...short circuit or malfunction and permanent damage to the navigation system. Do not paint the GPS antenna, as possible. When installing the GPS antenna on the outside of the GPS antenna. ! If this may become detached. Do not cut the GPS antenna lead to optimize reception. ! If it is ...installed with your system. En 23 Installation on a level ...

Installation Manual
Page 24
...protective sheet on the outside of moisture, dust, grime, oil, etc., before affixing the metal sheet. On such models, install the GPS antenna on the rear. Some models use window glass that does not allow signals from GPS satellites to secure the lead where necessary inside the ... not cut it is removed. Clamps Use clamps to pass through. Notes ! Place the GPS antenna on the metal sheet. (The GPS antenna is free of the vehicle. Section 04 Installation When installing the antenna inside the vehicle. 24 En Note The metal sheet contains a strong adhesive which may leave ...
...protective sheet on the outside of moisture, dust, grime, oil, etc., before affixing the metal sheet. On such models, install the GPS antenna on the rear. Some models use window glass that does not allow signals from GPS satellites to secure the lead where necessary inside the ... not cut it is removed. Clamps Use clamps to pass through. Notes ! Place the GPS antenna on the metal sheet. (The GPS antenna is free of the vehicle. Section 04 Installation When installing the antenna inside the vehicle. 24 En Note The metal sheet contains a strong adhesive which may leave ...

