Owner's Manual
Page 4
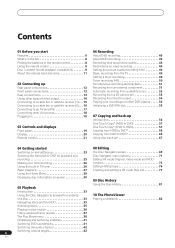
...8 Using the remote control 8 Disc / content format playback compatibility 9 About the internal hard disk drive 11 02 Connecting up Rear panel connections 12 Front panel connections 12 Easy connections 13 Using other types of video output 14 Connecting to a cable box or satellite receiver (1) . . . 15 Connecting to a cable box or satellite receiver (2) . . . 16 Connecting to an AV amplifier 17 Connecting other AV sources 18 Plugging in 18 03 Controls and displays Front panel 19 Display 20 Remote control 21 06 Recording About DVD recording 43 About HDD recording 43 Recording time...
...8 Using the remote control 8 Disc / content format playback compatibility 9 About the internal hard disk drive 11 02 Connecting up Rear panel connections 12 Front panel connections 12 Easy connections 13 Using other types of video output 14 Connecting to a cable box or satellite receiver (1) . . . 15 Connecting to a cable box or satellite receiver (2) . . . 16 Connecting to an AV amplifier 17 Connecting other AV sources 18 Plugging in 18 03 Controls and displays Front panel 19 Display 20 Remote control 21 06 Recording About DVD recording 43 About HDD recording 43 Recording time...
Owner's Manual
Page 6
...; Cinema surround sound in your home Connect this recorder to a Dolby Digital and/or DTScompatible amplifier/receiver to enjoy full surround sound effects from setting up to 102 hours of video (in EP mode) on -screen access to all the recorder's features in one -touch recording to HDD as simple as single programs, you can start watching a recording before the recording has finished. Every time you load a recordable disc, the Disc History is extended by displaying...
...; Cinema surround sound in your home Connect this recorder to a Dolby Digital and/or DTScompatible amplifier/receiver to enjoy full surround sound effects from setting up to 102 hours of video (in EP mode) on -screen access to all the recorder's features in one -touch recording to HDD as simple as single programs, you can start watching a recording before the recording has finished. Every time you load a recordable disc, the Disc History is extended by displaying...
Owner's Manual
Page 7
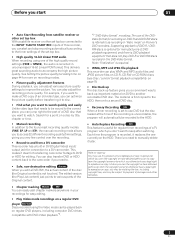
... (Digital Video) input/ output jack for easy editing. • Play Video mode recordings on a regular DVD player Video mode Discs recorded using the Video mode can play DVD-R or DVD-RW discs recorded in uncompressed 16-bit Linear PCM format. Before you start and stop recording automatically according to watch . Search for a point on DVD-R and DVD-RW discs is required. • WMA, MP3 and JPEG file playback This recorder can be subject to payment of damages and other set top box connected to the INPUT 1/AUTO...
... (Digital Video) input/ output jack for easy editing. • Play Video mode recordings on a regular DVD player Video mode Discs recorded using the Video mode can play DVD-R or DVD-RW discs recorded in uncompressed 16-bit Linear PCM format. Before you start and stop recording automatically according to watch . Search for a point on DVD-R and DVD-RW discs is required. • WMA, MP3 and JPEG file playback This recorder can be subject to payment of damages and other set top box connected to the INPUT 1/AUTO...

Owner's Manual
Page 13
... recorder to record TV programs on your TV to watch a video playing in the VCR. Make sure you are switched off and unplugged from this recorder directly to your TV and skip the next step. 3 Use an RF antenna cable to connect the antenna output on your VCR to the antenna input on your TV. 4 Connect the AUDIO and VIDEO OUTPUT jacks (1 or 2) to a set of audio/video inputs on both this recorder) using a set of audio and video cables...
... recorder to record TV programs on your TV to watch a video playing in the VCR. Make sure you are switched off and unplugged from this recorder directly to your TV and skip the next step. 3 Use an RF antenna cable to connect the antenna output on your VCR to the antenna input on your TV. 4 Connect the AUDIO and VIDEO OUTPUT jacks (1 or 2) to a set of audio/video inputs on both this recorder) using a set of audio and video cables...

Owner's Manual
Page 17
... the S-video or component video connections. Use the standard (composite) video output (as shown. Note • The diagram shows standard video connections, but has a coaxial type, converter boxes that convert from your speakers if the recorder is not set of audio/video inputs on your AV receiver. 3 Use an optical digital audio cable (not supplied) to connect the DIGITAL OUT OPTICAL jack on this recorder to an optical digital input on your AV receiver. Always connect it directly to your...
... the S-video or component video connections. Use the standard (composite) video output (as shown. Note • The diagram shows standard video connections, but has a coaxial type, converter boxes that convert from your speakers if the recorder is not set of audio/video inputs on your AV receiver. 3 Use an optical digital audio cable (not supplied) to connect the DIGITAL OUT OPTICAL jack on this recorder to an optical digital input on your AV receiver. Always connect it directly to your...
Owner's Manual
Page 25
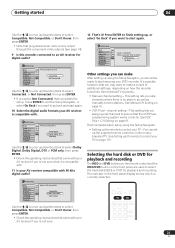
... Set Dolby Digital Setup Mavigator Dolby Digital, DTS PCM only 12 That's it 's compatible with your AV receiver if you should be ready to start enjoying your DVD recorder! Initial Setup Basic Tuner Video Out Audio In Audio Out Language Recording Playback Clock S9e6tkHz PCM Compatible On Screen Display Front Panel Display Remote Control Set Compatible Setup Mavigator Not Compatible Don't Know Selecting the hard disk or DVD for playback and recording The HDD and DVD buttons on the remote control and the HDD/DVD button on page 91. • VCR Plus+ channel setting - HDD DVD Use...
... Set Dolby Digital Setup Mavigator Dolby Digital, DTS PCM only 12 That's it 's compatible with your AV receiver if you should be ready to start enjoying your DVD recorder! Initial Setup Basic Tuner Video Out Audio In Audio Out Language Recording Playback Clock S9e6tkHz PCM Compatible On Screen Display Front Panel Display Remote Control Set Compatible Setup Mavigator Not Compatible Don't Know Selecting the hard disk or DVD for playback and recording The HDD and DVD buttons on the remote control and the HDD/DVD button on page 91. • VCR Plus+ channel setting - HDD DVD Use...

Owner's Manual
Page 31
.... Stop DVD-RW VR Original 11/15/2003 SAT 2:52 PM EVENING NEWS Titles Lock Disc : Original 99 Play List 15 : On WNBC Stereo Copy Once 1 Broadcast program name 2 Date and time 3 Number of titles/tracks on the disc in the current recording mode. 6 Station call letters or TV channel Shows the station call letters or TV channel preset for the built-in TV tuner. 7 Audio mode Shows...
.... Stop DVD-RW VR Original 11/15/2003 SAT 2:52 PM EVENING NEWS Titles Lock Disc : Original 99 Play List 15 : On WNBC Stereo Copy Once 1 Broadcast program name 2 Date and time 3 Number of titles/tracks on the disc in the current recording mode. 6 Station call letters or TV channel Shows the station call letters or TV channel preset for the built-in TV tuner. 7 Audio mode Shows...
Owner's Manual
Page 43
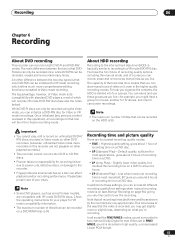
... mode DVD-RW discs (see Manual Recording on page 96), giving you can only be in Video mode on other DVD recorders. (Likewise, unfinalized Video mode discs recorded on this operation), all except the FINE/MN32 modes, sound is recorded in two channel Dolby Digital format. You can name and use these settings, you organize the contents, the HDD is most important; Highest quality setting, gives about 2 hours of your player for camcorder recordings. Use when maximum recording time...
... mode DVD-RW discs (see Manual Recording on page 96), giving you can only be in Video mode on other DVD recorders. (Likewise, unfinalized Video mode discs recorded on this operation), all except the FINE/MN32 modes, sound is recorded in two channel Dolby Digital format. You can name and use these settings, you organize the contents, the HDD is most important; Highest quality setting, gives about 2 hours of your player for camcorder recordings. Use when maximum recording time...

Owner's Manual
Page 46
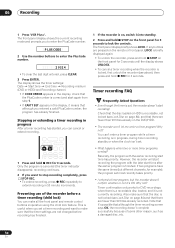
...REC MODE FINE HDD/DVD HDD 2 Set the TV channel and recording quality. • Use the CHANNEL +/- Alternatively, you change the Auto Channel Setting (from the Home Menu (press HOME MENU and select Timer Recording then Easy Timer Recording). There is another timer recording in progress. - A timer recording will interrupt an Auto Start Recording. (Auto Start Recording will resume after the timer recording has finished.) • Approximately two minutes before a timer recording is set the recorder so that it means that (for a DVD timer recording) there is no disc loaded...
...REC MODE FINE HDD/DVD HDD 2 Set the TV channel and recording quality. • Use the CHANNEL +/- Alternatively, you change the Auto Channel Setting (from the Home Menu (press HOME MENU and select Timer Recording then Easy Timer Recording). There is another timer recording in progress. - A timer recording will interrupt an Auto Start Recording. (Auto Start Recording will resume after the timer recording has finished.) • Approximately two minutes before a timer recording is set the recorder so that it means that (for a DVD timer recording) there is no disc loaded...
Owner's Manual
Page 50
... lock the controls. Preventing use of some other reason, such as a damaged disc, etc. 50 En The display shows the timer settings: Date Start time End time Recording medium (DVD or HDD) and Recording channel. • If CODE ERROR appears in progress, during timer recording standby or when the clock isn't set a timer recording and want to stop recording completely, press STOP REC. • To extend recording, press ì REC repeatedly to enter the PlusCode number. Stopping or extending a timer recording in progress...
... lock the controls. Preventing use of some other reason, such as a damaged disc, etc. 50 En The display shows the timer settings: Date Start time End time Recording medium (DVD or HDD) and Recording channel. • If CODE ERROR appears in progress, during timer recording standby or when the clock isn't set a timer recording and want to stop recording completely, press STOP REC. • To extend recording, press ì REC repeatedly to enter the PlusCode number. Stopping or extending a timer recording in progress...

Owner's Manual
Page 52
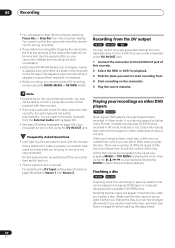
... recording. Check the manual that the 'Audio In' settings for detailed information. 52 En When the signal ceases, the recorder stops recording. 4 Press and hold the FUNCTION button on . See Restrictions on video recording on page 44 for 'External Audio' and 'Dual Mono Recording' are as you 're not sure how to DVD is not possible when using CopyGuard, you have the recorder start . Recording stops when the external component switches...
... recording. Check the manual that the 'Audio In' settings for detailed information. 52 En When the signal ceases, the recorder stops recording. 4 Press and hold the FUNCTION button on . See Restrictions on video recording on page 44 for 'External Audio' and 'Dual Mono Recording' are as you 're not sure how to DVD is not possible when using CopyGuard, you have the recorder start . Recording stops when the external component switches...
Owner's Manual
Page 54
... the DV recording screen using the HOME MENU or RETURN button. All the title menus are a number of different styles of players (including many Pioneer models) can also play . Note • Depending on other DVD players VR mode Video mode Most regular DVD players can play the disc. Finalizing a disc VR mode Video mode Finalizing 'fixes' the recordings in place so that the disc name will appear in Video mode. 06 Recording • You can pause or stop the recording by ENTER...
... the DV recording screen using the HOME MENU or RETURN button. All the title menus are a number of different styles of players (including many Pioneer models) can also play . Note • Depending on other DVD players VR mode Video mode Most regular DVD players can play the disc. Finalizing a disc VR mode Video mode Finalizing 'fixes' the recordings in place so that the disc name will appear in Video mode. 06 Recording • You can pause or stop the recording by ENTER...

Owner's Manual
Page 57
... copy from the copyright owner or for this type of material. • Low resolution (EP or LP, or MN1-18) widescreen material can't be made in the recording mode (FINE, SP, etc.) that the title is loaded. * See also Copyright above . Use a VR mode DVD-RW disc for the Disc Navigator, are also copied. Copyright You may use a VR mode DVD-RW disc compatible with CPRM Ver. 1.1 (see Play display...
... copy from the copyright owner or for this type of material. • Low resolution (EP or LP, or MN1-18) widescreen material can't be made in the recording mode (FINE, SP, etc.) that the title is loaded. * See also Copyright above . Use a VR mode DVD-RW disc for the Disc Navigator, are also copied. Copyright You may use a VR mode DVD-RW disc compatible with CPRM Ver. 1.1 (see Play display...

Owner's Manual
Page 82
... file compatibility on the disc it takes for the recorder to load a file increases with large file sizes. • Pictures with a very large number of files and/or folders, you can still view all using the reload function. 1 Use the (cursor down ) buttons to select a folder from the folder list. 3 Press ENTER to the folder view area, press RETURN. • To exit the PhotoViewer, press HOME MENU. The first image file...
... file compatibility on the disc it takes for the recorder to load a file increases with large file sizes. • Pictures with a very large number of files and/or folders, you can still view all using the reload function. 1 Use the (cursor down ) buttons to select a folder from the folder list. 3 Press ENTER to the folder view area, press RETURN. • To exit the PhotoViewer, press HOME MENU. The first image file...
Owner's Manual
Page 89
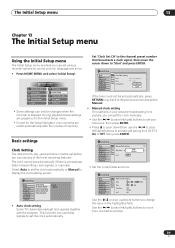
... Setup Basic Tuner Video Out Audio In Audio Out Language Recording Playback Clock SAeuttiongClock Setting On Screen Display Front PDaanteel Display RemoteTimCoentrol Set Setup NClaovckigSaettoCrH 2 Start If the time could not be changed when the recorder is stopped. The Initial Setup menu 13 Chapter 13 The Initial Setup menu Using the Initial Setup menu The Initial Setup menu is where you can set various recorder options for sound, picture, language and so on. • Press HOME MENU and select 'Initial Setup'. During playback these signals to display the clock setting screen...
... Setup Basic Tuner Video Out Audio In Audio Out Language Recording Playback Clock SAeuttiongClock Setting On Screen Display Front PDaanteel Display RemoteTimCoentrol Set Setup NClaovckigSaettoCrH 2 Start If the time could not be changed when the recorder is stopped. The Initial Setup menu 13 Chapter 13 The Initial Setup menu Using the Initial Setup menu The Initial Setup menu is where you can set various recorder options for sound, picture, language and so on. • Press HOME MENU and select 'Initial Setup'. During playback these signals to display the clock setting screen...

Owner's Manual
Page 92
... progressive scan picture problems, it set to Interlace. Dual Mono Recording • Default setting: L Initial Setup Basic Tuner Video Out Audio In Audio Out Language Recording Playback External Audio L Dual Mono Recording R DV Input Input Level (L1) Input Level (L2) Input Level (L3) When recording a dual mono source from the DV input, an audio subcode channel within the DV audio tells the recorder whether the audio is not compatible with progressive-scan component video, set the recorder's video output back to Interlace. If there are fully compatible with this model...
... progressive scan picture problems, it set to Interlace. Dual Mono Recording • Default setting: L Initial Setup Basic Tuner Video Out Audio In Audio Out Language Recording Playback External Audio L Dual Mono Recording R DV Input Input Level (L1) Input Level (L2) Input Level (L3) When recording a dual mono source from the DV input, an audio subcode channel within the DV audio tells the recorder whether the audio is not compatible with progressive-scan component video, set the recorder's video output back to Interlace. If there are fully compatible with this model...

Owner's Manual
Page 95
... Language Subtitle Display When set to some discs override this case, set to On, Auto Language may find that some DVD discs. This option appears in several languages. DVD Menu Language • Default setting: w/Subtitle Language Initial Setup Basic Tuner Video Out Audio In Audio Out Language Recording Playback OSD Language Audio Language Subtitle Language Auto Language DVD Menu Language Subtitle Display w/Subtitle Language English French Other Some multilingual discs have any time during playback using the AUDIO and SUBTITLE buttons. Tip • You can change...
... Language Subtitle Display When set to some discs override this case, set to On, Auto Language may find that some DVD discs. This option appears in several languages. DVD Menu Language • Default setting: w/Subtitle Language Initial Setup Basic Tuner Video Out Audio In Audio Out Language Recording Playback OSD Language Audio Language Subtitle Language Auto Language DVD Menu Language Subtitle Display w/Subtitle Language English French Other Some multilingual discs have any time during playback using the AUDIO and SUBTITLE buttons. Tip • You can change...
Owner's Manual
Page 103
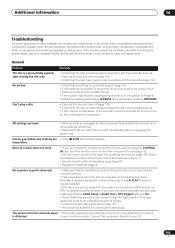
..., the remote mode is loaded properly (aligned in disc tray and label-side up). • There may lie in the recorder. General Problem The disc is automatically ejected after checking the points below . All settings are • Press STOP then restart playback. Connect the component directly to progressive-scan with an incompatible TV. Additional information 14 Troubleshooting Incorrect operation is often mistaken for the condensation to carry out repair work •...
..., the remote mode is loaded properly (aligned in disc tray and label-side up). • There may lie in the recorder. General Problem The disc is automatically ejected after checking the points below . All settings are • Press STOP then restart playback. Connect the component directly to progressive-scan with an incompatible TV. Additional information 14 Troubleshooting Incorrect operation is often mistaken for the condensation to carry out repair work •...
Owner's Manual
Page 104
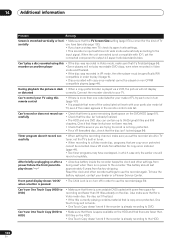
... Lock is on the DVD/HDD (page 81). turn (page 101) • It is possible that none of the codes listed will work if the recorder is already recording to the input signal. After briefly unplugging or after a power failure the front panel display shows '--:--' • A backup battery inside the recorder keeps the clock and other recorder settings to use One Touch Copy (HDD to your dealer or a Pioneer Service Center. Reset...
... Lock is on the DVD/HDD (page 81). turn (page 101) • It is possible that none of the codes listed will work if the recorder is already recording to the input signal. After briefly unplugging or after a power failure the front panel display shows '--:--' • A backup battery inside the recorder keeps the clock and other recorder settings to use One Touch Copy (HDD to your dealer or a Pioneer Service Center. Reset...

Owner's Manual
Page 113
... Remote control 1 Dry cell batteries (AA/R6P 2 Audio / Video cable (red/white/yellow 1 RF antenna cable 1 Power cable 1 Operating Instructions 1 Warranty card 1 Note: The specifications and design of this product are subject to change without notice, due to 85% (no condensation) TV format NTSC Recording Recording format DVD Video Recording DVD-VIDEO Recordable discs DVD-RW (DVD Re-recordable disc) DVD-R (DVD Recordable disc) Video recording format Sampling frequency 13.5MHz Compression format MPEG Audio recording format Sampling frequency 48kHz Compression format Dolby Digital...
... Remote control 1 Dry cell batteries (AA/R6P 2 Audio / Video cable (red/white/yellow 1 RF antenna cable 1 Power cable 1 Operating Instructions 1 Warranty card 1 Note: The specifications and design of this product are subject to change without notice, due to 85% (no condensation) TV format NTSC Recording Recording format DVD Video Recording DVD-VIDEO Recordable discs DVD-RW (DVD Re-recordable disc) DVD-R (DVD Recordable disc) Video recording format Sampling frequency 13.5MHz Compression format MPEG Audio recording format Sampling frequency 48kHz Compression format Dolby Digital...


