
Owner's Manual
Page 1
DVD Recorder DVR-220 DVR-320 4.7 Register Your Product on www.pioneerelectronics.com Operating Instructions
DVD Recorder DVR-220 DVR-320 4.7 Register Your Product on www.pioneerelectronics.com Operating Instructions

Owner's Manual
Page 4
...regulated due to reproduce or copy. Check the power cord once in the cord or tie it damaged, ask your nearest PIONEER authorized service center or your local authorities or the Electronics Industries Alliance : www.eiae.org. Any failure due to cause cancer... dealer for which requires repair will expose you may be authorized by Macrovision Corporation, and is a registered trademark of certain U.S. D1-4-2-8_En Recording equipment and copyright: You may be subject to be charged for general household purposes. S002_En This product is prohibited. Never make a knot...
...regulated due to reproduce or copy. Check the power cord once in the cord or tie it damaged, ask your nearest PIONEER authorized service center or your local authorities or the Electronics Industries Alliance : www.eiae.org. Any failure due to cause cancer... dealer for which requires repair will expose you may be authorized by Macrovision Corporation, and is a registered trademark of certain U.S. D1-4-2-8_En Recording equipment and copyright: You may be subject to be charged for general household purposes. S002_En This product is prohibited. Never make a knot...
Owner's Manual
Page 6
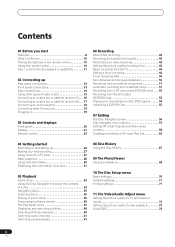
... recording 42 Recording time and picture quality 42 Restrictions on video recording 43 Setting the picture quality/recording time 43 Basic recording from the TV 44 Setting a timer recording 44 Timer recording FAQ 50 Simultaneous recording and playback 50 Recording from an external component 51 Automatic recording from a satellite tuner 51 Recording from a DV camcorder (DVR-320 only) . . . 52 Recording from the DV output (DVR-320...
... recording 42 Recording time and picture quality 42 Restrictions on video recording 43 Setting the picture quality/recording time 43 Basic recording from the TV 44 Setting a timer recording 44 Timer recording FAQ 50 Simultaneous recording and playback 50 Recording from an external component 51 Automatic recording from a satellite tuner 51 Recording from a DV camcorder (DVR-320 only) . . . 52 Recording from the DV output (DVR-320...

Owner's Manual
Page 7
...Setting up the remote to control your TV 86 Screen sizes and disc formats 87 Troubleshooting 88 Frequently asked questions 90 About DV (DVR-320 only 91 Manual recording modes 92 Information for cable/satellite/STB (set-top box) users 92 Language code list 93 Country code list 93 On-screen... displays and recorder displays 94 Handling discs 95 Storing discs 95 Damaged discs 95 Cleaning the pickup lens 95 Condensation 95 Hints on installation 96 Moving the recorder 96 Glossary 97 Specifications 99 7 En
...Setting up the remote to control your TV 86 Screen sizes and disc formats 87 Troubleshooting 88 Frequently asked questions 90 About DV (DVR-320 only 91 Manual recording modes 92 Information for cable/satellite/STB (set-top box) users 92 Language code list 93 Country code list 93 On-screen... displays and recorder displays 94 Handling discs 95 Storing discs 95 Damaged discs 95 Cleaning the pickup lens 95 Condensation 95 Hints on installation 96 Moving the recorder 96 Glossary 97 Specifications 99 7 En

Owner's Manual
Page 8
...tape that you want. The Disc Navigator is extended by title, chapter or time. 8 En See Setting the picture quality/recording time on recording modes. • Picture quality adjustment features During playback, you can adjust various picture quality settings to a month in 30 ... you want to make a DVD copy of an old video tape, you can program the recorder to record up to 32 programs, up the recorder, to programming a timer recording and editing a recording. • Progressive scan-compatible Compared to standard interlaced video, progressive scan effectively doubles the amount...
...tape that you want. The Disc Navigator is extended by title, chapter or time. 8 En See Setting the picture quality/recording time on recording modes. • Picture quality adjustment features During playback, you can adjust various picture quality settings to a month in 30 ... you want to make a DVD copy of an old video tape, you can program the recorder to record up to 32 programs, up the recorder, to programming a timer recording and editing a recording. • Progressive scan-compatible Compared to standard interlaced video, progressive scan effectively doubles the amount...

Owner's Manual
Page 9
..., MP3 and JPEG file playback This recorder can play DVD-R or DVD-RW discs recorded in 'Video mode' on DVD-R and DVD-RW discs is referred to and from a DV camcorder (DVR-320 only) This recorder has a built-in DV (Digital ...need to. • Safe, non-destructive editing VR mode When you very fine control over the recording. • Record to as recording in the DVD-Video format. You can be played back on regular DVD players, including computer ...En This makes it ideal for transferring camcorder footage to DVD for recording on Pioneer's DVD recorders. Note: 'Finalization' is not touched.
..., MP3 and JPEG file playback This recorder can play DVD-R or DVD-RW discs recorded in 'Video mode' on DVD-R and DVD-RW discs is referred to and from a DV camcorder (DVR-320 only) This recorder has a built-in DV (Digital ...need to. • Safe, non-destructive editing VR mode When you very fine control over the recording. • Record to as recording in the DVD-Video format. You can be played back on regular DVD players, including computer ...En This makes it ideal for transferring camcorder footage to DVD for recording on Pioneer's DVD recorders. Note: 'Finalization' is not touched.
Owner's Manual
Page 10
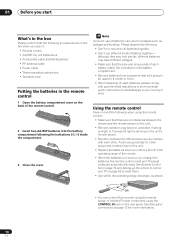
... preset codes are in the box when you start What's in the box Please confirm that apply in your TV on page 86 to this recorder using the remote sensor of another Pioneer component using remotes for other .
... preset codes are in the box when you start What's in the box Please confirm that apply in your TV on page 86 to this recorder using the remote sensor of another Pioneer component using remotes for other .

Owner's Manual
Page 11
... files and folders up to recognize MP3 and WMA files - Microsoft, Windows Media, and the Windows logo are both compatible with this recorder can be encoded by using Windows Media Codec 9 may be in an unplayable format-see also DRM in the United States and/or ...systems are trademarks, or registered trademarks of the following logos on the disc and/or disc packaging. Playable discs will play and record DVD-R/RW discs. WMA content can playback Windows Media Audio content. Before you start 01 Disc / content format playback compatibility General disc ...
... files and folders up to recognize MP3 and WMA files - Microsoft, Windows Media, and the Windows logo are both compatible with this recorder can be encoded by using Windows Media Codec 9 may be in an unplayable format-see also DRM in the United States and/or ...systems are trademarks, or registered trademarks of the following logos on the disc and/or disc packaging. Playable discs will play and record DVD-R/RW discs. WMA content can playback Windows Media Audio content. Before you start 01 Disc / content format playback compatibility General disc ...

Owner's Manual
Page 12
... due to the setting of the application software used for additional compatibility information. Note that Pioneer cannot guarantee that does not play my recordable discs in 'Video mode' on Pioneer's DVD recorders. In these particular instances, check with this recorder will often see the words Original and Play List to refer to the actual content...
... due to the setting of the application software used for additional compatibility information. Note that Pioneer cannot guarantee that does not play my recordable discs in 'Video mode' on Pioneer's DVD recorders. In these particular instances, check with this recorder will often see the words Original and Play List to refer to the actual content...

Owner's Manual
Page 13
... input. 7 AC IN Connect to a power outlet using the supplied power cable after making all other source component for recording. 5 CONTROL IN Use to control this recorder from the remote sensor of another Pioneer component with a component video input. 3 Audio/video outputs 1 and 2 Two sets of audio/video outputs (stereo analog audio;.../UHF OUT jack for connection to your TV antenna to the VHF/UHF IN jack. PULL-OPEN VIDEO/R/RW DV IN/OUT DV IN/OUT DVR-320 only: On the right side is for connection to a DV camcorder. 13 En Front panel connections VIDEO/R/RW PULL-OPEN S-VIDEO VIDEO On the...
... input. 7 AC IN Connect to a power outlet using the supplied power cable after making all other source component for recording. 5 CONTROL IN Use to control this recorder from the remote sensor of another Pioneer component with a component video input. 3 Audio/video outputs 1 and 2 Two sets of audio/video outputs (stereo analog audio;.../UHF OUT jack for connection to your TV antenna to the VHF/UHF IN jack. PULL-OPEN VIDEO/R/RW DV IN/OUT DV IN/OUT DVR-320 only: On the right side is for connection to a DV camcorder. 13 En Front panel connections VIDEO/R/RW PULL-OPEN S-VIDEO VIDEO On the...

Owner's Manual
Page 14
... 02 Connecting up Easy connections The setup described here is a basic configuration that all components are not connecting a VCR in /outs). Do not connect this recorder to your TV via a VCR (or your TV to a set of audio/video inputs on your TV (A/V IN 2 above) using AV cables, as the picture... CONTROL DIGITAL OUT AC IN 1 Antenna/cable TV wall outlet 1 Connect your TV antenna/cable TV outlet to the VHF/UHF IN jack on this recorder. 2 Use an RF antenna cable (one is equipped with their corresponding inputs for correct stereo sound. 5 Connect your VCR to use S-video or component ...
... 02 Connecting up Easy connections The setup described here is a basic configuration that all components are not connecting a VCR in /outs). Do not connect this recorder to your TV via a VCR (or your TV to a set of audio/video inputs on your TV (A/V IN 2 above) using AV cables, as the picture... CONTROL DIGITAL OUT AC IN 1 Antenna/cable TV wall outlet 1 Connect your TV antenna/cable TV outlet to the VHF/UHF IN jack on this recorder. 2 Use an RF antenna cable (one is equipped with their corresponding inputs for correct stereo sound. 5 Connect your VCR to use S-video or component ...

Owner's Manual
Page 15
... carries the picture as two separate color signals, plus a luminance (brightness) signal. The variety of outputs also gives you the flexibility of video output This recorder has standard (composite), S-video and component video outputs. There are two S-video outputs for how to an S-video input on page 77 for connection to...
... carries the picture as two separate color signals, plus a luminance (brightness) signal. The variety of outputs also gives you the flexibility of video output This recorder has standard (composite), S-video and component video outputs. There are two S-video outputs for how to an S-video input on page 77 for connection to...

Owner's Manual
Page 16
... S-VIDEO IN OPTICAL CONTROL DIGITAL OUT AC IN 1 Antenna/cable TV wall outlet 1 Connect RF antenna cables as supplied). Using the setup on this recorder to a set of audio/video inputs on your VCR, satellite receiver or cable box. If many or all the channels are using a cable box ...or satellite receiver with only a few scrambled channels, follow the setup on this recorder 'through' your TV using a set of A/V cables (as shown. This enables you to watch and record TV channels. 2 Connect the AUDIO and VIDEO OUTPUT jacks (1 or 2) on this page you can ...
... S-VIDEO IN OPTICAL CONTROL DIGITAL OUT AC IN 1 Antenna/cable TV wall outlet 1 Connect RF antenna cables as supplied). Using the setup on this recorder to a set of audio/video inputs on your VCR, satellite receiver or cable box. If many or all the channels are using a cable box ...or satellite receiver with only a few scrambled channels, follow the setup on this recorder 'through' your TV using a set of A/V cables (as shown. This enables you to watch and record TV channels. 2 Connect the AUDIO and VIDEO OUTPUT jacks (1 or 2) on this page you can ...

Owner's Manual
Page 17
...UHF IN 1 A/V OUT Cable box/ Satellite receiver Antenna/cable TV wall outlet 1 Connect RF antenna cables as supplied). Note • The setup on this recorder 'through' your TV using a set of A/V cables. Important • Do not connect this page does not allow you to watch one channel and... cable box. This enables you to watch discs. 3 Connect the audio/video output of your TV or AV receiver. This enables you to watch and record TV channels. 2 Connect the AUDIO and VIDEO OUTPUT jacks (1 or 2) on this setup. Connecting up 02 Connecting to a cable box or satellite receiver (2) If...
...UHF IN 1 A/V OUT Cable box/ Satellite receiver Antenna/cable TV wall outlet 1 Connect RF antenna cables as supplied). Note • The setup on this recorder 'through' your TV using a set of A/V cables. Important • Do not connect this page does not allow you to watch one channel and... cable box. This enables you to watch discs. 3 Connect the audio/video output of your TV or AV receiver. This enables you to watch and record TV channels. 2 Connect the AUDIO and VIDEO OUTPUT jacks (1 or 2) on this setup. Connecting up 02 Connecting to a cable box or satellite receiver (2) If...

Owner's Manual
Page 18
...; If your AV receiver doesn't have an optical digital input, but has a coaxial type, converter boxes that convert from your speakers if the recorder is not set of audio/video inputs on your AV receiver. 3 Use an optical digital audio cable (not supplied) to connect the OPTICAL DIGITAL... OUT jack on this recorder to an AV amplifier/receiver using the stereo analog connection. VHF/UHF IN VIDEO IN 4 TV 1 2 A/V VIDEO IN 1 OUT OUT IN VHF/UHF OUTPUT 1 R ...
...; If your AV receiver doesn't have an optical digital input, but has a coaxial type, converter boxes that convert from your speakers if the recorder is not set of audio/video inputs on your AV receiver. 3 Use an optical digital audio cable (not supplied) to connect the OPTICAL DIGITAL... OUT jack on this recorder to an AV amplifier/receiver using the stereo analog connection. VHF/UHF IN VIDEO IN 4 TV 1 2 A/V VIDEO IN 1 OUT OUT IN VHF/UHF OUTPUT 1 R ...

Owner's Manual
Page 19
...8226; The front panel connections make convenient connections for the video connection. VIDEO/R/RW DVR-320 DV IN/OUT DV IN/OUT DV IN/OUT DV camcorder 1 Use a DV cable (not supplied) to connect the DV in the recorder. Plugging in After checking all the connections, plug in /out jack of inputs on... to connect a DV camcorder or video deck, or DVD-R/RW recorder and digitally transfer DV tapes or DVD-R/RW discs to DVD-R/RW. Connecting up 02 Connecting other AV sources Connecting a VCR or analog camcorder Connecting a DV camcorder (DVR-320 only) Using the front panel DV IN/OUT jack, it is...
...8226; The front panel connections make convenient connections for the video connection. VIDEO/R/RW DVR-320 DV IN/OUT DV IN/OUT DV IN/OUT DV camcorder 1 Use a DV cable (not supplied) to connect the DV in the recorder. Plugging in After checking all the connections, plug in /out jack of inputs on... to connect a DV camcorder or video deck, or DVD-R/RW recorder and digitally transfer DV tapes or DVD-R/RW discs to DVD-R/RW. Connecting up 02 Connecting other AV sources Connecting a VCR or analog camcorder Connecting a DV camcorder (DVR-320 only) Using the front panel DV IN/OUT jack, it is...

Owner's Manual
Page 20
... 1 2 34 STANDBY/ON DISC DISC HISTORY NAVIGATOR PULL-OPEN 5 VIDEO/R/RW 6 OPEN/CLOSE REC REC MODE DV IN/OUT 15 Illustration shows DVR-320 1 STANDBY/ON Press to switch the recorder on/into standby. 2 DISC HISTORY (page 67) Press to display the Disc History screen. 3 DISC NAVIGATOR (page 33, 56) Press to directly...
... 1 2 34 STANDBY/ON DISC DISC HISTORY NAVIGATOR PULL-OPEN 5 VIDEO/R/RW 6 OPEN/CLOSE REC REC MODE DV IN/OUT 15 Illustration shows DVR-320 1 STANDBY/ON Press to switch the recorder on/into standby. 2 DISC HISTORY (page 67) Press to display the Disc History screen. 3 DISC NAVIGATOR (page 33, 56) Press to directly...
Owner's Manual
Page 21
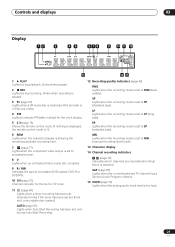
...) Shows the remote control mode (if nothing is displayed, the remote control mode is 1). 6 REM Lights when the character display is showing the remaining available recording time. 7 (page 77) Lights when the component video output is set to progressive scan. 8V Lights when an unfinalized Video mode disc is loaded. 9 ...R / RW Indicates the type of recordable DVD loaded: DVD-R or DVD-RW. 10 CH (page 27) Channel indicator for the built-in TV tuner. 11 (page 44) Lights when a ...
...) Shows the remote control mode (if nothing is displayed, the remote control mode is 1). 6 REM Lights when the character display is showing the remaining available recording time. 7 (page 77) Lights when the component video output is set to progressive scan. 8V Lights when an unfinalized Video mode disc is loaded. 9 ...R / RW Indicates the type of recordable DVD loaded: DVD-R or DVD-RW. 10 CH (page 27) Channel indicator for the built-in TV tuner. 11 (page 44) Lights when a ...
Owner's Manual
Page 22
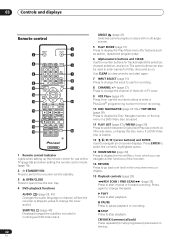
... the disc. 22 En Use CLEAR to clear an entry and start again. 7 INPUT SELECT (page 51) Press to change the input to switch the recorder on . PAUSE Press to stop playback. CM BACK (commercial back) Press repeatedly to skip progressively backward on discs with a TV (page 86) and when setting... (page 28) REV SCAN / FWD SCAN (page 35) Press to change the speed. AUDIO (page 28, 40) Changes the audio language or channel. (When the recorder is loaded. The same buttons can navigate all on . Press ENTER to select the currently highlighted option. 13 HOME MENU (page 30) Press to display...
... the disc. 22 En Use CLEAR to clear an entry and start again. 7 INPUT SELECT (page 51) Press to change the input to switch the recorder on . PAUSE Press to stop playback. CM BACK (commercial back) Press repeatedly to skip progressively backward on discs with a TV (page 86) and when setting... (page 28) REV SCAN / FWD SCAN (page 35) Press to change the speed. AUDIO (page 28, 40) Changes the audio language or channel. (When the recorder is loaded. The same buttons can navigate all on . Press ENTER to select the currently highlighted option. 13 HOME MENU (page 30) Press to display...

Owner's Manual
Page 23
...next menu page. TIMER REC (page 46) Press to set a timer recording from the last 30 recordable discs loaded. or to change the recording mode (picture quality). Press repeatedly to set a timer recording from the Easy Timer Recording screen. 17 DISC HISTORY (page 67) Press to display summary information ...the disc. STOP REC Press to the previous or next title/chapter/ track/folder; EASY TIMER (page 45) Press to set the recording time in the Disc Navigator screen. Controls and displays 03 CM SKIP (commercial skip) Press repeatedly to skip progressively forward on -screen ...
...next menu page. TIMER REC (page 46) Press to set a timer recording from the last 30 recordable discs loaded. or to change the recording mode (picture quality). Press repeatedly to set a timer recording from the Easy Timer Recording screen. 17 DISC HISTORY (page 67) Press to display summary information ...the disc. STOP REC Press to the previous or next title/chapter/ track/folder; EASY TIMER (page 45) Press to set the recording time in the Disc Navigator screen. Controls and displays 03 CM SKIP (commercial skip) Press repeatedly to skip progressively forward on -screen ...


