
Owner's Manual
Page 1
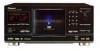
FILE-TYPE DVD PLAYER DV-F727 Operating Instructions
FILE-TYPE DVD PLAYER DV-F727 Operating Instructions
Owner's Manual
Page 3
... is for consumer products and this product will increase eye hazard. [For Canadian model] This Class B digital apparatus complies with the DVD player. Please write this equipment does cause harmful interference to radio communications. These limits are sure you for a Class B digital device...Consult the dealer or an experienced radio/TV technician for home and other rights owners. CONGRATULATIONS ON YOUR PURCHASE OF THIS FINE PIONEER PRODUCT. This equipment has been tested and found to comply with the instructions, may invalidate the user's right to correct the ...
... is for consumer products and this product will increase eye hazard. [For Canadian model] This Class B digital apparatus complies with the DVD player. Please write this equipment does cause harmful interference to radio communications. These limits are sure you for a Class B digital device...Consult the dealer or an experienced radio/TV technician for home and other rights owners. CONGRATULATIONS ON YOUR PURCHASE OF THIS FINE PIONEER PRODUCT. This equipment has been tested and found to comply with the instructions, may invalidate the user's right to correct the ...

Owner's Manual
Page 4
... works. © 1992-1997 Dolby Laboratories. Features of This Player 301 capacity disc changer compatible with DVD Video, Video CD, CD, and CD-R* formats DVDs, Video CDs, CDs, and CD-Rs that display the logos shown below . Multiple...1 layer 133 min. "Dolby" and the double-D symbol are trademarks of playable Diameter/ discs and their marks Playable sides DVD VIDEO DVD VIDEO Playback time Digital audio Digital video (MPEG 2) 12 cm (5 in the documentation supplied with some discs. • If... 20 minutes The disc format logos shown above cannot be played on Pioneer DVD players.
... works. © 1992-1997 Dolby Laboratories. Features of This Player 301 capacity disc changer compatible with DVD Video, Video CD, CD, and CD-R* formats DVDs, Video CDs, CDs, and CD-Rs that display the logos shown below . Multiple...1 layer 133 min. "Dolby" and the double-D symbol are trademarks of playable Diameter/ discs and their marks Playable sides DVD VIDEO DVD VIDEO Playback time Digital audio Digital video (MPEG 2) 12 cm (5 in the documentation supplied with some discs. • If... 20 minutes The disc format logos shown above cannot be played on Pioneer DVD players.

Owner's Manual
Page 5
.... Text Custom Auto Update Disc Type Title 1 DVD Silver Skies 2 DVD Someone2Hold 3 VCD Dance Coll. 4 DVD 5 CD Live at any time (page 28). Connection to another disc changer for increased capacity This unit can be connected to another DV-F727 unit for combined control of up using the single... loader slot, you may not be easily input using the Setup Navigator (page 20). Wide range of DVD viewing options Multi-Language ...
.... Text Custom Auto Update Disc Type Title 1 DVD Silver Skies 2 DVD Someone2Hold 3 VCD Dance Coll. 4 DVD 5 CD Live at any time (page 28). Connection to another disc changer for increased capacity This unit can be connected to another DV-F727 unit for combined control of up using the single... loader slot, you may not be easily input using the Setup Navigator (page 20). Wide range of DVD viewing options Multi-Language ...

Owner's Manual
Page 6
...Make the necessary connections. Learning the procedure for you are divided into units referred to your system. Organize the discs in Disc Composition DVD DVDs are divided into units referred to enjoy the benefits of the Sub Setup screen menus. Once you to go through the important stages...affected. Track 1 Track 2 Track 3 Track 4 Video CD Track 1 Track 2 Track 3 Track 4 Track 5 CD 6 How to offer. Because using the DVD player and DVDs may also be set up the player. The "Making Connections" section starting on page 15 shows how video and audio connections may be made...
...Make the necessary connections. Learning the procedure for you are divided into units referred to your system. Organize the discs in Disc Composition DVD DVDs are divided into units referred to enjoy the benefits of the Sub Setup screen menus. Once you to go through the important stages...affected. Track 1 Track 2 Track 3 Track 4 Video CD Track 1 Track 2 Track 3 Track 4 Track 5 CD 6 How to offer. Because using the DVD player and DVDs may also be set up the player. The "Making Connections" section starting on page 15 shows how video and audio connections may be made...

Owner's Manual
Page 7
...Remote Control 8 Names and Functions 9 Front Panel 9 Display Window 10 Remote Control 12 Rear Panel 14 Making Connections 15 Connecting Your DVD Player 15 Audio Connections 17 Video Connections 18 CD-Deck Synchro Connections 19 System Control Connections 19 Setting Up the Player 20 Using ...the Current Play Mode (Hi-Lite Scan 60 Continuing Playback from a Specified Location (Last Memory 61 Memorizing Settings for Often Viewed DVDs (Condition Memory 62 Memorizing Regularly Used Menu Settings (Function Memory 63 Viewing Disc Information 64 Connecting to Another Player for Control ...
...Remote Control 8 Names and Functions 9 Front Panel 9 Display Window 10 Remote Control 12 Rear Panel 14 Making Connections 15 Connecting Your DVD Player 15 Audio Connections 17 Video Connections 18 CD-Deck Synchro Connections 19 System Control Connections 19 Setting Up the Player 20 Using ...the Current Play Mode (Hi-Lite Scan 60 Continuing Playback from a Specified Location (Last Memory 61 Memorizing Settings for Often Viewed DVDs (Condition Memory 62 Memorizing Regularly Used Menu Settings (Function Memory 63 Viewing Disc Information 64 Connecting to Another Player for Control ...

Owner's Manual
Page 9
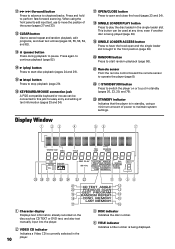
Names and Functions Front Panel 1 2 34 5 6 ÛN¿X≥
Names and Functions Front Panel 1 2 34 5 6 ÛN¿X≥
Owner's Manual
Page 10
...33, 55, 56, 58, and 62). ~ 8 (pause) button Press during playback to maintain system settings. 56 7 VIDEO CD DISC TITLE TRK CHP REMAIN TOTAL CD DVD DOLBY DIGITAL #* PBC PLAY 96 kHz CD TEXT ANGLE PREVIOUS SCAN BEST PROGRAM RANDOM REPEAT COND. Press and hold to this jack for easy entry... toward the remote sensor to operate the player (page 8). ( STANDBY/ON button Press to switch the player on the disc such as CD TEXT or DVD text, and also text manually input into the player. 2 VIDEO CD indicator Indicates a Video CD is currently selected in the 10 player. 3 DISC indicator ...
...33, 55, 56, 58, and 62). ~ 8 (pause) button Press during playback to maintain system settings. 56 7 VIDEO CD DISC TITLE TRK CHP REMAIN TOTAL CD DVD DOLBY DIGITAL #* PBC PLAY 96 kHz CD TEXT ANGLE PREVIOUS SCAN BEST PROGRAM RANDOM REPEAT COND. Press and hold to this jack for easy entry... toward the remote sensor to operate the player (page 8). ( STANDBY/ON button Press to switch the player on the disc such as CD TEXT or DVD text, and also text manually input into the player. 2 VIDEO CD indicator Indicates a Video CD is currently selected in the 10 player. 3 DISC indicator ...

Owner's Manual
Page 11
... Indicates the CD is being performed (page 55). # LAST MEMORY indicator Indicates the Last Memory location is an audio (CD) or video (DVD or Video CD) custom file (pages 26 and 38). - PROGRAM indicator Indicates program playback is being performed (page 57). @ REPEAT indicator ...Indicates repeat playback is being performed (page 60). ! MEMORY indicator Indicates Condition Memory settings are memorized for the DVD currently playing (page 61). $ COND. ALL, SINGLE, and CUSTOM indicators Indicates the current play mode (page 26). = ANGLE indicator Indicates ...
... Indicates the CD is being performed (page 55). # LAST MEMORY indicator Indicates the Last Memory location is an audio (CD) or video (DVD or Video CD) custom file (pages 26 and 38). - PROGRAM indicator Indicates program playback is being performed (page 57). @ REPEAT indicator ...Indicates repeat playback is being performed (page 60). ! MEMORY indicator Indicates Condition Memory settings are memorized for the DVD currently playing (page 61). $ COND. ALL, SINGLE, and CUSTOM indicators Indicates the current play mode (page 26). = ANGLE indicator Indicates ...
Owner's Manual
Page 12
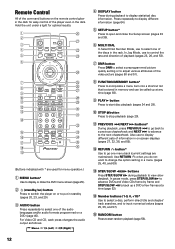
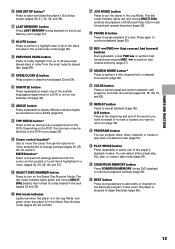
...). 7 DNR button Press DNR to select a preprogrammed picture quality setting or to adjust various attributes of the discs in memory and can be called up a DVD a few frames at any time (page 63). 9 PLAY 3 button Press to stop playback (page 29). - PREVIOUS 4/NEXT ¢ buttons* During playback, press ...previous chapter/track and NEXT ¢ to advance to back up at a time (page 52). ! In pause mode, press STEP/SLOW E to advance DVDs and Video CDs frame by frame and STEP/SLOW e to the next chapter/track. Press repeatedly to display different information (page 64). 5 SETUP button* ...
...). 7 DNR button Press DNR to select a preprogrammed picture quality setting or to adjust various attributes of the discs in memory and can be called up a DVD a few frames at any time (page 63). 9 PLAY 3 button Press to stop playback (page 29). - PREVIOUS 4/NEXT ¢ buttons* During playback, press ...previous chapter/track and NEXT ¢ to advance to back up at a time (page 52). ! In pause mode, press STEP/SLOW E to advance DVDs and Video CDs frame by frame and STEP/SLOW e to the next chapter/track. Press repeatedly to display different information (page 64). 5 SETUP button* ...
Owner's Manual
Page 13
...Best play back in both forward and reverse directions (page 53). £ PAUSE 8 button Press to pause playback of the subtitle languages programmed on a DVD or to turn on menu screens and to change settings (pages 20, 25, 30, 39, and 57). ENTER button* Press to implement settings selected ...). + SELECT DISC NUMBER button Press to turn the subtitles off (page 44). ( ANGLE button Press repeatedly to display different camera angles as recorded on some DVDs (page 54). ) TOP MENU button* Press to (page 55). • PROGRAM button You can select either single play, ALL play, or custom play ...
...Best play back in both forward and reverse directions (page 53). £ PAUSE 8 button Press to pause playback of the subtitle languages programmed on a DVD or to turn on menu screens and to change settings (pages 20, 25, 30, 39, and 57). ENTER button* Press to implement settings selected ...). + SELECT DISC NUMBER button Press to turn the subtitles off (page 44). ( ANGLE button Press repeatedly to display different camera angles as recorded on some DVDs (page 54). ) TOP MENU button* Press to (page 55). • PROGRAM button You can select either single play, ALL play, or custom play ...

Owner's Manual
Page 14
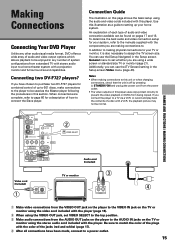
... digital audio signal recorded on discs (pages 16 and 17). = DIGITAL IN (coaxial) jack Connect the DIGITAL IN (coaxial) jack of another DV-F727 player or another component bearing the Pioneer Î mark. OUT (optical) to the stereo audio inputs of an AV component with a mini plug (2.5 mm dia. to (page 19). !... to set VIDEO SELECT to the top position (pages 15 and 18). 2 VIDEO IN jack Connect the VIDEO IN jack to the bottom position for DVD player connection, it were a component in decoder, etc. When using this unit to the identical jack on discs. (page 17). - Set to the ...
... digital audio signal recorded on discs (pages 16 and 17). = DIGITAL IN (coaxial) jack Connect the DIGITAL IN (coaxial) jack of another DV-F727 player or another component bearing the Pioneer Î mark. OUT (optical) to the stereo audio inputs of an AV component with a mini plug (2.5 mm dia. to (page 19). !... to set VIDEO SELECT to the top position (pages 15 and 18). 2 VIDEO IN jack Connect the VIDEO IN jack to the bottom position for DVD player connection, it were a component in decoder, etc. When using this unit to the identical jack on discs. (page 17). - Set to the ...
Owner's Manual
Page 15
...the contents of a disc with the color of the jacks (red and white) (page 17). 4 After all connections have chosen to purchase two DV-F727 players for a description of audio and video output options which allows playback to the top position. 3 Make audio connections from the power outlet. •... the audio and video cords included with a projection monitor and full surround sound capabilities. Use this player. Additionally, you can be found on DVDs from a standard TV with stereo audio input to a home theater system with this illustration as a guide to setting up to 601 discs, ...
...the contents of a disc with the color of the jacks (red and white) (page 17). 4 After all connections have chosen to purchase two DV-F727 players for a description of audio and video output options which allows playback to the top position. 3 Make audio connections from the power outlet. •... the audio and video cords included with a projection monitor and full surround sound capabilities. Use this player. Additionally, you can be found on DVDs from a standard TV with stereo audio input to a home theater system with this illustration as a guide to setting up to 601 discs, ...

Owner's Manual
Page 17
When a DVD recorded in the Setup screen Audio 1 menu (page 41). In this case, be made connections via the digital audio jacks to best reflect the type ... coaxial digital output on an AV component. DIGITAL OUT (Coaxial) The digital signal is not necessary to make connections to the coaxial digital input on DVD discs from both digital output jacks. OPT. MAKING CONNECTIONS Audio Connections This player features two digital (optical and coaxial) and also analog audio output connection...
When a DVD recorded in the Setup screen Audio 1 menu (page 41). In this case, be made connections via the digital audio jacks to best reflect the type ... coaxial digital output on an AV component. DIGITAL OUT (Coaxial) The digital signal is not necessary to make connections to the coaxial digital input on DVD discs from both digital output jacks. OPT. MAKING CONNECTIONS Audio Connections This player features two digital (optical and coaxial) and also analog audio output connection...

Owner's Manual
Page 18
... to the top position to determine the best possible connection for an exceptional video image that best portrays the high quality digital video recorded on DVDs. • Use a commercially available component video cable or 3 video cords to connect the COMPONENT VIDEO OUT jacks on the player to the component jacks on...
... to the top position to determine the best possible connection for an exceptional video image that best portrays the high quality digital video recorded on DVDs. • Use a commercially available component video cable or 3 video cords to connect the COMPONENT VIDEO OUT jacks on the player to the component jacks on...

Owner's Manual
Page 19
... program play function (page 57). • The CD-Deck synchro recording function does not work with Video CDs or DVDs. CD-Deck Synchro Connections If you have a Pioneer cassette deck that has the CD-Deck synchro function, connect the CD-DECK SYNCHRO jacks on the cassette deck using several...a commercially available cord with Î mark CONTROL OUT MAKING CONNECTIONS 19 with no resistance) to connect this unit to the operation manuals of another PIONEER component bearing the Î mark, you can control the player as a system, be sure to make a connection to the amplifier using an ...
... program play function (page 57). • The CD-Deck synchro recording function does not work with Video CDs or DVDs. CD-Deck Synchro Connections If you have a Pioneer cassette deck that has the CD-Deck synchro function, connect the CD-DECK SYNCHRO jacks on the cassette deck using several...a commercially available cord with Î mark CONTROL OUT MAKING CONNECTIONS 19 with no resistance) to connect this unit to the operation manuals of another PIONEER component bearing the Î mark, you can control the player as a system, be sure to make a connection to the amplifier using an ...
Owner's Manual
Page 20
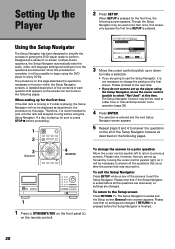
... is complete, it is not necessary to change the answer to a prior question Move the cursor control joystick left to return to enjoy DVDs. Please note that if the Setup Navigator is moving the cursor control joystick right, so it is finished. 20 When setting up for the... Select SETUP Exit 3 Move the cursor control joystick up the player using the Setup Navigator. A detailed description of the contents of getting the DVD player ready to function within the Setup Navigator screens. Please note, however, that no settings are changed . Setting Up the Player 2 Press SETUP...
... is complete, it is not necessary to change the answer to a prior question Move the cursor control joystick left to return to enjoy DVDs. Please note that if the Setup Navigator is moving the cursor control joystick right, so it is finished. 20 When setting up for the... Select SETUP Exit 3 Move the cursor control joystick up the player using the Setup Navigator. A detailed description of the contents of getting the DVD player ready to function within the Setup Navigator screens. Please note, however, that no settings are changed . Setting Up the Player 2 Press SETUP...

Owner's Manual
Page 21
.... If you have been made no internal decoder. Additionally, make changes in menus and on -screen display language, which refers to display wide-screen format DVDs: letter box and pan & scan. If you wish to change the audio or subtitle language to a different language, make sure that is connected to to...
.... If you have been made no internal decoder. Additionally, make changes in menus and on -screen display language, which refers to display wide-screen format DVDs: letter box and pan & scan. If you wish to change the audio or subtitle language to a different language, make sure that is connected to to...

Owner's Manual
Page 22
... downsampled to 48 kHz (when the original signal is capable of processing an audio signal with a sampling rate of 96 kHz. * Factory setting Note When a DVD is played back in the Setup Navigator.
... downsampled to 48 kHz (when the original signal is capable of processing an audio signal with a sampling rate of 96 kHz. * Factory setting Note When a DVD is played back in the Setup Navigator.

Owner's Manual
Page 23
...immediately to the left of the single loader slot. • Load discs with the label side facing to the right. (When loading double-sided DVDs, load the disc in the rack with the label denoting the contents you want to view facing the right.) • Do not place more discs.... 1 2,6 1 Press ( STANDBY/ON on the front panel). 2 Press OPEN/CLOSE 0 (OPEN/CLOSE on the front panel). SETTING UP THE PLAYER / GETTING STARTED USING YOUR DVD PLAYER 23 The disc rack hood slides open or closed and the rack makes a single revolution while the player determines where discs have finished loading...
...immediately to the left of the single loader slot. • Load discs with the label side facing to the right. (When loading double-sided DVDs, load the disc in the rack with the label denoting the contents you want to view facing the right.) • Do not place more discs.... 1 2,6 1 Press ( STANDBY/ON on the front panel). 2 Press OPEN/CLOSE 0 (OPEN/CLOSE on the front panel). SETTING UP THE PLAYER / GETTING STARTED USING YOUR DVD PLAYER 23 The disc rack hood slides open or closed and the rack makes a single revolution while the player determines where discs have finished loading...


