Owner's Manual
Page 6
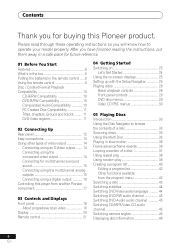
...safe place for future reference. 01 Before You Start Features 8 What's in the box 9 Putting the batteries in the remote control ..... 9 Using the remote control 9 Disc / Content Format Playback Compatibility 10 CD-R/RW Compatibility 10 DVD-R/RW Compatibility 10 Compressed Audio Compatibility 10 PC Created ... using the component video output 14 Connecting for buying this player from another Pioneer component 17 03 Controls and Displays Front panel 18 About progressive scan video 19 Display 20 Remote control 21 04 Getting Started Switching on 23 Let's Get Started 24 Using the...
...safe place for future reference. 01 Before You Start Features 8 What's in the box 9 Putting the batteries in the remote control ..... 9 Using the remote control 9 Disc / Content Format Playback Compatibility 10 CD-R/RW Compatibility 10 DVD-R/RW Compatibility 10 Compressed Audio Compatibility 10 PC Created ... using the component video output 14 Connecting for buying this player from another Pioneer component 17 03 Controls and Displays Front panel 18 About progressive scan video 19 Display 20 Remote control 21 04 Getting Started Switching on 23 Let's Get Started 24 Using the...
Owner's Manual
Page 9
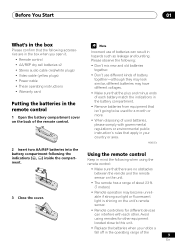
.... • Remove batteries from equipment that isn't going to this unit. • Replace the batteries when you open it. • Remote control • AA/R6P dry cell batteries x2 • Stereo audio cable (red/white plugs) • Video cable (yellow plugs) •...; Power cable • These operating instructions • Warranty card Putting the batteries in the remote control 1 Open the battery compartment cover on the unit's remote sensor. • Remote controllers for a month or more. • When disposing of used batteries, please comply with each other equipment...
.... • Remove batteries from equipment that isn't going to this unit. • Replace the batteries when you open it. • Remote control • AA/R6P dry cell batteries x2 • Stereo audio cable (red/white plugs) • Video cable (yellow plugs) •...; Power cable • These operating instructions • Warranty card Putting the batteries in the remote control 1 Open the battery compartment cover on the unit's remote sensor. • Remote controllers for a month or more. • When disposing of used batteries, please comply with each other equipment...
Owner's Manual
Page 12
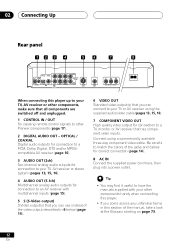
...CONTROL DIGITAL AUDIO OUT AUDIO OUT (2ch) L R FRONT SURROUND CENTER AUDIO OUT (5.1ch) SUB WOOFER S-VIDEO OUT VIDEO OUT Y PB PR COMPONENT VIDEO OUT When connecting this section of the video output described in 6 below (page 14). 6 VIDEO OUT Standard video output(s) that you can connect to your other Pioneer...and cables for connection to a TV, monitor or AV receiver that all components are switched off and unplugged. 1 CONTROL IN / OUT For passing remote control signals to other components handy when connecting this player. • If you come across any unfamiliar terms in this...
...CONTROL DIGITAL AUDIO OUT AUDIO OUT (2ch) L R FRONT SURROUND CENTER AUDIO OUT (5.1ch) SUB WOOFER S-VIDEO OUT VIDEO OUT Y PB PR COMPONENT VIDEO OUT When connecting this section of the video output described in 6 below (page 14). 6 VIDEO OUT Standard video output(s) that you can connect to your other Pioneer...and cables for connection to a TV, monitor or AV receiver that all components are switched off and unplugged. 1 CONTROL IN / OUT For passing remote control signals to other components handy when connecting this player. • If you come across any unfamiliar terms in this...
Owner's Manual
Page 13
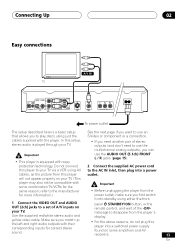
... player may also not be compatible with their corresponding inputs for the same reason; protection technology. In this player into a switched power supply found on remote control, and wait of stereo outputs (and don't need another pair of the -OFF- Connecting Up 02 Easy connections To power outlet The setup described here...
... player may also not be compatible with their corresponding inputs for the same reason; protection technology. In this player into a switched power supply found on remote control, and wait of stereo outputs (and don't need another pair of the -OFF- Connecting Up 02 Easy connections To power outlet The setup described here...
Owner's Manual
Page 17
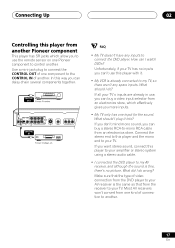
... you can't use this player with it into? Make sure that from the receiver to your TV's inputs are already in use the remote sensor on one kind of connection to another. 17 En How can buy a video input selector from an electronics store, which allow you... want stereo sound, connect this player to your TV. Most AV receivers won't convert from one Pioneer component to control another. What should I watch DVDs? Connecting Up 02 Controlling this player from another Pioneer component This player has SR jacks which effectively gives you more inputs. • My TV only ...
... you can't use this player with it into? Make sure that from the receiver to your TV's inputs are already in use the remote sensor on one kind of connection to another. 17 En How can buy a video input selector from an electronics store, which allow you... want stereo sound, connect this player to your TV. Most AV receivers won't convert from one Pioneer component to control another. What should I watch DVDs? Connecting Up 02 Controlling this player from another Pioneer component This player has SR jacks which effectively gives you more inputs. • My TV only ...
Owner's Manual
Page 18
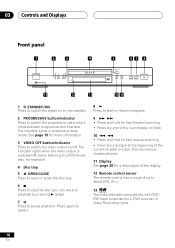
... to switch the video output on or into standby 2 PROGRESSIVE button/indicator Press to switch the progressive video output mode between progressive and interlace. 03 Controls and Displays Front panel 1 2 3 4 STANDBY/ON PROGRESSIVE VIDEO OFF Î 5 67 8 OPEN/CLOSE 0 41 ¡¢ 7 8 3 PLAY 3 13 12 ...of the current chapter or track, then to previous chapters/tracks 11 Display See page 20 for a description of the display 12 Remote control sensor The remote control has a range of up to about 23ft. (7m ) 13 Ths mark indicates compatibility with DVDRW discs receorded on a DVD ...
... to switch the video output on or into standby 2 PROGRESSIVE button/indicator Press to switch the progressive video output mode between progressive and interlace. 03 Controls and Displays Front panel 1 2 3 4 STANDBY/ON PROGRESSIVE VIDEO OFF Î 5 67 8 OPEN/CLOSE 0 41 ¡¢ 7 8 3 PLAY 3 13 12 ...of the current chapter or track, then to previous chapters/tracks 11 Display See page 20 for a description of the display 12 Remote control sensor The remote control has a range of up to about 23ft. (7m ) 13 Ths mark indicates compatibility with DVDRW discs receorded on a DVD ...
Owner's Manual
Page 21
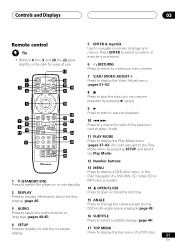
Controls and Displays 03 Remote control • Buttons 6 thru 9 and 20 thu 22 glow slightly in the dark for ease of a DVD disc 21 En Press ENTER to select an option ... 15 16 17 5 ENTER 18 6 7 8 9 10 11 12 VIDEO RETURN ADJUST DIMMER JOG MODE V.ADJ FL JOG 7 3 8 4¢ E/ E/ 1¡ PLAY MODE SURROUND CLEAR 1 2 3 C ENTER 4 5 6 E 7 8 9 0 TV CONTROL + + FUNC VOLUME CHANNEL TV - - 19 20 21 22 23 24 25 26 27 28 5 ENTER & Joystick Use to navigate on -screen display 17 TOP MENU...
Controls and Displays 03 Remote control • Buttons 6 thru 9 and 20 thu 22 glow slightly in the dark for ease of a DVD disc 21 En Press ENTER to select an option ... 15 16 17 5 ENTER 18 6 7 8 9 10 11 12 VIDEO RETURN ADJUST DIMMER JOG MODE V.ADJ FL JOG 7 3 8 4¢ E/ E/ 1¡ PLAY MODE SURROUND CLEAR 1 2 3 C ENTER 4 5 6 E 7 8 9 0 TV CONTROL + + FUNC VOLUME CHANNEL TV - - 19 20 21 22 23 24 25 26 27 28 5 ENTER & Joystick Use to navigate on -screen display 17 TOP MENU...
Owner's Manual
Page 22
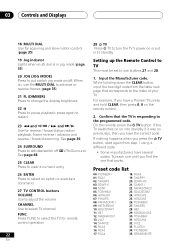
... was on previously), then you press the TV button, start again from the table next page that works. On the remote, press the TV button. If nothing happens when you have a Pioneer TV, press and hold CLEAR, then press 0, 0 on or put switch jog mode on , use the MULTI DIAL...down the CLEAR button, input the two digit code from step 1 using a different code. • Some manufacturers have several codes. 03 Controls and Displays 18 MULTI DIAL Use for remote control operation 22 00, PIONEER1 01, RCA1 02, SHARP3 03, ZENITH1 04, SONY 05, TOSHIBA1 06, HITACHI1 07, PHILIPS 08, PANASONIC1 09...
... was on previously), then you press the TV button, start again from the table next page that works. On the remote, press the TV button. If nothing happens when you have a Pioneer TV, press and hold CLEAR, then press 0, 0 on or put switch jog mode on , use the MULTI DIAL...down the CLEAR button, input the two digit code from step 1 using a different code. • Some manufacturers have several codes. 03 Controls and Displays 18 MULTI DIAL Use for remote control operation 22 00, PIONEER1 01, RCA1 02, SHARP3 03, ZENITH1 04, SONY 05, TOSHIBA1 06, HITACHI1 07, PHILIPS 08, PANASONIC1 09...
Owner's Manual
Page 23
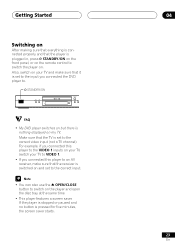
Make sure that the player is plugged in, press STANDBY/ON on the front panel, or on the remote control to switch the player on. Getting Started 04 Switching on After making sure that everything is connected properly and that the TV is set to ...
Make sure that the player is plugged in, press STANDBY/ON on the front panel, or on the remote control to switch the player on. Getting Started 04 Switching on After making sure that everything is connected properly and that the TV is set to ...
Owner's Manual
Page 24
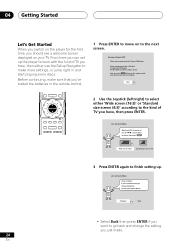
...of TV you for the first time, you should see a welcome screen displayed on your DVD player Put the batteries into the remote control Next, press the ENTER button on the remote control and start again choose [Back] Complete Back • Select Back then press ENTER if you want to setup your TV. ...work with the kind of TV do you just made. 24 En Before continuing, make more settings, or jump right in the remote control. 1 Press ENTER to move on to Pioneer DVD! From here you can set up . 04 Getting Started Let's Get Started When you switch on the player for purchasing this...
...of TV you for the first time, you should see a welcome screen displayed on your DVD player Put the batteries into the remote control Next, press the ENTER button on the remote control and start again choose [Back] Complete Back • Select Back then press ENTER if you want to setup your TV. ...work with the kind of TV do you just made. 24 En Before continuing, make more settings, or jump right in the remote control. 1 Press ENTER to move on to Pioneer DVD! From here you can set up . 04 Getting Started Let's Get Started When you switch on the player for purchasing this...
Owner's Manual
Page 28
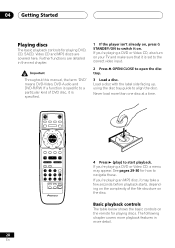
... Press 0 OPEN/CLOSE to a particular kind of the file structure on the remote for playing discs. MULTI SPEED + ENTER VIDEO ADJUST DIMMER JOG MODE V.ADJ FL JOG 7 3 8 4¢ E/ E/ 1¡ PLAY MODE SURROUND CLEAR 1 2 3 C ENTER 4 5 6 E 7 8 9 0 TV CONTROL + + FUNC VOLUME CHANNEL TV - - 4 Press 3 (play) to ... start playback. The folllowing chapter covers more playback features in the next chapter. 04 Getting Started Playing discs The basic playback controls for playing DVD, CD, SACD, Video CD and MP3 discs are detailed in more than one disc at a time....
... Press 0 OPEN/CLOSE to a particular kind of the file structure on the remote for playing discs. MULTI SPEED + ENTER VIDEO ADJUST DIMMER JOG MODE V.ADJ FL JOG 7 3 8 4¢ E/ E/ 1¡ PLAY MODE SURROUND CLEAR 1 2 3 C ENTER 4 5 6 E 7 8 9 0 TV CONTROL + + FUNC VOLUME CHANNEL TV - - 4 Press 3 (play) to ... start playback. The folllowing chapter covers more playback features in the next chapter. 04 Getting Started Playing discs The basic playback controls for playing DVD, CD, SACD, Video CD and MP3 discs are detailed in more than one disc at a time....

Owner's Manual
Page 29
.... Press to start fast reverse scanning. Skips to additional features, such as subtitle and audio language selection, or special features such as their remote control equivalents. Press ENTER to select (or wait a few seconds). • If the disc is stopped, playback starts from the selected title...or track (within the current group for DVD-Audio). DVD and Video CD: Display shows RESUME. They may find with some playback controls don't work slightly differently from the remote buttons. Use to the next track or chapter. OPEN/CLOSE 0 41 ¡¢ 7 8 3 PLAY 3 Î 41...
.... Press to start fast reverse scanning. Skips to additional features, such as subtitle and audio language selection, or special features such as their remote control equivalents. Press ENTER to select (or wait a few seconds). • If the disc is stopped, playback starts from the selected title...or track (within the current group for DVD-Audio). DVD and Video CD: Display shows RESUME. They may find with some playback controls don't work slightly differently from the remote buttons. Use to the next track or chapter. OPEN/CLOSE 0 41 ¡¢ 7 8 3 PLAY 3 Î 41...

Owner's Manual
Page 35
Playing Discs 05 Scanning discs You can fast-scan discs forward or backward at various different speeds using the remote. 1 During playback, press 1 or ¡ to start scanning. 2 Press repeatedly to increase the scanning speed. • MP3s can only be scanned at one speed. ... speed, turn the MULTI DIAL quickly (clockwise for forward; anticlockwise for reverse) during playback. • Change the speed/direction in the opposite direction to control fast and slow motion scanning and frame advance of DVD-Video, DVD-R/RW and Video CDs. To switch off jog mode, press JOG (JOG MODE...
Playing Discs 05 Scanning discs You can fast-scan discs forward or backward at various different speeds using the remote. 1 During playback, press 1 or ¡ to start scanning. 2 Press repeatedly to increase the scanning speed. • MP3s can only be scanned at one speed. ... speed, turn the MULTI DIAL quickly (clockwise for forward; anticlockwise for reverse) during playback. • Change the speed/direction in the opposite direction to control fast and slow motion scanning and frame advance of DVD-Video, DVD-R/RW and Video CDs. To switch off jog mode, press JOG (JOG MODE...
Owner's Manual
Page 48
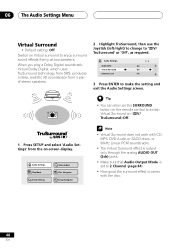
... exit the Audio Settings screen. • You can also use the Joystick (left/right) to change to enjoy surround sound effects from the on the remote control to 2 Channel (page 64). • How good the surround effect is varies with CD, MP3, DVD-Audio or SACD discs, or 96kHz Linear PCM soundtracks...
... exit the Audio Settings screen. • You can also use the Joystick (left/right) to change to enjoy surround sound effects from the on the remote control to 2 Channel (page 64). • How good the surround effect is varies with CD, MP3, DVD-Audio or SACD discs, or 96kHz Linear PCM soundtracks...
Owner's Manual
Page 75
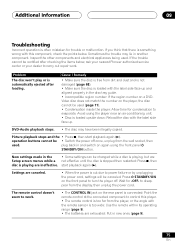
...• The disc may lie in the • Some settings can be used . The remote control doesn't seem to disappear from the player, or the angle with this player. • The remote control is playing are ineffective. If the trouble cannot be canceled: Press STANDBY/ON on the player... Settings are exhausted: Put in and switch on the rear panel is connected: Point the remote control at the connected component to control this component, check the points below , ask your nearest Pioneer authorized service center or your dealer to power failure or by unplugging the power cord, settings...
...• The disc may lie in the • Some settings can be used . The remote control doesn't seem to disappear from the player, or the angle with this player. • The remote control is playing are ineffective. If the trouble cannot be canceled: Press STANDBY/ON on the player... Settings are exhausted: Put in and switch on the rear panel is connected: Point the remote control at the connected component to control this component, check the points below , ask your nearest Pioneer authorized service center or your dealer to power failure or by unplugging the power cord, settings...
Owner's Manual
Page 79
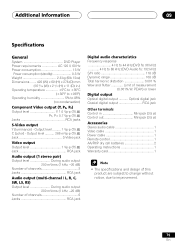
... 13 W Power consumption (standby 0.3 W Weight 2.6 kg (5lb 12oz) Dimensions ....... 420 (W) x 69 (H) x 278 (D) mm (16 9/16 (W) x 2 3/4 (H) x 11 (D) in Minijack (3.5 ø) Control out Minijack (3.5 ø) Accessories Stereo audio cable 1 Video cable 1 Power cable 1 Remote control 1 AA/R6P dry cell batteries 2 Operating Instructions 1 Warranty card 1 • The specifications and design of measurement (0.001% W. PEAK) or lower...
... 13 W Power consumption (standby 0.3 W Weight 2.6 kg (5lb 12oz) Dimensions ....... 420 (W) x 69 (H) x 278 (D) mm (16 9/16 (W) x 2 3/4 (H) x 11 (D) in Minijack (3.5 ø) Control out Minijack (3.5 ø) Accessories Stereo audio cable 1 Video cable 1 Power cable 1 Remote control 1 AA/R6P dry cell batteries 2 Operating Instructions 1 Warranty card 1 • The specifications and design of measurement (0.001% W. PEAK) or lower...


