
Owner's Manual
Page 3
...Displaying disc titles 25 Using CD TEXT functions 25 - Adjusting equalizer curves 30 - About AUX connection method 35 - XM operation 36 - Switching the SIRIUS channel select setting 37 - Switching the SIRIUS display 38 - When the game of SIRIUS operation 37 - Adjusting subwoofer settings 31 Using the high... tracks 22 Pausing CD playback 22 Using ITS playlists 23 - Switching the XM display 36 - Example of XM operation 36 - Selecting AUX as the source 35 - Fine-adjusting equalizer curve 30 Adjusting loudness 31 Using subwoofer output 31 - Erasing a track from your ITS playlist 23 -...
...Displaying disc titles 25 Using CD TEXT functions 25 - Adjusting equalizer curves 30 - About AUX connection method 35 - XM operation 36 - Switching the SIRIUS channel select setting 37 - Switching the SIRIUS display 38 - When the game of SIRIUS operation 37 - Adjusting subwoofer settings 31 Using the high... tracks 22 Pausing CD playback 22 Using ITS playlists 23 - Switching the XM display 36 - Example of XM operation 36 - Selecting AUX as the source 35 - Fine-adjusting equalizer curve 30 Adjusting loudness 31 Using subwoofer output 31 - Erasing a track from your ITS playlist 23 -...
Owner's Manual
Page 8
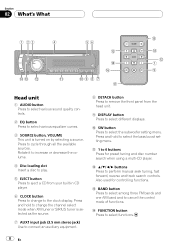
...perform manual seek tuning, fast forward, reverse and track search controls. Also used for preset tuning and disc number search when using a multi-CD player. Section 02 What's What 1 23 4 ed c b 56 d e g a9 8 7 h f i c 1 9 Head...to connect an auxiliary equipment. 8 DETACH button Press to remove the front panel from your built-in CD player. 6 CLOCK button Press to change the channel select mode when XM tuner or SIRIUS tuner is ...to select functions. 8 En e FUNCTION button Press to select the subwoofer setting menu. Press and hold to cycle through all the available sources.
...perform manual seek tuning, fast forward, reverse and track search controls. Also used for preset tuning and disc number search when using a multi-CD player. Section 02 What's What 1 23 4 ed c b 56 d e g a9 8 7 h f i c 1 9 Head...to connect an auxiliary equipment. 8 DETACH button Press to remove the front panel from your built-in CD player. 6 CLOCK button Press to change the channel select mode when XM tuner or SIRIUS tuner is ...to select functions. 8 En e FUNCTION button Press to select the subwoofer setting menu. Press and hold to cycle through all the available sources.
Owner's Manual
Page 29
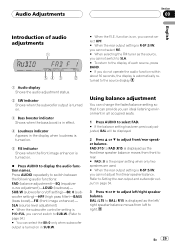
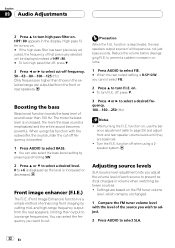
... :R15 is displayed as the front/rear speaker balance moves from left to right. En 29 function is on /off setting)-80: 0 (subwoofer setting)-HPF (high pass filter)-BASS (bass boost)-FIE (front image enhancer)- Using balance adjustment You can change the fader/balance setting so that...speakers are used. # When the rear output setting is R-SP :S/W, you cannot adjust front/rear speaker balance. Refer to Setting the rear output and subwoofer output on . % Press AUDIO to display the audio function names. Audio Adjustments Section 09 English Introduction of each source, press BAND. # If ...
... :R15 is displayed as the front/rear speaker balance moves from left to right. En 29 function is on /off setting)-80: 0 (subwoofer setting)-HPF (high pass filter)-BASS (bass boost)-FIE (front image enhancer)- Using balance adjustment You can change the fader/balance setting so that...speakers are used. # When the rear output setting is R-SP :S/W, you cannot adjust front/rear speaker balance. Refer to Setting the rear output and subwoofer output on . % Press AUDIO to display the audio function names. Audio Adjustments Section 09 English Introduction of each source, press BAND. # If ...
Owner's Manual
Page 31
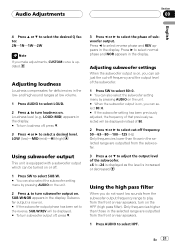
...high-sound ranges at low volume. 1 Press AUDIO to select LOUD. 2 Press a to turn loudness off , press b. 3 Press c or d to select the phase of the subwoofer. +6 to -24 is displayed as the level is updated. Using the high pass filter When you make adjustments, CUSTOM curve is increased or decreased. LOW... Section 09 English 4 Press a or b to select the desired Q factor. 2N-1N-1W-2W Note If you do not want low sounds from the subwoofer output frequency range to play from the front or rear speakers, turn on the HPF (high pass filter). Only frequencies higher than those in the...
...high-sound ranges at low volume. 1 Press AUDIO to select LOUD. 2 Press a to turn loudness off , press b. 3 Press c or d to select the phase of the subwoofer. +6 to -24 is displayed as the level is updated. Using the high pass filter When you make adjustments, CUSTOM curve is increased or decreased. LOW... Section 09 English 4 Press a or b to select the desired Q factor. 2N-1N-1W-2W Note If you do not want low sounds from the subwoofer output frequency range to play from the front or rear speakers, turn on the HPF (high pass filter). Only frequencies higher than those in the...
Owner's Manual
Page 32
.... 0 to +6 is displayed as the level is now on the FM tuner volume level, which remains unchanged. 1 Compare the FM tuner volume level with the subwoofer, the sound under the cut . off frequency is boosted. 1 Press AUDIO to select BASS. # You can also select the bass boost setting by cutting mid...
.... 0 to +6 is displayed as the level is now on the FM tuner volume level, which remains unchanged. 1 Compare the FM tuner volume level with the subwoofer, the sound under the cut . off frequency is boosted. 1 Press AUDIO to select BASS. # You can also select the bass boost setting by cutting mid...
Owner's Manual
Page 34
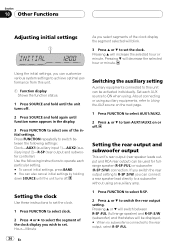
.... Pressing a or b will switch between the following settings: Clock-AUX1 (auxiliary input 1)-AUX2 (auxiliary input 2)-R-SP (rear output and subwoofer controller) Use the following instructions to operate each AUX source to ON when using auxiliary equipments, refer to Using the AUX source on the...display the segment selected will blink. 3 Press a or b to set . Using the initial settings, you can connect a rear speaker lead directly to a subwoofer without using an auxiliary amp. 1 Press FUNCTION to select R-SP. 2 Press a or b to switch the rear output setting. Set each particular setting....
.... Pressing a or b will switch between the following settings: Clock-AUX1 (auxiliary input 1)-AUX2 (auxiliary input 2)-R-SP (rear output and subwoofer controller) Use the following instructions to operate each AUX source to ON when using auxiliary equipments, refer to Using the AUX source on the...display the segment selected will blink. 3 Press a or b to set . Using the initial settings, you can connect a rear speaker lead directly to a subwoofer without using an auxiliary amp. 1 Press FUNCTION to select R-SP. 2 Press a or b to switch the rear output setting. Set each particular setting....
Owner's Manual
Page 35
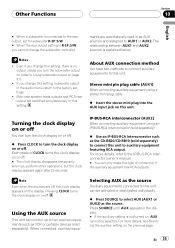
.../CD-RB10 (sold separately). Note Even when the sources are off . % Press CLOCK to the IP-BUS-RCA Interconnector owner's manual. # You can control up to the rear output, set for subwoofer R-SP :S/W. # When the rear output setting is R-SP :S/W, you change the subwoofer controller. Using the AUX...automatically read in the display. # If the auxiliary setting is not turned on the display. Other Functions Section 10 English # When a subwoofer is connected to two auxiliary equipments such as VCR or portable devices (sold separetely) to connect this unit to this unit. ments are switched...
.../CD-RB10 (sold separately). Note Even when the sources are off . % Press CLOCK to the IP-BUS-RCA Interconnector owner's manual. # You can control up to the rear output, set for subwoofer R-SP :S/W. # When the rear output setting is R-SP :S/W, you change the subwoofer controller. Using the AUX...automatically read in the display. # If the auxiliary setting is not turned on the display. Other Functions Section 10 English # When a subwoofer is connected to two auxiliary equipments such as VCR or portable devices (sold separetely) to connect this unit to this unit. ments are switched...
Owner's Manual
Page 42
... range 530 kHz to 15 000 Hz with no more than 5% THD. Maximum power output ....... 50 W × 4 50 W × 2/4 W + 70 W × 1/2 W (for subwoofer) Load impedance 4 W to 8 W × 4 4 W to 8 W × 2 + 2 W × 1 Preout max output level/output impedance 2.2 V/1 kW Equalizer (3-Band Parametric...dB (1 kHz) Number of quantization bits 16; linear Frequency characteristics ... 5 Hz to 20 000 Hz (±1 dB) Signal-to 0 dB CD player System Compact disc audio system Usable discs Compact disc Signal format: Sampling frequency ..... 44.1 kHz Number of channels 2 (stereo) MP3 decoding ...
... range 530 kHz to 15 000 Hz with no more than 5% THD. Maximum power output ....... 50 W × 4 50 W × 2/4 W + 70 W × 1/2 W (for subwoofer) Load impedance 4 W to 8 W × 4 4 W to 8 W × 2 + 2 W × 1 Preout max output level/output impedance 2.2 V/1 kW Equalizer (3-Band Parametric...dB (1 kHz) Number of quantization bits 16; linear Frequency characteristics ... 5 Hz to 20 000 Hz (±1 dB) Signal-to 0 dB CD player System Compact disc audio system Usable discs Compact disc Signal format: Sampling frequency ..... 44.1 kHz Number of channels 2 (stereo) MP3 decoding ...
Other Manual
Page 2
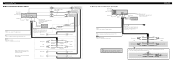
... Right + Rear speaker ≠ + Rear speaker ≠ + Subwoofer ≠ 7 When using a Subwoofer without using the optional amplifier Rear output Front output Subwoofer output Antenna jack This product Fuse (10 A) IP-BUS input (Blue) Multi-CD player IP-BUS cable (sold separately). IP-BUS input (Blue) ...IP-BUS cable Multi-CD player (sold separately). Black (chassis ground) Connect to system control terminal of this unit. Red Connect to the constant 12 V supply terminal. Perform these connections when using a subwoofer of 70 W (2 Ω), be connected (sold...
... Right + Rear speaker ≠ + Rear speaker ≠ + Subwoofer ≠ 7 When using a Subwoofer without using the optional amplifier Rear output Front output Subwoofer output Antenna jack This product Fuse (10 A) IP-BUS input (Blue) Multi-CD player IP-BUS cable (sold separately). IP-BUS input (Blue) ...IP-BUS cable Multi-CD player (sold separately). Black (chassis ground) Connect to system control terminal of this unit. Red Connect to the constant 12 V supply terminal. Perform these connections when using a subwoofer of 70 W (2 Ω), be connected (sold...


