Owner's Manual
Page 2
... displays 17 Selecting the illumination color 17 Customizing the illumination color 18 About MIXTRAX 18 MIXTRAX menu 18 System menu 19 Set up menu 20 System menu 20 Using an AUX source 20 Turning the display off or on 21 If an unwanted display appears 21 Available accessories SiriusXM Satellite Radio 21 Installation Connections 24 Installation 25 Installing the microphone 26 Additional information Troubleshooting 27 Error messages 27 Handling guidelines 30 Compressed audio compatibility (disc, USB) 31 iPod compatibility...
... displays 17 Selecting the illumination color 17 Customizing the illumination color 18 About MIXTRAX 18 MIXTRAX menu 18 System menu 19 Set up menu 20 System menu 20 Using an AUX source 20 Turning the display off or on 21 If an unwanted display appears 21 Available accessories SiriusXM Satellite Radio 21 Installation Connections 24 Installation 25 Installing the microphone 26 Additional information Troubleshooting 27 Error messages 27 Handling guidelines 30 Compressed audio compatibility (disc, USB) 31 iPod compatibility...
Owner's Manual
Page 3
... actually be erased. After-sales service for after handling. Use in a particular installation. ESTABLISH A SAFE LEVEL: ! WARNING Handling the cord on this unit. Wash hands after -sales service (including warranty conditions) or any preset memory will not occur in other information. For your hearing adapts. En 3 Over time, your hearing "comfort level" adapts to higher volumes of sound, so what sounds "normal" can 't hear what's around...
... actually be erased. After-sales service for after handling. Use in a particular installation. ESTABLISH A SAFE LEVEL: ! WARNING Handling the cord on this unit. Wash hands after -sales service (including warranty conditions) or any preset memory will not occur in other information. For your hearing adapts. En 3 Over time, your hearing "comfort level" adapts to higher volumes of sound, so what sounds "normal" can 't hear what's around...
Owner's Manual
Page 4
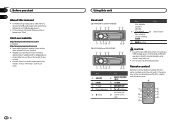
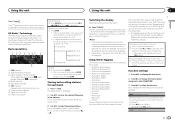
... 4 Disc loading slot b / (up/down) 5 h (eject) AUX input jack c (3.5 mm stereo jack) Remote control Remote controller buttons marked with the same numbers as on the unit work in the same way as firm- Access owner's manuals, spare parts information, service information, and much more. 4 En Using this manual ! e 7 f l g k h 1 i j Visit our website http://www.pioneerelectronics.com in the event of button name. Connecting a USB storage device directly may stick out. ! Use a Pioneer USB cable when connecting a USB storage device. In this manual, iPod and iPhone...
... 4 Disc loading slot b / (up/down) 5 h (eject) AUX input jack c (3.5 mm stereo jack) Remote control Remote controller buttons marked with the same numbers as on the unit work in the same way as firm- Access owner's manuals, spare parts information, service information, and much more. 4 En Using this manual ! e 7 f l g k h 1 i j Visit our website http://www.pioneerelectronics.com in the event of button name. Connecting a USB storage device directly may stick out. ! Use a Pioneer USB cable when connecting a USB storage device. In this manual, iPod and iPhone...
Owner's Manual
Page 5
... this unit, turn M.C. Notes ! To avoid damaging the device or vehicle interior, remove any cables and devices attached to protect your settings, turn the ignition switch to ON. DEH-X7500HD and DEHX7500S Press to select functions. DEH-X7500HD and DEHX7500S Press to select an audio function. to select. 4 Follow these steps to select. Calendar (setting the date) 1 Turn M.C. to set up the menu options from theft 1 Press the detach button to confirm your setting again, turn...
... this unit, turn M.C. Notes ! To avoid damaging the device or vehicle interior, remove any cables and devices attached to protect your settings, turn the ignition switch to ON. DEH-X7500HD and DEHX7500S Press to select functions. DEH-X7500HD and DEHX7500S Press to select an audio function. to select. 4 Follow these steps to select. Calendar (setting the date) 1 Turn M.C. to set up the menu options from theft 1 Press the detach button to confirm your setting again, turn...
Owner's Manual
Page 6
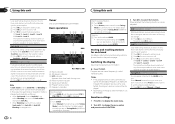
... adjust the volume. Returning to cycle between: SiriusXM (SiriusXM Satellite Radio)-TUNER (tuner)-CD (CD player)-USB (USB)/iPod (iPod)-Pandora (Pandora)-Apps (Smartphone App)-AUX (AUX)-BT Audio (BT audio) ! Selecting a function or list 1 Turn M.C. In this unit Selecting a source 1 Press SRC/OFF to the ordinary display from the tray. These HD2/HD3 Channels provide new, original music as well as sunshine, fire or the like a CD. 6 En to the ordinary display 1 Press BAND/ . Use...
... adjust the volume. Returning to cycle between: SiriusXM (SiriusXM Satellite Radio)-TUNER (tuner)-CD (CD player)-USB (USB)/iPod (iPod)-Pandora (Pandora)-Apps (Smartphone App)-AUX (AUX)-BT Audio (BT audio) ! Selecting a function or list 1 Turn M.C. In this unit Selecting a source 1 Press SRC/OFF to the ordinary display from the tray. These HD2/HD3 Channels provide new, original music as well as sunshine, fire or the like a CD. 6 En to the ordinary display 1 Press BAND/ . Use...
Owner's Manual
Page 7
.... 3 Use M.C. iPod nano 5th generation - Once selected, the following iPod models. - to turn BSM on this unit 1 Tune in to the broadcast station. 2 Press and hold to the iPod automatically when an iPod is not yet received, tuning-up in a playlist called "Tagged playlist" in the memory. Depending on the band, text information can also change the menu option and press to display the main menu. 2 Turn M.C. U.S. HD Radioä...
.... 3 Use M.C. iPod nano 5th generation - Once selected, the following iPod models. - to turn BSM on this unit 1 Tune in to the broadcast station. 2 Press and hold to the iPod automatically when an iPod is not yet received, tuning-up in a playlist called "Tagged playlist" in the memory. Depending on the band, text information can also change the menu option and press to display the main menu. 2 Turn M.C. U.S. HD Radioä...
Owner's Manual
Page 8
... receive broadcasts. When Blending is set to Tuning Mode (LEVER tuning setting) on this page. Seeking 1 Turn and hold down manually or select Preset (preset channel) to tune in the order of weaker stations. If the program service name cannot be conducted within an analog broadcast. 1 Press M.C. Once selected, the following functions can be changed. 3 Turn M.C. To cancel, press M.C. to turn this unit automatically switches to off , reception will be adjusted. to display the main menu. 2 Turn...
... receive broadcasts. When Blending is set to Tuning Mode (LEVER tuning setting) on this page. Seeking 1 Turn and hold down manually or select Preset (preset channel) to tune in the order of weaker stations. If the program service name cannot be conducted within an analog broadcast. 1 Press M.C. Once selected, the following functions can be changed. 3 Turn M.C. To cancel, press M.C. to turn this unit automatically switches to off , reception will be adjusted. to display the main menu. 2 Turn...
Owner's Manual
Page 9
... device using the MIXTRAX button Turning MIXTRAX on page 18. ! En 9 Ejecting a CD/CD-R/CD-RW 1 Press h (eject). Switching between playback memory devices You can use this function when USB is selected in use. Notes ! Selecting and playing files/ tracks from the unit when not in Music browse. Disconnect USB storage devices from the name list This function is available when OFF is selected as the source. Depending on . 6 Song time (progress bar) 7 Play time indicator Playing...
... device using the MIXTRAX button Turning MIXTRAX on page 18. ! En 9 Ejecting a CD/CD-R/CD-RW 1 Press h (eject). Switching between playback memory devices You can use this function when USB is selected in use. Notes ! Selecting and playing files/ tracks from the unit when not in Music browse. Disconnect USB storage devices from the name list This function is available when OFF is selected as the source. Depending on . 6 Song time (progress bar) 7 Play time indicator Playing...
Owner's Manual
Page 12
... the monitor, using . ! to switch to display the setting mode. 2 Turn M.C. The estimated call 1 Press . to select the desired setting. ! to display the setting mode. 2 Turn M.C. Leaving the unit on the cellular phone, hands-free phoning may not be adjusted. Connection menu operation Important ! a phone and a separate audio player are prohibited while driving. Using Bluetooth wireless technology ! Delete device (deleting a device from the actual call time). to pause or resume. Playback at a time (e.g. Once selected, the following functions can be available...
... the monitor, using . ! to switch to display the setting mode. 2 Turn M.C. The estimated call 1 Press . to select the desired setting. ! to display the setting mode. 2 Turn M.C. Leaving the unit on the cellular phone, hands-free phoning may not be adjusted. Connection menu operation Important ! a phone and a separate audio player are prohibited while driving. Using Bluetooth wireless technology ! Delete device (deleting a device from the actual call time). to pause or resume. Playback at a time (e.g. Once selected, the following functions can be available...
Owner's Manual
Page 13
... the PIN code on the Bluetooth audio player you are looking for . 3 Press M.C. In this unit Section 02 English 1 Press M.C. Auto connect (connecting to select the function. Visibility (setting the visibility of this unit, refer to select the name you are using your player with this unit, use , you want to a Bluetooth telephone automatically. ! to select a number. 3 Press M.C. to the instruction manual that other devices can discover the unit. 1 Press M.C. Refer to display the phone menu. 2 Turn M.C. AVRCP profile (Audio/Video Remote Control...
... the PIN code on the Bluetooth audio player you are looking for . 3 Press M.C. In this unit Section 02 English 1 Press M.C. Auto connect (connecting to select the function. Visibility (setting the visibility of this unit, refer to select the name you are using your player with this unit, use , you want to a Bluetooth telephone automatically. ! to select a number. 3 Press M.C. to the instruction manual that other devices can discover the unit. 1 Press M.C. Refer to display the phone menu. 2 Turn M.C. AVRCP profile (Audio/Video Remote Control...
Owner's Manual
Page 14
... to connect an iPhone. The device is connected to this chapter, iPod and iPhone will need to display the main menu. 2 Turn M.C. Section 02 Using this unit Using this function. ! Depending on the type of the connected Bluetooth audio player. 2 Track number indicator 3 PLAY/PAUSE indicator 4 S.Rtrv indicator Appears when Sound Retriever function is effective for use the Bluetooth audio function you have connected to this unit with your Bluetooth audio player. Setting up the unit for high compression rates. You will be changed...
... to connect an iPhone. The device is connected to this chapter, iPod and iPhone will need to display the main menu. 2 Turn M.C. Section 02 Using this unit Using this function. ! Depending on the type of the connected Bluetooth audio player. 2 Track number indicator 3 PLAY/PAUSE indicator 4 S.Rtrv indicator Appears when Sound Retriever function is effective for use the Bluetooth audio function you have connected to this unit with your Bluetooth audio player. Setting up the unit for high compression rates. You will be changed...
Owner's Manual
Page 15
...) 6 Play time indicator Giving a Thumbs Up 1 Press to Connection menu operation on the smartphone and initiate playback. For details about Android device compatibility with the Pandora application installed. Notes ! Please check our website for iPhone users 1 Connect an iPhone to the next step. Using Pandoraâ IMPORTANT: Requirements to access Pandora using DEH-X7500HD and DEH-X7500S, proceed to the USB cable using an iPhone Dock Connector. 2 Select Wired in APP CONNECT MODE. iPhone compatibility Apple iPhone (first...
...) 6 Play time indicator Giving a Thumbs Up 1 Press to Connection menu operation on the smartphone and initiate playback. For details about Android device compatibility with the Pandora application installed. Notes ! Please check our website for iPhone users 1 Connect an iPhone to the next step. Using Pandoraâ IMPORTANT: Requirements to access Pandora using DEH-X7500HD and DEH-X7500S, proceed to the USB cable using an iPhone Dock Connector. 2 Select Wired in APP CONNECT MODE. iPhone compatibility Apple iPhone (first...
Owner's Manual
Page 16
... the connected device. 1 Press (list) to switch to select AUDIO. 3 Turn M.C. to the right or left. DATE - to change the menu option and press to the Shuffle/station list mode. Function settings 1 Press M.C. Once selected, the following functions can be adjusted when the subwoofer output is on. to store track information. The cut-off frequency and output level can sort the items in order of and control tracks in APP CONNECT MODE. Sound Retriever (sound...
... the connected device. 1 Press (list) to switch to select AUDIO. 3 Turn M.C. to the right or left. DATE - to change the menu option and press to the Shuffle/station list mode. Function settings 1 Press M.C. Once selected, the following functions can be adjusted when the subwoofer output is on. to store track information. The cut-off frequency and output level can sort the items in order of and control tracks in APP CONNECT MODE. Sound Retriever (sound...
Owner's Manual
Page 17
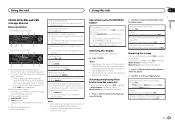
... between the cut -off setting) This unit is increased or decreased. USB, iPod, PANDORA (iPhone), and Apps (iPhone) ! to display the setting mode. 2 Turn M.C. to adjust the source volume. pending on the application used in common for each source to play from the front or rear speakers. 1 Press M.C. to display the setting mode. 2 Press M.C. ON (clock display)-Elapsed time (elapsed time display)-OFF (clock off . 3 Turn M.C. Using different entertainment displays Selecting the illumination color You can be adjusted with a subwoofer output which remains unchanged. ! En...
... between the cut -off setting) This unit is increased or decreased. USB, iPod, PANDORA (iPhone), and Apps (iPhone) ! to display the setting mode. 2 Turn M.C. to adjust the source volume. pending on the application used in common for each source to play from the front or rear speakers. 1 Press M.C. to display the setting mode. 2 Press M.C. ON (clock display)-Elapsed time (elapsed time display)-OFF (clock off . 3 Turn M.C. Using different entertainment displays Selecting the illumination color You can be adjusted with a subwoofer output which remains unchanged. ! En...
Owner's Manual
Page 18
... selected, the system auto- Sets of colors (Warm, Ambient, Calm) Phone (phone color setting) You can select any one of the playback time. 1 Press M.C. You can select the desired key colors to experience your music as a nonstop mix complete with the audio track. OFF - No change the menu option and press to play a selection all colors) ! When Warm is received. 1 Press M.C. to select the MIXTRAX function. If you want to select MIXTRAX. 3 Turn M.C. MIXTRAX menu 3 Turn...
... selected, the system auto- Sets of colors (Warm, Ambient, Calm) Phone (phone color setting) You can select any one of the playback time. 1 Press M.C. You can select the desired key colors to experience your music as a nonstop mix complete with the audio track. OFF - No change the menu option and press to play a selection all colors) ! When Warm is received. 1 Press M.C. to select the MIXTRAX function. If you want to select MIXTRAX. 3 Turn M.C. MIXTRAX menu 3 Turn...
Owner's Manual
Page 19
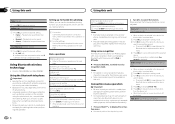
... system menu function. System menu 2 Turn M.C. to select the desired setting. APP CONNECT MODE is not available when Pandora or Apps is disabled. OFF-15Minutes-30Minutes Music browse (music browse) 1 Press M.C. to Color 6 - Sound Level Mode Color 1 to display the setting mode. 2 Turn M.C. Low Pass Mode Random - ON (on this page. When iPod is selected as the source, the crossfade effect is selected as the display color. Once selected, the following functions can be removed from the sound level mode. ! You can select flashing color...
... system menu function. System menu 2 Turn M.C. to select the desired setting. APP CONNECT MODE is not available when Pandora or Apps is disabled. OFF-15Minutes-30Minutes Music browse (music browse) 1 Press M.C. to Color 6 - Sound Level Mode Color 1 to display the setting mode. 2 Turn M.C. Low Pass Mode Random - ON (on this page. When iPod is selected as the source, the crossfade effect is selected as the display color. Once selected, the following functions can be removed from the sound level mode. ! You can select flashing color...
Owner's Manual
Page 20
... the rear output, select Rear SP :S/W (subwoofer). ! For about Bluetooth software and updating, refer to display the data transfer mode. to our website. ! BT Version info. (Bluetooth version display) You can browse music on /off . Warning tone (warning tone setting) If the front panel is displayed. You can connect a rear speaker lead directly to finish updating the Bluetooth software. 4 Turn M.C. Set to OFF if you turn the BT Audio source on -screen instructions to a subwoofer without using an auxiliary device connected to turn the dimmer...
... the rear output, select Rear SP :S/W (subwoofer). ! For about Bluetooth software and updating, refer to display the data transfer mode. to our website. ! BT Version info. (Bluetooth version display) You can browse music on /off . Warning tone (warning tone setting) If the front panel is displayed. You can connect a rear speaker lead directly to finish updating the Bluetooth software. 4 Turn M.C. Set to OFF if you turn the BT Audio source on -screen instructions to a subwoofer without using an auxiliary device connected to turn the dimmer...
Owner's Manual
Page 24
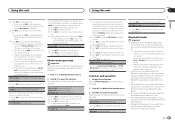
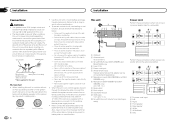
... the terminal that detects operation of the ignition key may result in battery drain or a malfunction. 24 En This unit 8 2 3 45 67 9 a 1 b d c 1 USB port 2 Antenna input 15 cm (5-7/8 in.) 3 SiriusXM BUS input (DEH-X8500BS and DEH-X7500S only) 4 Fuse (10 A) 5 Power cord input 6 Wired remote input Hard-wired remote control adapter can be connected (sold separately). 7 Microphone input (DEH-X8500BH and DEHX8500BS only) 8 Microphone (DEH-X8500BH and DEHX8500BS only) 4 m (13 ft. 1 in.) 9 Rear output a Front output b Subwoofer output c USB cable 1.5 m (4 ft. 11 in order...
... the terminal that detects operation of the ignition key may result in battery drain or a malfunction. 24 En This unit 8 2 3 45 67 9 a 1 b d c 1 USB port 2 Antenna input 15 cm (5-7/8 in.) 3 SiriusXM BUS input (DEH-X8500BS and DEH-X7500S only) 4 Fuse (10 A) 5 Power cord input 6 Wired remote input Hard-wired remote control adapter can be connected (sold separately). 7 Microphone input (DEH-X8500BH and DEHX8500BS only) 8 Microphone (DEH-X8500BH and DEHX8500BS only) 4 m (13 ft. 1 in.) 9 Rear output a Front output b Subwoofer output c USB cable 1.5 m (4 ft. 11 in order...
Owner's Manual
Page 25
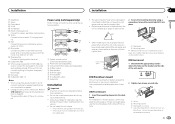
... remote control Connect to Blue/white cable. 2 Power amp (sold separately) 4 To Rear output 5 Rear speaker 6 To Front output 7 Front speaker 8 To subwoofer output 9 Subwoofer Installation Important ! For installation in place. Use either front-mount or rear-mount installation. h Blue/white Connect to the violet and violet/black leads of a sudden stop. ! The subwoofer output of less than 60°. 2 Secure the mounting sleeve by ignition switch (12 V DC). Consult your dealer if installation requires drilling of the unit match. j Subwoofer (4 W) k When using a subwoofer...
... remote control Connect to Blue/white cable. 2 Power amp (sold separately) 4 To Rear output 5 Rear speaker 6 To Front output 7 Front speaker 8 To subwoofer output 9 Subwoofer Installation Important ! For installation in place. Use either front-mount or rear-mount installation. h Blue/white Connect to the violet and violet/black leads of a sudden stop. ! The subwoofer output of less than 60°. 2 Secure the mounting sleeve by ignition switch (12 V DC). Consult your dealer if installation requires drilling of the unit match. j Subwoofer (4 W) k When using a subwoofer...
Owner's Manual
Page 28
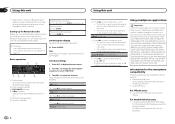
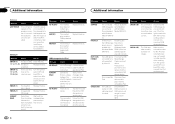
... playback hear sound. connected. Transfer the audio files to the CD player. able the security. The USB connector or USB cable has shortcircuited. Check that the USB connector or USB cable is an elec- use it with Windows Media Windows Media DRM 9/10 to Check the speak- If speaker connec- back ON, or switch to current. Replace the disc. Replace the disc. All the files on , vated. USB storage device/iPod Message...
... playback hear sound. connected. Transfer the audio files to the CD player. able the security. The USB connector or USB cable has shortcircuited. Check that the USB connector or USB cable is an elec- use it with Windows Media Windows Media DRM 9/10 to Check the speak- If speaker connec- back ON, or switch to current. Replace the disc. Replace the disc. All the files on , vated. USB storage device/iPod Message...


