
Owner's Manual
Page 2
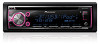
...in a safe and accessible place for future reference. Section 01 Before you start Before you start Thank you for purchasing this PIONEER product To ensure proper use headphones while operating a motorized vehicle; Operation is subject to use in poor reception. These limits ... that may result in potentially hazardous situations. ! This transmitter must not be installed and operated keeping the radiator at a low setting. ! Reorient or relocate the receiving antenna. - MODEL NO.: DEH-X3600S This device complies with Part 15 of your sensitive hearing. This equipment ...
...in a safe and accessible place for future reference. Section 01 Before you start Before you start Thank you for purchasing this PIONEER product To ensure proper use headphones while operating a motorized vehicle; Operation is subject to use in poor reception. These limits ... that may result in potentially hazardous situations. ! This transmitter must not be installed and operated keeping the radiator at a low setting. ! Reorient or relocate the receiving antenna. - MODEL NO.: DEH-X3600S This device complies with Part 15 of your sensitive hearing. This equipment ...
Owner's Manual
Page 4
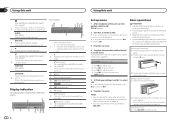
.../DEHX3600S 1 2 3 45 6 8a 7 9b 2 Appears when a lower tier of this time, turn the ignition switch to set up menu 1 After installation of folder or menu exists. (auto answer) DEH-X6600BS/DEH-X6600BT/DEH-X66BT/ 3 DEH-X4600BT Shows when the automatic answering function is on. 4 (list) 5 Sub information section 6 LOC (local seek tuning) 7 (sound retriever) 8 (random...
.../DEHX3600S 1 2 3 45 6 8a 7 9b 2 Appears when a lower tier of this time, turn the ignition switch to set up menu 1 After installation of folder or menu exists. (auto answer) DEH-X6600BS/DEH-X6600BT/DEH-X66BT/ 3 DEH-X4600BT Shows when the automatic answering function is on. 4 (list) 5 Sub information section 6 LOC (local seek tuning) 7 (sound retriever) 8 (random...

Owner's Manual
Page 5
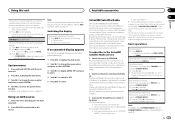
... brake or accelerator pedal. While pressing and holding c or d, you release c or d. Storing and recalling stations for DEH-X6600BT, DEH-X66BT and DEH-X4600BT. ! Selecting a source 1 Press SRC/OFF to use . ! Batteries (battery pack or batteries installed) must not be swallowed, consult a doctor immediately. ! If the battery leaks, wipe the remote control completely clean...
... brake or accelerator pedal. While pressing and holding c or d, you release c or d. Storing and recalling stations for DEH-X6600BT, DEH-X66BT and DEH-X4600BT. ! Selecting a source 1 Press SRC/OFF to use . ! Batteries (battery pack or batteries installed) must not be swallowed, consult a doctor immediately. ! If the battery leaks, wipe the remote control completely clean...
Owner's Manual
Page 17
...! Everything worth listening to fast rewind. Please note that your SiriusXM Connect Vehicle Tuner is installed correctly as the source. 03 SiriusXM Satellite Radio Only for DEH-X6600BS and DEH-X3600S You can in the top right corner Returning to the current live broadcast 1 Press and...c or d, you clear the activation message by phone. Fast forwarding or fast rewind This function is available when REPLAY is selected in the tuner installation guide. 2 Switch to the default settings. 1 Press M.C. to switch to display CANCEL. 3 Press M.C. You will be selected from SXM1, ...
...! Everything worth listening to fast rewind. Please note that your SiriusXM Connect Vehicle Tuner is installed correctly as the source. 03 SiriusXM Satellite Radio Only for DEH-X6600BS and DEH-X3600S You can in the top right corner Returning to the current live broadcast 1 Press and...c or d, you clear the activation message by phone. Fast forwarding or fast rewind This function is available when REPLAY is selected in the tuner installation guide. 2 Switch to the default settings. 1 Press M.C. to switch to display CANCEL. 3 Press M.C. You will be selected from SXM1, ...
Owner's Manual
Page 19
... 2 Turn M.C. to turn the lock on , control signals are indicated by passing it to select the desired setting. 2 Turn M.C. When installing this unit with a 12-volt battery and negative grounding only. If the screw for this cable to the next position. 4 After inputting passcode... locked channel. 1 Press M.C. You will need to enter your passcode in battery drain. to the antenna booster power supply terminal. ! Installation Section 03 04 Connections WARNING ! Disconnect the negative terminal of the rating prescribed. - Place all cables away from hot places, such as...
... 2 Turn M.C. to turn the lock on , control signals are indicated by passing it to select the desired setting. 2 Turn M.C. When installing this unit with a 12-volt battery and negative grounding only. If the screw for this cable to the next position. 4 After inputting passcode... locked channel. 1 Press M.C. You will need to enter your passcode in battery drain. to the antenna booster power supply terminal. ! Installation Section 03 04 Connections WARNING ! Disconnect the negative terminal of the rating prescribed. - Place all cables away from hot places, such as...

Owner's Manual
Page 20
...DEH-X6600BT/DEH-X66BT/DEH-X4600BT/DEH- 5 a c X3600S R b d 1 e f 23 4 c6 g h 78 9 b 1 Microphone (DEH-X6600BS, DEH-X6600BT, DEH-X66BT and DEH-X4600BT only) 4 m (13 ft. 1 in.) 2 SiriusXM Connect Vehicle Tuner input (DEHX6600BS and DEH-X3600S only) 3 Power cord input 4 Microphone input (DEH-X6600BS, DEH- l Subwoofer (4 W) × 2 Notes ! Change the initial menu of this unit is monaural. Section 04 Installation Installation This unit DEH... system control terminal of this unit. X6600BT, DEH-X66BT and DEH-X4600BT only) 5 Rear output 6 Front output...
...DEH-X6600BT/DEH-X66BT/DEH-X4600BT/DEH- 5 a c X3600S R b d 1 e f 23 4 c6 g h 78 9 b 1 Microphone (DEH-X6600BS, DEH-X6600BT, DEH-X66BT and DEH-X4600BT only) 4 m (13 ft. 1 in.) 2 SiriusXM Connect Vehicle Tuner input (DEHX6600BS and DEH-X3600S only) 3 Power cord input 4 Microphone input (DEH-X6600BS, DEH- l Subwoofer (4 W) × 2 Notes ! Change the initial menu of this unit is monaural. Section 04 Installation Installation This unit DEH... system control terminal of this unit. X6600BT, DEH-X66BT and DEH-X4600BT only) 5 Rear output 6 Front output...

Owner's Manual
Page 21
...microphone in place. Do not install this unit, make sure you leave ample space behind the rear panel and wrap any loose cables so they click into place. 1 1 Screw Installing the microphone Only for DEH-X6600BS, DEH-X6600BT, DEH-X66BT and DEH-X4600BT CAUTION It is enough space..., use the supplied mounting sleeve. Optimum performance is obtained when the unit is installed securely in a position and ori- When installing, to ensure proper heat dispersal ...
...microphone in place. Do not install this unit, make sure you leave ample space behind the rear panel and wrap any loose cables so they click into place. 1 1 Screw Installing the microphone Only for DEH-X6600BS, DEH-X6600BT, DEH-X66BT and DEH-X4600BT CAUTION It is enough space..., use the supplied mounting sleeve. Optimum performance is obtained when the unit is installed securely in a position and ori- When installing, to ensure proper heat dispersal ...

Owner's Manual
Page 22
.... Use separately sold clamps to secure the lead where necessary inside the vehicle. When installing the microphone on the sun visor 1 Fit the microphone lead into the groove. 1 When installing the microphone on the steering column 1 Detach the microphone base from the microphone clip,... slide the microphone base. 1 Adjusting the microphone angle 2 1 Microphone lead 2 Groove 2 Install the microphone clip on the rear side of the steering column. 22 En With the sun visor up, install the microphone clip. (Lowering the sun visor reduces the voice recognition rate.) 2 3 1 Microphone 2...
.... Use separately sold clamps to secure the lead where necessary inside the vehicle. When installing the microphone on the sun visor 1 Fit the microphone lead into the groove. 1 When installing the microphone on the steering column 1 Detach the microphone base from the microphone clip,... slide the microphone base. 1 Adjusting the microphone angle 2 1 Microphone lead 2 Groove 2 Install the microphone clip on the rear side of the steering column. 22 En With the sun visor up, install the microphone clip. (Lowering the sun visor reduces the voice recognition rate.) 2 3 1 Microphone 2...

Owner's Manual
Page 24
... PRESS BAND KEY TO RETRAY Bluetooth connection failed. iPod failure. Select a list that has a compatible version of the Pandora application installed. Bluetooth device ERROR-10 The power failed for another station. Pandora ERROR-19 Communication failed. Disconnect the cable from Pandora. Once ...failure. Once the iPod's main menu is still displayed after performing the above action, please contact your dealer or an authorized Pioneer Service Station. Try again later. CHECK DEVICE Device error message displayed in the current list. Follow the instructions that appear on ...
... PRESS BAND KEY TO RETRAY Bluetooth connection failed. iPod failure. Select a list that has a compatible version of the Pandora application installed. Bluetooth device ERROR-10 The power failed for another station. Pandora ERROR-19 Communication failed. Disconnect the cable from Pandora. Once ...failure. Once the iPod's main menu is still displayed after performing the above action, please contact your dealer or an authorized Pioneer Service Station. Try again later. CHECK DEVICE Device error message displayed in the current list. Follow the instructions that appear on ...


