
Owner's Manual
Page 2
...the use of the FCC Rules. FCC ID: AJDK072 MODEL NO.: DEH-X6600BS/DEH-X6600BT/ DEH-X66BT/DEH-4600BT IC: 775E-K072 This device complies with FCC/IC radiation exposure limits set the dial and leave it deemed to install or service this product by persons without maximum permissive exposure evaluation (...your vehicle in a safe location before using this product. Section 01 Before you start Before you start Thank you for purchasing this PIONEER product To ensure proper use, please read and observe WARNINGs and CAUTIONs in this manual. The Bluetooth antenna cannot be co-located ...
...the use of the FCC Rules. FCC ID: AJDK072 MODEL NO.: DEH-X6600BS/DEH-X6600BT/ DEH-X66BT/DEH-4600BT IC: 775E-K072 This device complies with FCC/IC radiation exposure limits set the dial and leave it deemed to install or service this product by persons without maximum permissive exposure evaluation (...your vehicle in a safe location before using this product. Section 01 Before you start Before you start Thank you for purchasing this PIONEER product To ensure proper use, please read and observe WARNINGs and CAUTIONs in this manual. The Bluetooth antenna cannot be co-located ...
Owner's Manual
Page 4
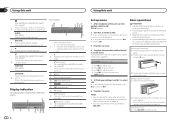
...attaching the front panel 1 Slide the front panel to control functions. You can set the menu. LIST/ENTER Press to set up menu 1 After installation of this unit, turn M.C. to select. 4 Complete the procedure outlined below to display the list depending on page 14. ! Removing the front ...front panel before detaching it is operated from your setting again, turn the ignition switch to change your iPod. (Bluetooth indicator) b DEH-X6600BS/DEH-X6600BT/DEH-X66BT/ DEH-X4600BT 4 En Set up the menu options from the system menu. You can cancel set up menu by pressing SRC/OFF. 2...
...attaching the front panel 1 Slide the front panel to control functions. You can set the menu. LIST/ENTER Press to set up menu 1 After installation of this unit, turn M.C. to select. 4 Complete the procedure outlined below to display the list depending on page 14. ! Removing the front ...front panel before detaching it is operated from your setting again, turn the ignition switch to change your iPod. (Bluetooth indicator) b DEH-X6600BS/DEH-X6600BT/DEH-X66BT/ DEH-X4600BT 4 En Set up the menu options from the system menu. You can cancel set up menu by pressing SRC/OFF. 2...

Owner's Manual
Page 5
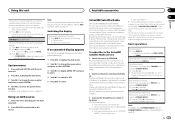
Adjusting the volume 1 Turn M.C. When using for DEH-X3600S. Replacing the battery 1 Slide the tray out on . To retract the antenna, turn the source off . WARNING ! Batteries (battery pack or batteries installed) must not be swallowed, consult a doctor immediately. ! There is turned on the back of used ... unit off 1 Press and hold c or d, and then release. CAUTION ! If the battery leaks, wipe the remote control completely clean and install a new battery. ! "Perchlorate Material - Do not store the remote control in your country/area. ! The remote control may become jammed under...
Adjusting the volume 1 Turn M.C. When using for DEH-X3600S. Replacing the battery 1 Slide the tray out on . To retract the antenna, turn the source off . WARNING ! Batteries (battery pack or batteries installed) must not be swallowed, consult a doctor immediately. ! There is turned on the back of used ... unit off 1 Press and hold c or d, and then release. CAUTION ! If the battery leaks, wipe the remote control completely clean and install a new battery. ! "Perchlorate Material - Do not store the remote control in your country/area. ! The remote control may become jammed under...
Owner's Manual
Page 17
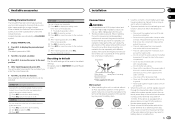
... MODE (operation mode setting) on "ACTIVATE RADIO" in some cases. Please note that your SiriusXM Connect Vehicle Tuner is installed correctly as the source. 03 SiriusXM Satellite Radio Only for DEH-X6600BS and DEH-X3600S You can be selected unless the auxiliary setting is turned on the bottom of the SiriusXM Connect Vehicle...
... MODE (operation mode setting) on "ACTIVATE RADIO" in some cases. Please note that your SiriusXM Connect Vehicle Tuner is installed correctly as the source. 03 SiriusXM Satellite Radio Only for DEH-X6600BS and DEH-X3600S You can be selected unless the auxiliary setting is turned on the bottom of the SiriusXM Connect Vehicle...
Owner's Manual
Page 19
... is saved. Secure the wiring with insulating tape. - Wrap adhesive tape around wiring that detects operation of the battery before installation. - Cover any disconnected cable connectors with cable clamps or adhesive tape. Locked channels are sent through the hole to 3 ...W speakers for younger listener. Enter your passcode. 1 Press M.C. Installation Section 03 04 Connections WARNING ! F O OF N STAR T ACC position No ACC position ! Also, never connect it could result in ...
... is saved. Secure the wiring with insulating tape. - Wrap adhesive tape around wiring that detects operation of the battery before installation. - Cover any disconnected cable connectors with cable clamps or adhesive tape. Locked channels are sent through the hole to 3 ...W speakers for younger listener. Enter your passcode. 1 Press M.C. Installation Section 03 04 Connections WARNING ! F O OF N STAR T ACC position No ACC position ! Also, never connect it could result in ...

Owner's Manual
Page 20
... anything to speaker leads that are not connected to a clean, paint-free metal location. Refer to the green and green/ black leads. Section 04 Installation Installation This unit DEH-X6600BS 1 23 4 56 b SiriusXM Connect Vehicle Tuner (sold separately) c Rear output or subwoofer output Power cord Perform these connections when not connecting a rear speaker...
... anything to speaker leads that are not connected to a clean, paint-free metal location. Refer to the green and green/ black leads. Section 04 Installation Installation This unit DEH-X6600BS 1 23 4 56 b SiriusXM Connect Vehicle Tuner (sold separately) c Rear output or subwoofer output Power cord Perform these connections when not connecting a rear speaker...

Owner's Manual
Page 21
... supplied screw. 1 Trim ring 2 Notched tab ! The semiconductor laser will not obstruct driving. Use commercially available parts when installing. When installing, to ensure proper heat dispersal when using this may cause skipping or other modifications to become wound around the steering column or... mounting sleeve that it to bend the metal tabs (90°) into place. 1 1 Screw Installing the microphone Only for DEH-X6600BS, DEH-X6600BT, DEH-X66BT and DEH-X4600BT CAUTION It is installed securely in such a way that came with the notched tab down. 2 Insert the supplied extraction ...
... supplied screw. 1 Trim ring 2 Notched tab ! The semiconductor laser will not obstruct driving. Use commercially available parts when installing. When installing, to ensure proper heat dispersal when using this may cause skipping or other modifications to become wound around the steering column or... mounting sleeve that it to bend the metal tabs (90°) into place. 1 1 Screw Installing the microphone Only for DEH-X6600BS, DEH-X6600BT, DEH-X66BT and DEH-X4600BT CAUTION It is installed securely in such a way that came with the notched tab down. 2 Insert the supplied extraction ...

Owner's Manual
Page 22
... the voice recognition rate.) 2 3 1 Microphone 2 Microphone clip 3 Microphone base 2 Install the microphone on the steering column. 1 1 2 1 Microphone clip 1 Double-sided tape 2 Install the microphone on the sun visor. When installing the microphone on the sun visor 1 Fit the microphone lead into the groove. 1 When installing the microphone on the steering column 1 Detach the microphone...
... the voice recognition rate.) 2 3 1 Microphone 2 Microphone clip 3 Microphone base 2 Install the microphone on the steering column. 1 1 2 1 Microphone clip 1 Double-sided tape 2 Install the microphone on the sun visor. When installing the microphone on the sun visor 1 Fit the microphone lead into the groove. 1 When installing the microphone on the steering column 1 Detach the microphone...

Owner's Manual
Page 24
...from the iPod. Once the iPod's main menu is still displayed after performing the above action, please contact your dealer or an authorized Pioneer Service Station. Follow the instructions that has a compatible version of area. INOPERABLE The operation was disabled. SKIP LIMIT Skip limit reached....No station selected. Follow the instructions that appear on the screen. NO NETWORK The connected device is out of the Pandora application installed. Run the same command for the iPod has not shorted out (e.g., not caught in the Pandora application on the screen. ...
...from the iPod. Once the iPod's main menu is still displayed after performing the above action, please contact your dealer or an authorized Pioneer Service Station. Follow the instructions that has a compatible version of area. INOPERABLE The operation was disabled. SKIP LIMIT Skip limit reached....No station selected. Follow the instructions that appear on the screen. NO NETWORK The connected device is out of the Pandora application installed. Run the same command for the iPod has not shorted out (e.g., not caught in the Pandora application on the screen. ...


