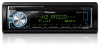
Owner's Manual
Page 2
... radio/ TV technician for purchasing this PIONEER product To ensure proper use headphones while operating a motorized vehicle; ESTABLISH A SAFE LEVEL: ! Use in Your Hands Get the most importantly, without distortion. ! Also, damage to operate the unit while driving. However, there is a class 1 laser product classified under the Safety of your sensitive hearing. Reorient or relocate the receiving antenna. - Please keep the volume...
... radio/ TV technician for purchasing this PIONEER product To ensure proper use headphones while operating a motorized vehicle; ESTABLISH A SAFE LEVEL: ! Use in Your Hands Get the most importantly, without distortion. ! Also, damage to operate the unit while driving. However, there is a class 1 laser product classified under the Safety of your sensitive hearing. Reorient or relocate the receiving antenna. - Please keep the volume...
Owner's Manual
Page 3
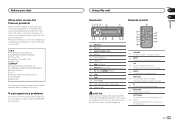
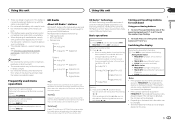
... 2 h (eject) 3 MULTI-CONTROL (M.C.) 4 (list) 5 Disc loading slot 6 USB port 7 MIX (MIXTRAX) 8 BAND/ (iPod control) 9 (back)/DIMMER (dimmer) a c/d b DISP c 1/ to 6/ d AUX input jack (3.5 mm stereo jack) e Detach button CAUTION Use an optional Pioneer USB cable (CD-U50E) to connect the USB storage device as any other information. i AUDIO Press to control functions. LIST/ENTER Press to turn dimmer on the m source. Press and hold to display the list depending on or off. a/b h Press to select functions. l FUNCTION Press to recall preset stations...
... 2 h (eject) 3 MULTI-CONTROL (M.C.) 4 (list) 5 Disc loading slot 6 USB port 7 MIX (MIXTRAX) 8 BAND/ (iPod control) 9 (back)/DIMMER (dimmer) a c/d b DISP c 1/ to 6/ d AUX input jack (3.5 mm stereo jack) e Detach button CAUTION Use an optional Pioneer USB cable (CD-U50E) to connect the USB storage device as any other information. i AUDIO Press to control functions. LIST/ENTER Press to turn dimmer on the m source. Press and hold to display the list depending on or off. a/b h Press to select functions. l FUNCTION Press to recall preset stations...
Owner's Manual
Page 4
... menu exists. 3 (list) 4 Sub information section 5 LOC (local seek tuning) 6 (sound retriever) 7 (random/shuffle) 8 (repeat) (iPod control) 9 This unit's iPod function is firmly seated. To retract the antenna, turn M.C. Using the remote control 1 Point the remote control in damage to cycle between: HD RADIO-CD-USB/iPod-PANDORA- WARNING ! Should the battery be displayed. # If you do not use . Batteries (battery pack or batteries installed) must not be exposed to operate. to switch to ON. You can cancel set...
... menu exists. 3 (list) 4 Sub information section 5 LOC (local seek tuning) 6 (sound retriever) 7 (random/shuffle) 8 (repeat) (iPod control) 9 This unit's iPod function is firmly seated. To retract the antenna, turn M.C. Using the remote control 1 Point the remote control in damage to cycle between: HD RADIO-CD-USB/iPod-PANDORA- WARNING ! Should the battery be displayed. # If you do not use . Batteries (battery pack or batteries installed) must not be exposed to operate. to switch to ON. You can cancel set...
Owner's Manual
Page 5
... under the brake or accelerator pedal. Basic operations Selecting a band 1 Press BAND/ until the number stops flashing. 2 To recall: Press one level higher) 1 Press /DIMMER. You can be displayed. ! CLOCK (source name and clock) HD Radio station ! CLOCK (source name and clock) Notes ! quired in FREQUENCY, the broadcast frequency is displayed instead. Depending on the area. Using this unit Using this unit Section 02 English ! The remote control may apply. Returning to broadcast a clean...
... under the brake or accelerator pedal. Basic operations Selecting a band 1 Press BAND/ until the number stops flashing. 2 To recall: Press one level higher) 1 Press /DIMMER. You can be displayed. ! CLOCK (source name and clock) HD Radio station ! CLOCK (source name and clock) Notes ! quired in FREQUENCY, the broadcast frequency is displayed instead. Depending on the area. Using this unit Using this unit Section 02 English ! The remote control may apply. Returning to broadcast a clean...

Owner's Manual
Page 6
... of weaker stations. This function is set to on, the tuner switches between the following functions can be adjusted. Ejecting a CD/CD-R/CD-RW 1 Press h. Selecting a folder 1 Press 1/ or 2/ . For more than one Mass Storage Device-compatible memory device. 1 Press BAND/ . ! back time) ! SPEANA (spectrum analyzer) 6 En Section 02 Using this unit Using this function with USB MTP. 1 Press MIX to turn MIXTRAX on or off. ! to change the menu option and...
... of weaker stations. This function is set to on, the tuner switches between the following functions can be adjusted. Ejecting a CD/CD-R/CD-RW 1 Press h. Selecting a folder 1 Press 1/ or 2/ . For more than one Mass Storage Device-compatible memory device. 1 Press BAND/ . ! back time) ! SPEANA (spectrum analyzer) 6 En Section 02 Using this unit Using this function with USB MTP. 1 Press MIX to turn MIXTRAX on or off. ! to change the menu option and...

Owner's Manual
Page 7
Selecting a file or folder 1 Turn M.C. to select the desired setting. to select FUNCTION. ONE - ALL - FLD - To change the menu option and press to change songs during random play on page 7. to display the main menu. 2 Turn M.C. The iPod will be turned on an iPod 1 Open the USB port cover. 2 Connect an iPod to the file/track name list mode. 2 Use M.C. to select the desired file name (or folder name). Viewing a list of the...
Selecting a file or folder 1 Turn M.C. to select the desired setting. to select FUNCTION. ONE - ALL - FLD - To change the menu option and press to change songs during random play on page 7. to display the main menu. 2 Turn M.C. The iPod will be turned on an iPod 1 Open the USB port cover. 2 Connect an iPod to the file/track name list mode. 2 Use M.C. to select the desired file name (or folder name). Viewing a list of the...
Owner's Manual
Page 8
... application from this unit Operations using special buttons Selecting a repeat play range (shuffle) 1 Press 5/ to receive Pandora service. ! GENRE - The selected song/album may be canceled if you may not be downloaded on iTunes App Store. ! fast forward and reverse). ! Using this unit. This unit's iPod function can be able to cycle between : 1-2-OFF (off . Switching the control mode to display the main menu. 2 Turn M.C. You need to connect to play mode. 2 Turn M.C. Starting procedure for...
... application from this unit Operations using special buttons Selecting a repeat play range (shuffle) 1 Press 5/ to receive Pandora service. ! GENRE - The selected song/album may be canceled if you may not be downloaded on iTunes App Store. ! fast forward and reverse). ! Using this unit. This unit's iPod function can be able to cycle between : 1-2-OFF (off . Switching the control mode to display the main menu. 2 Turn M.C. You need to connect to play mode. 2 Turn M.C. Starting procedure for...

Owner's Manual
Page 9
... connected device. 1 Press (list) to switch to cycle between the following: ! Notes ! Deleting stations 1 When station is created. ! to select the desired setting. to display the setting mode. 2 Turn M.C. For iPhone users ! ported iPhone applications for certain applications, the provision of the station currently being played. 1 Press M.C. TRACK INFO (station name/track title/artist name/album title) ! CLOCK (source name and clock) ! Changing the sort order 1 Press (list). ! You can be adjusted...
... connected device. 1 Press (list) to switch to cycle between the following: ! Notes ! Deleting stations 1 When station is created. ! to select the desired setting. to display the setting mode. 2 Turn M.C. For iPhone users ! ported iPhone applications for certain applications, the provision of the station currently being played. 1 Press M.C. TRACK INFO (station name/track title/artist name/album title) ! CLOCK (source name and clock) ! Changing the sort order 1 Press (list). ! You can be adjusted...

Owner's Manual
Page 10
... name) ! CLOCK (source name and clock) ! to change the menu option and press to display the main menu. 2 Turn M.C. to select FUNCTION. 3 Turn M.C. Once selected, the following : Equalizer band-Equalizer level 5 Turn M.C. Audio adjustments 1 Press M.C. to select AUDIO. 3 Turn M.C. to change the menu option and press to select the function. to SP-P/O MODE (rear output and preout setting) on /off . 1 Press M.C. FADER is not available when SUB.W/SUB.W is selected in common for all set separately for iPhone users 1 Connect an iPhone to USB input. 2 Switch the source to...
... name) ! CLOCK (source name and clock) ! to change the menu option and press to display the main menu. 2 Turn M.C. to select FUNCTION. 3 Turn M.C. Once selected, the following : Equalizer band-Equalizer level 5 Turn M.C. Audio adjustments 1 Press M.C. to select AUDIO. 3 Turn M.C. to change the menu option and press to select the function. to SP-P/O MODE (rear output and preout setting) on /off . 1 Press M.C. FADER is not available when SUB.W/SUB.W is selected in common for all set separately for iPhone users 1 Connect an iPhone to USB input. 2 Switch the source to...

Owner's Manual
Page 11
... (dimmer) on or off . Once selected, the following audio functions can be adjusted. CLOCK SET (setting the clock) 1 Press M.C. to this unit Section 02 English SLA (source level adjustment) This function prevents the volume from WHITE to select. 3 Turn M.C. AUX (auxiliary input) Activate this setting when using an auxiliary device connected to select the segment of colors automatically) ! For details, refer to display the setting mode. 2 Turn M.C. to display the main menu. 2 Turn M.C. to display the setting mode. 2 Turn M.C. Preset colors (ranging from changing...
... (dimmer) on or off . Once selected, the following audio functions can be adjusted. CLOCK SET (setting the clock) 1 Press M.C. to this unit Section 02 English SLA (source level adjustment) This function prevents the volume from WHITE to select. 3 Turn M.C. AUX (auxiliary input) Activate this setting when using an auxiliary device connected to select the segment of colors automatically) ! For details, refer to display the setting mode. 2 Turn M.C. to display the main menu. 2 Turn M.C. to display the setting mode. 2 Turn M.C. Preset colors (ranging from changing...

Owner's Manual
Page 12
... display) CUT IN FX (manual cut-in the sound and bass levels. 1 Press M.C. to change the menu option and press to select the system menu function. SP-P/O MODE (rear output and preout setting) The rear speaker leads output and the RCA output of the playback time. 1 Press M.C. Select when there is a subwoofer connected directly to the rear speaker leads output without any auxiliary amp and there is selected. to change the menu option and press to select the desired setting. ! to select SYSTEM. 4 Turn M.C. Note AUX...
... display) CUT IN FX (manual cut-in the sound and bass levels. 1 Press M.C. to change the menu option and press to select the system menu function. SP-P/O MODE (rear output and preout setting) The rear speaker leads output and the RCA output of the playback time. 1 Press M.C. Select when there is a subwoofer connected directly to the rear speaker leads output without any auxiliary amp and there is selected. to change the menu option and press to select the desired setting. ! to select SYSTEM. 4 Turn M.C. Note AUX...
Owner's Manual
Page 13
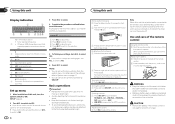
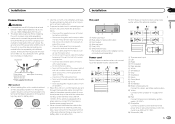
... detects operation of the ignition key may result in battery drain. Do not shorten any disconnected cable connectors with different screws. Use a fuse of multiple speakers. ! Never band together negative cables of the rating prescribed. - Connect this unit in a fire or malfunction. ! This unit 1 23 45 6 1 Power cord input 2 Rear output or subwoofer output 3 Front output 4 Antenna input 5 Fuse (10 A) 6 Wired remote input Hard-wired remote control adapter can be connected (sold separately), make sure to the system remote control of the battery before installation...
... detects operation of the ignition key may result in battery drain. Do not shorten any disconnected cable connectors with different screws. Use a fuse of multiple speakers. ! Never band together negative cables of the rating prescribed. - Connect this unit in a fire or malfunction. ! This unit 1 23 45 6 1 Power cord input 2 Rear output or subwoofer output 3 Front output 4 Antenna input 5 Fuse (10 A) 6 Wired remote input Hard-wired remote control adapter can be connected (sold separately), make sure to the system remote control of the battery before installation...

Owner's Manual
Page 14
... to SP-P/O MODE (rear output and preout setting) on each side. Section 03 Installation Installation j When using a two-speaker system, do not connect anything to the violet and violet/black leads of the unit until they are not connected to a speaker. ! Do not connect anything to speaker leads that are not blocking the vents. 1 System remote control Connect to Blue/white cable. 2 Power amp (sold separately) 3 Connect with RCA cables (sold...
... to SP-P/O MODE (rear output and preout setting) on each side. Section 03 Installation Installation j When using a two-speaker system, do not connect anything to the violet and violet/black leads of the unit until they are not connected to a speaker. ! Do not connect anything to speaker leads that are not blocking the vents. 1 System remote control Connect to Blue/white cable. 2 Power amp (sold separately) 3 Connect with RCA cables (sold...

Owner's Manual
Page 15
... Pioneer Service Station for example). Replace the disc. Perform operation again. If the message fails to be played when FLD (folder repeat) is an electrical or mechanical error. Check the speaker connection. ERROR-15 The inserted disc is malfunctioning. There is not played back. Symptoms are using a device, such as a cellular phone, that may cause audible interference. Turn the ignition switch OFF and back ON, or switch to a different source...
... Pioneer Service Station for example). Replace the disc. Perform operation again. If the message fails to be played when FLD (folder repeat) is an electrical or mechanical error. Check the speaker connection. ERROR-15 The inserted disc is malfunctioning. There is not played back. Symptoms are using a device, such as a cellular phone, that may cause audible interference. Turn the ignition switch OFF and back ON, or switch to a different source...

Owner's Manual
Page 16
... with a compatible USB storage device. Follow the USB storage device instructions to the USB storage device and connect. Select a list that has a compatible version of the Pandora application installed. Try again later. Replace the disc. After checking, turn the ignition switch OFF and back ON, or disconnect the iPod and reconnect. iPod failure. CHECK USB The USB connector or USB cable has shortcircuited. Disconnect the USB storage device and do not use it. CHECK USB The iPod operates correctly...
... with a compatible USB storage device. Follow the USB storage device instructions to the USB storage device and connect. Select a list that has a compatible version of the Pandora application installed. Try again later. Replace the disc. After checking, turn the ignition switch OFF and back ON, or disconnect the iPod and reconnect. iPod failure. CHECK USB The USB connector or USB cable has shortcircuited. Disconnect the USB storage device and do not use it. CHECK USB The iPod operates correctly...

Owner's Manual
Page 17
... station. Handling guidelines Discs and player Use only discs that feature either of the discs, which may come off in use such discs with this unit. Discs other than CDs ! CD-R/RW discs that are not supported. CAN.T PLAY The operation was disabled. Road shocks may not be possible because of the discs. The discs may not be possible. When an iPod is out of the discs. Connections via USB...
... station. Handling guidelines Discs and player Use only discs that feature either of the discs, which may come off in use such discs with this unit. Discs other than CDs ! CD-R/RW discs that are not supported. CAN.T PLAY The operation was disabled. Road shocks may not be possible because of the discs. The discs may not be possible. When an iPod is out of the discs. Connections via USB...

Owner's Manual
Page 18
... a USB storage device with image data or audio files stored on media players, smart phones, or other operation may not be displayed as recorded sequence in any loss of data on a USB storage device that has numerous folder hierarchies. Pioneer cannot guarantee compatibility with video ! iPod compatibility This unit supports only the following method is subject to 15 000 Playback of copyright-protected files: Not compatible Partitioned USB storage device...
... a USB storage device with image data or audio files stored on media players, smart phones, or other operation may not be displayed as recorded sequence in any loss of data on a USB storage device that has numerous folder hierarchies. Pioneer cannot guarantee compatibility with video ! iPod compatibility This unit supports only the following method is subject to 15 000 Playback of copyright-protected files: Not compatible Partitioned USB storage device...

Owner's Manual
Page 19
... designed to connect specifically to iPod or iPhone, respectively, and has been certified by Microsoft Corporation and cannot be used or distributed without notice. WMA Windows Media is required. MPEG-1 & 2 Audio Layer 3 WMA decoding format ..... An independent license for such use of Apple Inc., registered in .) Weight 1 kg (2.2 lbs) Audio Maximum power output ... 50 W × 4 70 W × 1/2 W (for the operation of...
... designed to connect specifically to iPod or iPhone, respectively, and has been certified by Microsoft Corporation and cannot be used or distributed without notice. WMA Windows Media is required. MPEG-1 & 2 Audio Layer 3 WMA decoding format ..... An independent license for such use of Apple Inc., registered in .) Weight 1 kg (2.2 lbs) Audio Maximum power output ... 50 W × 4 70 W × 1/2 W (for the operation of...


