Owner's Manual
Page 2
...unit 3 After-sales service for Pioneer products 3 In case of trouble 3 Visit our website 3 Demo mode 3 About this manual 3 Operating this unit Head unit 4 Remote control 4 Set up menu 4 Basic operations 5 Use and care of the remote control 5 Menu operations identical for function settings/audio adjustments/initial settings/lists 5 Tuner 6 CD/CD-R/CD-RW and USB storage devices 7 iPod 8 Using Pandoraâ 10 Audio adjustments 11 Using Bluetooth wireless technology 12 Initial settings 14 Other functions 15 Available accessories XM tuner 17 SIRIUS Satellite Radio tuner 18 Installation Connections...
...unit 3 After-sales service for Pioneer products 3 In case of trouble 3 Visit our website 3 Demo mode 3 About this manual 3 Operating this unit Head unit 4 Remote control 4 Set up menu 4 Basic operations 5 Use and care of the remote control 5 Menu operations identical for function settings/audio adjustments/initial settings/lists 5 Tuner 6 CD/CD-R/CD-RW and USB storage devices 7 iPod 8 Using Pandoraâ 10 Audio adjustments 11 Using Bluetooth wireless technology 12 Initial settings 14 Other functions 15 Available accessories XM tuner 17 SIRIUS Satellite Radio tuner 18 Installation Connections...

Owner's Manual
Page 3
... discontinue use headphones while operating a motorized vehicle; Pioneer Electronics (USA) Inc. Slowly increase the sound until you have established a comfortable sound level, set to the companies at a safe level BEFORE your product to receive notices about product updates (such as "USB storage device". ! Wash hands after -sales service (including warranty conditions) or any preset memory will be loud and harmful to as "iPod". CAUTION: USE OF CONTROL OR ADJUSTMENT...
... discontinue use headphones while operating a motorized vehicle; Pioneer Electronics (USA) Inc. Slowly increase the sound until you have established a comfortable sound level, set to the companies at a safe level BEFORE your product to receive notices about product updates (such as "USB storage device". ! Wash hands after -sales service (including warranty conditions) or any preset memory will be loud and harmful to as "iPod". CAUTION: USE OF CONTROL OR ADJUSTMENT...
Owner's Manual
Page 4
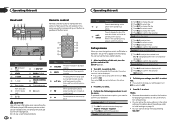
...option, you turn the ignition switch to ON after installation, set the menu. to confirm the selection. Calendar (setting the date) 1 Turn M.C. e b a 98 7 6 c 9 f k g j h a 3 i d Part 1 (phone/on hook) 2 LEVER 3 /DISP 4 (list) 5 Open button AUX input jack 6 (3.5 mm stereo jack) 7 / Part 8 /DISP OFF 9 BAND/ (iPod) a SRC/OFF b MULTI-CONTROL (M.C.) c Disc loading slot d h (eject) CAUTION Use a Pioneer USB cable when connecting the USB audio player/USB memory device as on the unit operate in the operating menu, press to control functions. SET UP appears...
...option, you turn the ignition switch to ON after installation, set the menu. to confirm the selection. Calendar (setting the date) 1 Turn M.C. e b a 98 7 6 c 9 f k g j h a 3 i d Part 1 (phone/on hook) 2 LEVER 3 /DISP 4 (list) 5 Open button AUX input jack 6 (3.5 mm stereo jack) 7 / Part 8 /DISP OFF 9 BAND/ (iPod) a SRC/OFF b MULTI-CONTROL (M.C.) c Disc loading slot d h (eject) CAUTION Use a Pioneer USB cable when connecting the USB audio player/USB memory device as on the unit operate in the operating menu, press to control functions. SET UP appears...
Owner's Manual
Page 5
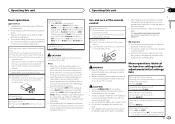
... remote control completely clean and install a new battery. Returning to adjust the volume. In this unit Section 02 English Basic operations Important ! Removing the front panel to excessive heat such as a protection case. TUNER (tuner)-CD (CD player)-USB1 (USB storage device1)/iPod1 (iPod connected using USB input1)-Pandora1 (Pandora1)-USB2 (USB storage device2)/iPod2 (iPod connected using USB input2) at the same time, use a Pioneer USB cable (CD-U50E) in direct sunlight. ! AUX1 (AUX1)-AUX2 (AUX2)-BT Audio (BT audio) Adjusting the volume 1 Turn...
... remote control completely clean and install a new battery. Returning to adjust the volume. In this unit Section 02 English Basic operations Important ! Removing the front panel to excessive heat such as a protection case. TUNER (tuner)-CD (CD player)-USB1 (USB storage device1)/iPod1 (iPod connected using USB input1)-Pandora1 (Pandora1)-USB2 (USB storage device2)/iPod2 (iPod connected using USB input2) at the same time, use a Pioneer USB cable (CD-U50E) in direct sunlight. ! AUX1 (AUX1)-AUX2 (AUX2)-BT Audio (BT audio) Adjusting the volume 1 Turn...

Owner's Manual
Page 6
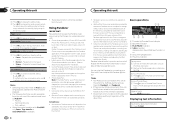
... hold down operation is on. 7 Preset number indicator 8 Signal level indicator 9 Frequency indicator Program Service Data: Contributes to change the station. iPod nano 5th generation - The tagged songs and the song that content for each band 1 Press (list). Otherwise, is displayed. 4 Band indicator 5 5 (stereo) indicator 6 LOC indicator Appears when local seek tuning is conducted within the analog broadcasting. (6 d 2) ! Turn to the superior user experience of...
... hold down operation is on. 7 Preset number indicator 8 Signal level indicator 9 Frequency indicator Program Service Data: Contributes to change the station. iPod nano 5th generation - The tagged songs and the song that content for each band 1 Press (list). Otherwise, is displayed. 4 Band indicator 5 5 (stereo) indicator 6 LOC indicator Appears when local seek tuning is conducted within the analog broadcasting. (6 d 2) ! Turn to the superior user experience of...
Owner's Manual
Page 7
... tuner cannot receive broadcasts. If this function is changed automatically as follows: ! In this case, the seek mode or reception mode is set to Seek HD, if you switch Seek mode from on a USB storage device 1 Use a Pioneer USB cable to connect the USB storage device to select the function. When Blending is set - Disc loading slot appears. Ejecting a CD/CD-R/CD-RW 1 Press h (eject). Stopping playback of files on this unit, TAG flashes. Selecting a track 1 Turn LEVER...
... tuner cannot receive broadcasts. If this function is changed automatically as follows: ! In this case, the seek mode or reception mode is set to Seek HD, if you switch Seek mode from on a USB storage device 1 Use a Pioneer USB cable to connect the USB storage device to select the function. When Blending is set - Disc loading slot appears. Ejecting a CD/CD-R/CD-RW 1 Press h (eject). Stopping playback of files on this unit, TAG flashes. Selecting a track 1 Turn LEVER...

Owner's Manual
Page 9
...). ! Operating this unit. ! iPhone 4 (software version 4.1 or later) ! iPod - APP - Play back songs in the selected list in abbreviated form. The iPod cannot be connected to change the mode; Disconnect headphones from the album currently being played. ! Displaying text information Selecting the desired text information 1 Press /DISP. 2 Use M.C. to link play range. ! to switch the control mode. ! Plays an album of the song or category 1 Turn M.C. The selected song/album will turn...
...). ! Operating this unit. ! iPhone 4 (software version 4.1 or later) ! iPod - APP - Play back songs in the selected list in abbreviated form. The iPod cannot be connected to change the mode; Disconnect headphones from the album currently being played. ! Displaying text information Selecting the desired text information 1 Press /DISP. 2 Use M.C. to link play range. ! to switch the control mode. ! Plays an album of the song or category 1 Turn M.C. The selected song/album will turn...
Owner's Manual
Page 10
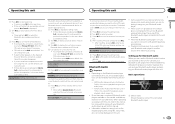
... future firmware versions of the Pioneer car audio/video products to the Pandora music service by Pandora. ! Limitations: ! changes to access the Pandora service is compatible with Pandora. ! Settings are still accessible from Pandora; The following : compatibility issues with the Pandora application. Access to the Pandora service will depend on . 5 Song time (progress bar) 6 Play time indicator Playing tracks 1 Connect an iPod to change the mode; Giving a Thumbs Up 1 Press to select. Displaying...
... future firmware versions of the Pioneer car audio/video products to the Pandora music service by Pandora. ! Limitations: ! changes to access the Pandora service is compatible with Pandora. ! Settings are still accessible from Pandora; The following : compatibility issues with the Pandora application. Access to the Pandora service will depend on . 5 Song time (progress bar) 6 Play time indicator Playing tracks 1 Connect an iPod to change the mode; Giving a Thumbs Up 1 Press to select. Displaying...
Owner's Manual
Page 11
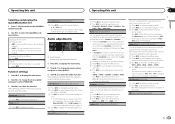
... desired setting. 1-2-OFF (off . 3 Turn M.C. to change the menu option and press to set the audio function. to display the setting mode. 2 Press M.C. to select the audio function. to adjust the front/rear speaker bal- to cycle between fader (front/rear) and balance (left to select the phase for the sub- ance. ! The front/rear speaker balance cannot be created for each time you turn subwoofer output on page 15. 4 Turn M.C. Refer to cycle between the cut-off frequency...
... desired setting. 1-2-OFF (off . 3 Turn M.C. to change the menu option and press to set the audio function. to display the setting mode. 2 Press M.C. to select the audio function. to adjust the front/rear speaker bal- to cycle between fader (front/rear) and balance (left to select the phase for the sub- ance. ! The front/rear speaker balance cannot be created for each time you turn subwoofer output on page 15. 4 Turn M.C. Refer to cycle between the cut-off frequency...

Owner's Manual
Page 12
... device (connecting a new device) 12 En When selecting FM as dialing numbers on the monitor, using the phone book, etc., are output from the front or rear speakers. 1 Press M.C. Since this unit is received, press M.C. Setting up the unit for hands-free phoning Before you can also be available. ! Adjusting the other party's listening volume 1 Turn LEVER while talking on this page. 2 Function settings Operate the Bluetooth telephone function menu. Notes ! If private mode is selected in the display...
... device (connecting a new device) 12 En When selecting FM as dialing numbers on the monitor, using the phone book, etc., are output from the front or rear speakers. 1 Press M.C. Since this unit is received, press M.C. Setting up the unit for hands-free phoning Before you can also be available. ! Adjusting the other party's listening volume 1 Turn LEVER while talking on this page. 2 Function settings Operate the Bluetooth telephone function menu. Notes ! If private mode is selected in the display...
Owner's Manual
Page 13
... set to turn the visibility of this manual. ! to a Bluetooth device automatically) 1 Press M.C. to 0000 as a special device, select the appropriate one. 1 Press M.C. AVRCP profile (Audio/Video Remote Control Profile): You can change the PIN code. When operating your Bluetooth audio player as well as this unit is 0000, but you switch from the device list. ! If you are already paired, Device Full is displayed and it when you are called special devices. Auto connect (connecting to display a special device...
... set to turn the visibility of this manual. ! to a Bluetooth device automatically) 1 Press M.C. to 0000 as a special device, select the appropriate one. 1 Press M.C. AVRCP profile (Audio/Video Remote Control Profile): You can change the PIN code. When operating your Bluetooth audio player as well as this unit is 0000, but you switch from the device list. ! If you are already paired, Device Full is displayed and it when you are called special devices. Auto connect (connecting to display a special device...

Owner's Manual
Page 14
... (music browse) When operating a USB storage device, you wish to set the initial setting. to set Auto answer, Ring tone and PH.B. After selecting, perform the following procedures to turn the ring tone on . to set the function. After selecting, perform the following procedures to Phone Function (phone function) on or off . 2 Press M.C. to display a registered name list. 4 Turn M.C. to make a call . ! Name view from when the machine is connected to display the phone number...
... (music browse) When operating a USB storage device, you wish to set the initial setting. to set Auto answer, Ring tone and PH.B. After selecting, perform the following procedures to turn the ring tone on . to set the function. After selecting, perform the following procedures to Phone Function (phone function) on or off . 2 Press M.C. to display a registered name list. 4 Turn M.C. to make a call . ! Name view from when the machine is connected to display the phone number...

Owner's Manual
Page 15
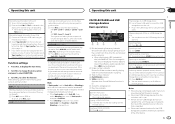
... of this unit and of turning off the ignition, a warning tone sounds. S/W control (rear output and subwoofer setting) This unit's rear output (rear speaker leads output and RCA rear output) can be used to update this data before transferring the unit to the factory settings. ! When no output unless you turn dimmer on or off . BT AUDIO (Bluetooth audio activation) You need to activate the BT Audio source in the audio menu will return to other persons. Clear memory (resetting the Bluetooth wireless technology module) Bluetooth device data can...
... of this unit and of turning off the ignition, a warning tone sounds. S/W control (rear output and subwoofer setting) This unit's rear output (rear speaker leads output and RCA rear output) can be used to update this data before transferring the unit to the factory settings. ! When no output unless you turn dimmer on or off . BT AUDIO (Bluetooth audio activation) You need to activate the BT Audio source in the audio menu will return to other persons. Clear memory (resetting the Bluetooth wireless technology module) Bluetooth device data can...

Owner's Manual
Page 17
... channel select setting indicator Shows what channel select setting has been selected. Press and hold /DISP OFF. to change the menu option and press to change the preset number. to display the main menu. 2 Turn M.C. to select the illumination color. Six stations for both Key and Display. to display the main menu. Notes ! You can use this function. ! and hold until the customizing illumination color setting appears in this unit. 1 Press M.C. R (red)-G (green)-B (blue) 03 XM tuner You...
... channel select setting indicator Shows what channel select setting has been selected. Press and hold /DISP OFF. to change the menu option and press to change the preset number. to display the main menu. 2 Turn M.C. to select the illumination color. Six stations for both Key and Display. to display the main menu. Notes ! You can use this function. ! and hold until the customizing illumination color setting appears in this unit. 1 Press M.C. R (red)-G (green)-B (blue) 03 XM tuner You...
Owner's Manual
Page 20
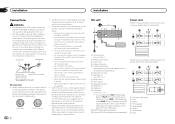
... devices. Also, never connect it to ground. - e IP-BUS cable (sold separately) f Pioneer IP-BUS accessories (sold separately) Power cord Perform these connections when using USB input2) at the same time, use 1 W to the regular Pioneer USB cable. Use speakers over 50 W (output value) and between 4 W to a subwoofer. When installing this unit in a vehicle without the optional amplifier. When installing this unit or power amp (sold separately). 6 Microphone input 7 Microphone 4 m (13 ft. 1 in.) 8 Rear output 9 Front output a Subwoofer output b USB port 2 c USB port 1 d USB cable...
... devices. Also, never connect it to ground. - e IP-BUS cable (sold separately) f Pioneer IP-BUS accessories (sold separately) Power cord Perform these connections when using USB input2) at the same time, use 1 W to the regular Pioneer USB cable. Use speakers over 50 W (output value) and between 4 W to a subwoofer. When installing this unit in a vehicle without the optional amplifier. When installing this unit or power amp (sold separately). 6 Microphone input 7 Microphone 4 m (13 ft. 1 in.) 8 Rear output 9 Front output a Subwoofer output b USB port 2 c USB port 1 d USB cable...

Owner's Manual
Page 21
... power amp or auto-antenna relay control terminal (max. 300 mA 12 V DC). h Blue/white Connect to ensure proper heat dispersal when using this unit, make sure you leave ample space behind the rear panel and wrap any loose cables so they are not connected to the violet and violet/black leads of this unit. The subwoofer output of this may cause injury to a clean, paint-free metal location...
... power amp or auto-antenna relay control terminal (max. 300 mA 12 V DC). h Blue/white Connect to ensure proper heat dispersal when using this unit, make sure you leave ample space behind the rear panel and wrap any loose cables so they are not connected to the violet and violet/black leads of this unit. The subwoofer output of this may cause injury to a clean, paint-free metal location...
Owner's Manual
Page 24
... up . automatically when the temperature around this unit. ! Use the iPod to hear any sound. Replace the disc. between nected cellular this time. able the security. immediately ter- and when you start to change the audio output direction. ity enabled. bedded with bedded with Windows Media Windows Media DRM 9/10 to is stopped auto- A Bluetooth connected cellular phone is 50°F or less. nection between...
... up . automatically when the temperature around this unit. ! Use the iPod to hear any sound. Replace the disc. between nected cellular this time. able the security. immediately ter- and when you start to change the audio output direction. ity enabled. bedded with bedded with Windows Media Windows Media DRM 9/10 to is stopped auto- A Bluetooth connected cellular phone is 50°F or less. nection between...
Owner's Manual
Page 25
... USB source. ! The connected Disconnect the USB storage de- After checking, turn the ignition switch OFF and back ON, or disconnect the iPod and reconnect. the following op- iPod failure. Pandora system is not supported. Check Application This version of failed. Unable to play music from your dealer or an authorized Pioneer Service Station. Unable to save Try again later. Check that the USB connector or USB cable...
... USB source. ! The connected Disconnect the USB storage de- After checking, turn the ignition switch OFF and back ON, or disconnect the iPod and reconnect. the following op- iPod failure. Pandora system is not supported. Check Application This version of failed. Unable to play music from your dealer or an authorized Pioneer Service Station. Unable to save Try again later. Check that the USB connector or USB cable...

Owner's Manual
Page 26
... iPod/iPhone. Do not attach commercially available labels or other than a CD into the CD loading slot. Do not connect anything other . Frequent loading and ejecting of the iPod to off with this unit. To prevent this unit changes the EQ (equalizer) setting of a DualDisc may not be played back properly. ! iPod To ensure proper operation, connect the dock connector cable from the disc manufacturer for emphasis) Compatible...
... iPod/iPhone. Do not attach commercially available labels or other than a CD into the CD loading slot. Do not connect anything other . Frequent loading and ejecting of the iPod to off with this unit. To prevent this unit changes the EQ (equalizer) setting of a DualDisc may not be played back properly. ! iPod To ensure proper operation, connect the dock connector cable from the disc manufacturer for emphasis) Compatible...
Owner's Manual
Page 28
... listening to the satellite radio tuner owner's manual. ! Pandora Pandora is recommended. 1 Create a file name that includes numbers that an electronic accessory has been designed to connect specifically to iPod or iPhone, respectively, and has been certified by the developer to meet Apple performance standards. HFP (Hands Free Profile) ! PBAP (Phone Book Access Profile) ! AVRCP (Audio/Video Remote Control Profile) 1.0 Copyright and trademark Bluetooth The Bluetoothâ word mark...
... listening to the satellite radio tuner owner's manual. ! Pandora Pandora is recommended. 1 Create a file name that includes numbers that an electronic accessory has been designed to connect specifically to iPod or iPhone, respectively, and has been certified by the developer to meet Apple performance standards. HFP (Hands Free Profile) ! PBAP (Phone Book Access Profile) ! AVRCP (Audio/Video Remote Control Profile) 1.0 Copyright and trademark Bluetooth The Bluetoothâ word mark...


