Owner's Manual
Page 2
...Tuning in strong signals 19 Built-in CD Player Playing a CD 20 Selecting a track directly 20 Introduction of advanced built-in CD player operation 21 Repeating play 27 After you have finished reading the instructions, keep this Pioneer product. Installing the battery 11 - Displaying... disc titles 24 Using CD TEXT functions 24 - Contents Thank you for buying this manual in a safe place for Pioneer products 7 Product registration 7 Features 7 About WMA 8 About AAC 8 About the SAT RADIO READY mark 8 ...
...Tuning in strong signals 19 Built-in CD Player Playing a CD 20 Selecting a track directly 20 Introduction of advanced built-in CD player operation 21 Repeating play 27 After you have finished reading the instructions, keep this Pioneer product. Installing the battery 11 - Displaying... disc titles 24 Using CD TEXT functions 24 - Contents Thank you for buying this manual in a safe place for Pioneer products 7 Product registration 7 Features 7 About WMA 8 About AAC 8 About the SAT RADIO READY mark 8 ...

Owner's Manual
Page 3
... 28 Searching every 10 tracks in the current folder 28 Displaying text information on CD TEXT discs 37 - Playback from the preset channel list 44 SIRIUS Satellite Radio tuner Listening to XM Satellite Radio 42 Selecting an XM channel directly 42 Introduction of advanced SIRIUS tuner operation 46... Selecting a track directly 31 50-disc multi-CD player 32 Introduction of advanced multi-CD player operation 32 Repeating play 40 Playing songs in a random order (shuffle) 40 Pausing a song 41 XM tuner Listening to SIRIUS Satellite Radio 45 Selecting a SIRIUS channel directly 45 Introduction of ...
... 28 Searching every 10 tracks in the current folder 28 Displaying text information on CD TEXT discs 37 - Playback from the preset channel list 44 SIRIUS Satellite Radio tuner Listening to XM Satellite Radio 42 Selecting an XM channel directly 42 Introduction of advanced SIRIUS tuner operation 46... Selecting a track directly 31 50-disc multi-CD player 32 Introduction of advanced multi-CD player operation 32 Repeating play 40 Playing songs in a random order (shuffle) 40 Pausing a song 41 XM tuner Listening to SIRIUS Satellite Radio 45 Selecting a SIRIUS channel directly 45 Introduction of ...

Owner's Manual
Page 4
... 67 Auto TA and EQ (auto-time alignment and auto-equalizing) 68 Adjusting the audio finely 55 Extra functions 56 Introduction of a CD/MP3/WMA 53 Using ITS playlist and disc title functions 53 Using disc title functions 53 - Adjusting the time alignment 59 About the ...network function 59 - Selecting a channel in the channel category 47 Displaying the Radio ID 47 TV tuner Watching the television 48 Introduction of advanced TV tuner operation 49 Storing broadcast stations 49 Storing the strongest broadcast stations ...
... 67 Auto TA and EQ (auto-time alignment and auto-equalizing) 68 Adjusting the audio finely 55 Extra functions 56 Introduction of a CD/MP3/WMA 53 Using ITS playlist and disc title functions 53 Using disc title functions 53 - Adjusting the time alignment 59 About the ...network function 59 - Selecting a channel in the channel category 47 Displaying the Radio ID 47 TV tuner Watching the television 48 Introduction of advanced TV tuner operation 49 Storing broadcast stations 49 Storing the strongest broadcast stations ...
Owner's Manual
Page 5
... title 76 Using different entertainment displays 77 Using the PGM button 78 Additional Information Understanding built-in CD player error messages 79 Understanding auto TA and EQ error messages 79 CD player and care 80 CD-R/CD-RW discs 80 MP3, WMA, AAC and WAV files 81 - WAV additional information 82 About folders and...
... title 76 Using different entertainment displays 77 Using the PGM button 78 Additional Information Understanding built-in CD player error messages 79 Understanding auto TA and EQ error messages 79 CD player and care 80 CD-R/CD-RW discs 80 MP3, WMA, AAC and WAV files 81 - WAV additional information 82 About folders and...
Owner's Manual
Page 7
... product catalogues, research new products, and much more. U.S.A. Box 1760 Long Beach, CA 90801-1760 800-421-1404 CANADA Pioneer Electronics of an insurance claim such as pay-audio or audio-on CDROM/CD-R/CD-RW (ISO9660 Level 1/Level 2 standard recordings). revenue-generating) real time broadcasting (terrestrial, satellite, cable and/or any other...
... product catalogues, research new products, and much more. U.S.A. Box 1760 Long Beach, CA 90801-1760 800-421-1404 CANADA Pioneer Electronics of an insurance claim such as pay-audio or audio-on CDROM/CD-R/CD-RW (ISO9660 Level 1/Level 2 standard recordings). revenue-generating) real time broadcasting (terrestrial, satellite, cable and/or any other...
Owner's Manual
Page 8
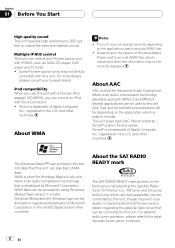
... WMA data. Please inquire to your nearest dealer. For more details, please consult your dealer or nearest authorized Pioneer service station regarding the satellite radio tuner that this unit can be connected to encode AAC files, but file formats and extensions differ depending on the... Multi-CD player, DVD player and TV tuner. ! Depending on the version of Apple Computer, Inc., registered in the U.S. Section 01 Before You Start High quality sound This unit features high performance DSP system to the satellite radio tuner owner's manual. 8 En Some Pioneer source units...
... WMA data. Please inquire to your nearest dealer. For more details, please consult your dealer or nearest authorized Pioneer service station regarding the satellite radio tuner that this unit can be connected to encode AAC files, but file formats and extensions differ depending on the... Multi-CD player, DVD player and TV tuner. ! Depending on the version of Apple Computer, Inc., registered in the U.S. Section 01 Before You Start High quality sound This unit features high performance DSP system to the satellite radio tuner owner's manual. 8 En Some Pioneer source units...

Owner's Manual
Page 12
... on the remote control. Pause (pause)-Search mode (search method)-TitleInput "A" (disc title input) Note Refer to Introduction of advanced built-in CD player). SLA (source level adjustment) Note Refer to Introduction of audio adjustments on page 21. compression)-A.EQ (auto-equalizer on the head unit... operation % Press FUNCTION to select the desired mode. AUDIO button operation % Press AUDIO to select the desired mode (e.g., built-in CD player operation on page 56. But operation of FUNCTION button and AUDIO button on the remote control differs from the operation of MULTI-...
... on the remote control. Pause (pause)-Search mode (search method)-TitleInput "A" (disc title input) Note Refer to Introduction of advanced built-in CD player). SLA (source level adjustment) Note Refer to Introduction of audio adjustments on page 21. compression)-A.EQ (auto-equalizer on the head unit... operation % Press FUNCTION to select the desired mode. AUDIO button operation % Press AUDIO to select the desired mode (e.g., built-in CD player operation on page 56. But operation of FUNCTION button and AUDIO button on the remote control differs from the operation of MULTI-...
Owner's Manual
Page 13
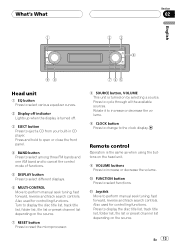
... title list, track title list, folder list, file list or preset channel list depending on the head unit. 9 VOLUME buttons Press to eject a CD from your built-in CD player. Press to select functions. Press to the clock display. Rotate it to increase or decrease the volume. 9 CLOCK button Press to change...
... title list, track title list, folder list, file list or preset channel list depending on the head unit. 9 VOLUME buttons Press to eject a CD from your built-in CD player. Press to select functions. Press to the clock display. Rotate it to increase or decrease the volume. 9 CLOCK button Press to change...
Owner's Manual
Page 14
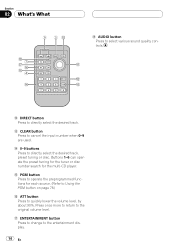
... number search for each source. (Refer to Using the PGM button on page 78.) g ATT button Press to operate the preprogrammed functions for the multi-CD player. Section 02 What's What i7 hg f4 e 9 3a i AUDIO button Press to directly select the desired track, preset tuning or disc. f PGM button Press...
... number search for each source. (Refer to Using the PGM button on page 78.) g ATT button Press to operate the preprogrammed functions for the multi-CD player. Section 02 What's What i7 hg f4 e 9 3a i AUDIO button Press to directly select the desired track, preset tuning or disc. f PGM button Press...
Owner's Manual
Page 15
...cases, the sound source will start. Notes ! If you cannot insert a disc completely or if after you select a source, the unit is connected to a Pioneer product (such as a source, enables control of them to external unit 1 or external unit 2 is no magazine in the unit (refer to page 20). %...this unit. # You can be controlled by this unit. When there is displayed. ! When the AUX (auxiliary input) is no disc in CD player-Multi-CD player- External unit refers to the vehicle's auto-antenna relay control terminal, the vehicle's antenna extends when this unit. Do not use an ...
...cases, the sound source will start. Notes ! If you cannot insert a disc completely or if after you select a source, the unit is connected to a Pioneer product (such as a source, enables control of them to external unit 1 or external unit 2 is no magazine in the unit (refer to page 20). %...this unit. # You can be controlled by this unit. When there is displayed. ! When the AUX (auxiliary input) is no disc in CD player-Multi-CD player- External unit refers to the vehicle's auto-antenna relay control terminal, the vehicle's antenna extends when this unit. Do not use an ...

Owner's Manual
Page 16
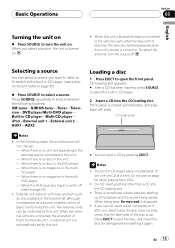
If an error message such as ERROR-11 is displayed, refer to increase or decrease the volume. With the head unit, rotate VOLUME to Understanding built-in CD player error messages on page 79. When the CD loading or ejecting function does not operate properly, you can eject the CD by pressing and holding EJECT while opening the front panel. ! Adjusting the volume % Use VOLUME to increase or decrease the volume. Turning the unit off % Press SOURCE and hold until the unit turns off. 16 En With the remote control, press VOLUME to adjust the sound level. Section 03 Basic Operations !
If an error message such as ERROR-11 is displayed, refer to increase or decrease the volume. With the head unit, rotate VOLUME to Understanding built-in CD player error messages on page 79. When the CD loading or ejecting function does not operate properly, you can eject the CD by pressing and holding EJECT while opening the front panel. ! Adjusting the volume % Use VOLUME to increase or decrease the volume. Turning the unit off % Press SOURCE and hold until the unit turns off. 16 En With the remote control, press VOLUME to adjust the sound level. Section 03 Basic Operations !

Owner's Manual
Page 20
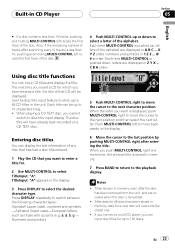
... a track directly by pressing CLEAR. 3 Press DIRECT. Note After entering the number input mode, if you cannot select Compact Disc (built-in CD player). When Ever Scroll is inserted, the disc title automatically begins to play . Press SOURCE until you see Compact Disc displayed. # If no... entered number will skip to another track, push MULTI-CONTROL left or right. Pushing again will play a CD with your built-in CD player. Insert a disc in CD player. More advanced CD operation is automatically canceled. 20 En Track number input display appears. 2 Press 0-9 buttons to select the ...
... a track directly by pressing CLEAR. 3 Press DIRECT. Note After entering the number input mode, if you cannot select Compact Disc (built-in CD player). When Ever Scroll is inserted, the disc title automatically begins to play . Press SOURCE until you see Compact Disc displayed. # If no... entered number will skip to another track, push MULTI-CONTROL left or right. Pushing again will play a CD with your built-in CD player. Insert a disc in CD player. More advanced CD operation is automatically canceled. 20 En Track number input display appears. 2 Press 0-9 buttons to select the ...

Owner's Manual
Page 21
... switch between the functions in the following order: Play mode (repeat play)-Random mode (random play)-Scan mode (scan play ranges for the builtin CD player: Disc repeat (disc repeat) and Track repeat (one-track repeat). 1 Use MULTI-CONTROL to select Random mode. Press MULTI-CONTROL repeatedly ... the display is not canceled automatically. Track repeat - Random mode appears in the display. 2 Press MULTI-CONTROL to turn random play on the CD in a random order. 1 Use MULTI-CONTROL to select Play mode. Turn MULTI-CONTROL clockwise to switch between the functions in reverse order by ...
... switch between the functions in the following order: Play mode (repeat play)-Random mode (random play)-Scan mode (scan play ranges for the builtin CD player: Disc repeat (disc repeat) and Track repeat (one-track repeat). 1 Use MULTI-CONTROL to select Random mode. Press MULTI-CONTROL repeatedly ... the display is not canceled automatically. Track repeat - Random mode appears in the display. 2 Press MULTI-CONTROL to turn random play on the CD in a random order. 1 Use MULTI-CONTROL to select Play mode. Turn MULTI-CONTROL clockwise to switch between the functions in reverse order by ...

Owner's Manual
Page 22
...-CONTROL. Refer to Selecting the search method on this page. 2 Push and hold MULTI-CONTROL left or right to search every 10 tracks on the CD. 1 Use MULTI-CONTROL to turn pause off . The first 10 seconds of the tracks will continue to play. # If the display has automatically returned to... scan play on . Pause appears in the current disc If a disc contains over 10 tracks, you want to turn pause on . Note After scanning of a CD is finished, normal playback of each track is less than 10 tracks, pushing and holding MULTI-CONTROL right recalls the last track of the disc...
...-CONTROL. Refer to Selecting the search method on this page. 2 Push and hold MULTI-CONTROL left or right to search every 10 tracks on the CD. 1 Use MULTI-CONTROL to turn pause off . The first 10 seconds of the tracks will continue to play. # If the display has automatically returned to... scan play on . Pause appears in the current disc If a disc contains over 10 tracks, you want to turn pause on . Note After scanning of a CD is finished, normal playback of each track is less than 10 tracks, pushing and holding MULTI-CONTROL right recalls the last track of the disc...
Owner's Manual
Page 23
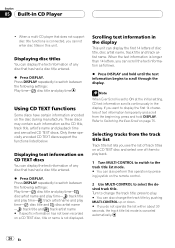
... letter. Push MULTI-CONTROL left recalls the first track of the alphabet. After data for up to 10 characters long. ! If you connect a multi-CD player, you insert a CD for . 2 Use MULTI-CONTROL to select TitleInput "A". X Y Z order, numbers and symbols in Z Y X ... When the letter you cannot switch to ... display. Notes ! The next time you can display the text information of any disc that has had a disc title entered. 1 Play the CD that CD will overwrite the oldest one more time, the entered title is pushed down to select a letter of the disc. Each time MULTI-CONTROL is...
... letter. Push MULTI-CONTROL left recalls the first track of the alphabet. After data for up to 10 characters long. ! If you connect a multi-CD player, you insert a CD for . 2 Use MULTI-CONTROL to select TitleInput "A". X Y Z order, numbers and symbols in Z Y X ... When the letter you cannot switch to ... display. Notes ! The next time you can display the text information of any disc that has had a disc title entered. 1 Play the CD that CD will overwrite the oldest one more time, the entered title is pushed down to select a letter of the disc. Each time MULTI-CONTROL is...
Owner's Manual
Page 24
... back. 1 Turn MULTI-CONTROL to switch to the track title list mode. # You can also perform this unit. Refer to Switching the Ever Scroll on CD TEXT discs You can display the text information of any disc that does not support disc title functions is connected, you cannot enter disc titles... track title list mode is set to switch between the following settings: Play time- : disc title and play time Using CD TEXT functions Some discs have certain information encoded on a CD TEXT disc, title or name is longer than 14 letters, you see the list of them to scroll through the display...
... back. 1 Turn MULTI-CONTROL to switch to the track title list mode. # You can also perform this unit. Refer to Switching the Ever Scroll on CD TEXT discs You can display the text information of any disc that does not support disc title functions is connected, you cannot enter disc titles... track title list mode is set to switch between the following settings: Play time- : disc title and play time Using CD TEXT functions Some discs have certain information encoded on a CD TEXT disc, title or name is longer than 14 letters, you see the list of them to scroll through the display...

Owner's Manual
Page 25
..., push MULTI-CONTROL left or right. En 25 Press SOURCE until you see Compact Disc displayed. # If no files, playback commences with your built-in CD player. When playing back MP3 files recorded as VBR (variable bit rate) files, the average bit rate value is loaded in the unit, you to... shown in the display may be displayed.) ! More advanced MP3/WMA/AAC/WAV operation is not displayed even after switching to select the built-in CD player. Insert a disc in the unit. (Refer to page 15.) 2 Push MULTI-CONTROL up or down to select a folder. # You cannot select a folder that does...
..., push MULTI-CONTROL left or right. En 25 Press SOURCE until you see Compact Disc displayed. # If no files, playback commences with your built-in CD player. When playing back MP3 files recorded as VBR (variable bit rate) files, the average bit rate value is loaded in the unit, you to... shown in the display may be displayed.) ! More advanced MP3/WMA/AAC/WAV operation is not displayed even after switching to select the built-in CD player. Insert a disc in the unit. (Refer to page 15.) 2 Push MULTI-CONTROL up or down to select a folder. # You cannot select a folder that does...

Owner's Manual
Page 26
....) ! The built-in the current folder When using the remote control, you have switched between MP3/WMA/AAC/WAV and CD-DA with MP3/WMA/AAC/ WAV files and audio data (CD-DA) such as VBR (variable bit rate) files, the play time will play back an MP3/ WMA/AAC/WAV file...), playback starts at the initial setting, folder and file name scroll continuously. About Ever Scroll, refer to Switching the Ever Scroll on CD-ROM. (Refer to enter the desired track number. # You can be correctly displayed if fast forward or reverse operations are skipped if they contain no ...
....) ! The built-in the current folder When using the remote control, you have switched between MP3/WMA/AAC/WAV and CD-DA with MP3/WMA/AAC/ WAV files and audio data (CD-DA) such as VBR (variable bit rate) files, the play time will play back an MP3/ WMA/AAC/WAV file...), playback starts at the initial setting, folder and file name scroll continuously. About Ever Scroll, refer to Switching the Ever Scroll on CD-ROM. (Refer to enter the desired track number. # You can be correctly displayed if fast forward or reverse operations are skipped if they contain no ...

Owner's Manual
Page 27
Play mode appears in CD player (MP3/ WMA/AAC/WAV) operation 1 1 Function display Shows the function status. 1 Press MULTI-CONTROL to select FUNCTION. Track repeat - Disc repeat - Repeat the current ...
Play mode appears in CD player (MP3/ WMA/AAC/WAV) operation 1 1 Function display Shows the function status. 1 Press MULTI-CONTROL to select FUNCTION. Track repeat - Disc repeat - Repeat the current ...

Owner's Manual
Page 30
... file name list File name list lets you see a list of the files (or folders) in the display. press to ON at the initial setting, CD text information scrolls continuously in the selected folder. # You can also perform this operation by pushing MULTI-CONTROL up or down. # To return to select...
... file name list File name list lets you see a list of the files (or folders) in the display. press to ON at the initial setting, CD text information scrolls continuously in the selected folder. # You can also perform this operation by pushing MULTI-CONTROL up or down. # To return to select...


