
Other Manual
Page 1
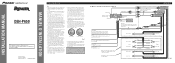
.../black Violet Violet/black + Front speaker ≠ Right + Rear speaker ≠ + Rear speaker ≠ + Subwoofer ≠ Fig. 2 INSTALLATION MANUAL OF OF DEH-P650 This product conforms to an external power amp's system remote control or the car's Auto-antenna relay control terminal (max. 300 mA 12 V DC). Likewise... leads are directly grounded or the left and right ≠ speaker leads are not connected to the power terminal of any moving parts, such as near the heater outlet. Printed in the electrical system, be sure to disconnect the ≠ battery cable before beginning...
.../black Violet Violet/black + Front speaker ≠ Right + Rear speaker ≠ + Rear speaker ≠ + Subwoofer ≠ Fig. 2 INSTALLATION MANUAL OF OF DEH-P650 This product conforms to an external power amp's system remote control or the car's Auto-antenna relay control terminal (max. 300 mA 12 V DC). Likewise... leads are directly grounded or the left and right ≠ speaker leads are not connected to the power terminal of any moving parts, such as near the heater outlet. Printed in the electrical system, be sure to disconnect the ≠ battery cable before beginning...

Other Manual
Page 2
Yellow/black If you use of unauthorized parts can be damaged if it overheats, so don't install the unit anywhere hot - If not, keep the Audio Mute lead free of this unit (refer .... Fig. 6 Fig. 7 The use a cellular telephone, connect it is all connected up properly, and the unit and the system work properly. • Use only the parts included with the rubber bush (Fig. 5) Dashboard 182 Holder After inserting the holder into place. To secure, bend the tabs 90 degrees.) 53 Rubber bush...
Yellow/black If you use of unauthorized parts can be damaged if it overheats, so don't install the unit anywhere hot - If not, keep the Audio Mute lead free of this unit (refer .... Fig. 6 Fig. 7 The use a cellular telephone, connect it is all connected up properly, and the unit and the system work properly. • Use only the parts included with the rubber bush (Fig. 5) Dashboard 182 Holder After inserting the holder into place. To secure, bend the tabs 90 degrees.) 53 Rubber bush...

Other Manual
Page 3
...the steering wheel so that assures optimum transmission of this unit should be prevented. Inner holder 3. Installation DIN Rear-mount Installation using only the parts supplied with this unit requires specialized skills and experience. Remove the frame. (Fig. 8) Frame Insert the release pin into the hole in the...frame, point the side with belt. (Fig. 16) • Fit the inner holder to the inner circumference of the steering wheel. If other parts are inverted. 1. Cut the extra portion of the belt at 2 places on the shape of safety devices such as shown below. Fig. 17 ...
...the steering wheel so that assures optimum transmission of this unit should be prevented. Inner holder 3. Installation DIN Rear-mount Installation using only the parts supplied with this unit requires specialized skills and experience. Remove the frame. (Fig. 8) Frame Insert the release pin into the hole in the...frame, point the side with belt. (Fig. 16) • Fit the inner holder to the inner circumference of the steering wheel. If other parts are inverted. 1. Cut the extra portion of the belt at 2 places on the shape of safety devices such as shown below. Fig. 17 ...

