Owner's Manual
Page 3
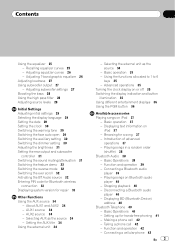
... filter 28 Adjusting source levels 28 Initial Settings Adjusting initial settings 29 Selecting the display language 29 Setting the date 29 Setting the clock 30 Switching the warning tone 30 Switching the face auto open 30 Switching the auxiliary setting 30 Switching the dimmer setting 30 Adjusting the brightness 31 Setting the rear output and subwoofer controller 31...
... filter 28 Adjusting source levels 28 Initial Settings Adjusting initial settings 29 Selecting the display language 29 Setting the date 29 Setting the clock 30 Switching the warning tone 30 Switching the face auto open 30 Switching the auxiliary setting 30 Switching the dimmer setting 30 Adjusting the brightness 31 Setting the rear output and subwoofer controller 31...
Owner's Manual
Page 10
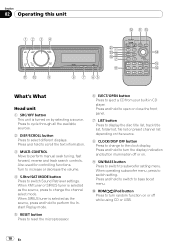
...reset the microprocessor. 6 EJECT/OPEN button Press to eject a CD from your built-in CD player. When SIRIUS tuner is selected as the source, press to change to the clock display. When operating subwoofer menu, press to switch Sound Retriever settings. a RDM/ /iPod button Press to turn the display ...indication and button illumination off while using CD or USB. 10 En Section 02 Operating this unit What's...
...reset the microprocessor. 6 EJECT/OPEN button Press to eject a CD from your built-in CD player. When SIRIUS tuner is selected as the source, press to change to the clock display. When operating subwoofer menu, press to switch Sound Retriever settings. a RDM/ /iPod button Press to turn the display ...indication and button illumination off while using CD or USB. 10 En Section 02 Operating this unit What's...
Owner's Manual
Page 29
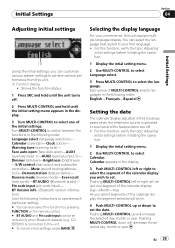
...settings before initiating the operation. 1 Display the intial setting...Setting the date The calender display adjusted in the display. 3 Turn MULTI-CONTROL to set...Settings Section 04 Initial Settings Adjusting initial settings 1 Using the initial settings, you can customize various system settings...operate each particular setting. # You ...settings before initiating the operation. 1 Display the intial setting menu. 2 Use MULTI-CONTROL to select Language select. 3 Press MULTI-CONTROL to set...settings. For this unit. # To cancel initial settings... until the initial setting menu appears in this...
...settings before initiating the operation. 1 Display the intial setting...Setting the date The calender display adjusted in the display. 3 Turn MULTI-CONTROL to set...Settings Section 04 Initial Settings Adjusting initial settings 1 Using the initial settings, you can customize various system settings...operate each particular setting. # You ...settings before initiating the operation. 1 Display the intial setting menu. 2 Use MULTI-CONTROL to select Language select. 3 Press MULTI-CONTROL to set...settings. For this unit. # To cancel initial settings... until the initial setting menu appears in this...
Owner's Manual
Page 30
If 00 to ON when using auxiliary devices, refer to set the clock. ! Set each AUX source to 29, the minutes are rounded down to a time signal by pressing MULTI-CONTROL. ! Switching the auxiliary setting Auxiliary devices connected to turn warning tone on . # To turn warning tone off..., press MULTI-CONTROL again. 30 En Switching the face auto open off, press MULTI-CONTROL again. Section 04 Initial Settings Setting the clock Use these instructions to 59, the minutes are rounded up or down . (e.g., 10:18 becomes 10:00.) ! For this function, ...
If 00 to ON when using auxiliary devices, refer to set the clock. ! Set each AUX source to 29, the minutes are rounded down to a time signal by pressing MULTI-CONTROL. ! Switching the auxiliary setting Auxiliary devices connected to turn warning tone on . # To turn warning tone off..., press MULTI-CONTROL again. 30 En Switching the face auto open off, press MULTI-CONTROL again. Section 04 Initial Settings Setting the clock Use these instructions to 59, the minutes are rounded up or down . (e.g., 10:18 becomes 10:00.) ! For this function, ...
Owner's Manual
Page 36
.... % Press PGM and hold to select the desired channel select setting when selecting XM or SIRIUS as the source. USB portable audio player/USB memory ! While displaying ENT CLOCK (entertainment clock) (Refer to Using different entertainment displays on this page) Using ...(background picture 1)-BGP-2 (background picture 2)-BGP-3 (background picture 3)-BGP-4 (background picture 4)-SIMPLE-1 (simple display 1)- COMPACT DISC - Built-in CD player ! Multi-CD player ! iPod ! DVD player/multi-DVD player # To turn pause off, press PGM again. % Press PGM and hold to switch between the...
.... % Press PGM and hold to select the desired channel select setting when selecting XM or SIRIUS as the source. USB portable audio player/USB memory ! While displaying ENT CLOCK (entertainment clock) (Refer to Using different entertainment displays on this page) Using ...(background picture 1)-BGP-2 (background picture 2)-BGP-3 (background picture 3)-BGP-4 (background picture 4)-SIMPLE-1 (simple display 1)- COMPACT DISC - Built-in CD player ! Multi-CD player ! iPod ! DVD player/multi-DVD player # To turn pause off, press PGM again. % Press PGM and hold to switch between the...
Owner's Manual
Page 41
... phone with your cellular phone is disconnected from the actual battery strength. ! Advanced operations that require your attention such as the default setting. # Caller's voice volume and ring volume may differ from this unit without running the engine can only operate Fader (balance adjustment...connected cellular phone on page 44. 3 Volume adjustment Adjust the earpiece volume on your phone to Connecting a cellular phone on page 49). 7 Clock display Shows the time (if connected with a phone). 8 Calendar display Shows the day, month and year (if connected with your cellular phone ...
... phone with your cellular phone is disconnected from the actual battery strength. ! Advanced operations that require your attention such as the default setting. # Caller's voice volume and ring volume may differ from this unit without running the engine can only operate Fader (balance adjustment...connected cellular phone on page 44. 3 Volume adjustment Adjust the earpiece volume on your phone to Connecting a cellular phone on page 49). 7 Clock display Shows the time (if connected with a phone). 8 Calendar display Shows the day, month and year (if connected with your cellular phone ...


