Owner's Manual
Page 2
...disc title functions 16 - Selecting tracks from theft 7 - Storing and recalling broadcast frequencies 12 - Playing tracks in CD Player 13 - Basic Operations 18 - Introduction of the remote control 8 - Introduction of advanced operations 15 - Switching... read through these operating instructions so you will know how to User 5 For Canadian model 5 About this Pioneer product. Before You Start Information to operate your unit from the track title list 17 - Installing the battery... - Adjusting initial settings 25 - Setting the clock 25 - Switching the dimmer setting 26
...disc title functions 16 - Selecting tracks from theft 7 - Storing and recalling broadcast frequencies 12 - Playing tracks in CD Player 13 - Basic Operations 18 - Introduction of the remote control 8 - Introduction of advanced operations 15 - Switching... read through these operating instructions so you will know how to User 5 For Canadian model 5 About this Pioneer product. Before You Start Information to operate your unit from the track title list 17 - Installing the battery... - Adjusting initial settings 25 - Setting the clock 25 - Switching the dimmer setting 26
Owner's Manual
Page 3
... 31 - Introduction of advanced operations 43 - Switching the XM display 33 - Displaying the Radio ID 34 SIRIUS Satellite Radio tuner 35 - Switching the SIRIUS display 36 - Displaying the Radio ID 38 Bluetooth Audio 38 - Stopping playback 40 - Disconnecting a Bluetooth audio player 40 ...- Displaying BD (Bluetooth Device) address 40 - Switching the sound muting/ attenuation 27 - Turning the clock display on Bluetooth audio player 40 -...
... 31 - Introduction of advanced operations 43 - Switching the XM display 33 - Displaying the Radio ID 34 SIRIUS Satellite Radio tuner 35 - Switching the SIRIUS display 36 - Displaying the Radio ID 38 Bluetooth Audio 38 - Stopping playback 40 - Disconnecting a Bluetooth audio player 40 ...- Displaying BD (Bluetooth Device) address 40 - Switching the sound muting/ attenuation 27 - Turning the clock display on Bluetooth audio player 40 -...
Owner's Manual
Page 9
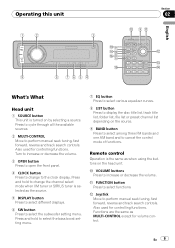
.... b FUNCTION button Press to increase or decrease the volume. Turn to increase or decrease the volume. 3 OPEN button Press to open the front panel. 4 CLOCK button Press to change the channel select mode when XM tuner or SIRIUS tuner is selected as MULTI-CONTROL except for controlling functions. Remote control ...
.... b FUNCTION button Press to increase or decrease the volume. Turn to increase or decrease the volume. 3 OPEN button Press to open the front panel. 4 CLOCK button Press to change the channel select mode when XM tuner or SIRIUS tuner is selected as MULTI-CONTROL except for controlling functions. Remote control ...
Owner's Manual
Page 25
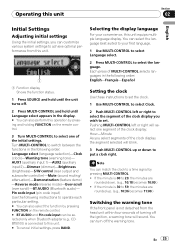
... muting/ attenuation)-Demonstration (feature demo) -Reverse mode (reverse mode)-Ever-scroll (ever scroll)-BT AUDIO (Bluetooth audio)- Note You can match the clock to a time signal by pressing and holding FUNCTION on the remote control. # BT AUDIO and Pin code input can be selected only when Bluetooth...will select one of the initial settings. En 25 Pin code input (pin code input) Use the following order: Language select (language selection)-Clock (clock)-Warning tone (warning tone)- If the minute is 00 to select the language. You can turn off the warning tone. Pushing MULTI-CONTROL ...
... muting/ attenuation)-Demonstration (feature demo) -Reverse mode (reverse mode)-Ever-scroll (ever scroll)-BT AUDIO (Bluetooth audio)- Note You can match the clock to a time signal by pressing and holding FUNCTION on the remote control. # BT AUDIO and Pin code input can be selected only when Bluetooth...will select one of the initial settings. En 25 Pin code input (pin code input) Use the following order: Language select (language selection)-Clock (clock)-Warning tone (warning tone)- If the minute is 00 to select the language. You can turn off the warning tone. Pushing MULTI-CONTROL ...
Owner's Manual
Page 29
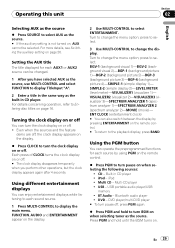
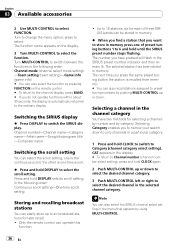
...appears on the display. % Press CLOCK to turn the clock display on the remote control. # To return to the playback display, press BAND. Turn to select. VISUALIZER2 (visualizer 2)-VISUALIZER3 (visualizer 3)-SPECTRUM ANALYZER 1 (spectrum analyzer 1)-SPECTRUM ANALYZER 2 (spectrum analyzer 2)-MOVIE (movie)- Multi-CD player ! Setting the AUX title... % Press PGM and hold until the BSM turns on the display. 2 Use MULTI-CONTROL to select ENTERTAINMENT. Each press of CLOCK turns the clock display on when selecting tuner as the built-in CD player. Built-in the same way as the source. Multi...
...appears on the display. % Press CLOCK to turn the clock display on the remote control. # To return to the playback display, press BAND. Turn to select. VISUALIZER2 (visualizer 2)-VISUALIZER3 (visualizer 3)-SPECTRUM ANALYZER 1 (spectrum analyzer 1)-SPECTRUM ANALYZER 2 (spectrum analyzer 2)-MOVIE (movie)- Multi-CD player ! Setting the AUX title... % Press PGM and hold until the BSM turns on the display. 2 Use MULTI-CONTROL to select ENTERTAINMENT. Each press of CLOCK turns the clock display on when selecting tuner as the built-in CD player. Built-in the same way as the source. Multi...
Owner's Manual
Page 34
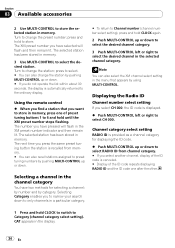
... channels in the menu that you have pressed will flash and then remain lit. Turn to Channel number (channel number select setting), press and hold CLOCK again. 2 Push MULTI-CONTROL up or down . # If you have selected will flash in memory, press one of the ID code repeats displaying... RADIO ID and the ID code one after the other. 1 Press and hold to Category (channel category select setting). press and hold CLOCK to switch to store. The XM preset number you want to store in the...
... channels in the menu that you have pressed will flash and then remain lit. Turn to Channel number (channel number select setting), press and hold CLOCK again. 2 Push MULTI-CONTROL up or down . # If you have selected will flash in memory, press one of the ID code repeats displaying... RADIO ID and the ID code one after the other. 1 Press and hold to Category (channel category select setting). press and hold CLOCK to switch to store. The XM preset number you want to store in the...
Owner's Manual
Page 36
...display, press BAND. # If you want to store in the display. # To return to Channel number (channel number select setting), press and hold CLOCK again. 2 Push MULTI-CONTROL up or down to 18 stations, six for selecting a channel: by number and by pushing MULTI-CONTROL up to select... the scroll setting. The number you have two methods for each of preset tuning buttons 1 to 6 and hold CLOCK to switch to the ordinary display. Selecting a channel in the channel category You have pressed will flash in memory. % When you find a station...
...display, press BAND. # If you want to store in the display. # To return to Channel number (channel number select setting), press and hold CLOCK again. 2 Push MULTI-CONTROL up or down to 18 stations, six for selecting a channel: by number and by pushing MULTI-CONTROL up to select... the scroll setting. The number you have two methods for each of preset tuning buttons 1 to 6 and hold CLOCK to switch to the ordinary display. Selecting a channel in the channel category You have pressed will flash in memory. % When you find a station...
Owner's Manual
Page 41
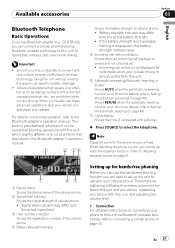
CD-BTB100), you can connect a cellular phone featuring Bluetooth wireless technology to this unit via Bluetooth wireless technology, using phone book, etc., are prohibited while you ... connection between this unit and your phone, registering your phone with this unit, and adjusting the volume level. 1 Connection For detailed instructions on page 49). 7 Clock display Shows the time (if connected with your cellular phone. Since this unit is on standby to connect with this unit. 6 Automatic answering/Automatic rejecting...
CD-BTB100), you can connect a cellular phone featuring Bluetooth wireless technology to this unit via Bluetooth wireless technology, using phone book, etc., are prohibited while you ... connection between this unit and your phone, registering your phone with this unit, and adjusting the volume level. 1 Connection For detailed instructions on page 49). 7 Clock display Shows the time (if connected with your cellular phone. Since this unit is on standby to connect with this unit. 6 Automatic answering/Automatic rejecting...


