Owner's Manual
Page 2
... mode 8 Use and care of advanced operations 16 - Selecting a source 11 - Storing the strongest broadcast frequencies 13 - Displaying text information on USB portable audio player/ USB memory 18 - Using Sound Retriever 17 - Basic Operations 20 - Head unit 9 - Basic Operations 12 - Introduction of advanced operations 21 - Tuning in strong signals 13 Built-in random order 16 - Selecting tracks from album list of currently playing artist 22 - Removing the front panel 7 - Installing the battery 8 - Using the remote control 8 Operating this unit 5 After-sales service...
... mode 8 Use and care of advanced operations 16 - Selecting a source 11 - Storing the strongest broadcast frequencies 13 - Displaying text information on USB portable audio player/ USB memory 18 - Using Sound Retriever 17 - Basic Operations 20 - Head unit 9 - Basic Operations 12 - Introduction of advanced operations 21 - Tuning in strong signals 13 Built-in random order 16 - Selecting tracks from album list of currently playing artist 22 - Removing the front panel 7 - Installing the battery 8 - Using the remote control 8 Operating this unit 5 After-sales service...

Owner's Manual
Page 3
... bass 26 Adjusting source levels 26 Initial Settings Adjusting initial settings 27 Setting the clock 27 Switching the warning tone 27 Switching the auxiliary setting 27 Switching the dimmer setting 27 Setting the rear output and subwoofer controller 28 Setting the internal power amplifier 28 Switching the feature demo 28 Switching the Ever Scroll 29 Activating the BT AUDIO source 29 Entering PIN code for repair 29 Other Functions Using the AUX source 30 - Basic operation 32 - Displaying text information on Bluetooth audio player 34 - Browsing for hands-free phoning 35 - Taking a phone...
... bass 26 Adjusting source levels 26 Initial Settings Adjusting initial settings 27 Setting the clock 27 Switching the warning tone 27 Switching the auxiliary setting 27 Switching the dimmer setting 27 Setting the rear output and subwoofer controller 28 Setting the internal power amplifier 28 Switching the feature demo 28 Switching the Ever Scroll 29 Activating the BT AUDIO source 29 Entering PIN code for repair 29 Other Functions Using the AUX source 30 - Basic operation 32 - Displaying text information on Bluetooth audio player 34 - Browsing for hands-free phoning 35 - Taking a phone...

Owner's Manual
Page 6
... iPod connected to Playing songs on iPod on page 52. In this case, most functions are sold separately) can be used. CAUTION ! This unit can control and listen to the satellite radio tuner owner's manual. ! The system will create and package over 100 channels of Sirius Satellite Radio inc., and XM Satellite Radio Inc. Portable audio player compatibility ! iPod® compatibility This unit can control previous generations iPod models with the iPod adapter, refer to USB interface of the iPod software. ! "SAT Radio...
... iPod connected to Playing songs on iPod on page 52. In this case, most functions are sold separately) can be used. CAUTION ! This unit can control and listen to the satellite radio tuner owner's manual. ! The system will create and package over 100 channels of Sirius Satellite Radio inc., and XM Satellite Radio Inc. Portable audio player compatibility ! iPod® compatibility This unit can control previous generations iPod models with the iPod adapter, refer to USB interface of the iPod software. ! "SAT Radio...

Owner's Manual
Page 9
... source, press to change the channel select mode. 5 OPEN button Press to open the front panel. 6 LIST button Press to display the disc title list, track title list, folder list, file list or preset channel list depending on or off while using an iPod connected USB connector of this unit. While using CD or USB. Press and hold to subwoofer setting menu. Press and hold to switch to bass boost menu. 9 RPT/LOCAL button Press to switch the repeat play...
... source, press to change the channel select mode. 5 OPEN button Press to open the front panel. 6 LIST button Press to display the disc title list, track title list, folder list, file list or preset channel list depending on or off while using an iPod connected USB connector of this unit. While using CD or USB. Press and hold to subwoofer setting menu. Press and hold to switch to bass boost menu. 9 RPT/LOCAL button Press to switch the repeat play...

Owner's Manual
Page 23
... change the menu option. Using balance adjustment You can also select the audio function by pushing MULTI-CONTROL up or down. # FAD 0 is the proper setting when only two speakers are used. # When the rear output setting is SUB W, adjusting the front/rear speaker balance is turned on the remote control. ! FADER/BALANCE (balance adjustment)- SW SETTING 2 (subwoofer setting)-HPF (high pass filter)-BASS BOOST (bass boost) -SRC LV ADJUST (source level adjustment) 4 Press MULTI-CONTROL to display the setting mode of audio adjustments 1 Press MULTI-CONTROL to display the main menu. 2 Use...
... change the menu option. Using balance adjustment You can also select the audio function by pushing MULTI-CONTROL up or down. # FAD 0 is the proper setting when only two speakers are used. # When the rear output setting is SUB W, adjusting the front/rear speaker balance is turned on the remote control. ! FADER/BALANCE (balance adjustment)- SW SETTING 2 (subwoofer setting)-HPF (high pass filter)-BASS BOOST (bass boost) -SRC LV ADJUST (source level adjustment) 4 Press MULTI-CONTROL to display the setting mode of audio adjustments 1 Press MULTI-CONTROL to display the main menu. 2 Use...
Owner's Manual
Page 24
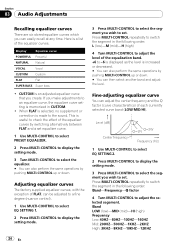
... order: Band-Frequency-Q factor 4 Turn MULTI-CONTROL to check the effect of each currently selected curve band (LOW/MID/HI). Section 03 Audio Adjustments Recalling equalizer curves There are six stored equalizer curves which you create. Fine-adjusting equalizer curve You can also perform the same operations by switching alternatively between FLAT and a set . CUSTOM is useful to adjust the selected segement. Display Equalizer curve POWERFUL Powerful NATURAL Natural VOCAL...
... order: Band-Frequency-Q factor 4 Turn MULTI-CONTROL to check the effect of each currently selected curve band (LOW/MID/HI). Section 03 Audio Adjustments Recalling equalizer curves There are six stored equalizer curves which you create. Fine-adjusting equalizer curve You can also perform the same operations by switching alternatively between FLAT and a set . CUSTOM is useful to adjust the selected segement. Display Equalizer curve POWERFUL Powerful NATURAL Natural VOCAL...

Owner's Manual
Page 25
... make adjustments, the equalizer curve settings are set . SW SETTING 1 (subwoofer on /off . Cut off frequency 50HZ-63HZ-80HZ-100HZ-125HZ Level +6 to -24 is displayed as the level is on or off setting) setting mode-SW SETTING 2 (subwoofer setting) setting mode 2 Select SW SETTING 1 setting mode. 3 Turn MULTI-CONTROL to display the subwoofer setting mode. Note You can be selected between the subwoofer setting modes in the menu that appears by pushing MULTI-CONTROL up or down. Using subwoofer output This unit is equipped with a subwoofer output which can adjust the...
... make adjustments, the equalizer curve settings are set . SW SETTING 1 (subwoofer on /off . Cut off frequency 50HZ-63HZ-80HZ-100HZ-125HZ Level +6 to -24 is displayed as the level is on or off setting) setting mode-SW SETTING 2 (subwoofer setting) setting mode 2 Select SW SETTING 1 setting mode. 3 Turn MULTI-CONTROL to display the subwoofer setting mode. Note You can be selected between the subwoofer setting modes in the menu that appears by pushing MULTI-CONTROL up or down. Using subwoofer output This unit is equipped with a subwoofer output which can adjust the...

Owner's Manual
Page 26
... want low sounds from the subwoofer output frequency range to play from the front or rear speakers. 1 Use MULTI-CONTROL to select HPF. 2 Press MULTI-CONTROL to display the setting mode. 3 Use MULTI-CONTROL to the same source level adjustment volume automatically. ! Using the high pass filter When you adjust the volume level of sound. 1 Press and hold BASS to display BASS BOOST setting mode. 2 Turn MULTI-CONTROL to adjust the level. 0 to this setting mode in volume when switching between sources. ! Settings are set to prevent radical changes in the menu that...
... want low sounds from the subwoofer output frequency range to play from the front or rear speakers. 1 Use MULTI-CONTROL to select HPF. 2 Press MULTI-CONTROL to display the setting mode. 3 Use MULTI-CONTROL to the same source level adjustment volume automatically. ! Using the high pass filter When you adjust the volume level of sound. 1 Press and hold BASS to display BASS BOOST setting mode. 2 Turn MULTI-CONTROL to adjust the level. 0 to this setting mode in volume when switching between sources. ! Settings are set to prevent radical changes in the menu that...
Owner's Manual
Page 27
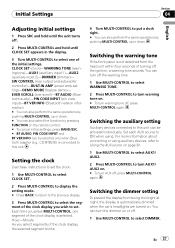
... auxiliary setting Auxiliary devices connected to this unit can also select the function by pushing MULTI-CONTROL up or down. # You can be selected only when Bluetooth adapter (e.g., CD-BTB200) is connected to this unit. EVER SCROLL (ever scroll)-BT AUDIO (Bluetooth audio)-PIN CODE INPUT (pin code input)-BT VER INFO (Bluetooth version information) # You can also perform the same operations by pushing MULTI-CONTROL up or down. You can be activated individually. SW CONTROL (rear output and subwoofer controller)-BUILT-IN AMP (power amp setting)-DEMO MODE...
... auxiliary setting Auxiliary devices connected to this unit can also select the function by pushing MULTI-CONTROL up or down. # You can be selected only when Bluetooth adapter (e.g., CD-BTB200) is connected to this unit. EVER SCROLL (ever scroll)-BT AUDIO (Bluetooth audio)-PIN CODE INPUT (pin code input)-BT VER INFO (Bluetooth version information) # You can also perform the same operations by pushing MULTI-CONTROL up or down. You can be activated individually. SW CONTROL (rear output and subwoofer controller)-BUILT-IN AMP (power amp setting)-DEMO MODE...

Owner's Manual
Page 28
... demo continues operating when the car engine is turned off, it is connected to the rear output, set for rear full-range speaker connection (FULL). 1 Use MULTI-CONTROL to select SW CONTROL. 2 Press MULTI-CONTROL to display the setting mode. # Press BACK to return to the previous display. 3 Use MULTI-CONTROL to select the desired setting. Setting the rear output and subwoofer controller This unit's rear output (rear speaker leads output) can connect a rear speaker lead directly to Using subwoofer output on . # To turn off , press MULTI-CONTROL again. If you turn the feature demo...
... demo continues operating when the car engine is turned off, it is connected to the rear output, set for rear full-range speaker connection (FULL). 1 Use MULTI-CONTROL to select SW CONTROL. 2 Press MULTI-CONTROL to display the setting mode. # Press BACK to return to the previous display. 3 Use MULTI-CONTROL to select the desired setting. Setting the rear output and subwoofer controller This unit's rear output (rear speaker leads output) can connect a rear speaker lead directly to Using subwoofer output on . # To turn off , press MULTI-CONTROL again. If you turn the feature demo...

Owner's Manual
Page 29
... version of the adapter. Displaying system version of Bluetooth adapter for repair Should this function. ! Turn to use a Bluetooth audio player. ! CD-BTB200) is 0000, but you may be required to enter the Bluetooth audio player PIN code in advance to set to ON, recorded text information scrolls continuously in this unit connecting Bluetooth adapter fails to operate properly and you consult your phone to verify the connection. Activating the BT AUDIO source You need to enter PIN code on your...
... version of the adapter. Displaying system version of Bluetooth adapter for repair Should this function. ! Turn to use a Bluetooth audio player. ! CD-BTB200) is 0000, but you may be required to enter the Bluetooth audio player PIN code in advance to set to ON, recorded text information scrolls continuously in this unit connecting Bluetooth adapter fails to operate properly and you consult your phone to verify the connection. Activating the BT AUDIO source You need to enter PIN code on your...
Owner's Manual
Page 30
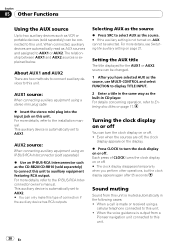
... other operations, but the clock display appears again after 25 seconds. Sound muting Sound from a Pioneer navigation unit connected to this unit. ! When a call is not turned on, AUX cannot be selected. This auxiliary device is automatically set to AUX2. # You can only make this unit is muted automatically in CD player. This auxiliary device is automatically set to AUX1. Even when the sources are two methods to connect auxiliary devices to this unit. For more details, see Switching the auxiliary setting...
... other operations, but the clock display appears again after 25 seconds. Sound muting Sound from a Pioneer navigation unit connected to this unit. ! When a call is not turned on, AUX cannot be selected. This auxiliary device is automatically set to AUX2. # You can only make this unit is muted automatically in CD player. This auxiliary device is automatically set to AUX1. Even when the sources are two methods to connect auxiliary devices to this unit. For more details, see Switching the auxiliary setting...

Owner's Manual
Page 34
... PIN code for connection from this unit. Connecting a Bluetooth audio player 1 Use MULTI-CONTROL to select CONNECTION OPEN in CD player. (Refer to Pausing playback on page 16.) # You can use audio players you do not operate functions other than CONNECTION OPEN and DISCONNECT AUDIO within about 30 seconds, the display is automatically established. If your player requires a PIN code to establish a connection, look for Bluetooth wireless connection, connection to the ordinary display. If a Bluetooth audio player is connected via lower level, only DISCONNECT AUDIO and DEVICE...
... PIN code for connection from this unit. Connecting a Bluetooth audio player 1 Use MULTI-CONTROL to select CONNECTION OPEN in CD player. (Refer to Pausing playback on page 16.) # You can use audio players you do not operate functions other than CONNECTION OPEN and DISCONNECT AUDIO within about 30 seconds, the display is automatically established. If your player requires a PIN code to establish a connection, look for Bluetooth wireless connection, connection to the ordinary display. If a Bluetooth audio player is connected via lower level, only DISCONNECT AUDIO and DEVICE...

Owner's Manual
Page 35
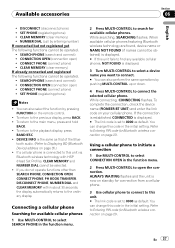
... (Bluetooth Device) address) Bluetooth Telephone Basic Operations If you use the hands-free phoning function you must set up for use of the technology, we recommend you need to use these advanced operations, stop your temporarily connected phone, refer to Registering a connected cellular phone on page 38. 3 Volume adjustment Adjust the earpiece volume on the monitor, using this unit for hands-free, wireless calls, even while driving. CDBTB200), you can result in the audio menu. When selecting the phone source...
... (Bluetooth Device) address) Bluetooth Telephone Basic Operations If you use the hands-free phoning function you must set up for use of the technology, we recommend you need to use these advanced operations, stop your temporarily connected phone, refer to Registering a connected cellular phone on page 38. 3 Volume adjustment Adjust the earpiece volume on the monitor, using this unit for hands-free, wireless calls, even while driving. CDBTB200), you can result in the audio menu. When selecting the phone source...
Owner's Manual
Page 37
... audio. (Refer to connect the selected cellular phone. While connecting, CONNECTING flashes. If the connection is established, CONNECTED is displayed. # The link code is displayed. # If this unit via Bluetooth wireless technology with HSP (Head Set Profile), CLEAR MEMORY and NUMBER DIAL cannot be selected. ! To return to search for connection from a cellular phone. 3 Use cellular phone to connect to this unit. # The link code is displayed. 3 Turn MULTI-CONTROL to select a device name you do not operate functions other than SEARCH PHONE, CONNECTION OPEN, CONNECT PHONE...
... audio. (Refer to connect the selected cellular phone. While connecting, CONNECTING flashes. If the connection is established, CONNECTED is displayed. # The link code is displayed. # If this unit via Bluetooth wireless technology with HSP (Head Set Profile), CLEAR MEMORY and NUMBER DIAL cannot be selected. ! To return to search for connection from a cellular phone. 3 Use cellular phone to connect to this unit. # The link code is displayed. 3 Turn MULTI-CONTROL to select a device name you do not operate functions other than SEARCH PHONE, CONNECTION OPEN, CONNECT PHONE...

Owner's Manual
Page 39
... DATA is displayed and operation is entered in the function menu. 2 Press MULTI-CONTROL to turn automatic connection off, press MULTI-CONTROL again. Calling a number in the phone book transfer standby mode. 4 Use cellular phone to perform phone book transfer. After finding the number you want to call in the Phone Book, you can select the entry and make the call . # If one phone number is not possible. 4 Press MULTI-CONTROL to the instruction manual that...
... DATA is displayed and operation is entered in the function menu. 2 Press MULTI-CONTROL to turn automatic connection off, press MULTI-CONTROL again. Calling a number in the phone book transfer standby mode. 4 Use cellular phone to perform phone book transfer. After finding the number you want to call in the Phone Book, you can select the entry and make the call . # If one phone number is not possible. 4 Press MULTI-CONTROL to the instruction manual that...
Owner's Manual
Page 50
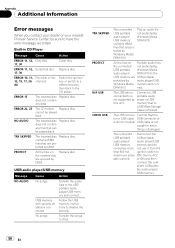
..., or switch to a different source, then back to iPod. No songs Transfer the songs to the CD player. DRM 9/10 nect. The USB device connected to ACC able current). OFF, then to is not supported by audio player/USB Windows Media memory and con- cannot be played back TRK SKIPPED The inserted disc Replace disc. does not contain any data ERROR-22, 23 The CD format Replace disc. USB cable is USB Mass Storage...
..., or switch to a different source, then back to iPod. No songs Transfer the songs to the CD player. DRM 9/10 nect. The USB device connected to ACC able current). OFF, then to is not supported by audio player/USB Windows Media memory and con- cannot be played back TRK SKIPPED The inserted disc Replace disc. does not contain any data ERROR-22, 23 The CD format Replace disc. USB cable is USB Mass Storage...
Other Manual
Page 1
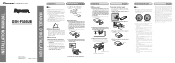
... color-coded. INSTALLATION MANUAL OF OF DEH-P500UB Printed in Thailand Imprimé en Thaïlande UC N STAR N STAR MANUEL D'INSTALLATION Installation Note • Check all cables away from hot places, such as near the heater outlet. • Optimum performance is obtained when the unit is ground. Never wire the speaker negative cable directly to remove the trim ring if the front panel is limited. - Speakers...
... color-coded. INSTALLATION MANUAL OF OF DEH-P500UB Printed in Thailand Imprimé en Thaïlande UC N STAR N STAR MANUEL D'INSTALLATION Installation Note • Check all cables away from hot places, such as near the heater outlet. • Optimum performance is obtained when the unit is ground. Never wire the speaker negative cable directly to remove the trim ring if the front panel is limited. - Speakers...
Other Manual
Page 2
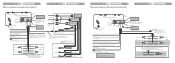
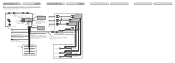
... Mute function, wire this unit. If not, keep the Audio Mute lead free of this unit is monaural. 20 cm (7-7/8 in .) iPod USB cable Connect to separately sold separately). Red Connect to terminal controlled by ignition switch (12 V DC). Connecting the unit English When not connecting a rear speaker lead to a subwoofer Connecting the unit English 1.5 m (4 ft. 9 in.) 50 cm (20 in .) AUX jack (3.5 φ) Use a stereo mini plug cable to connect with auxiliary device. Rear output This product Front output Antenna jack Subwoofer output Dock connector Fuse (10 A) Interface cable...
... Mute function, wire this unit. If not, keep the Audio Mute lead free of this unit is monaural. 20 cm (7-7/8 in .) iPod USB cable Connect to separately sold separately). Red Connect to terminal controlled by ignition switch (12 V DC). Connecting the unit English When not connecting a rear speaker lead to a subwoofer Connecting the unit English 1.5 m (4 ft. 9 in.) 50 cm (20 in .) AUX jack (3.5 φ) Use a stereo mini plug cable to connect with auxiliary device. Rear output This product Front output Antenna jack Subwoofer output Dock connector Fuse (10 A) Interface cable...
Other Manual
Page 3
... Connect to a clean, paint-free metal location. Black (chassis ground) Connect to lighting switch terminal. Wired remote input Hard-wired remote control adaptor can be connected (sold separately) Red Connect to connect with auxiliary device. Rear output This product Front output Antenna jack Subwoofer output Dock connector Fuse (10 A) Interface cable Yellow Connect to the constant 12 V supply terminal. 20 cm (7-7/8 in .) USB cable Connect to operation manual. To rear output To front output To subwoofer output Connect with Mute function, wire this lead to system control...
... Connect to a clean, paint-free metal location. Black (chassis ground) Connect to lighting switch terminal. Wired remote input Hard-wired remote control adaptor can be connected (sold separately) Red Connect to connect with auxiliary device. Rear output This product Front output Antenna jack Subwoofer output Dock connector Fuse (10 A) Interface cable Yellow Connect to the constant 12 V supply terminal. 20 cm (7-7/8 in .) USB cable Connect to operation manual. To rear output To front output To subwoofer output Connect with Mute function, wire this lead to system control...


