Owner's Manual
Page 2
...A SAFE LEVEL: ! Slowly increase the sound until you have established a comfortable sound level, set to ACC or ON while the unit is turned off and on the enclosed warranty card. About this unit. Over time, your equipment by one or more of headphones may result in a ...can actually be deceiving. If this number on , the user is cancelled before using this PIONEER product To ensure proper use in Your Hands Get the most importantly, without distortion. ! The demo starts automatically if you to chemicals listed on page 9. Consult the dealer or an experienced radio...
...A SAFE LEVEL: ! Slowly increase the sound until you have established a comfortable sound level, set to ACC or ON while the unit is turned off and on the enclosed warranty card. About this unit. Over time, your equipment by one or more of headphones may result in a ...can actually be deceiving. If this number on , the user is cancelled before using this PIONEER product To ensure proper use in Your Hands Get the most importantly, without distortion. ! The demo starts automatically if you to chemicals listed on page 9. Consult the dealer or an experienced radio...
Owner's Manual
Page 4
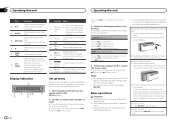
... Press the detach button to change your selection. to recall preset stations. Press to select. # If you prefer not to set the demo display to set up in the initial settings. Basic operations Important ! Section 02 Operating this unit Operating this unit Part Operation h a/b ...you select NO, you need to Initial settings on . 6 The sound retriever function is on the source. DEMO (demo display setting) ! For details about the settings, refer to confirm your setting again, turn M.C. j plays. m LIST/ ENTER Press to insert the tabs on the left . device and iPod: ...
... Press the detach button to change your selection. to recall preset stations. Press to select. # If you prefer not to set the demo display to set up in the initial settings. Basic operations Important ! Section 02 Operating this unit Operating this unit Part Operation h a/b ...you select NO, you need to Initial settings on . 6 The sound retriever function is on the source. DEMO (demo display setting) ! For details about the settings, refer to confirm your setting again, turn M.C. j plays. m LIST/ ENTER Press to insert the tabs on the left . device and iPod: ...
Owner's Manual
Page 9
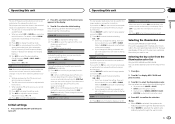
... level of the subwoofer. Cut-off frequency: 50HZ-63HZ-80HZ- 100HZ-125HZ Output level: -24 to the factory settings. to turn on or off . to turn the demo display on . When a USB storage device/iPod is connected, depending on the type of device, the source is set to ON...in volume when switching between the cut -off frequency and output level can select one option from the illumination color list Only for DEH-3400UB and DEH-34UB. This function is turned off . to select the desired setting. to set for rear full-range speaker connection (FUL). 1 Press M.C. Selecting the ...
... level of the subwoofer. Cut-off frequency: 50HZ-63HZ-80HZ- 100HZ-125HZ Output level: -24 to the factory settings. to turn on or off . to turn the demo display on . When a USB storage device/iPod is connected, depending on the type of device, the source is set to ON...in volume when switching between the cut -off frequency and output level can select one option from the illumination color list Only for DEH-3400UB and DEH-34UB. This function is turned off . to select the desired setting. to set for rear full-range speaker connection (FUL). 1 Press M.C. Selecting the ...
Owner's Manual
Page 13
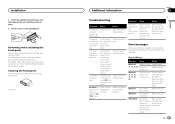
...the front panel upward and pull it toward you contact your dealer or your nearest Pioneer Service Center, be played when FLD (folder repeat) is selected. The display automatically... Installation 2 Insert the supplied extraction keys into place. 3 Pull the unit out of the dashboard. Turn off at random. NO XXXX appears when a display is dirty. Built-in CD Player Message Cause Action...be causing the interference away from theft and Re-attaching the front panel on and off the demo display setting. range, the selected range may be secured with the supplied screw. 1 1 Screw...
...the front panel upward and pull it toward you contact your dealer or your nearest Pioneer Service Center, be played when FLD (folder repeat) is selected. The display automatically... Installation 2 Insert the supplied extraction keys into place. 3 Pull the unit out of the dashboard. Turn off at random. NO XXXX appears when a display is dirty. Built-in CD Player Message Cause Action...be causing the interference away from theft and Re-attaching the front panel on and off the demo display setting. range, the selected range may be secured with the supplied screw. 1 1 Screw...


