Owner's Manual
Page 2
...Customer 2 About this unit 3 About this Pioneer product. After you will know how to operate your unit from theft 4 • Removing the front panel 4 • Attaching the front panel 4 Use and care of the remote control (DEH-340) 5 • Installing the battery 5 • Using the remote... control 5 What's what 6 Remote control (DEH-340) 7 Power ON/OFF Turning the unit on 7 Selecting a source 7 Turning the unit off 7 Tuner...
...Customer 2 About this unit 3 About this Pioneer product. After you will know how to operate your unit from theft 4 • Removing the front panel 4 • Attaching the front panel 4 Use and care of the remote control (DEH-340) 5 • Installing the battery 5 • Using the remote... control 5 What's what 6 Remote control (DEH-340) 7 Power ON/OFF Turning the unit on 7 Selecting a source 7 Turning the unit off 7 Tuner...

Owner's Manual
Page 6
... control may become jammed under the brake or accelerator pedals. als. • In the event of battery leakage, wipe the remote control completely clean and install a new battery. • When disposing of used for a month or longer. • Do not recharge, disassemble, heat or dis- CAUTION • Use only one CR2025... in your country/area. 5 En WARNING Keep the battery out of the reach of children. Before You Start Use and care of the remote control (DEH-340) Installing the battery Remove the cover on the back of the remote control and insert the battery with metallic materi-
... control may become jammed under the brake or accelerator pedals. als. • In the event of battery leakage, wipe the remote control completely clean and install a new battery. • When disposing of used for a month or longer. • Do not recharge, disassemble, heat or dis- CAUTION • Use only one CR2025... in your country/area. 5 En WARNING Keep the battery out of the reach of children. Before You Start Use and care of the remote control (DEH-340) Installing the battery Remove the cover on the back of the remote control and insert the battery with metallic materi-
Other Manual
Page 1
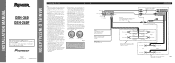
...values other than those for vehicles with insulating tape. Printed in Imprimé UC N STAR N STAR MANUEL D'INSTALLATION Connecting the Units Note: • This unit is installed in the electrical system, be different colors even if they lie against metal parts. • Route and secure...supply terminal. • When an external power amp is a possibility of high-current products such as near the heater outlet. INSTALLATION MANUAL OF OF DEH-340 DEH-240F This product conforms to an external power amp's system remote control or the car's Auto-antenna relay control terminal (max...
...values other than those for vehicles with insulating tape. Printed in Imprimé UC N STAR N STAR MANUEL D'INSTALLATION Connecting the Units Note: • This unit is installed in the electrical system, be different colors even if they lie against metal parts. • Route and secure...supply terminal. • When an external power amp is a possibility of high-current products such as near the heater outlet. INSTALLATION MANUAL OF OF DEH-340 DEH-240F This product conforms to an external power amp's system remote control or the car's Auto-antenna relay control terminal (max...
Other Manual
Page 4
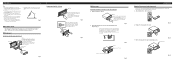
...Factory radio mounting bra1c2ket 1S1crew D13ashboard or Console Fig. 8 Fig. 9 About the fixing screws for instance, near a heater outlet. • If installation angle exceeds 60° from horizontal, the unit might not give its optimum performance. (Fig. 3) 60° Fig. 3 DIN Front/Rear-mount...9) Select a position where the screw holes of the bracket and the screw holes of the unit, pull the unit out. Installation Note: • Before finally installing the unit, connect the wiring temporarily, making sure it is a sudden stop, like an emergency stop. • The semiconductor ...
...Factory radio mounting bra1c2ket 1S1crew D13ashboard or Console Fig. 8 Fig. 9 About the fixing screws for instance, near a heater outlet. • If installation angle exceeds 60° from horizontal, the unit might not give its optimum performance. (Fig. 3) 60° Fig. 3 DIN Front/Rear-mount...9) Select a position where the screw holes of the bracket and the screw holes of the unit, pull the unit out. Installation Note: • Before finally installing the unit, connect the wiring temporarily, making sure it is a sudden stop, like an emergency stop. • The semiconductor ...


