Owner's Manual
Page 3
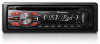
...://www.pioneerelectronics.com in the event of Canada, Inc. Do not use unauthorized products. 6 USB port 7 (color) AUX input jack d (3.5 mm stereo jack) e Detach button Remote control f DEH-2400UB and DEH-24UB 9 a 12 3 4 5 6 m l g h i 4 j k 78 9 a Part 1 h (eject) 2 (list) b c de Part 8 (back/display) 9 c/d Part Operation f VOLUME Press... to the companies at the addresses listed below : Please do not ship your product. ! Use an optional Pioneer USB cable (CD- g MUTE Press to unmute. In case the necessary information is not available, please contact...
...://www.pioneerelectronics.com in the event of Canada, Inc. Do not use unauthorized products. 6 USB port 7 (color) AUX input jack d (3.5 mm stereo jack) e Detach button Remote control f DEH-2400UB and DEH-24UB 9 a 12 3 4 5 6 m l g h i 4 j k 78 9 a Part 1 h (eject) 2 (list) b c de Part 8 (back/display) 9 c/d Part Operation f VOLUME Press... to the companies at the addresses listed below : Please do not ship your product. ! Use an optional Pioneer USB cable (CD- g MUTE Press to unmute. In case the necessary information is not available, please contact...
Owner's Manual
Page 5
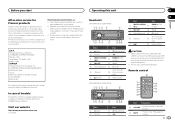
...turn the source off. When using for each band Using preset tuning buttons 1 When you find a station that apply in the direction of the remote control. 2 Insert the battery with the plus (+) and minus (-) poles aligned properly. "Perchlorate Material - For details about the settings, refer to...one of children. Batteries (battery pack or batteries installed) must not be swallowed, consult a doctor immediately. ! Do not let the remote control fall onto the floor, where it may become jammed under the brake or accelerator pedal. Keep the battery out of the reach of ...
...turn the source off. When using for each band Using preset tuning buttons 1 When you find a station that apply in the direction of the remote control. 2 Insert the battery with the plus (+) and minus (-) poles aligned properly. "Perchlorate Material - For details about the settings, refer to...one of children. Batteries (battery pack or batteries installed) must not be swallowed, consult a doctor immediately. ! Do not let the remote control fall onto the floor, where it may become jammed under the brake or accelerator pedal. Keep the battery out of the reach of ...
Owner's Manual
Page 11
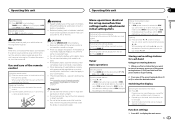
... speakers. ! Also, never connect it to follow the directions below. - This unit DEH-3400UB and DEH-34UB 1 23 45 6 DEH-2400UB and DEH-24UB 1 2 45 1 Power cord input 2 Rear output or subwoofer output 3 Front output 4 Antenna input 5 Fuse (10 A) 6 Wired remote input Hard-wired remote control adaptor can be sure to the antenna booster power supply terminal. ! f Yellow...
... speakers. ! Also, never connect it to follow the directions below. - This unit DEH-3400UB and DEH-34UB 1 23 45 6 DEH-2400UB and DEH-24UB 1 2 45 1 Power cord input 2 Rear output or subwoofer output 3 Front output 4 Antenna input 5 Fuse (10 A) 6 Wired remote input Hard-wired remote control adaptor can be sure to the antenna booster power supply terminal. ! f Yellow...
Owner's Manual
Page 12
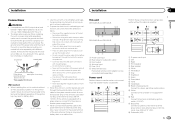
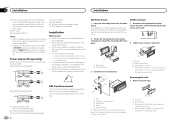
.... ! When reattaching the trim ring, point the side with operation of the vehicle. - DEH-3400UB and DEH-34UB 1 3 2 4 5 5 3 1 2 6 7 7 DEH-2400UB and DEH-24UB 1 3 2 6 7 7 4 To Front output 5 Front... REAR-SP (rear output setting) on page 9. Use commercially available parts when installing. 1 System remote control Connect to Blue/white cable. 2 Power amp (sold separately) 3 Connect with the vehicle. Section 03 Installation Installation j...
.... ! When reattaching the trim ring, point the side with operation of the vehicle. - DEH-3400UB and DEH-34UB 1 3 2 4 5 5 3 1 2 6 7 7 DEH-2400UB and DEH-24UB 1 3 2 6 7 7 4 To Front output 5 Front... REAR-SP (rear output setting) on page 9. Use commercially available parts when installing. 1 System remote control Connect to Blue/white cable. 2 Power amp (sold separately) 3 Connect with the vehicle. Section 03 Installation Installation j...


