Owner's Manual
Page 2
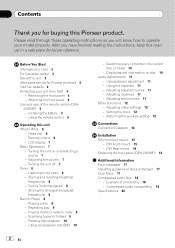
... this unit 3 After-sales service for Pioneer products 4 Visit our website 4 Protecting your...radio 8 - Attaching the front panel 4 Use and care of discs and player 17 Dual Discs 17 Compressed audio files 18 - Searching every 10 tracks in Player 8 - Displaying text information on and selecting a source 7 - Using the equalizer 11 - DIN Front-mount 15 - DIN Rear-mount 16 Fastening the front panel (DEH-2000MP...) 16 Additional Information Error messages 17 Handling guideline of the remote control (DEH2000MP) 5 - Adjusting initial settings 12 - Setting the clock...
... this unit 3 After-sales service for Pioneer products 4 Visit our website 4 Protecting your...radio 8 - Attaching the front panel 4 Use and care of discs and player 17 Dual Discs 17 Compressed audio files 18 - Searching every 10 tracks in Player 8 - Displaying text information on and selecting a source 7 - Using the equalizer 11 - DIN Front-mount 15 - DIN Rear-mount 16 Fastening the front panel (DEH-2000MP...) 16 Additional Information Error messages 17 Handling guideline of the remote control (DEH2000MP) 5 - Adjusting initial settings 12 - Setting the clock...
Owner's Manual
Page 6
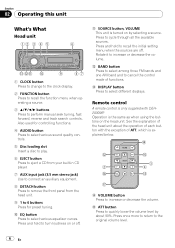
...button Press to select various sound quality controls. 5 Disc loading slot Insert a disc to play. 6 EJECT button Press to eject a CD from your built-in CD player. 7 AUX input jack (3.5 mm stereo jack) Use to connect an auxiliary equipment. 8 DETACH button Press to remove the front ...of the head unit about 90%. Section 02 Operating this unit What's What Head unit 12 3 4 5 6 d cb a 9 87 1 CLOCK button Press to change to the clock display. 2 FUNCTION button Press to recall the function menu when operating a source. 3 a/b/c/d buttons Press to increase or decrease the volume. c...
...button Press to select various sound quality controls. 5 Disc loading slot Insert a disc to play. 6 EJECT button Press to eject a CD from your built-in CD player. 7 AUX input jack (3.5 mm stereo jack) Use to connect an auxiliary equipment. 8 DETACH button Press to remove the front ...of the head unit about 90%. Section 02 Operating this unit What's What Head unit 12 3 4 5 6 d cb a 9 87 1 CLOCK button Press to change to the clock display. 2 FUNCTION button Press to recall the function menu when operating a source. 3 a/b/c/d buttons Press to increase or decrease the volume. c...
Owner's Manual
Page 12
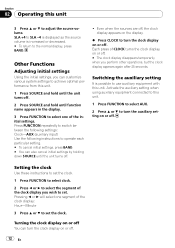
... to select one segment of the initial settings. Switching the auxiliary setting It is increased or decreased. # To return to turn the clock display on or off . 2 Press SOURCE and hold until the unit turns off . Activate the auxiliary setting when using auxiliary equipment connected... to this unit. Other Functions Adjusting initial settings Using the initial settings, you wish to select the segment of CLOCK turns the clock display on or off . SLA +4 to SLA -4 is displayed as the source volume is possible to turn the auxiliary setting...
... to select one segment of the initial settings. Switching the auxiliary setting It is increased or decreased. # To return to turn the clock display on or off . 2 Press SOURCE and hold until the unit turns off . Activate the auxiliary setting when using auxiliary equipment connected... to this unit. Other Functions Adjusting initial settings Using the initial settings, you wish to select the segment of CLOCK turns the clock display on or off . SLA +4 to SLA -4 is displayed as the source volume is possible to turn the auxiliary setting...


