Owner's Manual
Page 2
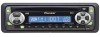
...put them away in CD player error messages 15 Specifications 16 1 En Please read through these operating instructions so you for buying this manual 3 After-sales service for Pioneer products 3 Precautions 3 Protecting your model properly. Contents Thank you will know how to operate your unit from theft 4 • Removing...levels 12 Other Functions Setting the time 13 Setting the time display on or off 13 Additional Information CD player and care 14 CD-R/CD-RW discs 14 Understanding built-in a safe place for future reference. Before You Start Dear Customer 2 About this unit 3 About this...
...put them away in CD player error messages 15 Specifications 16 1 En Please read through these operating instructions so you for buying this manual 3 After-sales service for Pioneer products 3 Precautions 3 Protecting your model properly. Contents Thank you will know how to operate your unit from theft 4 • Removing...levels 12 Other Functions Setting the time 13 Setting the time display on or off 13 Additional Information CD player and care 14 CD-R/CD-RW discs 14 Understanding built-in a safe place for future reference. Before You Start Dear Customer 2 About this unit 3 About this...
Owner's Manual
Page 4
...security and convenience, be reprogrammed. CUSTOMER SERVICE DEPARTMENT P.O. THE USE OF OPTICAL INSTRUMENTS WITH THIS PRODUCT WILL INCREASE EYE HAZARD. Pioneer Electronics Service, Inc. Before You Start About this unit The tuner frequencies on this unit are not selfexplanatory. For your ...for repair without advance contact. 3 En • Keep this manual handy as a reference for operating procedures and precautions. • Always keep the volume low enough so you purchased this unit for Pioneer products Please contact the dealer or distributor from this product's ...
...security and convenience, be reprogrammed. CUSTOMER SERVICE DEPARTMENT P.O. THE USE OF OPTICAL INSTRUMENTS WITH THIS PRODUCT WILL INCREASE EYE HAZARD. Pioneer Electronics Service, Inc. Before You Start About this unit The tuner frequencies on this unit are not selfexplanatory. For your ...for repair without advance contact. 3 En • Keep this manual handy as a reference for operating procedures and precautions. • Always keep the volume low enough so you purchased this unit for Pioneer products Please contact the dealer or distributor from this product's ...
Owner's Manual
Page 6
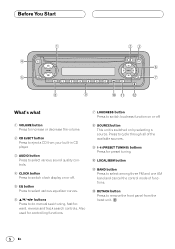
... on or off . 8 SOURCE button This unit is switched on or off . 5 EQ button Press to select various equalizer curves. 6 5/∞/2/3 buttons Press to do manual seek tuning, fast forward, reverse and track search controls. Before You Start 1 4 5 23 6 7 8 9 0- = What's what 1 VOLUME button Press to increase or decrease the volume. 2 CD...
... on or off . 8 SOURCE button This unit is switched on or off . 5 EQ button Press to select various equalizer curves. 6 5/∞/2/3 buttons Press to do manual seek tuning, fast forward, reverse and track search controls. Before You Start 1 4 5 23 6 7 8 9 0- = What's what 1 VOLUME button Press to increase or decrease the volume. 2 CD...

Owner's Manual
Page 8
... until the desired band is lowered. 3 Press BAND to store in memory press a PRESET TUNING button and hold 2 or 3 for FM or AM. 4 To perform manual tuning, press 2 or 3 with the touch of the three FM bands, and 6 AM stations can be stored in memory. • You can easily store up...
... until the desired band is lowered. 3 Press BAND to store in memory press a PRESET TUNING button and hold 2 or 3 for FM or AM. 4 To perform manual tuning, press 2 or 3 with the touch of the three FM bands, and 6 AM stations can be stored in memory. • You can easily store up...


