Owner's Manual
Page 6
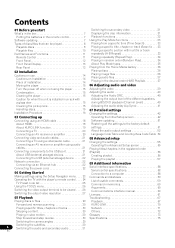
... Ethernet hub 22 Connecting the power cord 22 04 Getting Started Making settings using the Setup Navigator menu . . . . 23 Operating the TV with the player's remote control . . . . 24 TV Preset code list 25 Using the TOOLS menu 26 Switching the video output terminal to be viewed . . . . 26 ... 59 List of usable commands 59 Command mnemonics 60 Arguments 60 Communications interface manual 60 Licenses 61 05 Playback Troubleshooting 67 Playing discs or files 29 Playback 67 Forward and reverse scanning 30 KURO LINK 70 Playing specific titles, chapters or tracks 30 Network 71...
... Ethernet hub 22 Connecting the power cord 22 04 Getting Started Making settings using the Setup Navigator menu . . . . 23 Operating the TV with the player's remote control . . . . 24 TV Preset code list 25 Using the TOOLS menu 26 Switching the video output terminal to be viewed . . . . 26 ... 59 List of usable commands 59 Command mnemonics 60 Arguments 60 Communications interface manual 60 Licenses 61 05 Playback Troubleshooting 67 Playing discs or files 29 Playback 67 Forward and reverse scanning 30 KURO LINK 70 Playing specific titles, chapters or tracks 30 Network 71...

Owner's Manual
Page 7
...( and ). • Do not heat batteries, disassemble them, or throw them into the remote control, set them in the proper direction, as inside of used batteries, please comply with an old one...procure one . • When loading the batteries into flames or water. • Batteries may be heard). 7 En Putting the batteries in the box • Remote control x 1 • Video/audio cable (yellow/white/red plugs) x 1 • AA/R6 dry cell batteries x 2 • Power cord x 1 ..., explode or catch fire. Close securely (a click should get on the Pioneer website.
...( and ). • Do not heat batteries, disassemble them, or throw them into the remote control, set them in the proper direction, as inside of used batteries, please comply with an old one...procure one . • When loading the batteries into flames or water. • Batteries may be heard). 7 En Putting the batteries in the box • Remote control x 1 • Video/audio cable (yellow/white/red plugs) x 1 • AA/R6 dry cell batteries x 2 • Power cord x 1 ..., explode or catch fire. Close securely (a click should get on the Pioneer website.

Owner's Manual
Page 11
...Press to 192 kbps Functions Sampling frequencies: 22.05 kHz, 32 kHz, 44.1 kHz and 48 kHz Windows Media is either a registered trademark or Remote Control trademark of Microsoft Corporation in the United States and/or other countries. Press to execute the selected item or enter a setting that has been changed... 9 22 10 11 12 13 14 HOME MENU ENTER RETURN PLAY PREV PAUSE STOP NEXT RED GREEN BLUE YELLOW VIDEO ADJUST 23 BD PLAYER 1 STANDBY/ON - Press to turn the power on and off. 2 TV CONTROL - (page 24) 3 AUDIO - (page 31) 4 SUBTITLE - (page 30) 5 Number buttons -
...Press to 192 kbps Functions Sampling frequencies: 22.05 kHz, 32 kHz, 44.1 kHz and 48 kHz Windows Media is either a registered trademark or Remote Control trademark of Microsoft Corporation in the United States and/or other countries. Press to execute the selected item or enter a setting that has been changed... 9 22 10 11 12 13 14 HOME MENU ENTER RETURN PLAY PREV PAUSE STOP NEXT RED GREEN BLUE YELLOW VIDEO ADJUST 23 BD PLAYER 1 STANDBY/ON - Press to turn the power on and off. 2 TV CONTROL - (page 24) 3 AUDIO - (page 31) 4 SUBTITLE - (page 30) 5 Number buttons -

Owner's Manual
Page 12
...61552; NEXT - (page 30 page 30) // - (page 30) 13 RED/GREEN/BLUE/YELLOW - Press and hold to stop playback. 4 Remote control sensor - Press again to execute the selected item or enter a setting that has been changed, etc. Press to start playback. 12 En 01 7 VIDEO... 23 feet (7 m). Press to select items, change settings and move the player away from the fluorescent light. 5 Disc tray 6 Blu-ray indicator - Press to start forward scanning (page 30). - Press to open and close the disc tray. 22 TOOLS - (page 26) 23 RETURN - Front panel display ...
...61552; NEXT - (page 30 page 30) // - (page 30) 13 RED/GREEN/BLUE/YELLOW - Press and hold to stop playback. 4 Remote control sensor - Press again to execute the selected item or enter a setting that has been changed, etc. Press to start playback. 12 En 01 7 VIDEO... 23 feet (7 m). Press to select items, change settings and move the player away from the fluorescent light. 5 Disc tray 6 Blu-ray indicator - Press to start forward scanning (page 30). - Press to open and close the disc tray. 22 TOOLS - (page 26) 23 RETURN - Front panel display ...
Owner's Manual
Page 13
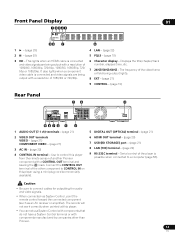
The frequency of the video frame or field being output with a resolution of another Pioneer component with a CONTROL OUT terminal and bearing the mark. Use to CONTROL IN on this player from the remote sensor of 1080/60i or 720/60p. 4 LAN - (page 22) 5 PQLS - (page 19) 6 Character display - Displays the title/chapter/track number...
The frequency of the video frame or field being output with a resolution of another Pioneer component with a CONTROL OUT terminal and bearing the mark. Use to CONTROL IN on this player from the remote sensor of 1080/60i or 720/60p. 4 LAN - (page 22) 5 PQLS - (page 19) 6 Character display - Displays the title/chapter/track number...

Owner's Manual
Page 15
...use a dirty cleaning cloth. In this happens, turn the player's power off . Be sure to dust or dirt, consult your nearest Pioneer authorized service center. Do not scratch the disc's signal surface or let it to wipe the disc gently from an air-conditioner. The water droplets will dissipate ...the dirt, then wipe again with cables connected could scratch the disk or damage the inside (on the remote control to a soft cloth, wring out thoroughly, wipe off the moisture with the player for when the unit is installed in a rack with a dry cloth. 15 damage the cabinet. ...
...use a dirty cleaning cloth. In this happens, turn the player's power off . Be sure to dust or dirt, consult your nearest Pioneer authorized service center. Do not scratch the disc's signal surface or let it to wipe the disc gently from an air-conditioner. The water droplets will dissipate ...the dirt, then wipe again with cables connected could scratch the disk or damage the inside (on the remote control to a soft cloth, wring out thoroughly, wipe off the moisture with the player for when the unit is installed in a rack with a dry cloth. 15 damage the cabinet. ...
Owner's Manual
Page 24
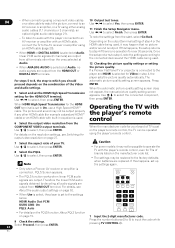
...example a standard HDMI™ cable) or an HDMI cable with the player's remote control When the manufacturer code for Video in equalizer is used. 6 Select the output video resolution from the HDMI OUT or If a Pioneer Flat Panel TV or projector is connected to the AV receiver or amplifier... using the player's remote control. and Audio settings. Use / to select, then press ENTER. Use / ...
...example a standard HDMI™ cable) or an HDMI cable with the player's remote control When the manufacturer code for Video in equalizer is used. 6 Select the output video resolution from the HDMI OUT or If a Pioneer Flat Panel TV or projector is connected to the AV receiver or amplifier... using the player's remote control. and Audio settings. Use / to select, then press ENTER. Use / ...

Owner's Manual
Page 44
...Choose this when connected with a High Speed HDMI™ cable (page 18). HDMI Audio Out Auto The signals are output with the remote control of the player and DNS server (page 48). Also refer to output the video signals as such (page 52). Off Select this when you want ... player with the TV's power. Auto Off Enables PQLS function (page 19). Display Network Configuration Select this to display a list of the AV device connected using an HDMI cable. available languages Choose a language for the code table). Audio Language English * For some discs, it is switched by...
...Choose this when connected with a High Speed HDMI™ cable (page 18). HDMI Audio Out Auto The signals are output with the remote control of the player and DNS server (page 48). Also refer to output the video signals as such (page 52). Off Select this when you want ... player with the TV's power. Auto Off Enables PQLS function (page 19). Display Network Configuration Select this to display a list of the AV device connected using an HDMI cable. available languages Choose a language for the code table). Audio Language English * For some discs, it is switched by...

Owner's Manual
Page 46
... The screen saver turns off automatically if no operation for over 1 minute after playback is playing. DVD-Video Parental Lock Change the player's parental lock level (page 50). BDMV Parental Lock Change the restricted age (page 50). Parental Lock Options 07 Setting Options Explanation... is automatically activated if no operation for over 1 minute after the Home Menu or Home Media Gallery is performed on the player or remote control. Output Terminal Set the terminals from the network server (page 51). Off The screen saver is performed for over 30 minutes...
... The screen saver turns off automatically if no operation for over 1 minute after playback is playing. DVD-Video Parental Lock Change the player's parental lock level (page 50). BDMV Parental Lock Change the restricted age (page 50). Parental Lock Options 07 Setting Options Explanation... is automatically activated if no operation for over 1 minute after the Home Menu or Home Media Gallery is performed on the player or remote control. Output Terminal Set the terminals from the network server (page 51). Off The screen saver is performed for over 30 minutes...
Owner's Manual
Page 58
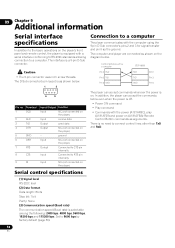
...on the diagram below . 1 5 6 9 Pin no need to connect control lines other than TxD and RxD. Control terminal such as a computer Pin 2 RxD Pin 3 TxD Pin 5 GND BDP-V6000 RxD TxD GND Pin 2 Pin 3 Pin 5 The player can accept the commands below even when the power is as shown below ... commands as arguments. 09 Chapter 9 Additional information Serial interface specifications In addition to the basic operations on the player's front panel and remote control, the player is equipped with the computer using the 9-pin D-Sub connector's pins 2 and 3 for signal transfer and pin 5 as the...
...on the diagram below . 1 5 6 9 Pin no need to connect control lines other than TxD and RxD. Control terminal such as a computer Pin 2 RxD Pin 3 TxD Pin 5 GND BDP-V6000 RxD TxD GND Pin 2 Pin 3 Pin 5 The player can accept the commands below even when the power is as shown below ... commands as arguments. 09 Chapter 9 Additional information Serial interface specifications In addition to the basic operations on the player's front panel and remote control, the player is equipped with the computer using the 9-pin D-Sub connector's pins 2 and 3 for signal transfer and pin 5 as the...

Owner's Manual
Page 59
... *3 *3 *3 4 *4 *4 39 ?Z 40 /Argument/ RU Firmware Version Request Remote Control Button *1 The PL commands include both the PL command without address is set to for details. *3 For the SM command, ... DVD Disc Status Request 28 ?J BD Disc Status Request 29 ?D Get Information 30 ?K CD Disc Status Request 31 ?P Player Active Mode Request 32 ?L Player Model ...
... *3 *3 *3 4 *4 *4 39 ?Z 40 /Argument/ RU Firmware Version Request Remote Control Button *1 The PL commands include both the PL command without address is set to for details. *3 For the SM command, ... DVD Disc Status Request 28 ?J BD Disc Status Request 29 ?D Get Information 30 ?K CD Disc Status Request 31 ?P Player Active Mode Request 32 ?L Player Model ...
Owner's Manual
Page 68
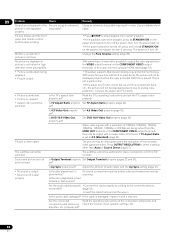
... properly. Picture freezes and the front panel and remote control buttons stop working. • Press STOP to turn off the power, then turn off , press and hold STANDBY/ON on the player's front panel for discs recorded on the player's front panel to stop playback, then restart playback...and 51). Change the Pure Cinema setting (page 39). With some discs, it with a resolution of 16:9 even if TV Aspect Ratio is set to 4:3 (Standard) (page 42). This is not displayed long cable? Connect the player and TV directly. • Picture is stretched. • Picture ...
... properly. Picture freezes and the front panel and remote control buttons stop working. • Press STOP to turn off the power, then turn off , press and hold STANDBY/ON on the player's front panel for discs recorded on the player's front panel to stop playback, then restart playback...and 51). Change the Pure Cinema setting (page 39). With some discs, it with a resolution of 16:9 even if TV Aspect Ratio is set to 4:3 (Standard) (page 42). This is not displayed long cable? Connect the player and TV directly. • Picture is stretched. • Picture ...

Owner's Manual
Page 72
... the TV's power is turned on the player's front panel or been cleared. the disc tray does not open. Is an AV receiver or amplifier Operate with the device. 72 En If the message appears repeatedly, please ask your nearest Pioneer authorized service center or your dealer to On... Is Front Key Lock set KURO LINK to the factory defaults (page 51). been turned off from the player? Is a disc loaded in conjunction with the remote control of the TV connected to Off (page 55). Are you disconnected the Always press STANDBY/ON on , set to Off (page ...
... the TV's power is turned on the player's front panel or been cleared. the disc tray does not open. Is an AV receiver or amplifier Operate with the device. 72 En If the message appears repeatedly, please ask your nearest Pioneer authorized service center or your dealer to On... Is Front Key Lock set KURO LINK to the factory defaults (page 51). been turned off from the player? Is a disc loaded in conjunction with the remote control of the TV connected to Off (page 55). Are you disconnected the Always press STANDBY/ON on , set to Off (page ...


