Owner's Manual
Page 3
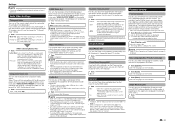
... .....6 Checking the Accessories 7 Names and Functions of Parts 7 Main Unit (Front 7 Front Panel Display 7 Main Unit (Rear 8 Remote Control Unit 8 Connections Connections 9 Connecting to the HDMI Terminal 9 Selecting the priority video output when connecting HDMI and Component video 9 Connecting ... or laundry tub; Wash hands after handling. Contents Introduction Important Notice 4 The Icons Used in the Remote Control ..........12 Approximate operating range of remote control....12 Connecting the Power Cord 12 Turning the Power On 12 Turning the power off 12 Language Setting ...
... .....6 Checking the Accessories 7 Names and Functions of Parts 7 Main Unit (Front 7 Front Panel Display 7 Main Unit (Rear 8 Remote Control Unit 8 Connections Connections 9 Connecting to the HDMI Terminal 9 Selecting the priority video output when connecting HDMI and Component video 9 Connecting ... or laundry tub; Wash hands after handling. Contents Introduction Important Notice 4 The Icons Used in the Remote Control ..........12 Approximate operating range of remote control....12 Connecting the Power Cord 12 Turning the Power On 12 Turning the power off 12 Language Setting ...
Owner's Manual
Page 7
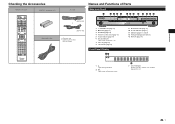
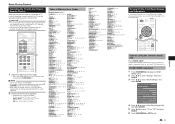
Introduction Checking the Accessories Remote control unit "AAA/R03" size battery (2) AC cord Names and Functions of Parts Main Unit (Front) 1 2 34 5 678 9 10 11 12 13 Video/audio cable (BDP-43FD) or (BDP-41FD) • Warranty card • Operating instructions (this document) STANDBY/...ON PQLS 1 STANDBY/ON (page 12) 2 (STOP) (page 14) 3 (PAUSE) (page 18) 4 Remote control sensor (page 12) 5 PQLS indicator (page...
Introduction Checking the Accessories Remote control unit "AAA/R03" size battery (2) AC cord Names and Functions of Parts Main Unit (Front) 1 2 34 5 678 9 10 11 12 13 Video/audio cable (BDP-43FD) or (BDP-41FD) • Warranty card • Operating instructions (this document) STANDBY/...ON PQLS 1 STANDBY/ON (page 12) 2 (STOP) (page 14) 3 (PAUSE) (page 18) 4 Remote control sensor (page 12) 5 PQLS indicator (page...

Owner's Manual
Page 8
...SKIP SEARCH (page 18) 19 Remote control LED Lights when a command is sent from the remote control. Switches the AV receiver's input to "1". Press and hold KEY LOCK for more than 2 seconds. • Each time you perform this is being set the keylock to operate a Pioneer AV receiver. -... Names and Functions of Parts Main Unit (Rear) 1 23 4 56 7 8 AC IN 10 1 RS-232C terminal The terminal is not used. 2 COMPONENT VIDEO OUTPUT jacks (page 10) 3 VIDEO OUTPUT jack (page 10) 4 HDMI OUT terminal (page 9) 5 LAN (10/100) terminal (page 11) BDP-...
...SKIP SEARCH (page 18) 19 Remote control LED Lights when a command is sent from the remote control. Switches the AV receiver's input to "1". Press and hold KEY LOCK for more than 2 seconds. • Each time you perform this is being set the keylock to operate a Pioneer AV receiver. -... Names and Functions of Parts Main Unit (Rear) 1 23 4 56 7 8 AC IN 10 1 RS-232C terminal The terminal is not used. 2 COMPONENT VIDEO OUTPUT jacks (page 10) 3 VIDEO OUTPUT jack (page 10) 4 HDMI OUT terminal (page 9) 5 LAN (10/100) terminal (page 11) BDP-...
Owner's Manual
Page 12
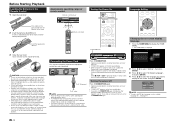
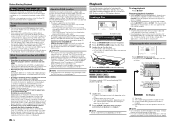
...connect the power cord once all equipment connections are not going to use the remote control for a long period of time (1 month or more and then turn on this Player for 10 seconds or more ). AC IN BDP-43FD To AC IN terminal To AC outlet NOTE • Place the ... • When the power is turned on with no disc loaded, the Pioneer logo screen (wallpaper) is displayed. • When the power is turned on with governmental regulations or environmental public institution's rules that apply in the Remote Control 1 Open the rear cover. If a battery should leak and the fluid should...
...connect the power cord once all equipment connections are not going to use the remote control for a long period of time (1 month or more and then turn on this Player for 10 seconds or more ). AC IN BDP-43FD To AC IN terminal To AC outlet NOTE • Place the ... • When the power is turned on with no disc loaded, the Pioneer logo screen (wallpaper) is displayed. • When the power is turned on with governmental regulations or environmental public institution's rules that apply in the Remote Control 1 Open the rear cover. If a battery should leak and the fluid should...
Owner's Manual
Page 13
... EXIT to select the TV channel. If this is 00 (PIONEER). • If you can be operated. 2 Check that the indicators on the player's remote control, the TV can be restored to input the code while pressing TV CONTROL . NOTE • The factory setting is pressed. INPUT... for TVs of brands listed on the manufacturer code list. • The setting may be operated using the remote control unit Press FRONT LIGHT. Operate using the player's remote control. HOME MENU operation 1 Press HOME MENU to display the HOME MENU screen. 2 Press to select "Settings",...
... EXIT to select the TV channel. If this is 00 (PIONEER). • If you can be operated. 2 Check that the indicators on the player's remote control, the TV can be restored to input the code while pressing TV CONTROL . NOTE • The factory setting is pressed. INPUT... for TVs of brands listed on the manufacturer code list. • The setting may be operated using the remote control unit Press FRONT LIGHT. Operate using the player's remote control. HOME MENU operation 1 Press HOME MENU to display the HOME MENU screen. 2 Press to select "Settings",...
Owner's Manual
Page 14
...brands, even if connected with an HDMI cable and the main unit settings are activated when a Pioneer AV amplifier supporting the PQLS functions is displayed. Control function with the Flat Panel TV's remote control. Perform playback operation by pressing STOP, then press PLAY. (This may ... on the disc tray. • Insert the disc with HDMI. Also refer to achieve high sound quality playback using the control function with HDMIcompatible Pioneer Flat Panel TV or AV system (AV receiver or amplifier, etc.) is enabled, video signals with linear PCM audio output ...
...brands, even if connected with an HDMI cable and the main unit settings are activated when a Pioneer AV amplifier supporting the PQLS functions is displayed. Control function with the Flat Panel TV's remote control. Perform playback operation by pressing STOP, then press PLAY. (This may ... on the disc tray. • Insert the disc with HDMI. Also refer to achieve high sound quality playback using the control function with HDMIcompatible Pioneer Flat Panel TV or AV system (AV receiver or amplifier, etc.) is enabled, video signals with linear PCM audio output ...
Owner's Manual
Page 19
... set , then press ENTER. • Operations vary depending on remote control button operations. 2 Press to set continued viewing playback. • The Function Control screen appears automatically. • The Function Control screen can be changed also in "Settings" - Setting 1 During... broadcasts are recorded: • The display will be switched.) NOTE • When you play a program recorded in Function Control Screen (see right). • Some discs allow changing of the screen when multiple angles are the same for subtitles automatically disappears...
... set , then press ENTER. • Operations vary depending on remote control button operations. 2 Press to set continued viewing playback. • The Function Control screen appears automatically. • The Function Control screen can be changed also in "Settings" - Setting 1 During... broadcasts are recorded: • The display will be switched.) NOTE • When you play a program recorded in Function Control Screen (see right). • Some discs allow changing of the screen when multiple angles are the same for subtitles automatically disappears...
Owner's Manual
Page 20
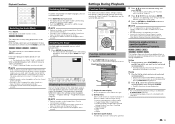
...video is also possible with all discs. 20 Settings Common Operations The "Menu" enables various audio/visual settings and adjustments on the remote control. Repeat Playback is recorded with multiple angles, you can switch to a specific time. • When continued viewing playback is ... These functions may not work with REPEAT on the functions using the remote control unit. Example: Setting "Control" 1 Display the Menu screen 2 Select a menu item 3 Select the next item Press HOME MENU to select "Control", then press ENTER. Chapter Number (Direct Chapter Skip) • Shows...
...video is also possible with all discs. 20 Settings Common Operations The "Menu" enables various audio/visual settings and adjustments on the remote control. Repeat Playback is recorded with multiple angles, you can switch to a specific time. • When continued viewing playback is ... These functions may not work with REPEAT on the functions using the remote control unit. Example: Setting "Control" 1 Display the Menu screen 2 Select a menu item 3 Select the next item Press HOME MENU to select "Control", then press ENTER. Chapter Number (Direct Chapter Skip) • Shows...
Owner's Manual
Page 21
...the disc is only valid for about 10 minutes. Item (Subtitle) Select the language you want to operate this when connecting to a TV with the remote control unit of Blu-ray discs, select "PCM" or "Bitstream (Mix)". • For details, refer to the secondary audio of a Flat Panel TV...the range between the loudest and softest sounds (dynamic range) for the FL OFF indicator. No: Select this case, press VIDEO OUTPUT RESET on the remote control for subtitles, audio and menus displayed on page 14. • When "Component" is played as a TV to select a compatible digital audio output ...
...the disc is only valid for about 10 minutes. Item (Subtitle) Select the language you want to operate this when connecting to a TV with the remote control unit of Blu-ray discs, select "PCM" or "Bitstream (Mix)". • For details, refer to the secondary audio of a Flat Panel TV...the range between the loudest and softest sounds (dynamic range) for the FL OFF indicator. No: Select this case, press VIDEO OUTPUT RESET on the remote control for subtitles, audio and menus displayed on page 14. • When "Component" is played as a TV to select a compatible digital audio output ...

Owner's Manual
Page 23
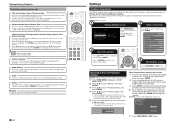
.../ character you obtain the IP address automatically? Confirm the current setting. Then, press to 9) or and ENTER on the remote control. Do you have input. • To change , and press RETURN (Del.Char.). Numeric Edit 1234567890 Selected by pressing Selected by Settings 23...
.../ character you obtain the IP address automatically? Confirm the current setting. Then, press to 9) or and ENTER on the remote control. Do you have input. • To change , and press RETURN (Del.Char.). Numeric Edit 1234567890 Selected by pressing Selected by Settings 23...
Owner's Manual
Page 26
... not recorded normally. • Proper playback may be impossible due to person. Possible causes and solutions • Operate the remote control from within a distance of 23 ft from the remote control sensor. (Page 12) • Replace the batteries. (Page 12) • Are you using an HDMI cable. •... settings. (Page 21) • Press STOP, then restart playback. • Turn off . (Page 21) Basic Operation Problem The remote control does not work . Depending on the player's front panel for some discs in disc tray and label-side up , or compatibility issues between this ...
... not recorded normally. • Proper playback may be impossible due to person. Possible causes and solutions • Operate the remote control from within a distance of 23 ft from the remote control sensor. (Page 12) • Replace the batteries. (Page 12) • Are you using an HDMI cable. •... settings. (Page 21) • Press STOP, then restart playback. • Turn off . (Page 21) Basic Operation Problem The remote control does not work . Depending on the player's front panel for some discs in disc tray and label-side up , or compatibility issues between this ...

Owner's Manual
Page 27
Once connections and the settings of all devices connected by Pioneer. Input of other HDMI cables are finished, be compliant with USB 2.0. • Occurs if USB memory not compliant • Connect USB 2.0 High Speed (480 with ..." appears on , it all settings including the language setting stored in memory are connected. • Also refer to "Yes". (Page 21) • The control function with wireless remote control capability may not operate properly if the player's picture is a non-standard disc or scratched, etc. Possible causes and solutions • Some TVs with...
Once connections and the settings of all devices connected by Pioneer. Input of other HDMI cables are finished, be compliant with USB 2.0. • Occurs if USB memory not compliant • Connect USB 2.0 High Speed (480 with ..." appears on , it all settings including the language setting stored in memory are connected. • Also refer to "Yes". (Page 21) • The control function with wireless remote control capability may not operate properly if the player's picture is a non-standard disc or scratched, etc. Possible causes and solutions • Some TVs with...


