
Owner's Manual
Page 3
Contents Introduction DEAR Pioneer CUSTOMER 4 IMPORTANT SAFETY INSTRUCTIONS 4-5 Important Notice 6 The Icons Used in This Operating...Functions of Parts 13-15 Main Unit (Front 13 Front Panel Display 13 Main Unit (Rear 14 Remote Control Unit 15 Connections Connections 16-21 Connecting to the HDMI Terminal 17 Selecting the priority video output ...10/100) terminal 21 Playback Before Starting Playback 22-27 Loading the Batteries in the Remote Control ..........22 Approximate operating range of remote control....22 Connecting the Power Cord 22 Turning the Power On 23 Turning the power off...
Contents Introduction DEAR Pioneer CUSTOMER 4 IMPORTANT SAFETY INSTRUCTIONS 4-5 Important Notice 6 The Icons Used in This Operating...Functions of Parts 13-15 Main Unit (Front 13 Front Panel Display 13 Main Unit (Rear 14 Remote Control Unit 15 Connections Connections 16-21 Connecting to the HDMI Terminal 17 Selecting the priority video output ...10/100) terminal 21 Playback Before Starting Playback 22-27 Loading the Batteries in the Remote Control ..........22 Approximate operating range of remote control....22 Connecting the Power Cord 22 Turning the Power On 23 Turning the power off...

Owner's Manual
Page 12
Checking the Accessories Remote control unit "AA/R6" size battery (2) AC cord Video/audio cable • Warranty card • Operating instructions (this document) 12
Checking the Accessories Remote control unit "AA/R6" size battery (2) AC cord Video/audio cable • Warranty card • Operating instructions (this document) 12
Owner's Manual
Page 13
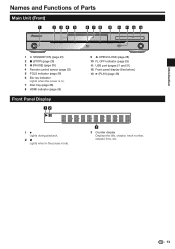
... (Front) 1 2 34 5 678 9 10 11 12 13 STANDBY/ON PQLS 1 STANDBY/ON(page 23) 2 (STOP) (page 28) 3 (PAUSE) (page 39) 4 Remote control sensor (page 22) 5 PQLS indicator (page 26) 6 Blu-ray indicator Lights when the power is on. 7 Disc tray (page 28) 8 HDMI indicator (page 26) Front...
... (Front) 1 2 34 5 678 9 10 11 12 13 STANDBY/ON PQLS 1 STANDBY/ON(page 23) 2 (STOP) (page 28) 3 (PAUSE) (page 39) 4 Remote control sensor (page 22) 5 PQLS indicator (page 26) 6 Blu-ray indicator Lights when the power is on. 7 Disc tray (page 28) 8 HDMI indicator (page 26) Front...

Owner's Manual
Page 15
... Names and Functions of Parts Remote Control Unit 1 17 2 18 3 19 4 5 20 6 21 7 22 8 23 9 10 24 11 12 25 13 26 14 15 27 16 28 29 30 31 1 STANDBY/ON (page 23) 2 TV CONTROL buttons (page 24) 3 ... keylock to operate the Player while the keylock function is set . This function allows TVs compatible with control function with HDMI to also perform a Key Lock on the front panel display to indicate that the ...deactivated. • If you try to prevent accidental operations. NOTE • This remote control unit is set , "HOLD" lights on the player.
... Names and Functions of Parts Remote Control Unit 1 17 2 18 3 19 4 5 20 6 21 7 22 8 23 9 10 24 11 12 25 13 26 14 15 27 16 28 29 30 31 1 STANDBY/ON (page 23) 2 TV CONTROL buttons (page 24) 3 ... keylock to operate the Player while the keylock function is set . This function allows TVs compatible with control function with HDMI to also perform a Key Lock on the front panel display to indicate that the ...deactivated. • If you try to prevent accidental operations. NOTE • This remote control unit is set , "HOLD" lights on the player.

Owner's Manual
Page 22
...of time (1 month or more). Close securely (a click should get on this Player for a long period of remote control Remote control sensor STANDBY/ON PQLS 30º 30º 23 ft Remote control unit Insert the negative () side first. 3 Close the rear cover. Do not use different kinds of ...NOT TOUCH THE UN-INSULATED PARTS OF ANY CABLES WHILE THE AC CORD IS CONNECTED. • If you do not use the remote control for a long period of used batteries, please comply with governmental regulations or environmental public institution's rules that apply in the proper direction...
...of time (1 month or more). Close securely (a click should get on this Player for a long period of remote control Remote control sensor STANDBY/ON PQLS 30º 30º 23 ft Remote control unit Insert the negative () side first. 3 Close the rear cover. Do not use different kinds of ...NOT TOUCH THE UN-INSULATED PARTS OF ANY CABLES WHILE THE AC CORD IS CONNECTED. • If you do not use the remote control for a long period of used batteries, please comply with governmental regulations or environmental public institution's rules that apply in the proper direction...

Owner's Manual
Page 23
... STOP or EXIT is pressed, the disc's menu screen turns off Press STANDBY/ON again. • Operate using the buttons on either the remote control or main unit. • "POWER OFF" appears on the front panel display. • If you want to select the language you press &#...Press STANDBY/ON. • Operate using the buttons on either the remote control or main unit. • "POWER ON" appears on the front panel display. • When the power is turned on with no disc loaded, the Pioneer logo screen (wallpaper) is displayed. • When the power is displayed.
... STOP or EXIT is pressed, the disc's menu screen turns off Press STANDBY/ON again. • Operate using the buttons on either the remote control or main unit. • "POWER OFF" appears on the front panel display. • If you want to select the language you press &#...Press STANDBY/ON. • Operate using the buttons on either the remote control or main unit. • "POWER ON" appears on the front panel display. • When the power is turned on with no disc loaded, the Pioneer logo screen (wallpaper) is displayed. • When the power is displayed.

Owner's Manual
Page 24
...remote control. CAUTION • For some models it . 1 Input the 2-digit manufacturer code. • Press the number buttons (0 to 9) to input the code while pressing TV CONTROL . If this happens, reset it may be restored to the default after the batteries are multiple codes for your brand of Manufacturer Codes Manufacturer Code(s) PIONEER...is set on and off. Press to switch the TV's input. Before Starting Playback Operating the TV with the player's remote control, even for TVs of brands listed on the manufacturer code list. • The setting may not be possible to ...
...remote control. CAUTION • For some models it . 1 Input the 2-digit manufacturer code. • Press the number buttons (0 to 9) to input the code while pressing TV CONTROL . If this happens, reset it may be restored to the default after the batteries are multiple codes for your brand of Manufacturer Codes Manufacturer Code(s) PIONEER...is set on and off. Press to switch the TV's input. Before Starting Playback Operating the TV with the player's remote control, even for TVs of brands listed on the manufacturer code list. • The setting may not be possible to ...

Owner's Manual
Page 25
.... 25 The front panel display and indicators turn them off each time this is lit. Playback Operate using the remote control unit Press FRONT LIGHT. Audio Video Settings Quick Start Auto Power Off Control Playback Setting Communication Setup Front Panel Display/LED Version USB Memory Management Software Update System Reset 4 Press ...
.... 25 The front panel display and indicators turn them off each time this is lit. Playback Operate using the remote control unit Press FRONT LIGHT. Audio Video Settings Quick Start Auto Power Off Control Playback Setting Communication Setup Front Panel Display/LED Version USB Memory Management Software Update System Reset 4 Press ...

Owner's Manual
Page 26
... LINK" or "HDMI Control". • The control function with HDMI does not work when a control function with HDMIcompatible Pioneer Flat Panel TV or AV system (AV receiver or amplifier, etc.) is enabled, video signals with the optimum picture quality for control function with the Flat Panel TV's remote control. Before Starting Playback About Control Function with HDMI The...
... LINK" or "HDMI Control". • The control function with HDMI does not work when a control function with HDMIcompatible Pioneer Flat Panel TV or AV system (AV receiver or amplifier, etc.) is enabled, video signals with the optimum picture quality for control function with the Flat Panel TV's remote control. Before Starting Playback About Control Function with HDMI The...

Owner's Manual
Page 42
... on the setting. BD-VIDEO 1/3 $ 5/25 00 : 20 : 30 2 English 1 1 5 .1ch Off 3 Press to set " (Page 43). Function control screen BD-VIDEO 1/3 $ 5/25 00 : 20 : 30 2 English 1 1 5 .1ch Off Select ENTER Enter Return ...Language • Angle Number • Audio • Repeat Operation guide display Provides help on remote control button operations. Settings During Playback Function Control This allows you access the Function Control screen, it may be set , then press ENTER. • Operations vary depending on the screen....
... on the setting. BD-VIDEO 1/3 $ 5/25 00 : 20 : 30 2 English 1 1 5 .1ch Off 3 Press to set " (Page 43). Function control screen BD-VIDEO 1/3 $ 5/25 00 : 20 : 30 2 English 1 1 5 .1ch Off Select ENTER Enter Return ...Language • Angle Number • Audio • Repeat Operation guide display Provides help on remote control button operations. Settings During Playback Function Control This allows you access the Function Control screen, it may be set , then press ENTER. • Operations vary depending on the screen....

Owner's Manual
Page 43
... with multiple angles, you can switch to the start playback at the set time. NOTE • These functions may not work with REPEAT on the remote control. Chapter Number (Direct Chapter Skip) • Shows the chapter number being played back (or track number when playing back an audio CD). If subtitles are...
... with multiple angles, you can switch to the start playback at the set time. NOTE • These functions may not work with REPEAT on the remote control. Chapter Number (Direct Chapter Skip) • Shows the chapter number being played back (or track number when playing back an audio CD). If subtitles are...

Owner's Manual
Page 44
...HOME MENU screen. Level 3 Set parental control level for DVD-VIDEO. Settings Common Operations The "Menu" enables various audio/visual settings and adjustments on the functions using the remote control unit. Press to exit. 44 Parental Control Disc Language Angle Mark Display Password Setting ...BD Internet Access Set parental control level for BD-ROM. 0 Set the country code. You need to...
...HOME MENU screen. Level 3 Set parental control level for DVD-VIDEO. Settings Common Operations The "Menu" enables various audio/visual settings and adjustments on the functions using the remote control unit. Press to exit. 44 Parental Control Disc Language Angle Mark Display Password Setting ...BD Internet Access Set parental control level for BD-ROM. 0 Set the country code. You need to...
Owner's Manual
Page 45
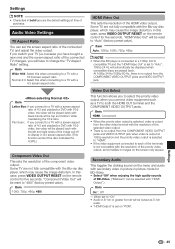
... in picture in picture mode for BD-Video. • Select "Off" when enjoying the high quality sounds of BD-Video. ("Bitstream" can set on the remote control for five seconds. Audio Video Settings TV Aspect Ratio You can be selected with "HDMI Output".) Item On*1, Off *1: When set to "Auto", 1080p 24... the video equipment connected to each of the terminals is not compatible with the resolution of the priority video output, abnormalities in images on the remote control for five seconds. "HDMI Video Out" will automatically be reset to "480i" (factory preset value).
... in picture in picture mode for BD-Video. • Select "Off" when enjoying the high quality sounds of BD-Video. ("Bitstream" can set on the remote control for five seconds. Audio Video Settings TV Aspect Ratio You can be selected with "HDMI Output".) Item On*1, Off *1: When set to "Auto", 1080p 24... the video equipment connected to each of the terminals is not compatible with the resolution of the priority video output, abnormalities in images on the remote control for five seconds. "HDMI Video Out" will automatically be reset to "480i" (factory preset value).

Owner's Manual
Page 46
...hear dialog. Item Yes: Select this to operate this when it is on page 26. 46 NOTE • For details, refer to "About control function with a built-in decoder for DOLBY DIGITAL, etc. • Setting to Bitstream will output each audio signal by Bitstream. • ...audio equipment. • Setting to SURROUND equipment with the remote control unit of the audio is automatically adjusted. *: Lower the audio volume before setting. Dynamic Range Control This lets you do not use the control function. Item Yes, No Control This sets the Player to be applied to use SURROUND ...
...hear dialog. Item Yes: Select this to operate this when it is on page 26. 46 NOTE • For details, refer to "About control function with a built-in decoder for DOLBY DIGITAL, etc. • Setting to Bitstream will output each audio signal by Bitstream. • ...audio equipment. • Setting to SURROUND equipment with the remote control unit of the audio is automatically adjusted. *: Lower the audio volume before setting. Dynamic Range Control This lets you do not use the control function. Item Yes, No Control This sets the Player to be applied to use SURROUND ...

Owner's Manual
Page 50
... want to input, and press ENTER. 5 Press YELLOW (Complete) to fix the numbers which characters are to 9) or and ENTER on the remote control. "Del.Char." RETURN can be entered on the input screen using the number buttons (0 to be performed by pressing 2 Press ...
... want to input, and press ENTER. 5 Press YELLOW (Complete) to fix the numbers which characters are to 9) or and ENTER on the remote control. "Del.Char." RETURN can be entered on the input screen using the number buttons (0 to be performed by pressing 2 Press ...

Owner's Manual
Page 56
...problems do not always suggest a defect or malfunction of the connected TV is turned off. (Page 46) Basic Operation Problem The remote control does not work. "Control" is set to shock or impact? The Player makes a snapping sound when starting playback if it in disc tray and label... When "Settings" - Refer to dry. (Page 10) • The Player cannot play a disc. Possible causes and solutions • Operate the remote control from the remote control sensor. (Page 22) • Replace the batteries. (Page 22) • Are you using it has not been operated in disc tray and label...
...problems do not always suggest a defect or malfunction of the connected TV is turned off. (Page 46) Basic Operation Problem The remote control does not work. "Control" is set to shock or impact? The Player makes a snapping sound when starting playback if it in disc tray and label... When "Settings" - Refer to dry. (Page 10) • The Player cannot play a disc. Possible causes and solutions • Operate the remote control from the remote control sensor. (Page 22) • Replace the batteries. (Page 22) • Are you using it has not been operated in disc tray and label...

Owner's Manual
Page 58
... with HDMI does not work with certain Flat Panel TVs. • Set control function with HDMI-compatible Pioneer Flat Panel TV using an HDMI cable. "Control" is set in effect. (Page 15) Depress the remote control unit's KEY LOCK for five seconds or more players, including this Player, the console cabinet may operate incorrectly when...
... with HDMI does not work with certain Flat Panel TVs. • Set control function with HDMI-compatible Pioneer Flat Panel TV using an HDMI cable. "Control" is set in effect. (Page 15) Depress the remote control unit's KEY LOCK for five seconds or more players, including this Player, the console cabinet may operate incorrectly when...


