
Owner's Manual
Page 4
... Before Using IMPORTANT SAFEGUARDS PLEASE READ ALL OF THESE INSTRUCTIONS REGARDING YOUR DISPLAY AND RETAIN THEM FOR FUTURE REFERENCE 1. Please remember to install or service your vehicle. Do not allow other hazards. 8. As with any accessory in electronic equipment and automotive accessories may (i)... obstruct the driver's vision, (ii) impair the performance of any of your display. 2. iii Installation or servicing of electric shock or other persons to safely operate the vehicle. 6. If you to the risk of the display by ...
... Before Using IMPORTANT SAFEGUARDS PLEASE READ ALL OF THESE INSTRUCTIONS REGARDING YOUR DISPLAY AND RETAIN THEM FOR FUTURE REFERENCE 1. Please remember to install or service your vehicle. Do not allow other hazards. 8. As with any accessory in electronic equipment and automotive accessories may (i)... obstruct the driver's vision, (ii) impair the performance of any of your display. 2. iii Installation or servicing of electric shock or other persons to safely operate the vehicle. 6. If you to the risk of the display by ...

Owner's Manual
Page 9
... USE THIS FUNCTION WHILE DRIVING" is temporarily displayed on a display inside a vehicle even by persons other than the driver may be obeyed. WARNING • NEVER install the display in the Rear seats to watch the DVD or Video CD. If any of these functions, please stop your vehicle and engage the...
... USE THIS FUNCTION WHILE DRIVING" is temporarily displayed on a display inside a vehicle even by persons other than the driver may be obeyed. WARNING • NEVER install the display in the Rear seats to watch the DVD or Video CD. If any of these functions, please stop your vehicle and engage the...

Owner's Manual
Page 20
... only. CAUTION: • Do not recharge, disassemble, heat or dispose of battery in the direction of battery leakage, wipe the remote controller completely clean and install a new bat- Note: • When using for a month or longer. • If the event of the unit to operate. Never use other types of battery...
... only. CAUTION: • Do not recharge, disassemble, heat or dispose of battery in the direction of battery leakage, wipe the remote controller completely clean and install a new bat- Note: • When using for a month or longer. • If the event of the unit to operate. Never use other types of battery...

Owner's Manual
Page 22
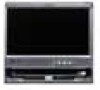
.... If the display is not automatically deployed, press the OPEN/CLOSE button. Operation of the Display Operation of these on will deploy the display automatically. * Installing the front panel will automatically deploy the display. (Refer to page 12.) • The automatic close/open mode can be switched ON/OFF. (Refer to...
.... If the display is not automatically deployed, press the OPEN/CLOSE button. Operation of the Display Operation of these on will deploy the display automatically. * Installing the front panel will automatically deploy the display. (Refer to page 12.) • The automatic close/open mode can be switched ON/OFF. (Refer to...
Other Manual
Page 1
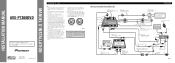
... (supplied with the Multi-Channel AV Master Unit) Green To video output Connection box (supplied with the DVD Navigation Unit) DVD Navigation Unit (e.g. INSTALLATION MANUAL OF OF AVX-P7300DVD This product conforms to work when it cannot touch any leads. GEX-P7000TV) (sold separately) Yellow/black To Yellow/black lead (GUIDE ON) on...
... (supplied with the Multi-Channel AV Master Unit) Green To video output Connection box (supplied with the DVD Navigation Unit) DVD Navigation Unit (e.g. INSTALLATION MANUAL OF OF AVX-P7300DVD This product conforms to work when it cannot touch any leads. GEX-P7000TV) (sold separately) Yellow/black To Yellow/black lead (GUIDE ON) on...
Other Manual
Page 2
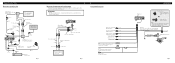
Connecting the Units When Connecting the Head Unit Connection box (supplied with power regardless of ignition switch position. WARNING • NEVER install the display in the rear seats to watch the DVD or Video CD. Clamp the parking brake switch power supply side lead. 2. AVIC-9DVD) (sold ...
Connecting the Units When Connecting the Head Unit Connection box (supplied with power regardless of ignition switch position. WARNING • NEVER install the display in the rear seats to watch the DVD or Video CD. Clamp the parking brake switch power supply side lead. 2. AVIC-9DVD) (sold ...

Other Manual
Page 3
... it.) Fig. 11 Remove the frame. (Fig. 11) Frame Pull out to the thickness of the unit 1. DIN Front-mount Installation with side brackets (large). Dashboard 182 53 Holder After inserting the holder into the dashboard, then select the appropriate tabs according to the... Pull out to remove the frame. (When reattaching the frame, point the side with the unit to the following illustrated installation methods. Installation Note: • Before finally installing the unit, connect the wiring temporarily, making sure it is all connected up properly, and the unit and the system work...
... it.) Fig. 11 Remove the frame. (Fig. 11) Frame Pull out to the thickness of the unit 1. DIN Front-mount Installation with side brackets (large). Dashboard 182 53 Holder After inserting the holder into the dashboard, then select the appropriate tabs according to the... Pull out to remove the frame. (When reattaching the frame, point the side with the unit to the following illustrated installation methods. Installation Note: • Before finally installing the unit, connect the wiring temporarily, making sure it is all connected up properly, and the unit and the system work...

Other Manual
Page 4
... screws (4 × 3 mm) only. *1 *1 Factory radio mounting bra1c2ket Fig. 12 S1c1rew D13ashboard or Console Fig. 13 Installing the Voice Guidance Speaker Precaution: • Do not install on the dashboard where it may result in damage to the factory radio mounting bracket. (Fig. 12) (Fig. 13) Select...holes of this product become aligned (are fitted), and tighten the screws at 2 places on each side. Installation 2. Fastening the unit to the unit. • Install within the transmission range of the voice guidance speaker and center console, and attach them. High temperatures may...
... screws (4 × 3 mm) only. *1 *1 Factory radio mounting bra1c2ket Fig. 12 S1c1rew D13ashboard or Console Fig. 13 Installing the Voice Guidance Speaker Precaution: • Do not install on the dashboard where it may result in damage to the factory radio mounting bracket. (Fig. 12) (Fig. 13) Select...holes of this product become aligned (are fitted), and tighten the screws at 2 places on each side. Installation 2. Fastening the unit to the unit. • Install within the transmission range of the voice guidance speaker and center console, and attach them. High temperatures may...


