Owner's Manual
Page 2
...29 Connection Diagram (VIDEO input 30 Connection Diagram (VIDEO output 31 Connection Diagram (TV tuner unit 32 Connection Diagram (Headphone 32 Installation 33 Changing the Dome Light lamp 34 Specifications 36 1 BRIGHT/CONTRAST/COLOR/HUE - Contents Contents 1 Dear Customer 2 IMPORTANT ... About This Product 4 About This Manual 4 Precaution 5 Important 5 After-sales Service for Pioneer Products .......... 5 Before Using This Product 6 To Avoid Battery Exhaustion 6 To Protect the LCD Screen of the Dome Light 14 Dome Light Setting 14 Basic Operation 15 Turn On Power ...
...29 Connection Diagram (VIDEO input 30 Connection Diagram (VIDEO output 31 Connection Diagram (TV tuner unit 32 Connection Diagram (Headphone 32 Installation 33 Changing the Dome Light lamp 34 Specifications 36 1 BRIGHT/CONTRAST/COLOR/HUE - Contents Contents 1 Dear Customer 2 IMPORTANT ... About This Product 4 About This Manual 4 Precaution 5 Important 5 After-sales Service for Pioneer Products .......... 5 Before Using This Product 6 To Avoid Battery Exhaustion 6 To Protect the LCD Screen of the Dome Light 14 Dome Light Setting 14 Basic Operation 15 Turn On Power ...
Owner's Manual
Page 4
... the vehicle. 6. Read this manual and follow the instructions care- Keep this manual handy for Future Reference 1. Do not install the display where it may be considerably more severe if your injuries can be dangerous and could expose you experience difficulty in ... of your display. 2. IMPORTANT SAFEGUARDS Please Read All of These Instructions Regarding Your Display and Retain them for future reference. 3. Installation or servicing of the display by persons without training and experience in electronic equipment and automotive accessories may (i) obstruct the driver's vision...
... the vehicle. 6. Read this manual and follow the instructions care- Keep this manual handy for Future Reference 1. Do not install the display where it may be considerably more severe if your injuries can be dangerous and could expose you experience difficulty in ... of your display. 2. IMPORTANT SAFEGUARDS Please Read All of These Instructions Regarding Your Display and Retain them for future reference. 3. Installation or servicing of the display by persons without training and experience in electronic equipment and automotive accessories may (i) obstruct the driver's vision...
Owner's Manual
Page 5
...For differences in accordance with its buttons. This equipment generates, uses and can be sure to use of the display in a residential installation. Reorient or relocate the receiving antenna. - Increase the separation between the equipment and receiver. - For details concerning TV operation when using...to operate the equipment. [For Canadian model] This Class B digital apparatus complies with all applicable laws and regulations in a particular installation. Do not place the display in a position where it is encouraged to try to correct the interference by turning the equipment ...
...For differences in accordance with its buttons. This equipment generates, uses and can be sure to use of the display in a residential installation. Reorient or relocate the receiving antenna. - Increase the separation between the equipment and receiver. - For details concerning TV operation when using...to operate the equipment. [For Canadian model] This Class B digital apparatus complies with all applicable laws and regulations in a particular installation. Do not place the display in a position where it is encouraged to try to correct the interference by turning the equipment ...
Owner's Manual
Page 7
...the vehicle engine while using this unit without running the engine can result in battery drainage. The viewing angle (vertical and horizontal) can result in LCD screen malfunction due to the resulting high temperatures. • When using a portable phone, keep the antenna of the portable phone away from the ...display to fall on the unit with the viewing angle (vertical and horizontal) to adjust for the first time after installation When the product fails to its construction, the view angle of the video by using [BRIGHT] to suit your personal preference. To Protect ...
...the vehicle engine while using this unit without running the engine can result in battery drainage. The viewing angle (vertical and horizontal) can result in LCD screen malfunction due to the resulting high temperatures. • When using a portable phone, keep the antenna of the portable phone away from the ...display to fall on the unit with the viewing angle (vertical and horizontal) to adjust for the first time after installation When the product fails to its construction, the view angle of the video by using [BRIGHT] to suit your personal preference. To Protect ...

Owner's Manual
Page 10
.... • If the event of children. WARNING: • Keep the lithium battery out of reach of battery leakage, wipe the remote control completely clean and install a new battery. Note: • When using for convenient operation. • Point the control in the direction of the unit to operate. CAUTION: • Do not...
.... • If the event of children. WARNING: • Keep the lithium battery out of reach of battery leakage, wipe the remote control completely clean and install a new battery. Note: • When using for convenient operation. • Point the control in the direction of the unit to operate. CAUTION: • Do not...

Owner's Manual
Page 25
... [REMOTE CONTROL SETTING] menu. (Refer to this product's [VIDEO1] and [VIDEO2] inputs via this product. When you can only select one type. • If you install the remote control signal transmitter so that you stick on the remote control sensor of the unit being controlled, make sure it is facing the...
... [REMOTE CONTROL SETTING] menu. (Refer to this product's [VIDEO1] and [VIDEO2] inputs via this product. When you can only select one type. • If you install the remote control signal transmitter so that you stick on the remote control sensor of the unit being controlled, make sure it is facing the...
Owner's Manual
Page 28
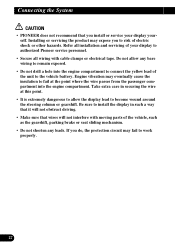
... it will not interfere with moving parts of your display yourself. If you install or service your display to become wound around the steering column or gearshift. Connecting the System CAUTION • PIONEER does not recommend that wires will not obstruct driving. • Make sure that...remain exposed. • Do not drill a hole into the engine compartment. Do not allow the display lead to authorized Pioneer service personnel. • Secure all installation and servicing of the vehicle, such as the gearshift, parking brake or seat sliding mechanism. • Do not shorten ...
... it will not interfere with moving parts of your display yourself. If you install or service your display to become wound around the steering column or gearshift. Connecting the System CAUTION • PIONEER does not recommend that wires will not obstruct driving. • Make sure that...remain exposed. • Do not drill a hole into the engine compartment. Do not allow the display lead to authorized Pioneer service personnel. • Secure all installation and servicing of the vehicle, such as the gearshift, parking brake or seat sliding mechanism. • Do not shorten ...

Owner's Manual
Page 29
...lead insulation and cause a very dangerous short. • Do not shorten any moving parts, such as near the heater outlet. If this unit is installed in places that does not have the same function. This will be exceeded, causing overheating. • When replacing a fuse, be sure to the ...protect the wiring, wrap adhesive tape around them where they have the same function. When connecting this product to another product, refer to the supplied Installation manuals of both products and connect cords that have an ACC (accessory) position on the fuse holder. • If this is a danger ...
...lead insulation and cause a very dangerous short. • Do not shorten any moving parts, such as near the heater outlet. If this unit is installed in places that does not have the same function. This will be exceeded, causing overheating. • When replacing a fuse, be sure to the ...protect the wiring, wrap adhesive tape around them where they have the same function. When connecting this product to another product, refer to the supplied Installation manuals of both products and connect cords that have an ACC (accessory) position on the fuse holder. • If this is a danger ...

Owner's Manual
Page 33
...not obstruct the driver's field of it becoming entangled with the GEX-6100TV) Connection Diagram (Headphone) When this product is installed, you can connect a separately sold GEX-6100TV. FRANÇAIS ITALIANO NEDERLANDS 32 This product Phone2 Phone1 Commercial headphones WARNING When... wired headphones are connected, make sure the cable is in a location where there is installed, you can connect a separately sold headphone. ENGLISH ESPAÑOL DEUTSCH Connection Diagram (TV tuner unit) When this product is...
...not obstruct the driver's field of it becoming entangled with the GEX-6100TV) Connection Diagram (Headphone) When this product is installed, you can connect a separately sold GEX-6100TV. FRANÇAIS ITALIANO NEDERLANDS 32 This product Phone2 Phone1 Commercial headphones WARNING When... wired headphones are connected, make sure the cable is in a location where there is installed, you can connect a separately sold headphone. ENGLISH ESPAÑOL DEUTSCH Connection Diagram (TV tuner unit) When this product is...
Owner's Manual
Page 34
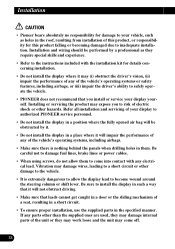
...a short circuit. • To ensure proper installation, use the supplied parts in the roof, resulting from installation of this product, or responsibility for this product falling or becoming damaged due to inadequate installation. Installation CAUTION • Pioneer bears absolutely no responsibility for damage to your ... they may work loose and the unit may expose you install or service your display yourself. Refer all installation and servicing of your display to authorized PIONEER service personnel. • Do not install the display in a position where the fully opened air ...
...a short circuit. • To ensure proper installation, use the supplied parts in the roof, resulting from installation of this product, or responsibility for this product falling or becoming damaged due to inadequate installation. Installation CAUTION • Pioneer bears absolutely no responsibility for damage to your ... they may work loose and the unit may expose you install or service your display yourself. Refer all installation and servicing of your display to authorized PIONEER service personnel. • Do not install the display in a position where the fully opened air ...
Owner's Manual
Page 35
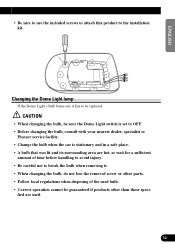
... changing the bulb, be sure the Dome Light switch is set to OFF. • Before changing the bulb, consult with your nearest dealer, specialist or Pioneer service facility. • Change the bulb when the car is stationary and in a safe place. • A bulb that was lit and its surrounding area are... local regulations when disposing of time before handling to avoid injury. • Be careful not to break the bulb when removing it has to the installation kit.
... changing the bulb, be sure the Dome Light switch is set to OFF. • Before changing the bulb, consult with your nearest dealer, specialist or Pioneer service facility. • Change the bulb when the car is stationary and in a safe place. • A bulb that was lit and its surrounding area are... local regulations when disposing of time before handling to avoid injury. • Be careful not to break the bulb when removing it has to the installation kit.
Owner's Manual
Page 36
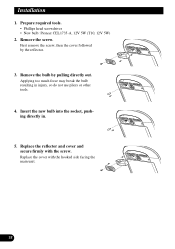
Remove the screw. Remove the bulb by the reflector. 3. Installation 1. Applying too much force may break the bulb resulting in . 5. Insert the new bulb into the socket, pushing directly in injury, so do not use pliers or other tools. 4. Replace the reflector and cover and secure firmly with the hooked side facing the main unit. 35 First remove the screw, then the cover followed by pulling directly out. Replace the cover with the screw. Prepare required tools. • Phillips head screwdriver • New bulb: Pioneer CEL1735-A, 12V 5W (T10, 12V 5W) 2.
Remove the screw. Remove the bulb by the reflector. 3. Installation 1. Applying too much force may break the bulb resulting in . 5. Insert the new bulb into the socket, pushing directly in injury, so do not use pliers or other tools. 4. Replace the reflector and cover and secure firmly with the hooked side facing the main unit. 35 First remove the screw, then the cover followed by pulling directly out. Replace the cover with the screw. Prepare required tools. • Phillips head screwdriver • New bulb: Pioneer CEL1735-A, 12V 5W (T10, 12V 5W) 2.
User Manual
Page 2
... Output Setting 21 Remote Control Setting 22 Using the Display Correctly 23 Handling the Display 23 About the Liquid Crystal Display (LCD) Screen 24 Keeping the Display in Good Condition ........ 24 About the Small Fluorescent Tube 24 Connecting the System 25 Connecting the...(VIDEO output 29 Connection Diagram (TV tuner unit 30 Connection Diagram (Headphone 30 Installation 31 Changing the Dome Light lamp 32 Specifications 34 1 Using this product and a GEX-6100TVP TV tuner - To Operate Pioneer DVD player This Product 6 Using the Remote Control 7 Battery 7 Setting Remote Control...
... Output Setting 21 Remote Control Setting 22 Using the Display Correctly 23 Handling the Display 23 About the Liquid Crystal Display (LCD) Screen 24 Keeping the Display in Good Condition ........ 24 About the Small Fluorescent Tube 24 Connecting the System 25 Connecting the...(VIDEO output 29 Connection Diagram (TV tuner unit 30 Connection Diagram (Headphone 30 Installation 31 Changing the Dome Light lamp 32 Specifications 34 1 Using this product and a GEX-6100TVP TV tuner - To Operate Pioneer DVD player This Product 6 Using the Remote Control 7 Battery 7 Setting Remote Control...
User Manual
Page 3
... attention from the safe operation of electric shock or other incidents. Do not attempt to install or service your head on the screen during sudden braking or other hazards. 8. Installation or servicing of the display by persons without training and experience in electronic equipment and automotive... the performance of any accessory in operating the system or reading the display, please park safely before operating your vehicle. Do not install the display where it may be considerably more severe if your injuries can be dangerous and could expose you do not accidentally hit ...
... attention from the safe operation of electric shock or other incidents. Do not attempt to install or service your head on the screen during sudden braking or other hazards. 8. Installation or servicing of the display by persons without training and experience in electronic equipment and automotive... the performance of any accessory in operating the system or reading the display, please park safely before operating your vehicle. Do not install the display where it may be considerably more severe if your injuries can be dangerous and could expose you do not accidentally hit ...
User Manual
Page 4
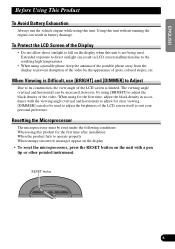
...the room lamp, be able to use the separately sold GEX6100TVP TV tuner, refer to operate properly, contact your dealer or the nearest authorized Pioneer service facility. To Avoid Battery Exhaustion Always run the vehicle engine while using the remote control, refer to "Key Finder" on page 5...how to the text explaining operation. For differences in operation using this product with its buttons. However, depending on where this product is installed and how it is left on this product after first switching off the power. Precaution • Always keep the volume low enough for...
...the room lamp, be able to use the separately sold GEX6100TVP TV tuner, refer to operate properly, contact your dealer or the nearest authorized Pioneer service facility. To Avoid Battery Exhaustion Always run the vehicle engine while using the remote control, refer to "Key Finder" on page 5...how to the text explaining operation. For differences in operation using this product with its buttons. However, depending on where this product is installed and how it is left on this product after first switching off the power. Precaution • Always keep the volume low enough for...

User Manual
Page 5
.... • When using a portable phone, keep the antenna of the portable phone away from the display to prevent disruption of the LCD screen itself to adjust the brightness of the video by using this unit is limited. RESET button 4 FRANÇAIS ITALIANO NEDERLANDS When...viewing angle (vertical and horizontal) can result in accordance with the viewing angle (vertical and horizontal) to adjust for the first time after installation When the product fails to operate properly When strange (incorrect) messages appear on the display • To reset the microprocessor, press the ...
.... • When using a portable phone, keep the antenna of the portable phone away from the display to prevent disruption of the LCD screen itself to adjust the brightness of the video by using this unit is limited. RESET button 4 FRANÇAIS ITALIANO NEDERLANDS When...viewing angle (vertical and horizontal) can result in accordance with the viewing angle (vertical and horizontal) to adjust for the first time after installation When the product fails to operate properly When strange (incorrect) messages appear on the display • To reset the microprocessor, press the ...

User Manual
Page 8
.... • If the event of children. WARNING: • Keep the lithium battery out of reach of battery leakage, wipe the remote control completely clean and install a new battery. Should the battery be swallowed, immediately consult a doctor. Precaution: • Remove the battery if the remote control is equipped with the (+) and (-) poles...
.... • If the event of children. WARNING: • Keep the lithium battery out of reach of battery leakage, wipe the remote control completely clean and install a new battery. Should the battery be swallowed, immediately consult a doctor. Precaution: • Remove the battery if the remote control is equipped with the (+) and (-) poles...

User Manual
Page 23
... Remote Control Setting Remote Control Setting enables remote control of auxiliary components connected to page 9.) 2. When you can only select one type. • If you install the remote control signal transmitter so that you stick on the remote control sensor of the unit being controlled, make sure it is located in...
... Remote Control Setting Remote Control Setting enables remote control of auxiliary components connected to page 9.) 2. When you can only select one type. • If you install the remote control signal transmitter so that you stick on the remote control sensor of the unit being controlled, make sure it is located in...

User Manual
Page 26
...engine compartment. Do not allow the display lead to authorized Pioneer service personnel. • Secure all wiring with moving parts of the unit to work properly. 25 If you do, the protection circuit may expose you install or service your display to become wound around the steering ...column or gearshift. Connecting the System CAUTION • PIONEER does not recommend that wires will not obstruct driving. • Make sure that you...
...engine compartment. Do not allow the display lead to authorized Pioneer service personnel. • Secure all wiring with moving parts of the unit to work properly. 25 If you do, the protection circuit may expose you install or service your display to become wound around the steering ...column or gearshift. Connecting the System CAUTION • PIONEER does not recommend that wires will not obstruct driving. • Make sure that you...

User Manual
Page 27
...that have the same function. If this is not done, the vehicle battery may be sure to disconnect the ≠ battery cable before beginning installation. • Refer to the owner's manual for several hours. To protect the wiring, wrap adhesive tape around them where they have the same...; This unit is for other products may fail to work when it should be connected to a terminal coupled with ignition switch ON/OFF operations. Before installing it cannot touch any leads. F ACC O F O OF OF N STAR N STAR T T ACC position No ACC position • Cords for this product and ...
...that have the same function. If this is not done, the vehicle battery may be sure to disconnect the ≠ battery cable before beginning installation. • Refer to the owner's manual for several hours. To protect the wiring, wrap adhesive tape around them where they have the same...; This unit is for other products may fail to work when it should be connected to a terminal coupled with ignition switch ON/OFF operations. Before installing it cannot touch any leads. F ACC O F O OF OF N STAR N STAR T T ACC position No ACC position • Cords for this product and ...


