
Owner's Manual
Page 2
... Using a Display connected to Rear Video Output Important 6 Resetting the Microprocessor 7 Precaution 7 When using the 50-Disc Type Multi-CD Player ...... 7 Remote Control and Care 8 • Battery Operation for Each Source Unit .......... 9 To Listen to Music 9 • When connecting a Multi-DVD player PTY Function 24 • Searching the PTY • PTY Alarm • Canceling Announcements TA Function 27 • Activating/Deactivating the TA Function Radio Text 29 • Radio Text display • Storing Radio Text in memory • Recalling preset Radio...
... Using a Display connected to Rear Video Output Important 6 Resetting the Microprocessor 7 Precaution 7 When using the 50-Disc Type Multi-CD Player ...... 7 Remote Control and Care 8 • Battery Operation for Each Source Unit .......... 9 To Listen to Music 9 • When connecting a Multi-DVD player PTY Function 24 • Searching the PTY • PTY Alarm • Canceling Announcements TA Function 27 • Activating/Deactivating the TA Function Radio Text 29 • Radio Text display • Storing Radio Text in memory • Recalling preset Radio...

Owner's Manual
Page 3
... Display Position 79 Changing the Pattern of Plate 79 Other Functions 81 Switching the Center Screen and Time Display in the Center Room 81 Switching the Color of the Spectrum Analyzer 81 Listening Sounds or Viewing Images from Additional Units 82 • Accessing the Set Up Menu • Switching the AUX Source • Switching the Video Mode • Switching the Speaker Input Mode AUX Title Input 84 Muting Function 84 • Mobile Navigation Unit Muting • Cellular Telephone Muting Troubleshooting 85 Terms 88 Installation 89 Specifications...
... Display Position 79 Changing the Pattern of Plate 79 Other Functions 81 Switching the Center Screen and Time Display in the Center Room 81 Switching the Color of the Spectrum Analyzer 81 Listening Sounds or Viewing Images from Additional Units 82 • Accessing the Set Up Menu • Switching the AUX Source • Switching the Video Mode • Switching the Speaker Input Mode AUX Title Input 84 Muting Function 84 • Mobile Navigation Unit Muting • Cellular Telephone Muting Troubleshooting 85 Terms 88 Installation 89 Specifications...

Owner's Manual
Page 6
... Theater" is NTSC system compatible. Output Setting of the DVD Player When connecting Pioneer's Multi-DVD player such as the XDV-P9, make those settings. Before Using This Product About This Product The tuner frequencies on this product are trademarks of Dolby Laboratories. When connecting an external component to this product, be able to navigate quite easily throughout it is not, images will be sure the component...
... Theater" is NTSC system compatible. Output Setting of the DVD Player When connecting Pioneer's Multi-DVD player such as the XDV-P9, make those settings. Before Using This Product About This Product The tuner frequencies on this product are trademarks of Dolby Laboratories. When connecting an external component to this product, be able to navigate quite easily throughout it is not, images will be sure the component...

Owner's Manual
Page 7
... card. 6 When Using a Display connected to Rear Video Output This product's Rear video output is for the easiest possible use with the functions and their potential and to enable passengers in a safe place and apply the parking brake, the picture appears on a display inside a vehicle even by reading through the manual before you familiarize yourself with a video screen that enables the Driver to watch the Video or DVD while Driving. This operation manual is not...
... card. 6 When Using a Display connected to Rear Video Output This product's Rear video output is for the easiest possible use with the functions and their potential and to enable passengers in a safe place and apply the parking brake, the picture appears on a display inside a vehicle even by reading through the manual before you familiarize yourself with a video screen that enables the Driver to watch the Video or DVD while Driving. This operation manual is not...
Owner's Manual
Page 10
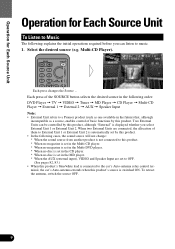
... player. * When no disc is set in the future) that, although incompatible as a source, enables control of them to External Unit 1 or External Unit 2 is automatically set to OFF. (See pages 82, 83.) • When this product's blue/white lead is connected to music. 1. Each press of the SOURCE button selects the desired source in the following order: DVD Player = TV = VIDEO = Tuner = MD Player = CD Player = Multi-CD Player = External 1 = External 2 = AUX = Speaker Input Note: • External Unit refers to a Pioneer...
... player. * When no disc is set in the future) that, although incompatible as a source, enables control of them to External Unit 1 or External Unit 2 is automatically set to OFF. (See pages 82, 83.) • When this product's blue/white lead is connected to music. 1. Each press of the SOURCE button selects the desired source in the following order: DVD Player = TV = VIDEO = Tuner = MD Player = CD Player = Multi-CD Player = External 1 = External 2 = AUX = Speaker Input Note: • External Unit refers to a Pioneer...

Owner's Manual
Page 12
... Tour Move the joystick up to move in play. The screen appearing at the center of the room can be changed. (See page 81.) Move the joystick left to move to the entrance of the sound currently in virtual space to the Spectrum Analyzer Room. Click the joystick to the Function Menu Screen. This screen provides a visual image of the volume settings.
... Tour Move the joystick up to move in play. The screen appearing at the center of the room can be changed. (See page 81.) Move the joystick left to move to the entrance of the sound currently in virtual space to the Spectrum Analyzer Room. Click the joystick to the Function Menu Screen. This screen provides a visual image of the volume settings.

Owner's Manual
Page 16
... MENU button. Using the Screen Pictures (Selecting the NAVI, VTR etc.) Using the Screen Pictures (Selecting the NAVI, VTR etc.) Selecting the Mobile Navigation Picture You can confirm it on . • If, while "NAVI" is highlighted in green. 5. Switch the power to your navigation unit, you switch off your navigation unit ON before performing operations. (Refer to the video input on this product. "Set Up" is selected as source, you can switch the picture...
... MENU button. Using the Screen Pictures (Selecting the NAVI, VTR etc.) Using the Screen Pictures (Selecting the NAVI, VTR etc.) Selecting the Mobile Navigation Picture You can confirm it on . • If, while "NAVI" is highlighted in green. 5. Switch the power to your navigation unit, you switch off your navigation unit ON before performing operations. (Refer to the video input on this product. "Set Up" is selected as source, you can switch the picture...

Owner's Manual
Page 19
.... Using the Screen Pictures (Selecting the NAVI, VTR etc.) Option SHARP HUE COLOR Adjustment You can also make adjustments to greenish. You can adjust the sharpness of the picture. • The display changes as the distinction of the picture changes from red- The selected option is automatically canceled. 18 dish to the picture quality when viewing with the car courtesy light ON or OFF, and store both settings in memory...
.... Using the Screen Pictures (Selecting the NAVI, VTR etc.) Option SHARP HUE COLOR Adjustment You can also make adjustments to greenish. You can adjust the sharpness of the picture. • The display changes as the distinction of the picture changes from red- The selected option is automatically canceled. 18 dish to the picture quality when viewing with the car courtesy light ON or OFF, and store both settings in memory...

Owner's Manual
Page 25
... not be provided by PTY information (Program Type ID code). Built-In Tuner/Using the RDS Functions Using the RDS Functions This product features a tuner with FM programs. You get display of Program Service Name and PTY (Program Type ID code), tuning to stations broadcasting a desired PTY, automatic tuning to look for a station by all FM stations. RDS (Radio broadcast Data System) is divided into 8 types, such as ROCK...
... not be provided by PTY information (Program Type ID code). Built-In Tuner/Using the RDS Functions Using the RDS Functions This product features a tuner with FM programs. You get display of Program Service Name and PTY (Program Type ID code), tuning to stations broadcasting a desired PTY, automatic tuning to look for a station by all FM stations. RDS (Radio broadcast Data System) is divided into 8 types, such as ROCK...

Owner's Manual
Page 33
... MENU button. The DVD Function Menu appears, offering you the following options: 7 DVD Function Menu (DVD, Video CD) Pause (See page 33.) Repeat Play (See page 33.) PGM button (See page 34.) Multi-DVD Player 3. Exit from the DVD Function Menu. 1. Click the joystick. Refer to "Operation at the Function Menu Screen (DVD, Video CD) With Multi-DVD player, the Function Menu differs for playing DVDs, Video CDs and CDs. Click the joystick. Operation at the Function Menu Screen (CD)". (See page 35.) Accessing the DVD Function Menu (DVD, Video...
... MENU button. The DVD Function Menu appears, offering you the following options: 7 DVD Function Menu (DVD, Video CD) Pause (See page 33.) Repeat Play (See page 33.) PGM button (See page 34.) Multi-DVD Player 3. Exit from the DVD Function Menu. 1. Click the joystick. Refer to "Operation at the Function Menu Screen (DVD, Video CD) With Multi-DVD player, the Function Menu differs for playing DVDs, Video CDs and CDs. Click the joystick. Operation at the Function Menu Screen (CD)". (See page 35.) Accessing the DVD Function Menu (DVD, Video...
Owner's Manual
Page 59
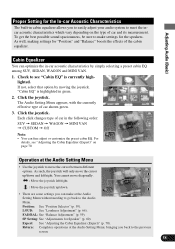
.... To get the best possible sound spaciousness, be sure to make at the Audio Setting Menu without needing to go back to see "Adjusting the Cabin Equalizer (Expert)" on the type of car in the following order: SUV = SEDAN = WAGON = MINI VAN = CUSTOM = Off Note: • You can fine adjust or customize the preset cabin EQ. Check to the Audio Menu. As such, the joystick...
.... To get the best possible sound spaciousness, be sure to make at the Audio Setting Menu without needing to go back to see "Adjusting the Cabin Equalizer (Expert)" on the type of car in the following order: SUV = SEDAN = WAGON = MINI VAN = CUSTOM = Off Note: • You can fine adjust or customize the preset cabin EQ. Check to the Audio Menu. As such, the joystick...
Owner's Manual
Page 70
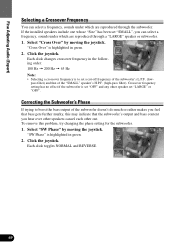
... the bass output of the subwoofer doesn't do much or rather makes you feel that bass gets further murky, this problem, try changing the phase setting for the subwoofer. 1. Each click toggles NORMAL and REVERSE. 69 Select "Cross Over" by moving the joystick. Click the joystick. Crossover frequency setting has no effect if the subwoofer is highlighted in green. 2. If the installed speakers include...
... the bass output of the subwoofer doesn't do much or rather makes you feel that bass gets further murky, this problem, try changing the phase setting for the subwoofer. 1. Each click toggles NORMAL and REVERSE. 69 Select "Cross Over" by moving the joystick. Click the joystick. Crossover frequency setting has no effect if the subwoofer is highlighted in green. 2. If the installed speakers include...

Owner's Manual
Page 78
... Initial Settings Menu • Press the RETURN button. The Initial Settings Menu appears, with "SENS" highlighted in green. 4. The selected option is highlighted in green. 7 Initial Settings Menu Setting the Time (See page 78.) Correcting Distorted Sound (See page 78.) Adjusting the Display Position (See page 79.) Changing the Pattern of each function. Switch the Power off . 77 Changing the Initial Settings Changing the Initial Settings Accessing the Initial Settings Menu 1. Press the MENU button...
... Initial Settings Menu • Press the RETURN button. The Initial Settings Menu appears, with "SENS" highlighted in green. 4. The selected option is highlighted in green. 7 Initial Settings Menu Setting the Time (See page 78.) Correcting Distorted Sound (See page 78.) Adjusting the Display Position (See page 79.) Changing the Pattern of each function. Switch the Power off . 77 Changing the Initial Settings Changing the Initial Settings Accessing the Initial Settings Menu 1. Press the MENU button...

Owner's Manual
Page 85
... speakers are being played back (as the source or no audio adjustment is possible. The main menu icons whirl down, with "Function" highlighted in green. 4. The title edit display appears on page 47, and perform procedures 5 to "Disc Title Input" on the screen. 5. The sound is turned off, "MUTE" is displayed and no sounds are muted automatically: • When the guidance audio is output from the Mobile Navigation Unit cannot be changed. 1. The Function Menu appears...
... speakers are being played back (as the source or no audio adjustment is possible. The main menu icons whirl down, with "Function" highlighted in green. 4. The title edit display appears on page 47, and perform procedures 5 to "Disc Title Input" on the screen. 5. The sound is turned off, "MUTE" is displayed and no sounds are muted automatically: • When the guidance audio is output from the Mobile Navigation Unit cannot be changed. 1. The Function Menu appears...
Owner's Manual
Page 86
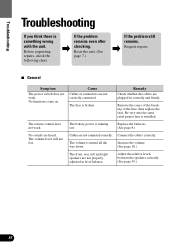
... the problem remains even after checking. Cause Cables or connectors are not connected correctly. Increase the volume. (See page 10.) The front, rear, left and right speakers are heard. Troubleshooting Troubleshooting If you think there is running out. The remote control does not work . The volume is installed. Be very sure the same rated proper fuse is turned all the way down. Replace the batteries. (See page 8.) No sounds...
... the problem remains even after checking. Cause Cables or connectors are not connected correctly. Increase the volume. (See page 10.) The front, rear, left and right speakers are heard. Troubleshooting Troubleshooting If you think there is running out. The remote control does not work . The volume is installed. Be very sure the same rated proper fuse is turned all the way down. Replace the batteries. (See page 8.) No sounds...

Owner's Manual
Page 90
... minimum rating of 45 W and impedance of damage to 8 ohms. Connecting speakers with insulating tape. If you do not connect the blue/white lead to an external power amp's system remote control or the car's Auto-antenna relay control terminal (max. 300 mA 12 V DC). F ACC O F O OF OF N STAR N STAR T T ACC position No ACC position • The black lead is output through a hole into the lead.
... minimum rating of 45 W and impedance of damage to 8 ohms. Connecting speakers with insulating tape. If you do not connect the blue/white lead to an external power amp's system remote control or the car's Auto-antenna relay control terminal (max. 300 mA 12 V DC). F ACC O F O OF OF N STAR N STAR T T ACC position No ACC position • The black lead is output through a hole into the lead.
Owner's Manual
Page 92
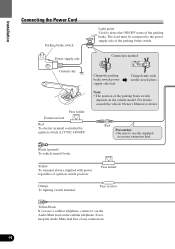
... of the parking brake. This lead must be connected to the power supply side of any connections. 91 Installation Connecting the Power Cord Parking brake switch Power supply side Light green Used to detect the ON/OFF status of the parking brake switch depends on the cellular telephone. Connection method Ground side Fuse holder Extension lead Red To electric terminal controlled by ignition switch (12V DC) ON/OFF. For details, consult the vehicle Owner's Manual or...
... of the parking brake. This lead must be connected to the power supply side of any connections. 91 Installation Connecting the Power Cord Parking brake switch Power supply side Light green Used to detect the ON/OFF status of the parking brake switch depends on the cellular telephone. Connection method Ground side Fuse holder Extension lead Red To electric terminal controlled by ignition switch (12V DC) ON/OFF. For details, consult the vehicle Owner's Manual or...

Owner's Manual
Page 97
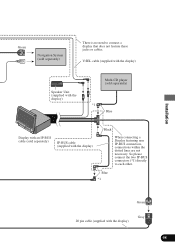
... cable (supplied with the display) Installation Speaker Unit (supplied with the display) Multi-CD player (sold separately) *1 Blue Display with an IP-BUS cable (sold separately) Blue IP-BUS cable (supplied with the TV tuner) IP-BUS cable (supplied with Gray the display) 96 Green Navigation System (sold separately) There is no need to each other. Blue *1 FM MODULATOR IP-BUS MAIN UNIT IP-BUS AV MASTER RCA cable (sold separately) 20 pin cable Red...
... cable (supplied with the display) Installation Speaker Unit (supplied with the display) Multi-CD player (sold separately) *1 Blue Display with an IP-BUS cable (sold separately) Blue IP-BUS cable (supplied with the TV tuner) IP-BUS cable (supplied with Gray the display) 96 Green Navigation System (sold separately) There is no need to each other. Blue *1 FM MODULATOR IP-BUS MAIN UNIT IP-BUS AV MASTER RCA cable (sold separately) 20 pin cable Red...
Owner's Manual
Page 99
... display) Speaker Unit (supplied with the display) Multi-CD player (sold separately) *1 Blue Display with an IP-BUS cable (sold separately) There is no need to each other. So please connect the two IP-BUS connectors (*1) directly to connect a display that does not feature these jacks or cables. Blue *1 Green 20 pin cable (supplied with the display) Gray 98 Installation Green Navigation System (sold separately) IP-BUS cable (supplied with the display) Black...
... display) Speaker Unit (supplied with the display) Multi-CD player (sold separately) *1 Blue Display with an IP-BUS cable (sold separately) There is no need to each other. So please connect the two IP-BUS connectors (*1) directly to connect a display that does not feature these jacks or cables. Blue *1 Green 20 pin cable (supplied with the display) Gray 98 Installation Green Navigation System (sold separately) IP-BUS cable (supplied with the display) Black...

Owner's Manual
Page 100
...'s picture. Installation VIDEO Input/Output Connection It is possible to use an AV selector (sold separately) To audio outputs Audio outputs Muti-DVD player Rear video output This Product Left (White) Right (Red) When other products, such as a Single CD player, are connected to the AV input on the Rear Display without deactivation, connect the Rear Display directly to the Multi-DVD player instead of using the external video connection of this product, or use an external video component by connecting it to this product, ejecting a disc will turn...
...'s picture. Installation VIDEO Input/Output Connection It is possible to use an AV selector (sold separately) To audio outputs Audio outputs Muti-DVD player Rear video output This Product Left (White) Right (Red) When other products, such as a Single CD player, are connected to the AV input on the Rear Display without deactivation, connect the Rear Display directly to the Multi-DVD player instead of using the external video connection of this product, or use an external video component by connecting it to this product, ejecting a disc will turn...


