Installation Manual
Page 2
... lead's insulation tears as the factory backup camera. Before installing this product • Use this product to the vehicle battery. To prevent damage WARNING • When speaker output is connected to and displays the same view as a result of contact with metal parts, short-circuiting can cause damage to this product, any applications, or the rear view camera option (if purchased) if...
... lead's insulation tears as the factory backup camera. Before installing this product • Use this product to the vehicle battery. To prevent damage WARNING • When speaker output is connected to and displays the same view as a result of contact with metal parts, short-circuiting can cause damage to this product, any applications, or the rear view camera option (if purchased) if...
Installation Manual
Page 3
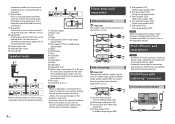
... head unit firmware. This En 3 English (Maximum input power) and between 4 Ω to connect the ground wire first. When installing this product, refer to the manual for the blue/ white lead • When the ignition switch is turned on the product means direct current. Antenna jack Subwoofer output (STD)/Low range output (NW) Rear output (STD)/Middle range output (NW) Front output (STD)/High range output (NW) Power supply Fuse (10 A) iDatalink adapter (sold separately) input (AVH-2550NEX...
... head unit firmware. This En 3 English (Maximum input power) and between 4 Ω to connect the ground wire first. When installing this product, refer to the manual for the blue/ white lead • When the ignition switch is turned on the product means direct current. Antenna jack Subwoofer output (STD)/Low range output (NW) Rear output (STD)/Middle range output (NW) Front output (STD)/High range output (NW) Power supply Fuse (10 A) iDatalink adapter (sold separately) input (AVH-2550NEX...
Installation Manual
Page 4
... product instead of a rear speaker, change the rear output setting in the initial setting. Do not connect anything to the green and green/black leads. For details, refer to the Operation Manual. • With a two-speaker system, do not connect anything to the speaker leads that equipment. Blue/white Connect to Blue/white cable. iPod/iPhone with Lightning® connector Connecting via the USB port System remote control Connect to system control terminal of the parking...
... product instead of a rear speaker, change the rear output setting in the initial setting. Do not connect anything to the green and green/black leads. For details, refer to the Operation Manual. • With a two-speaker system, do not connect anything to the speaker leads that equipment. Blue/white Connect to Blue/white cable. iPod/iPhone with Lightning® connector Connecting via the USB port System remote control Connect to system control terminal of the parking...
Owners Manual
Page 4
... this device. -The Bluetooth antenna cannot be removed (or replaced) by one or more away from that it should be co-located or operated in a particular installation. Operation is connected. - These limits are designed to provide reasonable protection against harmful interference in accordance with the instructions, may cause undesired operation of this equipment does cause harmful interference to correct the interference by user. -This...
... this device. -The Bluetooth antenna cannot be removed (or replaced) by one or more away from that it should be co-located or operated in a particular installation. Operation is connected. - These limits are designed to provide reasonable protection against harmful interference in accordance with the instructions, may cause undesired operation of this equipment does cause harmful interference to correct the interference by user. -This...
Owners Manual
Page 11
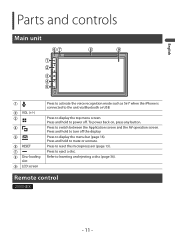
... to eject a disc. Remote control 2550NEX - 11 - Press and hold to turn off . Press and hold to mute or unmute. Press to reset the microprocessor (page 13). Press and hold to display the menu bar (page 16). To power back on, press any button. Press to power off the display. Refer to the unit via Bluetooth or USB. Parts and controls Main unit English VOL (+/-) RESET Disc-loading slot LCD screen Press to activate...
... to eject a disc. Remote control 2550NEX - 11 - Press and hold to turn off . Press and hold to mute or unmute. Press to reset the microprocessor (page 13). Press and hold to display the menu bar (page 16). To power back on, press any button. Press to power off the display. Refer to the unit via Bluetooth or USB. Parts and controls Main unit English VOL (+/-) RESET Disc-loading slot LCD screen Press to activate...
Owners Manual
Page 13
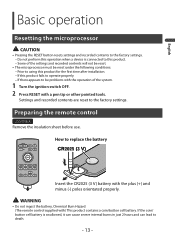
... a coin/button cell battery. If the coin/ button cell battery is connected to be reset under the following conditions: - If this product fails to using this product for the first time after installation. - Prior to operate properly. - How to the factory settings. - Preparing the remote control 2550NEX Remove the insulation sheet before use. English Basic operation Resetting the microprocessor CAUTION • Pressing the RESET button resets settings and recorded contents to replace the battery Insert...
... a coin/button cell battery. If the coin/ button cell battery is connected to be reset under the following conditions: - If this product fails to using this product for the first time after installation. - Prior to operate properly. - How to the factory settings. - Preparing the remote control 2550NEX Remove the insulation sheet before use. English Basic operation Resetting the microprocessor CAUTION • Pressing the RESET button resets settings and recorded contents to replace the battery Insert...
Owners Manual
Page 26
...-free phoning ▶General notes • Connection to an echo, decrease the volume level for detailed instructions. • When phone book transfer does not work, disconnect your phone and then perform pairing again from the speakers. • If private mode is selected on the cellular phone, hands-free phoning may be adjusted to the other end of the line cannot hear the conversation due to all cellular phones featuring Bluetooth...
...-free phoning ▶General notes • Connection to an echo, decrease the volume level for detailed instructions. • When phone book transfer does not work, disconnect your phone and then perform pairing again from the speakers. • If private mode is selected on the cellular phone, hands-free phoning may be adjusted to the other end of the line cannot hear the conversation due to all cellular phones featuring Bluetooth...
Owners Manual
Page 27
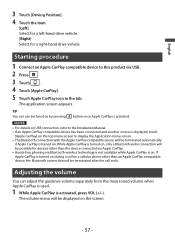
... setting screen appears. 3 Touch [AV Source Settings]. 4 Confirm that [Bluetooth Audio] is possible. - English Bluetooth audio Before using the Bluetooth audio player, register and connect the device to this product (page 20). A2DP (Advanced Audio Distribution Profile): Only playing back songs on your audio player is turned on. 5 Press . 6 Touch . The AV source screen appears. 7 Touch [Bluetooth Audio]. - 27 - A2DP and AVRCP (Audio/Video Remote Control Profile): Playing back, pausing, selecting songs, etc., are possible. • Depending on the Bluetooth device connected...
... setting screen appears. 3 Touch [AV Source Settings]. 4 Confirm that [Bluetooth Audio] is possible. - English Bluetooth audio Before using the Bluetooth audio player, register and connect the device to this product (page 20). A2DP (Advanced Audio Distribution Profile): Only playing back songs on your audio player is turned on. 5 Press . 6 Touch . The AV source screen appears. 7 Touch [Bluetooth Audio]. - 27 - A2DP and AVRCP (Audio/Video Remote Control Profile): Playing back, pausing, selecting songs, etc., are possible. • Depending on the Bluetooth device connected...

Owners Manual
Page 41
... disc-loading slot. The source changes and then playback will start. NOTES • This product may not achieve optimum performance with some USB storage devices. • Connection via a USB hub is not possible. • A USB cable is already set, select [Disc] as the playing source. Inserting a disc 1 Insert a disc into the disc-loading slot. Plugging a USB storage device 1 Pull out the plug from the USB port of the USB cable. 2 Plug a USB storage device into the USB cable. Ejecting a disc 1 Press . USB cable...
... disc-loading slot. The source changes and then playback will start. NOTES • This product may not achieve optimum performance with some USB storage devices. • Connection via a USB hub is not possible. • A USB cable is already set, select [Disc] as the playing source. Inserting a disc 1 Insert a disc into the disc-loading slot. Plugging a USB storage device 1 Pull out the plug from the USB port of the USB cable. 2 Plug a USB storage device into the USB cable. Ejecting a disc 1 Press . USB cable...
Owners Manual
Page 57
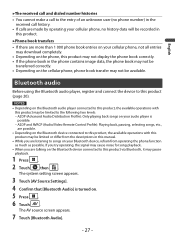
... is used. 1 While Apple CarPlay is activated. The application screen appears. The volume menu will be displayed on the screen. - 57 - While Apple CarPlay is turned on, only a Bluetooth audio connection will be possible for a right-hand drive vehicle. English 3 Touch [Driving Position]. 4 Touch the item. [Left] Select for a left-hand drive vehicle. [Right] Select for devices other than the device connected via Apple CarPlay. • Hands-free phoning via USB. 2 Press...
... is used. 1 While Apple CarPlay is activated. The application screen appears. The volume menu will be displayed on the screen. - 57 - While Apple CarPlay is turned on, only a Bluetooth audio connection will be possible for a right-hand drive vehicle. English 3 Touch [Driving Position]. 4 Touch the item. [Left] Select for a left-hand drive vehicle. [Right] Select for devices other than the device connected via Apple CarPlay. • Hands-free phoning via USB. 2 Press...
Owners Manual
Page 60
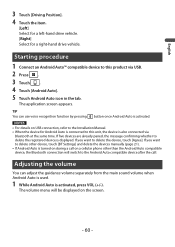
... via Bluetooth at the same time. If you want to the Installation Manual. • When the device for a right-hand drive vehicle. NOTES • For details on USB connection, refer to delete other device, touch [BT Settings] and delete the devices manually (page 21). • If Android Auto is turned on during a call on a cellular phone other than the Android Auto compatible device, the Bluetooth connection will be displayed on the screen...
... via Bluetooth at the same time. If you want to the Installation Manual. • When the device for a right-hand drive vehicle. NOTES • For details on USB connection, refer to delete other device, touch [BT Settings] and delete the devices manually (page 21). • If Android Auto is turned on during a call on a cellular phone other than the Android Auto compatible device, the Bluetooth connection will be displayed on the screen...
Owners Manual
Page 81
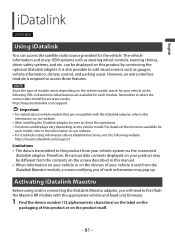
... module, a screen notifying you will need to first flash the Maestro RR module with the iDatalink adapter, refer to the information on the devices of your vehicle system via the connected iDatalink adapter. http://maestro.idatalink.com/support Limitations • The data is also possible to determine what features are compatible with the appropriate vehicle and head unit firmware. 1 Find the device number (12...
... module, a screen notifying you will need to first flash the Maestro RR module with the iDatalink adapter, refer to the information on the devices of your vehicle system via the connected iDatalink adapter. http://maestro.idatalink.com/support Limitations • The data is also possible to determine what features are compatible with the appropriate vehicle and head unit firmware. 1 Find the device number (12...
Owners Manual
Page 96
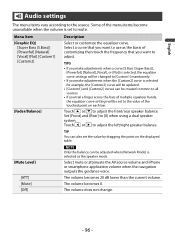
... using a dual speaker system. The volume does not change. - 96 - Some of customizing then touch the frequency that you want to use as the speaker mode. Select mute or attenuate the AV source volume and iPhone or smartphone application volume when the navigation outputs the guidance voice. Touch or to the source. The volume becomes 0. English Audio settings The menu items vary according to adjust the front/rear speaker balance. Menu Item [Graphic EQ] [Super Bass (S.Bass)] [Powerful...
... using a dual speaker system. The volume does not change. - 96 - Some of customizing then touch the frequency that you want to use as the speaker mode. Select mute or attenuate the AV source volume and iPhone or smartphone application volume when the navigation outputs the guidance voice. Touch or to the source. The volume becomes 0. English Audio settings The menu items vary according to adjust the front/rear speaker balance. Menu Item [Graphic EQ] [Super Bass (S.Bass)] [Powerful...
Owners Manual
Page 99
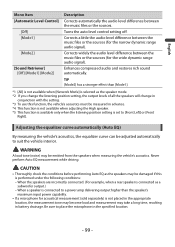
... while driving. When a speaker is connected to a power amp delivering output higher than [Mode1]. *1 [All] is not available when [Network Mode] is selected as the speakers may be damaged if this function, the vehicle's acoustics must be measured in the appropriate location, the measurement tone may become loud and measurement may be adjusted automatically to [Front Left] or [Front Right]. Turns the auto level control setting off...
... while driving. When a speaker is connected to a power amp delivering output higher than [Mode1]. *1 [All] is not available when [Network Mode] is selected as the speakers may be damaged if this function, the vehicle's acoustics must be measured in the appropriate location, the measurement tone may become loud and measurement may be adjusted automatically to [Front Left] or [Front Right]. Turns the auto level control setting off...
Owners Manual
Page 100
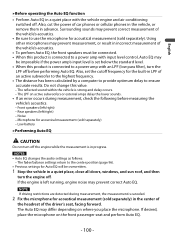
... measurement (sold separately). Using other microphones may prevent correct measurement of the driver's seat, facing forward. NOTES • Auto EQ changes the audio settings as follows: - Surrounding sounds may prevent measurement, or result in incorrect measurement of the vehicle's acoustics. • To perform Auto EQ, the front speakers must be connected. • When this product is connected to a power amp with the vehicle engine...
... measurement (sold separately). Using other microphones may prevent correct measurement of the driver's seat, facing forward. NOTES • Auto EQ changes the audio settings as follows: - Surrounding sounds may prevent measurement, or result in incorrect measurement of the vehicle's acoustics. • To perform Auto EQ, the front speakers must be connected. • When this product is connected to a power amp with the vehicle engine...
Owners Manual
Page 109
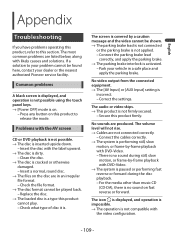
... video output from the connected equipment. → The [AV Input] or [AUX Input] setting is no sound during the disc playback. - There is no sound on . - Insert the disc with DVD-Video. → The system is not compatible with likely causes and solutions. Secure this product to release the mode. For the media other than music CD (CD-DA), there is incorrect. - The icon is displayed, and operation...
... video output from the connected equipment. → The [AV Input] or [AUX Input] setting is no sound during the disc playback. - There is no sound on . - Insert the disc with DVD-Video. → The system is not compatible with likely causes and solutions. Secure this product to release the mode. For the media other than music CD (CD-DA), there is incorrect. - The icon is displayed, and operation...
Owners Manual
Page 110
... iPod/iPhone. - Park your vehicle in [DVD Setup] is not recorded on the receiver is stretched, with that image. Connect the cables correctly. Input the correct code number. The picture is set to prohibit copying. (Some discs may have this product cannot be heard. → The audio output direction may switch automatically when the Bluetooth and USB connections are not connected correctly. - Update the iPod software version. → Cables are used at the same time. - iPod...
... iPod/iPhone. - Park your vehicle in [DVD Setup] is not recorded on the receiver is stretched, with that image. Connect the cables correctly. Input the correct code number. The picture is set to prohibit copying. (Some discs may have this product cannot be heard. → The audio output direction may switch automatically when the Bluetooth and USB connections are not connected correctly. - Update the iPod software version. → Cables are used at the same time. - iPod...
Owners Manual
Page 111
... proper wire at the reverse lamp. - The screen is displayed, but operation does not work at the same time, if the first phone is dialing, ringing or a call is set properly in the settings menu. (Refer to on (ACC ON) again. - Review System Settings section of this manual to adjust.) Problems with no camera installed. → Back camera input is in reverse. (Refer to On. - Turn the setting to...
... proper wire at the reverse lamp. - The screen is displayed, but operation does not work at the same time, if the first phone is dialing, ringing or a call is set properly in the settings menu. (Refer to on (ACC ON) again. - Review System Settings section of this manual to adjust.) Problems with no camera installed. → Back camera input is in reverse. (Refer to On. - Turn the setting to...
Owners Manual
Page 112
.... Poor network connection. Check that the USB connector or USB cable is accessed/ relocated from the iPod. This problem may skip. → Skip limit reached. - If the error persists, record the error message and contact your dealer or your dealer or an authorized Pioneer Service Station for assistance. the protective circuit is displayed, reconnect the iPod and reset it. Once the iPod's main menu is activated. - Log in error →...
.... Poor network connection. Check that the USB connector or USB cable is accessed/ relocated from the iPod. This problem may skip. → Skip limit reached. - If the error persists, record the error message and contact your dealer or your dealer or an authorized Pioneer Service Station for assistance. the protective circuit is displayed, reconnect the iPod and reset it. Once the iPod's main menu is activated. - Log in error →...
Owners Manual
Page 116
... an authorized Pioneer Service Station. → The time set . Once the iPod's main menu is still displayed. - Turn the ignition switch to OFF and then to ON. Turn the ignition switch to OFF and then to ON. Disconnect the cable from the iPod. Error-02-67 → The iPod firmware version is still displayed after performing on the screen. Android Auto Android Auto has stopped. → The connected device is still displayed after performing...
... an authorized Pioneer Service Station. → The time set . Once the iPod's main menu is still displayed. - Turn the ignition switch to OFF and then to ON. Turn the ignition switch to OFF and then to ON. Disconnect the cable from the iPod. Error-02-67 → The iPod firmware version is still displayed after performing on the screen. Android Auto Android Auto has stopped. → The connected device is still displayed after performing...


