
Owner's Manual
Page 1
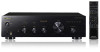
Operating Instructions Mode d'emploi Integrated Amplifier Amplificateur Intégré
Operating Instructions Mode d'emploi Integrated Amplifier Amplificateur Intégré
Owner's Manual
Page 3
...to chemicals listed on proposition 65 known to the State of sound, so what 's around you find it damaged, ask your nearest PIONEER authorized service center or your equipment by playing it at a safe level - Guard against this by setting your equipment at a safe...never touch the power cord when your hands are not likely to be regulated due to environmental considerations. Product Name: Integrated Amplifier Model Number: A-20 Responsible Party Name: PIONEER ELECTRONICS (USA) INC. This product is subject to the following two conditions: (1) This device may not cause harmful interference...
...to chemicals listed on proposition 65 known to the State of sound, so what 's around you find it damaged, ask your nearest PIONEER authorized service center or your equipment by playing it at a safe level - Guard against this by setting your equipment at a safe...never touch the power cord when your hands are not likely to be regulated due to environmental considerations. Product Name: Integrated Amplifier Model Number: A-20 Responsible Party Name: PIONEER ELECTRONICS (USA) INC. This product is subject to the following two conditions: (1) This device may not cause harmful interference...
Owner's Manual
Page 4
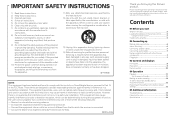
... After you start What's in the box 5 Loading the batteries in the remote control . . . . . .5 Using the remote control 5 Installing the amplifier 5 02 Connecting up Making cable connections 6 About "Bi-wiring 6 Connecting speaker cables 7 Connecting audio cables 7 Using centralized control with other . The wide ...heat sources such as power-supply cord or plug is encouraged to try to correct the interference by one wider than the other Pioneer components 7 Plugging in accordance with the apparatus. However, there is no guarantee that you for help. Reorient or relocate the ...
... After you start What's in the box 5 Loading the batteries in the remote control . . . . . .5 Using the remote control 5 Installing the amplifier 5 02 Connecting up Making cable connections 6 About "Bi-wiring 6 Connecting speaker cables 7 Connecting audio cables 7 Using centralized control with other . The wide ...heat sources such as power-supply cord or plug is encouraged to try to correct the interference by one wider than the other Pioneer components 7 Plugging in accordance with the apparatus. However, there is no guarantee that you for help. Reorient or relocate the ...
Owner's Manual
Page 5
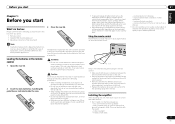
... quality may become unreliable if strong sunlight or fluorescent light is vibration or other object or material with the unit have a longer life. Installing the amplifier When installing this unit. • Replace the batteries when you notice a fall off with large quantities of water. • When disposing of the remote. It...
... quality may become unreliable if strong sunlight or fluorescent light is vibration or other object or material with the unit have a longer life. Installing the amplifier When installing this unit. • Replace the batteries when you notice a fall off with large quantities of water. • When disposing of the remote. It...
Owner's Manual
Page 6
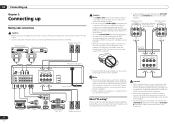
...may be caused to the speaker. • Another method of this happens, the magnetic field produced by leakage flux from the amplifier's transformer. Turntables equipped with MC (moving -magnet) type cartridges. Speaker system Speaker system Right Remove the shorting Left bar between ...REC L L L R R R CD recorder or tape deck Right Left Speaker system A • If your speakers or other countries. In this amplifier. terminals. SACD/CD player Network audio player Speaker system B Right Left Caution • The SIGNAL GND terminal is removed, no effect will be produced...
...may be caused to the speaker. • Another method of this happens, the magnetic field produced by leakage flux from the amplifier's transformer. Turntables equipped with MC (moving -magnet) type cartridges. Speaker system Speaker system Right Remove the shorting Left bar between ...REC L L L R R R CD recorder or tape deck Right Left Speaker system A • If your speakers or other countries. In this amplifier. terminals. SACD/CD player Network audio player Speaker system B Right Left Caution • The SIGNAL GND terminal is removed, no effect will be produced...
Owner's Manual
Page 7
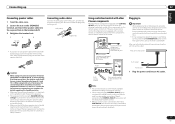
...connections, plug the unit into an AC outlet. IN OUT CONTROL To other Pioneer components Multiple Pioneer components equipped with CONTROL IN/OUT jacks can be accessed. A-20 remote control Aim remote control at the A-20 (the remote sensor is twisted together and inserted fully into the speaker terminal....STANDBY/ON button on the front panel of the unit so the A-20 is turned OFF. When using the unit for details regarding the impedance value. • Make sure the positive and negative (+/-) terminals on the amplifier match those on the speakers. • These speaker terminals carry ...
...connections, plug the unit into an AC outlet. IN OUT CONTROL To other Pioneer components Multiple Pioneer components equipped with CONTROL IN/OUT jacks can be accessed. A-20 remote control Aim remote control at the A-20 (the remote sensor is twisted together and inserted fully into the speaker terminal....STANDBY/ON button on the front panel of the unit so the A-20 is turned OFF. When using the unit for details regarding the impedance value. • Make sure the positive and negative (+/-) terminals on the amplifier match those on the speakers. • These speaker terminals carry ...
Owner's Manual
Page 8
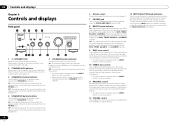
... the flat (normal) position. 03 Controls and displays Chapter 3: Controls and displays Front panel 1 23 4 5 6 78 9 10 11 12 13 1 /I STANDBY/ON Switches the amplifier between off : The signal passes through the various adjustment circuits (BASS, TREBLE, BALANCE, LOUDNESS). Set to this button to listen to the speaker system connected...
... the flat (normal) position. 03 Controls and displays Chapter 3: Controls and displays Front panel 1 23 4 5 6 78 9 10 11 12 13 1 /I STANDBY/ON Switches the amplifier between off : The signal passes through the various adjustment circuits (BASS, TREBLE, BALANCE, LOUDNESS). Set to this button to listen to the speaker system connected...
Owner's Manual
Page 10
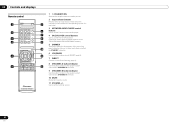
... connected to the corresponding input on the rear panel. 3 NETWORK AUDIO PLAYER control buttons Use to control Pioneer network audio player. 4 SACD PLAYER control buttons Use to control Pioneer SACD player. (Cannot be used to perform playback/pause on . 2 Input selector buttons Press to select.../unmutes the sound. 11 VOLUME +/- 03 Controls and displays Remote control 1 5 2 6 7 3 8 4 9 10 3 11 3 4 1 STANDBY/ON Switches the amplifier between standby and on the PD-D6/PD-D6MK2/PD-D9/PD-D9MK2 models.) 5 DIMMER This button allows the illumination of the unit's front panel...
... connected to the corresponding input on the rear panel. 3 NETWORK AUDIO PLAYER control buttons Use to control Pioneer network audio player. 4 SACD PLAYER control buttons Use to control Pioneer SACD player. (Cannot be used to perform playback/pause on . 2 Input selector buttons Press to select.../unmutes the sound. 11 VOLUME +/- 03 Controls and displays Remote control 1 5 2 6 7 3 8 4 9 10 3 11 3 4 1 STANDBY/ON Switches the amplifier between standby and on the PD-D6/PD-D6MK2/PD-D9/PD-D9MK2 models.) 5 DIMMER This button allows the illumination of the unit's front panel...

Owner's Manual
Page 12
Press the buttons again to the amplifier. To set for automatic standby status (Auto Power Down) When this condition is in standby mode, hold the unit's front-panel DIRECT button and LOUDNESS ...
Press the buttons again to the amplifier. To set for automatic standby status (Auto Power Down) When this condition is in standby mode, hold the unit's front-panel DIRECT button and LOUDNESS ...

Owner's Manual
Page 14
05 Additional information Specifications Amplifier section Power output specification is for when power supply is 120 V. • Continuous power output (both channels driven at 20 Hz to 20 kHz) THD 0.1 %, 4 50 W + 50 W THD 0.05 %, 8 30 W+30 W Audio section • Input (Sensitivity/Impedance) SACD/CD, NETWORK, TUNER, AUX, RECORDER 200 mV/50 kΩ PHONO (... without notice, due to improvements. • Corporation and product names mentioned herein are trademarks or registered trademarks of the respective corporations. 14 En © 2012 PIONEER CORPORATION. All rights reserved.
05 Additional information Specifications Amplifier section Power output specification is for when power supply is 120 V. • Continuous power output (both channels driven at 20 Hz to 20 kHz) THD 0.1 %, 4 50 W + 50 W THD 0.05 %, 8 30 W+30 W Audio section • Input (Sensitivity/Impedance) SACD/CD, NETWORK, TUNER, AUX, RECORDER 200 mV/50 kΩ PHONO (... without notice, due to improvements. • Corporation and product names mentioned herein are trademarks or registered trademarks of the respective corporations. 14 En © 2012 PIONEER CORPORATION. All rights reserved.

