
Owner's Manual
Page 3
... or the manufacturer's instructions have been adhered to ensure reliable operation of overhead power lines or other equipment. Do not place this product from overheating, and these openings must not be sure the service technician has used replacement parts specified by the product manufacturer as a bookcase or rack unless proper ventilation is left un-used to connect the unit to...
... or the manufacturer's instructions have been adhered to ensure reliable operation of overhead power lines or other equipment. Do not place this product from overheating, and these openings must not be sure the service technician has used replacement parts specified by the product manufacturer as a bookcase or rack unless proper ventilation is left un-used to connect the unit to...
Owner's Manual
Page 6
... Rear panel 14 Easy connections 16 Using other types of video output 17 Connecting using an S-Video output . . . 17 Connecting using the component video output 17 Connecting for multichannel surround sound 18 Connecting using the multichannel analog outputs 18 Connecting using a digital audio output 19 Connecting using i.LINK 20 About i.LINK 21 Creating an i.LINK network 21 Connecting using HDMI 22 About HDMI 23 Controlling this player from another Pioneer component 23 03 Controls and displays Front panel 25 About progressive scan video 26 Display 27 Remote control 28 Setting...
... Rear panel 14 Easy connections 16 Using other types of video output 17 Connecting using an S-Video output . . . 17 Connecting using the component video output 17 Connecting for multichannel surround sound 18 Connecting using the multichannel analog outputs 18 Connecting using a digital audio output 19 Connecting using i.LINK 20 About i.LINK 21 Creating an i.LINK network 21 Connecting using HDMI 22 About HDMI 23 Controlling this player from another Pioneer component 23 03 Controls and displays Front panel 25 About progressive scan video 26 Display 27 Remote control 28 Setting...
Owner's Manual
Page 7
... Audio Language 64 Subtitle Language 65 Auto Language 65 DVD Menu Language 66 Subtitle Display 66 Display settings 66 OSD Language 66 On Screen Display 66 Angle Indicator 66 Background 67 Screen Saver 67 Options 67 Parental Lock 67 Bonus Group 69 Auto Disc Menu 70 Group Playback 70 DVD Playback Mode 70 SACD Playback 71 HDMI Settings 71 CD Playback 73 DTS Downmix 74 Speakers 74 Audio Output Mode 74 Speaker Installation 74 Speaker Distance 75 Channel Level 76 i.LINK Setup 77 Audio Out 77 Connections Setup 77 Auto Select Play...
... Audio Language 64 Subtitle Language 65 Auto Language 65 DVD Menu Language 66 Subtitle Display 66 Display settings 66 OSD Language 66 On Screen Display 66 Angle Indicator 66 Background 67 Screen Saver 67 Options 67 Parental Lock 67 Bonus Group 69 Auto Disc Menu 70 Group Playback 70 DVD Playback Mode 70 SACD Playback 71 HDMI Settings 71 CD Playback 73 DTS Downmix 74 Speakers 74 Audio Output Mode 74 Speaker Installation 74 Speaker Distance 75 Channel Level 76 i.LINK Setup 77 Audio Out 77 Connections Setup 77 Auto Select Play...
Owner's Manual
Page 8
... can select which part of the disc you want to hear (stereo audio, multi-channel audio and, for connection to an AV amplifier to this player is fully compatible with the video and digital outputs disabled, and the front panel display switched off. i.LINK*3 digital interface The i.LINK interface makes it possible to connect this player to an i.LINK-equipped AV receiver with a single cable and enjoy high sampling rate (up to analog audio...
... can select which part of the disc you want to hear (stereo audio, multi-channel audio and, for connection to an AV amplifier to this player is fully compatible with the video and digital outputs disabled, and the front panel display switched off. i.LINK*3 digital interface The i.LINK interface makes it possible to connect this player to an i.LINK-equipped AV receiver with a single cable and enjoy high sampling rate (up to analog audio...
Owner's Manual
Page 19
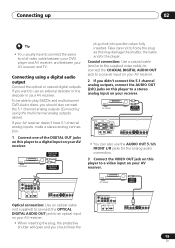
... 5.1 channel analog inputs, make a stereo analog connection. 1 Connect one of video cable between your DVD player and AV receiver, and between your AV receiver. DIGITAL IN OPTICAL AV receiver DIGITAL IN COAXIAL plug click into position when fully inserted. Connecting using a digital audio output Connect the optical or coaxial digital outputs if you should hear the AV receiver VIDEO INPUT FRONT SURROUND CENTER L L R AUDIO OUT (2ch) R SUB WOOFER AUDIO OUT (5.1ch) COAXIAL OPTICAL DIGITAL AUDIO OUT (AUDIO) HDMI OUT S400 IN OUT 1 2 CONTROL VIDEO...
... 5.1 channel analog inputs, make a stereo analog connection. 1 Connect one of video cable between your DVD player and AV receiver, and between your AV receiver. DIGITAL IN OPTICAL AV receiver DIGITAL IN COAXIAL plug click into position when fully inserted. Connecting using a digital audio output Connect the optical or coaxial digital outputs if you should hear the AV receiver VIDEO INPUT FRONT SURROUND CENTER L L R AUDIO OUT (2ch) R SUB WOOFER AUDIO OUT (5.1ch) COAXIAL OPTICAL DIGITAL AUDIO OUT (AUDIO) HDMI OUT S400 IN OUT 1 2 CONTROL VIDEO...
Owner's Manual
Page 20
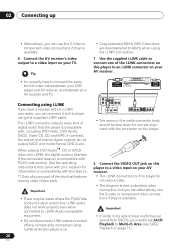
... cables or switch off any components connected using i.LINK while this feature. *1 Excluding any part of video cable between your DVD player and AV receiver, and between your AV receiver. • The i.LINK connectors on this player do not output SACD and multichannel DVD-Audio. 02 Connecting up • Alternatively, you can use the S-video or component video connections if they 're available. 4 Connect the AV receiver's video output to a video input on your TV. • Copy-protected 96kHz DVD-Video discs...
... cables or switch off any components connected using i.LINK while this feature. *1 Excluding any part of video cable between your DVD player and AV receiver, and between your AV receiver. • The i.LINK connectors on this player do not output SACD and multichannel DVD-Audio. 02 Connecting up • Alternatively, you can use the S-video or component video connections if they 're available. 4 Connect the AV receiver's video output to a video input on your TV. • Copy-protected 96kHz DVD-Video discs...

Owner's Manual
Page 23
... use the remote sensor on page 71 to multi-channel surround-sound audio. Depending on a single digital connection for up to 5 components). • The HDMI connection is compatible with 2 channel linear PCM signals (44.1 to 192kHz, 16/20/24 bit), and Dolby Digital, DTS and MPEG audio bitstream (5.1 channel signals up to 96kHz, 16/20/24bit). • It is used to control another Pioneer component This player has SR jacks which allow you to use with HDTV signals...
... use the remote sensor on page 71 to multi-channel surround-sound audio. Depending on a single digital connection for up to 5 components). • The HDMI connection is compatible with 2 channel linear PCM signals (44.1 to 192kHz, 16/20/24 bit), and Dolby Digital, DTS and MPEG audio bitstream (5.1 channel signals up to 96kHz, 16/20/24bit). • It is used to control another Pioneer component This player has SR jacks which allow you to use with HDTV signals...
Owner's Manual
Page 32
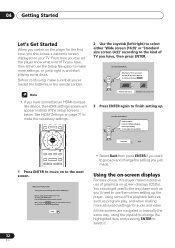
... switch on the player for the first time, you should get used to the way these work as program play, and when making more settings, or jump right in and start again choose [Back] ENTER VIDEO RETURN ADJUST DIMMER JOG MODE V.ADJ FL JOG 7 3 8 4¢ E/ E/ 1¡ PLAY MODE SURROUND 1 Press ENTER to move on your DVD player Put the batteries into the remote control Next, press the ENTER button on the remote control...
... switch on the player for the first time, you should get used to the way these work as program play, and when making more settings, or jump right in and start again choose [Back] ENTER VIDEO RETURN ADJUST DIMMER JOG MODE V.ADJ FL JOG 7 3 8 4¢ E/ E/ 1¡ PLAY MODE SURROUND 1 Press ENTER to move on your DVD player Put the batteries into the remote control Next, press the ENTER button on the remote control...
Owner's Manual
Page 33
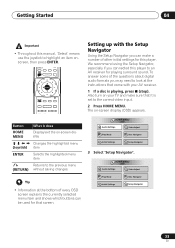
... selected menu item and shows which buttons can make sure that screen. HOME MENU DVD Audio Settings Video Adjust Play Mode Disc Navigator Initial Settings Setup Navigator 33 En DISPLAY AUDIO SUBTITLE ANGLE HOME MENU MENU TOP MENU - The on-screen display (OSD) appears. Getting Started 04 • Throughout this manual, 'Select' means use the joystick to an AV receiver for playing surround sound. We recommend using the Setup Navigator, especially if you may need to the correct video input. 2 Press HOME MENU. HOME MENU DVD Audio Settings Video Adjust Play Mode...
... selected menu item and shows which buttons can make sure that screen. HOME MENU DVD Audio Settings Video Adjust Play Mode Disc Navigator Initial Settings Setup Navigator 33 En DISPLAY AUDIO SUBTITLE ANGLE HOME MENU MENU TOP MENU - The on-screen display (OSD) appears. Getting Started 04 • Throughout this manual, 'Select' means use the joystick to an AV receiver for playing surround sound. We recommend using the Setup Navigator, especially if you may need to the correct video input. 2 Press HOME MENU. HOME MENU DVD Audio Settings Video Adjust Play Mode...
Owner's Manual
Page 42
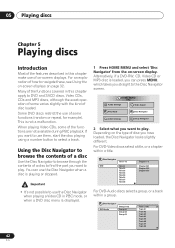
... HOME MENU and select 'Disc Navigator' from the on the type of the functions are not available during PBC playback. Alternatively, if a DVD-RW, CD, Video CD or MP3 disc is not a malfunction. If you want to use of a disc to find the part you straight to select a track. This is loaded, you can use of how to navigate these, see Using the on-screen displays on page 32. HOME MENU DVD Audio Settings Video Adjust Play Mode Disc...
... HOME MENU and select 'Disc Navigator' from the on the type of the functions are not available during PBC playback. Alternatively, if a DVD-RW, CD, Video CD or MP3 disc is not a malfunction. If you want to use of a disc to find the part you straight to select a track. This is loaded, you can use of how to navigate these, see Using the on-screen displays on page 32. HOME MENU DVD Audio Settings Video Adjust Play Mode Disc...
Owner's Manual
Page 61
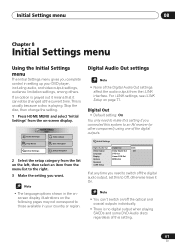
...-screen display. If an option is playing. Digital Audio Out settings • None of the digital outputs. Initial Settings menu 08 Chapter 8 Initial Settings menu Using the Initial Settings menu The Initial Settings menu gives you complete control in setting up your country or region. • You can't switch on/off the digital audio output, set this to Off, otherwise leave it cannot be changed at any time you need to the right. 3 Make the setting you connected this setting. 61 En Stop...
...-screen display. If an option is playing. Digital Audio Out settings • None of the digital outputs. Initial Settings menu 08 Chapter 8 Initial Settings menu Using the Initial Settings menu The Initial Settings menu gives you complete control in setting up your country or region. • You can't switch on/off the digital audio output, set this to Off, otherwise leave it cannot be changed at any time you need to the right. 3 Make the setting you connected this setting. 61 En Stop...
Owner's Manual
Page 66
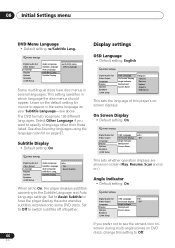
... Selecting languages using the language code list on the default setting for menus to have disc menus in several languages. Subtitle Display On Off Assist Subtitle When set to On, the player displays subtitles according to switch subtitles off altogether. On Screen Display • Default setting: On Initial Settings Digital Audio Out OSD Language On Video Output On Screen Display Off Language Angle Indicator Display Background Options Screen Saver Speakers i.LINK Setup This sets whether operation displays are shown on-screen (Play, Resume, Scan and so on DVD discs, change...
... Selecting languages using the language code list on the default setting for menus to have disc menus in several languages. Subtitle Display On Off Assist Subtitle When set to On, the player displays subtitles according to switch subtitles off altogether. On Screen Display • Default setting: On Initial Settings Digital Audio Out OSD Language On Video Output On Screen Display Off Language Angle Indicator Display Background Options Screen Saver Speakers i.LINK Setup This sets whether operation displays are shown on-screen (Play, Resume, Scan and so on DVD discs, change...

Owner's Manual
Page 67
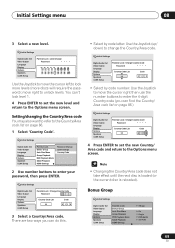
...Parental Lock level or the Country code you set to its factory settings (see Resetting the player on -screen when the player is not displayed for your children use the Parental Lock feature. This gives you may consider inappropriate for a dangerously long time. Some discs also support the Country code feature. Initial Settings Digital Audio Out Video Output Language Display Options Speakers i.LINK Setup Parental Lock Bonus Group Auto Disc Menu Group Playback DVD Playback Mode SACD Playback HDMI Settings Password Level Change Country Code 67 En Before you can change the password...
...Parental Lock level or the Country code you set to its factory settings (see Resetting the player on -screen when the player is not displayed for your children use the Parental Lock feature. This gives you may consider inappropriate for a dangerously long time. Some discs also support the Country code feature. Initial Settings Digital Audio Out Video Output Language Display Options Speakers i.LINK Setup Parental Lock Bonus Group Auto Disc Menu Group Playback DVD Playback Mode SACD Playback HDMI Settings Password Level Change Country Code 67 En Before you can change the password...
Owner's Manual
Page 69
... Options menu screen. 2 Use number buttons to the Options menu screen. Initial Settings Digital Audio Out Video Output Language Display Options Speakers i.LINK Setup Parental Lock : Change Country Code Password **** Country Code List us Code 2 1 1 9 • Select by code letter: Use the Joystick (up/ down) to lock more levels (more discs will require the password); Bonus Group Initial Settings Digital Audio Out Video Output Language Display Options Speakers i.LINK Setup Parental Lock Bonus Group Auto Disc Menu Group Playback DVD Playback Mode SACD Playback HDMI Settings Off...
... Options menu screen. 2 Use number buttons to the Options menu screen. Initial Settings Digital Audio Out Video Output Language Display Options Speakers i.LINK Setup Parental Lock : Change Country Code Password **** Country Code List us Code 2 1 1 9 • Select by code letter: Use the Joystick (up/ down) to lock more levels (more discs will require the password); Bonus Group Initial Settings Digital Audio Out Video Output Language Display Options Speakers i.LINK Setup Parental Lock Bonus Group Auto Disc Menu Group Playback DVD Playback Mode SACD Playback HDMI Settings Off...
Owner's Manual
Page 70
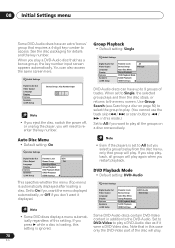
.... Auto Disc Menu • Default setting: On Initial Settings Digital Audio Out Video Output Language Display Options Speakers i.LINK Setup Parental Lock On Bonus Group Off Auto Disc Menu Group Playback DVD Playback Mode SACD Playback HDMI Settings This specifies whether the menu (Top menu) is ignored. If you press while a disc is loading, this setting. If you stop playback, all the groups on page 50) to select the group to play. (You cannot use the track skip / or scan buttons / in this case only the DVD-Video part of...
.... Auto Disc Menu • Default setting: On Initial Settings Digital Audio Out Video Output Language Display Options Speakers i.LINK Setup Parental Lock On Bonus Group Off Auto Disc Menu Group Playback DVD Playback Mode SACD Playback HDMI Settings This specifies whether the menu (Top menu) is ignored. If you press while a disc is loading, this setting. If you stop playback, all the groups on page 50) to select the group to play. (You cannot use the track skip / or scan buttons / in this case only the DVD-Video part of...

Owner's Manual
Page 71
... i.LINK Setup Parental Lock Bonus Group Auto Disc Menu Group Playback DVD Playback Mode SACD Playback HDMI Settings 3 Off (jp) 3 On 3 Single 3 DVD-Audio 3 2ch Area After selecting HDMI from the i.LINK and 5.1 channel analog outputs, SACD playback must be displayed: Resolution Aspect Ratio Colour Video Memory Audio 720x480 P 16:9 (Wide) Component (12bit) Direct Linear PCM • For multi-channel audio from the Initial Settings menu, the HDMI settings menu appears. With DVI-compatible devices (with HDCP), the same screen is shown, but the disc loaded is switched into several...
... i.LINK Setup Parental Lock Bonus Group Auto Disc Menu Group Playback DVD Playback Mode SACD Playback HDMI Settings 3 Off (jp) 3 On 3 Single 3 DVD-Audio 3 2ch Area After selecting HDMI from the i.LINK and 5.1 channel analog outputs, SACD playback must be displayed: Resolution Aspect Ratio Colour Video Memory Audio 720x480 P 16:9 (Wide) Component (12bit) Direct Linear PCM • For multi-channel audio from the Initial Settings menu, the HDMI settings menu appears. With DVI-compatible devices (with HDCP), the same screen is shown, but the disc loaded is switched into several...
Owner's Manual
Page 81
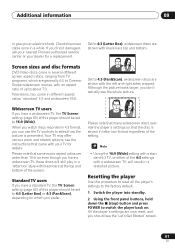
... this procedure to reset all the player's settings to the factory default. 1 Switch the player into standby. 2 Using the front panel buttons, hold down the (stop) button and press POWER to select how the picture is shown in a distorted picture. Widescreen TV users If you should be set to 4:3 (Letter Box) or 4:3 (Pan&Scan), depending on . Televisions, too, come in different aspect ratios; 'standard' 4:3 and widescreen 16:9. When you watch discs recorded in 4:3 format, you have...
... this procedure to reset all the player's settings to the factory default. 1 Switch the player into standby. 2 Using the front panel buttons, hold down the (stop) button and press POWER to select how the picture is shown in a distorted picture. Widescreen TV users If you should be set to 4:3 (Letter Box) or 4:3 (Pan&Scan), depending on . Televisions, too, come in different aspect ratios; 'standard' 4:3 and widescreen 16:9. When you watch discs recorded in 4:3 format, you have...
Owner's Manual
Page 90
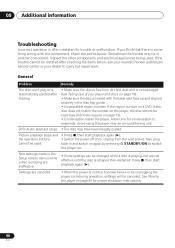
... the trouble cannot be used . DVD-Audio playback stops. • The disc may lie in and switch on again by unplugging the power cord during operation, settings will be canceled. New settings made in the disc tray guide. • Incompatible region number: If the region number on a DVD-Video disc does not match the number on the player, the disc cannot be used (see Taking care of your dealer to carry out repair work. General Problem Remedy The disc won't play or...
... the trouble cannot be used . DVD-Audio playback stops. • The disc may lie in and switch on again by unplugging the power cord during operation, settings will be canceled. New settings made in the disc tray guide. • Incompatible region number: If the region number on a DVD-Video disc does not match the number on the player, the disc cannot be used (see Taking care of your dealer to carry out repair work. General Problem Remedy The disc won't play or...

Owner's Manual
Page 91
... wide: Use the remote within its operating range (see Putting the batteries in the Initial Settings menu is incorrect. Some discs include a copy prevention signal, and when this type of disc is played back, stripes etc., may prevent recording or cause picture problems. This is not a malfunction. 91 En Picture disturbance during playback or dark. • This player is compatible with progressive scan: Press the PROGRESSIVE button on the front panel to set to interlace...
... wide: Use the remote within its operating range (see Putting the batteries in the Initial Settings menu is incorrect. Some discs include a copy prevention signal, and when this type of disc is played back, stripes etc., may prevent recording or cause picture problems. This is not a malfunction. 91 En Picture disturbance during playback or dark. • This player is compatible with progressive scan: Press the PROGRESSIVE button on the front panel to set to interlace...
Owner's Manual
Page 96
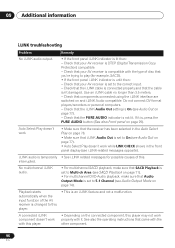
... multichannel SACD playback, make sure that components connected using the i.LINK interface are switched on page 74). Check that came with the type of the AV receiver is set to the correct input. - See also the operating instructions that your AV receiver is set to 5.1 Channel (see Audio Output Mode on and i.LINK Audio compatible. Do not connect DV format players/recorders or personal computers. - Check that i.LINK Audio Out is DTCP (Digital Transmission Copy Protection) compatible. - If...
... multichannel SACD playback, make sure that components connected using the i.LINK interface are switched on page 74). Check that came with the type of the AV receiver is set to the correct input. - See also the operating instructions that your AV receiver is set to 5.1 Channel (see Audio Output Mode on and i.LINK Audio compatible. Do not connect DV format players/recorders or personal computers. - Check that i.LINK Audio Out is DTCP (Digital Transmission Copy Protection) compatible. - If...


