Owner's Manual
Page 3
...complies with Canadian ICES-003. Operation is subject to the following measures: - Product Name: Plasma Display System Model Number: PDP-6010FD/PDP-5010FD Product Category: Class B Personal Computers & Peripherals Responsible Party Name: PIONEER ELECTRONICS SERVICE, INC. Phone: 800-421-1625 URL : http://www.pioneerelectronics.com NOTE:...outlet when left unused for connections. Reorient or relocate the receiving antenna. - Consult the dealer or an experienced radio/TV technician for the unit, you will expose you to chemicals listed on proposition 65 known to the State of an ...
...complies with Canadian ICES-003. Operation is subject to the following measures: - Product Name: Plasma Display System Model Number: PDP-6010FD/PDP-5010FD Product Category: Class B Personal Computers & Peripherals Responsible Party Name: PIONEER ELECTRONICS SERVICE, INC. Phone: 800-421-1625 URL : http://www.pioneerelectronics.com NOTE:...outlet when left unused for connections. Reorient or relocate the receiving antenna. - Consult the dealer or an experienced radio/TV technician for the unit, you will expose you to chemicals listed on proposition 65 known to the State of an ...
Owner's Manual
Page 4
...Activating the Parental Control 45 Setting the voluntary movie rating system (MPAA 45 Setting the TV ratings 45 Setting the TV Parental Guidelines (TV Guidelines 46 Blocking Not Rated TV programs......... 46 Canadian rating systems 46 Setting Canadian English ratings ........ 47 Contents Thank you... 12 Stand accessories (PDP-6010FD only 12 Speaker accessories 13 04 Part Names 14 Plasma display 14 Remote control unit 16 05 Preparation 17 Installing the plasma display 17 Moving the plasma display 17 Attaching the Pioneer stand 17 Installing the Pioneer speaker 18 When using...
...Activating the Parental Control 45 Setting the voluntary movie rating system (MPAA 45 Setting the TV ratings 45 Setting the TV Parental Guidelines (TV Guidelines 46 Blocking Not Rated TV programs......... 46 Canadian rating systems 46 Setting Canadian English ratings ........ 47 Contents Thank you... 12 Stand accessories (PDP-6010FD only 12 Speaker accessories 13 04 Part Names 14 Plasma display 14 Remote control unit 16 05 Preparation 17 Installing the plasma display 17 Moving the plasma display 17 Attaching the Pioneer stand 17 Installing the Pioneer speaker 18 When using...
Owner's Manual
Page 7
... plasma display, in possible malfunction. For custom installation, please consult the dealer where the unit was purchased. To ensure proper heat emission: • Distance the unit slightly from tipping over a long period of time, when using the still picture mode from a TV,... injury. Important User Guidance Information 01 English Chapter 1 Important User Guidance Information In order to obtain maximum enjoyment from this Pioneer PDP-6010FD/PDP-5010FD plasma display, please first read and follow the usage guidelines below , you can be installed by using only parts and accessories ...
... plasma display, in possible malfunction. For custom installation, please consult the dealer where the unit was purchased. To ensure proper heat emission: • Distance the unit slightly from tipping over a long period of time, when using the still picture mode from a TV,... injury. Important User Guidance Information 01 English Chapter 1 Important User Guidance Information In order to obtain maximum enjoyment from this Pioneer PDP-6010FD/PDP-5010FD plasma display, please first read and follow the usage guidelines below , you can be installed by using only parts and accessories ...
Owner's Manual
Page 8
... product for a 50 inch/60 inch display.) All Pioneer display panels are visible at the rear of the plasma display • Do not remove the handles from a cold place to all plasma displays because it with by holding only a single handle. Pioneer plasma display panels contain a very ...large number of pixels. (Over 3.1 million pixels for a long period of time, the functions of the plasma display automatically adjusts the brightness to ...
... product for a 50 inch/60 inch display.) All Pioneer display panels are visible at the rear of the plasma display • Do not remove the handles from a cold place to all plasma displays because it with by holding only a single handle. Pioneer plasma display panels contain a very ...large number of pixels. (Over 3.1 million pixels for a long period of time, the functions of the plasma display automatically adjusts the brightness to ...
Owner's Manual
Page 9
...images for a similar period of time. This plasma display is displayed for increased efficiency. If you watch may occur due to the remaining electric load. The after -image lagging may be irreparable. Note • When a program menu, TV Guide screen or frozen image is equipped with... a permanent after two to each type of time. On today's plasma displays, permanent image retention is designed to scale to three seconds. Image retention, also known as plasma displays). Minimizing damage from PC or TV game equipment, and/or fixed images such as still images, fixed images...
...images for a similar period of time. This plasma display is displayed for increased efficiency. If you watch may occur due to the remaining electric load. The after -image lagging may be irreparable. Note • When a program menu, TV Guide screen or frozen image is equipped with... a permanent after two to each type of time. On today's plasma displays, permanent image retention is designed to scale to three seconds. Image retention, also known as plasma displays). Minimizing damage from PC or TV game equipment, and/or fixed images such as still images, fixed images...
Owner's Manual
Page 10
..., resulting in the product indicates that the product needs servicing. 18. The optical characteristics of time. The plasma display weighs about 66.2 kg (145.9 lbs.) for the PDP-6010FD (including the stand and speaker) and about 44.0 kg (97 lbs.) for built-in electric shock and... the mounting hardware recommended by broken glass pieces in an enclosed place such as the original parts. a. e. Do not expose the plasma display to direct sunlight for future reference. 3. This product has been engineered and manufactured with impact. Overloading can block ventilation openings. ...
..., resulting in the product indicates that the product needs servicing. 18. The optical characteristics of time. The plasma display weighs about 66.2 kg (145.9 lbs.) for the PDP-6010FD (including the stand and speaker) and about 44.0 kg (97 lbs.) for built-in electric shock and... the mounting hardware recommended by broken glass pieces in an enclosed place such as the original parts. a. e. Do not expose the plasma display to direct sunlight for future reference. 3. This product has been engineered and manufactured with impact. Overloading can block ventilation openings. ...
Owner's Manual
Page 11
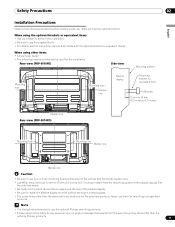
... glass. • The screw holes other than the optional Pioneer products. 11 En Safety Precautions 02 English Installation Precautions Observe the following mounting holes can be used for the installation: Rear view (PDP-6010FD) Side view Mounting surface Mounting hole 4 5 Mounting hole Median line Plasma display Mounting bracket (or equivalent item) M8 screw 12...
... glass. • The screw holes other than the optional Pioneer products. 11 En Safety Precautions 02 English Installation Precautions Observe the following mounting holes can be used for the installation: Rear view (PDP-6010FD) Side view Mounting surface Mounting hole 4 5 Mounting hole Median line Plasma display Mounting bracket (or equivalent item) M8 screw 12...
Owner's Manual
Page 12
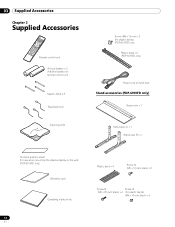
... × 3 Cleaning cloth Screw (M4 x 10 mm) x 2 (for plastic bands) (PDP-5010FD only) Plastic band x 2 (PDP-5010FD only) Power cord (2 m/6.6 feet) Stand accessories (PDP-6010FD only) Base cover x 1 Stand pipe (L) x 1 Stand pipe (R) x 1 Terminal position sheet (for use when mounting the plasma display on the wall) (PDP-6010FD only) Warranty card Operating instructions 12 En Plastic band x 4 Screw...
... × 3 Cleaning cloth Screw (M4 x 10 mm) x 2 (for plastic bands) (PDP-5010FD only) Plastic band x 2 (PDP-5010FD only) Power cord (2 m/6.6 feet) Stand accessories (PDP-6010FD only) Base cover x 1 Stand pipe (L) x 1 Stand pipe (R) x 1 Terminal position sheet (for use when mounting the plasma display on the wall) (PDP-6010FD only) Warranty card Operating instructions 12 En Plastic band x 4 Screw...
Owner's Manual
Page 14
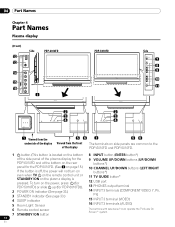
... PDP-6010FD and PDP-5010FD. 1 a button (This button is pressed. To turn on even when TV a on the remote control unit or STANDBY/ON on the power, press a (for PDP-5010FD) or slide a up (for the PDP-5010FD. (See 1 on page 15.) If the button is off, the power will not turn on the plasma... is located on the bottom 8 INPUT button (ENTER button*) of the side panel of the plasma display for the PDP-6010FD and at the bottom on the rear panel for PDP-6010FD)). 2 POWER ON indicator (See page 33.) 3 STANDBY indicator (See page 33.) 4 SLEEP indicator 5 Room Light Sensor 9 VOLUME UP/DOWN buttons (...
... PDP-6010FD and PDP-5010FD. 1 a button (This button is pressed. To turn on even when TV a on the remote control unit or STANDBY/ON on the power, press a (for PDP-5010FD) or slide a up (for the PDP-5010FD. (See 1 on page 15.) If the button is off, the power will not turn on the plasma... is located on the bottom 8 INPUT button (ENTER button*) of the side panel of the plasma display for the PDP-6010FD and at the bottom on the rear panel for PDP-6010FD)). 2 POWER ON indicator (See page 33.) 3 STANDBY indicator (See page 33.) 4 SLEEP indicator 5 Room Light Sensor 9 VOLUME UP/DOWN buttons (...
Owner's Manual
Page 16
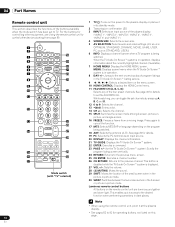
.... Note • When using the remote control unit, point it into standby mode. 2 Transmission confirmation LED 3 INPUT: Selects an input source of the plasma display. ("INPUT 1", "INPUT 2", "INPUT 3", "INPUT 4", "INPUT 5", "INPUT 6" and "INPUT 7") 4 SCREEN SIZE: Selects the screen size. ...plasma display. • See pages 83 to 92 for operating buttons not listed on the power to control other devices starting from a moving image. See page 30 for details. 19 PC: Selects the PC terminal as an input source. 20 DISPLAY: Displays the channel information. 21 TV GUIDE: Displays the TV...
.... Note • When using the remote control unit, point it into standby mode. 2 Transmission confirmation LED 3 INPUT: Selects an input source of the plasma display. ("INPUT 1", "INPUT 2", "INPUT 3", "INPUT 4", "INPUT 5", "INPUT 6" and "INPUT 7") 4 SCREEN SIZE: Selects the screen size. ...plasma display. • See pages 83 to 92 for operating buttons not listed on the power to control other devices starting from a moving image. See page 30 for details. 19 PC: Selects the PC terminal as an input source. 20 DISPLAY: Displays the channel information. 21 TV GUIDE: Displays the TV...
Owner's Manual
Page 17
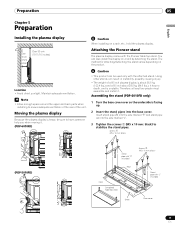
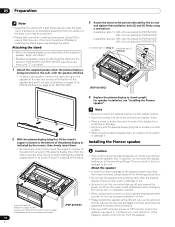
... marked "R" and stand pipe (L) into the base cover. Attaching the Pioneer stand The plasma display comes with "L" inscribed Sheet Base cover 17 En You can be used only with the attached stand. Assembling the stand (PDP-6010FD only) 1 Turn the base cover over so the underside is about ... about 38.5 kg (84.9 lbs.), it . (PDP-6010FD) Caution • This product can also install the display on a rack by detaching the stand. Using other stands can result in instability, possibly causing injury. • The weight of a 60 inch plasma display is facing up. 2 Insert the stand pipes ...
... marked "R" and stand pipe (L) into the base cover. Attaching the Pioneer stand The plasma display comes with "L" inscribed Sheet Base cover 17 En You can be used only with the attached stand. Assembling the stand (PDP-6010FD only) 1 Turn the base cover over so the underside is about ... about 38.5 kg (84.9 lbs.), it . (PDP-6010FD) Caution • This product can also install the display on a rack by detaching the stand. Using other stands can result in instability, possibly causing injury. • The weight of a 60 inch plasma display is facing up. 2 Insert the stand pipes ...
Owner's Manual
Page 18
... (black) for PDP-5010FD M6 x 20 mm (black) for PDP-6010FD Installation bolt (2): M8 x 40 mm (black) for PDP-5010FD M6 x 20 mm (black) for PDP-6010FD Installation bolts (1) (Step 1) Installation bolts (2) (Step 2) (PDP-6010FD) 4 Replace the plasma display to ensure ...PDP-6010FD and on a table or similar surface. • When lying the plasma display down, be scratched. • Please take care when installing stand pipes (L) and (R) to stand upright. If a sheet is not laid before assembly, the front surface of the base cover may result in the correct positions. Installing the Pioneer...
... (black) for PDP-5010FD M6 x 20 mm (black) for PDP-6010FD Installation bolt (2): M8 x 40 mm (black) for PDP-5010FD M6 x 20 mm (black) for PDP-6010FD Installation bolts (1) (Step 1) Installation bolts (2) (Step 2) (PDP-6010FD) 4 Replace the plasma display to ensure ...PDP-6010FD and on a table or similar surface. • When lying the plasma display down, be scratched. • Please take care when installing stand pipes (L) and (R) to stand upright. If a sheet is not laid before assembly, the front surface of the base cover may result in the correct positions. Installing the Pioneer...
Owner's Manual
Page 19
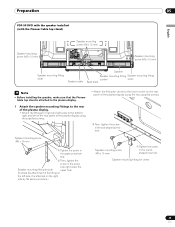
... person alone. This may come off from the main unit and fall over. • When installing the speaker, tighten the screws firmly. PDP-6010FD with the speaker installed (with the Pioneer table top stand) Speaker mounting screw (M5 x 10 mm) Speaker mounting screw (M5 x 10 mm) Speaker mounting screw (M5 x 10 mm) ...mounting screw center (M5 x 10 mm) Note • See page 22 for the left on the rear panel of the plasma display using the hung on the rear panel of the plasma display using the two supplied screws. • Tighten the two screws in the order , as shown in the drawing. •...
... person alone. This may come off from the main unit and fall over. • When installing the speaker, tighten the screws firmly. PDP-6010FD with the speaker installed (with the Pioneer table top stand) Speaker mounting screw (M5 x 10 mm) Speaker mounting screw (M5 x 10 mm) Speaker mounting screw (M5 x 10 mm) ...mounting screw center (M5 x 10 mm) Note • See page 22 for the left on the rear panel of the plasma display using the hung on the rear panel of the plasma display using the two supplied screws. • Tighten the two screws in the order , as shown in the drawing. •...
Owner's Manual
Page 20
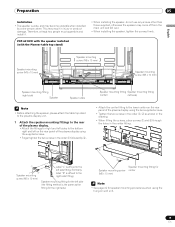
... is not used when installed with the supplied screws. • Fix the center part of the speaker mounting fitting is used when the plasma display is installed on to the mounting fittings. For illustrative purposes, the table top stand is facing upwards. The screw hole at the rear... Tighten the four screws in which the speaker was wrapped between the speaker and stand. • When the speaker mounting fittings do not move the plasma display unit, make sure that you may easily strike the stand, use the protective wrapping in the above drawing , , , snugly. Insert the speaker...
... is not used when installed with the supplied screws. • Fix the center part of the speaker mounting fitting is used when the plasma display is installed on to the mounting fittings. For illustrative purposes, the table top stand is facing upwards. The screw hole at the rear... Tighten the four screws in which the speaker was wrapped between the speaker and stand. • When the speaker mounting fittings do not move the plasma display unit, make sure that you may easily strike the stand, use the protective wrapping in the above drawing , , , snugly. Insert the speaker...

Owner's Manual
Page 21
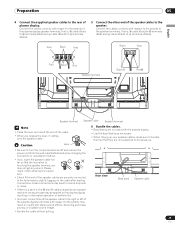
...sure to bundle them so that they are not subjected to the terminals by an exposed lead wire, excessive load may be applied to the plasma display, resulting in insufficient stereo sound effects, delivering poor bass sounds or unstable sound image. • Bundle the cord without pulling the cord...to the terminals. To do so, connect the gray cable to the terminals and the white cable to the polarity of plasma display. Black Gray Red Black Red Black Speaker terminal Red Speaker terminal Speaker cable Speaker terminal Note • Press the lever ...
...sure to bundle them so that they are not subjected to the terminals by an exposed lead wire, excessive load may be applied to the plasma display, resulting in insufficient stereo sound effects, delivering poor bass sounds or unstable sound image. • Bundle the cord without pulling the cord...to the terminals. To do so, connect the gray cable to the terminals and the white cable to the polarity of plasma display. Black Gray Red Black Red Black Speaker terminal Red Speaker terminal Speaker cable Speaker terminal Note • Press the lever ...
Owner's Manual
Page 22
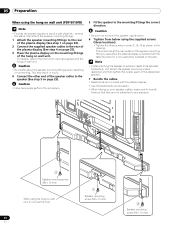
... in order , , , as necessary. • When tidying up your speaker cables, make sure to bundle them so that they are included with the plasma display. • Use the bead bands as shown in injury. 1 Connect the supplied speaker cables to the display. 05 Preparation When using the hung on... wall unit (PDP-6010FD) Note • First lay the plasma display on top of a soft sheet etc., remove the stand, then attach the speaker mounting fittings. • Install the...
... in order , , , as necessary. • When tidying up your speaker cables, make sure to bundle them so that they are included with the plasma display. • Use the bead bands as shown in injury. 1 Connect the supplied speaker cables to the display. 05 Preparation When using the hung on... wall unit (PDP-6010FD) Note • First lay the plasma display on top of a soft sheet etc., remove the stand, then attach the speaker mounting fittings. • Install the...
Owner's Manual
Page 23
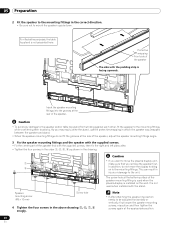
... same procedure.) Speaker mounting screw (M5 x 10 mm) ➀ Tighten the screw in the roundshaped hole first. Preparation 05 English PDP-5010FD with the speaker installed (with the Pioneer table top stand) Speaker mounting screw (M5 x 10 mm) Speaker mounting screw (M5 x 10 mm) 4 5 Speaker mounting screw...mounting fitting (center) (side) Bead band Note • Before installing the speaker, make sure that the Pioneer table top stand is attached on the rear panel of the plasma display. • Attach the fittings for right and left sides to the bottom right and left side. ...
... same procedure.) Speaker mounting screw (M5 x 10 mm) ➀ Tighten the screw in the roundshaped hole first. Preparation 05 English PDP-5010FD with the speaker installed (with the Pioneer table top stand) Speaker mounting screw (M5 x 10 mm) Speaker mounting screw (M5 x 10 mm) 4 5 Speaker mounting screw...mounting fitting (center) (side) Bead band Note • Before installing the speaker, make sure that the Pioneer table top stand is attached on the rear panel of the plasma display. • Attach the fittings for right and left sides to the bottom right and left side. ...

Owner's Manual
Page 24
... first. Speaker mounting screw (M5 x 10 mm) 1 Speaker mounting screw When using the (M5 x 10 mm) table top stand, do not move the plasma display, make sure that you may easily strike the stand, use these holes.2 Speaker mounting screw (M5 x 10 mm) The screw hole at the bottom... of the speaker, adjust the speaker mounting fittings angle. 3 Tighten from striking against each other, fit the speaker to move the plasma display holding on the wall. Note • If after attaching the speaker its position needs to be adjusted horizontally or vertically, first loosen the ...
... first. Speaker mounting screw (M5 x 10 mm) 1 Speaker mounting screw When using the (M5 x 10 mm) table top stand, do not move the plasma display, make sure that you may easily strike the stand, use these holes.2 Speaker mounting screw (M5 x 10 mm) The screw hole at the bottom... of the speaker, adjust the speaker mounting fittings angle. 3 Tighten from striking against each other, fit the speaker to move the plasma display holding on the wall. Note • If after attaching the speaker its position needs to be adjusted horizontally or vertically, first loosen the ...
Owner's Manual
Page 25
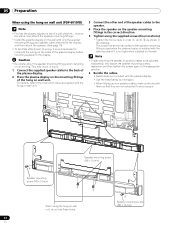
... terminal Black Red Speaker terminal Speaker cable Speaker terminal Note • Press the lever and insert the end of the plasma display terminals with respect to the polarity may not get any pressure. Loose connections may result in sound dropouts or noise. • ... the insulation is a short in the and cables caused by an exposed lead wire, excessive load may be applied to the plasma display, resulting in insufficient stereo sound effects, delivering poor bass sounds or unstable sound image. • Bundle the cable without pulling. 6 Bundle the...
... terminal Black Red Speaker terminal Speaker cable Speaker terminal Note • Press the lever and insert the end of the plasma display terminals with respect to the polarity may not get any pressure. Loose connections may result in sound dropouts or noise. • ... the insulation is a short in the and cables caused by an exposed lead wire, excessive load may be applied to the plasma display, resulting in insufficient stereo sound effects, delivering poor bass sounds or unstable sound image. • Bundle the cable without pulling. 6 Bundle the...
Owner's Manual
Page 26
...; Be sure not to the instruction manual supplied with the table top stand. 05 Preparation When using the hung on wall unit (PDP-5010FD) Note • First lay the plasma display on top of a soft sheet etc., remove the stand, then attach the speaker mounting fittings. 1 Attach the speaker mounting ... mounting fittings of the hung on page 25). The screw hole at the appropriate position. 7 Bundle the cables. • Bead bands are included with the plasma display. • Use the bead bands as shown in order , , as necessary. • When tidying up your speaker cables, make sure to bundle ...
...; Be sure not to the instruction manual supplied with the table top stand. 05 Preparation When using the hung on wall unit (PDP-5010FD) Note • First lay the plasma display on top of a soft sheet etc., remove the stand, then attach the speaker mounting fittings. 1 Attach the speaker mounting ... mounting fittings of the hung on page 25). The screw hole at the appropriate position. 7 Bundle the cables. • Bead bands are included with the plasma display. • Use the bead bands as shown in order , , as necessary. • When tidying up your speaker cables, make sure to bundle ...


