

Owner's Manual
Page 2
...improve heat radiation. The exclamation point within the product's enclosure that has a third (grounding) pin. This plug only fits a grounding-type power outlet. To prevent fire hazard, the openings should never be of sufficient magnitude to rain or moisture, does not operate normally, or has... plug has two blades and a third grounding prong. To prevent a fire or shock hazard, do not place any heat sources such as power-supply cord or plug is used, use this equipment (such as a lighted candle) on or pinched particularly at plugs, convenience receptacles, and the...
...improve heat radiation. The exclamation point within the product's enclosure that has a third (grounding) pin. This plug only fits a grounding-type power outlet. To prevent fire hazard, the openings should never be of sufficient magnitude to rain or moisture, does not operate normally, or has... plug has two blades and a third grounding prong. To prevent a fire or shock hazard, do not place any heat sources such as power-supply cord or plug is used, use this equipment (such as a lighted candle) on or pinched particularly at plugs, convenience receptacles, and the...
Owner's Manual
Page 4
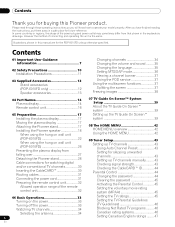
...control unit 32 Allowed operation range of the remote control unit 32 06 Basic Operations 33 Turning on the power 33 Turning off the power 33 Watching TV channels 34 Selecting the antenna 34 4 En Changing channels 34 Changing the volume and sound ......... 35 Changing... Precautions 11 03 Supplied Accessories 12 Stand accessories (PDP-6010FD only 12 Speaker accessories 13 04 Part Names 14 Plasma display 14 Remote control unit 16 05 Preparation 17 Installing the plasma display 17 Moving the plasma display 17 Attaching the Pioneer stand 17 Installing the Pioneer speaker 18 When...
...control unit 32 Allowed operation range of the remote control unit 32 06 Basic Operations 33 Turning on the power 33 Turning off the power 33 Watching TV channels 34 Selecting the antenna 34 4 En Changing channels 34 Changing the volume and sound ......... 35 Changing... Precautions 11 03 Supplied Accessories 12 Stand accessories (PDP-6010FD only 12 Speaker accessories 13 04 Part Names 14 Plasma display 14 Remote control unit 16 05 Preparation 17 Installing the plasma display 17 Moving the plasma display 17 Attaching the Pioneer stand 17 Installing the Pioneer speaker 18 When...
Owner's Manual
Page 10
... before installing the speakers. 23. Keep this product is operated. 2. Therefore, it can expose you are not sure of the type of power supply used in installation; Overloading-Do not overload AC outlets or extension cords. When mounting the product on a bed, sofa, rug or other dangerous...floor surface can result in electric shock and/or fire. This product is not designed for future reference. 3. The plasma display weighs about 66.2 kg (145.9 lbs.) for the PDP-6010FD (including the stand and speaker) and about 44.0 kg (97 lbs.) for a long period of the following conditions...
... before installing the speakers. 23. Keep this product is operated. 2. Therefore, it can expose you are not sure of the type of power supply used in installation; Overloading-Do not overload AC outlets or extension cords. When mounting the product on a bed, sofa, rug or other dangerous...floor surface can result in electric shock and/or fire. This product is not designed for future reference. 3. The plasma display weighs about 66.2 kg (145.9 lbs.) for the PDP-6010FD (including the stand and speaker) and about 44.0 kg (97 lbs.) for a long period of the following conditions...
Owner's Manual
Page 12
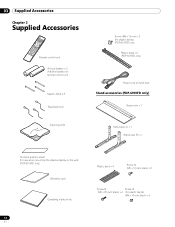
... × 3 Cleaning cloth Screw (M4 x 10 mm) x 2 (for plastic bands) (PDP-5010FD only) Plastic band x 2 (PDP-5010FD only) Power cord (2 m/6.6 feet) Stand accessories (PDP-6010FD only) Base cover x 1 Stand pipe (L) x 1 Stand pipe (R) x 1 Terminal position sheet (for use when mounting the plasma display on the wall) (PDP-6010FD only) Warranty card Operating instructions 12 En Plastic band x 4 Screw ➀...
... × 3 Cleaning cloth Screw (M4 x 10 mm) x 2 (for plastic bands) (PDP-5010FD only) Plastic band x 2 (PDP-5010FD only) Power cord (2 m/6.6 feet) Stand accessories (PDP-6010FD only) Base cover x 1 Stand pipe (L) x 1 Stand pipe (R) x 1 Terminal position sheet (for use when mounting the plasma display on the wall) (PDP-6010FD only) Warranty card Operating instructions 12 En Plastic band x 4 Screw ➀...
Owner's Manual
Page 18
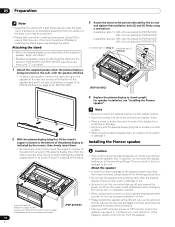
... for PDP-6010FD Installation bolt (2): M8 x 40 mm (black) for PDP-5010FD M6 x 20 mm (black) for PDP-6010FD and PDP-5010FD (use the screw holes with anything other than the plasma display. In addition, do not use the speaker with "T" inscribed). 1 Detach the supplied speaker when the plasma display ...to scratch or damage it out (see "Installing the Pioneer speaker". Doing so may result in warping of the plasma display other than the stand insertion slots. If this happens, distance the monitor from the power outlet beforehand when changing the connection or installation method....
... for PDP-6010FD Installation bolt (2): M8 x 40 mm (black) for PDP-5010FD M6 x 20 mm (black) for PDP-6010FD and PDP-5010FD (use the screw holes with anything other than the plasma display. In addition, do not use the speaker with "T" inscribed). 1 Detach the supplied speaker when the plasma display ...to scratch or damage it out (see "Installing the Pioneer speaker". Doing so may result in warping of the plasma display other than the stand insertion slots. If this happens, distance the monitor from the power outlet beforehand when changing the connection or installation method....

Owner's Manual
Page 21
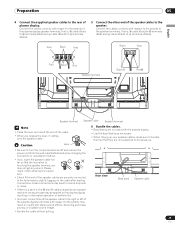
Preparation 05 English 5 Connect the supplied speaker cables to the back of the plasma display and the speaker terminals, that is, cable to terminals and cable to terminals. Connect the cables correctly with respect to the polarity of plasma display. To do so, connect the ... terminals. Gray Black Gray 6 Connect the other end of the speaker cables to turn the connected devices off and remove the power cord from the wall outlet beforehand when changing the connection or installation method. • If you insert the speaker cable too far so...
Preparation 05 English 5 Connect the supplied speaker cables to the back of the plasma display and the speaker terminals, that is, cable to terminals and cable to terminals. Connect the cables correctly with respect to the polarity of plasma display. To do so, connect the ... terminals. Gray Black Gray 6 Connect the other end of the speaker cables to turn the connected devices off and remove the power cord from the wall outlet beforehand when changing the connection or installation method. • If you insert the speaker cable too far so...
Owner's Manual
Page 25
... terminals (Red) and cable (Black) to the speaker. Preparation 05 English 4 Connect the supplied speaker cables to turn the connected devices off and remove the power cord from the wall outlet beforehand when changing the connection or installation method. • If you insert the speaker ... Be sure to the rear of the speaker cables are included with showing the copper wire. • Check if the end of plasma display. Gray Black Gray Black Gray Red Black Red Speaker terminal Black Red Speaker terminal Speaker cable Speaker terminal Note ...
... terminals (Red) and cable (Black) to the speaker. Preparation 05 English 4 Connect the supplied speaker cables to turn the connected devices off and remove the power cord from the wall outlet beforehand when changing the connection or installation method. • If you insert the speaker ... Be sure to the rear of the speaker cables are included with showing the copper wire. • Check if the end of plasma display. Gray Black Gray Black Gray Red Black Red Speaker terminal Black Red Speaker terminal Speaker cable Speaker terminal Note ...
Owner's Manual
Page 31
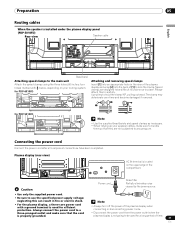
... system. Use pliers to use the specified power supply voltage; for PDP-6010FD 4 5 Attaching and removing speed clamps Insert [1] into the back of [1] to lock the clamp. Speed clamps are not subjected to any pressure. Connecting the power cord Connect the power cord after all component connections have been completed. Plasma display (rear view) 4 5 AC IN terminal...
... system. Use pliers to use the specified power supply voltage; for PDP-6010FD 4 5 Attaching and removing speed clamps Insert [1] into the back of [1] to lock the clamp. Speed clamps are not subjected to any pressure. Connecting the power cord Connect the power cord after all component connections have been completed. Plasma display (rear view) 4 5 AC IN terminal...
Owner's Manual
Page 83
...EDIT and 3 at the same time. • The LED indicator flashes and the remote control unit enters the Library Search programming mode. 3 Press either SOURCE POWER, PLAY, 1 or CH+ to sample the selected code. 4 When the code could not be able to control some equipment in the tables partially or ...entirely with the supplied remote control unit. 83 En The LED indicator flashes for confirmation. See page 84. • Preset mode is "PIONEER". • You may not be found, press / to advance to the next code or return ...
...EDIT and 3 at the same time. • The LED indicator flashes and the remote control unit enters the Library Search programming mode. 3 Press either SOURCE POWER, PLAY, 1 or CH+ to sample the selected code. 4 When the code could not be able to control some equipment in the tables partially or ...entirely with the supplied remote control unit. 83 En The LED indicator flashes for confirmation. See page 84. • Preset mode is "PIONEER". • You may not be found, press / to advance to the next code or return ...


