
Command Reference
Page 18
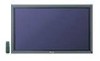
Industrial Solutions Business Group 2265 East 220th Street Long Beach, California 90810 United States of America (310) 952-2000 http://www.pioneerelectronics.com PDP-504CMX RS-232C Command Protocol Manual Pioneer Electronics (USA) Inc.
Industrial Solutions Business Group 2265 East 220th Street Long Beach, California 90810 United States of America (310) 952-2000 http://www.pioneerelectronics.com PDP-504CMX RS-232C Command Protocol Manual Pioneer Electronics (USA) Inc.
Operating Instructions
Page 6
...Canada, please contact a Pioneer Canadian Authorized Dealer to the following address: Pioneer Electronics of the FCC Rules. English Safety Precautions FEDERAL COMMUNICATIONS COMMISSION DECLARATION OF CONFORMITY This device complies with Video Card Model Number: PDP-504CMX / PDP-434CMX (Plasma Display) PDA-5003/PDA...instructions, service manuals, or accessories, please call the number shown below. 8 0 0 - 8 7 2 - 4 1 5 9 Please do not ship your product. and you wish to locate the nearest Pioneer Authorized Independent Service Company, or if you wish to Pioneer without first calling...
...Canada, please contact a Pioneer Canadian Authorized Dealer to the following address: Pioneer Electronics of the FCC Rules. English Safety Precautions FEDERAL COMMUNICATIONS COMMISSION DECLARATION OF CONFORMITY This device complies with Video Card Model Number: PDP-504CMX / PDP-434CMX (Plasma Display) PDA-5003/PDA...instructions, service manuals, or accessories, please call the number shown below. 8 0 0 - 8 7 2 - 4 1 5 9 Please do not ship your product. and you wish to locate the nearest Pioneer Authorized Independent Service Company, or if you wish to Pioneer without first calling...
Operating Instructions
Page 7
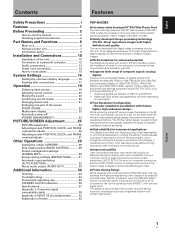
English Contents Safety Precautions i Features 1 Before Proceeding 3 How to use this manual 3 Checking supplied accessories 5 Part Names and Functions 6 Main unit 6 Remote control unit 7 Connection panel 8 Installation and Connections 10 Installation of the unit 10 Connection to a personal computer 12 Audio connections 13 Power cord connection 14 How to route cables ...
English Contents Safety Precautions i Features 1 Before Proceeding 3 How to use this manual 3 Checking supplied accessories 5 Part Names and Functions 6 Main unit 6 Remote control unit 7 Connection panel 8 Installation and Connections 10 Installation of the unit 10 Connection to a personal computer 12 Audio connections 13 Power cord connection 14 How to route cables ...
Operating Instructions
Page 9
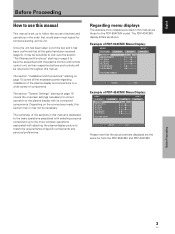
..." starting on page 16 covers the on the connections made, this manual are the same for someone setting up to throughout this unit. Depending on -screen settings necessary for the PDP-504CMX model. The remainder of actions and operations in this section may or... H.ENHANCE V. Regarding menu displays The example menu displays provided in the order that all the necessary points regarding installation of the plasma display and connections to become acquainted with the plasma monitor and remote control unit, as shown: Example of components. E N H A N C E : SETUP 0 0 0 0 0 0 ...
..." starting on page 16 covers the on the connections made, this manual are the same for someone setting up to throughout this unit. Depending on -screen settings necessary for the PDP-504CMX model. The remainder of actions and operations in this section may or... H.ENHANCE V. Regarding menu displays The example menu displays provided in the order that all the necessary points regarding installation of the plasma display and connections to become acquainted with the plasma monitor and remote control unit, as shown: Example of components. E N H A N C E : SETUP 0 0 0 0 0 0 ...

Operating Instructions
Page 16
... in .) into the main unit from tipping over. 10 En CAUTION This unit incorporates a thin design. Front Rear PDP-504CMX: 798 mm (31-7/16 in.) (Bolt hole thread pitch) PDP-434CMX: 880 mm (31-7/16 in.) (Bolt hole thread pitch) Always install the supplied display stands according to the ...depth, making it very unstable when stood on a flat, unwarped surface. to the instruction manual provided with bolt holes for accident or damage caused by the use of parts and accessories manufactured by PIONEER. As a result, two or more persons should cooperate when unpacking, moving , or ...
... in .) into the main unit from tipping over. 10 En CAUTION This unit incorporates a thin design. Front Rear PDP-504CMX: 798 mm (31-7/16 in.) (Bolt hole thread pitch) PDP-434CMX: 880 mm (31-7/16 in.) (Bolt hole thread pitch) Always install the supplied display stands according to the ...depth, making it very unstable when stood on a flat, unwarped surface. to the instruction manual provided with bolt holes for accident or damage caused by the use of parts and accessories manufactured by PIONEER. As a result, two or more persons should cooperate when unpacking, moving , or ...

Technical Manual
Page 1
...consideration of the handwriting device. Before installation and preparatory work to qualified personnel, or consult the nearest PIONEER dealer for assistance. ÷ We accept no responsibility for losses resulting from natural disasters. If adequate...place, immediately halt the installation process and discontinue marketing activities. TECHNICAL MANUAL (Ver. 1.0) HANDWRITING DEVICE: PDK-50HW3 Supported plasma displays: PDP-504CMX PDP-503CMX PDP-50MXE1 PDP-50MXE1-S PDP-503MXE This manual provides precautions and information for installation, preparation, and handling of construction,...
...consideration of the handwriting device. Before installation and preparatory work to qualified personnel, or consult the nearest PIONEER dealer for assistance. ÷ We accept no responsibility for losses resulting from natural disasters. If adequate...place, immediately halt the installation process and discontinue marketing activities. TECHNICAL MANUAL (Ver. 1.0) HANDWRITING DEVICE: PDK-50HW3 Supported plasma displays: PDP-504CMX PDP-503CMX PDP-50MXE1 PDP-50MXE1-S PDP-503MXE This manual provides precautions and information for installation, preparation, and handling of construction,...

Technical Manual
Page 7
... max. Specifications 1.1 Specifications System (plasma display and handwriting device) specifications Screen size 50 inches Aspect ratio 16:9 Power supply Plasma display (PDP-504CMX) AC 100 V (50/60 Hz) Handwriting device USB bus power Power consumption Plasma display (PDP-504CMX) 360 W (see Note 2)...1500 hpa Separate plasma display (PDP-504CMX) specifications Refer to "Specifications" in the Technical Manual of the plasma display.) 7 External dimensions (not including plasma display and pen stand) 1258 (W) x 758 (H) x 74 (D) mm Weight (Not including plasma display, but...
... max. Specifications 1.1 Specifications System (plasma display and handwriting device) specifications Screen size 50 inches Aspect ratio 16:9 Power supply Plasma display (PDP-504CMX) AC 100 V (50/60 Hz) Handwriting device USB bus power Power consumption Plasma display (PDP-504CMX) 360 W (see Note 2)...1500 hpa Separate plasma display (PDP-504CMX) specifications Refer to "Specifications" in the Technical Manual of the plasma display.) 7 External dimensions (not including plasma display and pen stand) 1258 (W) x 758 (H) x 74 (D) mm Weight (Not including plasma display, but...
Technical Manual
Page 11
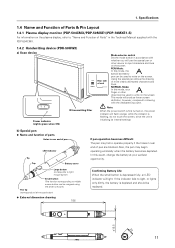
... fails to drawing with the dedicated input pen. Using the special pen allows the drawing of Parts" in the Technical Manual supplied with whether you will light. Power indicator (Lights green when ON) IR transmitting filter Note: When the power switch... operating erratically when the battery becomes depleted. 1. Specifications 1.4 Name and Function of Parts & Pin Layout 1.4.1 Plasma display monitor (PDP-504CMX/PDP-50MXE1/PDP-50MXE1-S) For information on the plasma display, refer to "Name and Function of more clearly delineated characters and lines. This mode will produce lower...
... fails to drawing with the dedicated input pen. Using the special pen allows the drawing of Parts" in the Technical Manual supplied with whether you will light. Power indicator (Lights green when ON) IR transmitting filter Note: When the power switch... operating erratically when the battery becomes depleted. 1. Specifications 1.4 Name and Function of Parts & Pin Layout 1.4.1 Plasma display monitor (PDP-504CMX/PDP-50MXE1/PDP-50MXE1-S) For information on the plasma display, refer to "Name and Function of more clearly delineated characters and lines. This mode will produce lower...
Technical Manual
Page 12
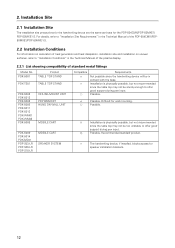
... brackets. 12 Installation is physically possible, but not recommended since the handwriting device will be in the Technical Manual of the plasma display. 2.2.1 List showing compatibility of heat generation and heat dissipation, installation site and installation on uneven surfaces,.... Difficult for wall mounting. For details, refer to "Installation Site Requirements" in the Technical Manual of the PDP-504CMX/PDP50MXE1/PDP-50MXE1-S. 2.2 Installation Conditions For information on calculation of standard metal fittings Model No. Possible. 2. Possible. Possible.
... brackets. 12 Installation is physically possible, but not recommended since the handwriting device will be in the Technical Manual of the plasma display. 2.2.1 List showing compatibility of heat generation and heat dissipation, installation site and installation on uneven surfaces,.... Difficult for wall mounting. For details, refer to "Installation Site Requirements" in the Technical Manual of the PDP-504CMX/PDP50MXE1/PDP-50MXE1-S. 2.2 Installation Conditions For information on calculation of standard metal fittings Model No. Possible. 2. Possible. Possible.
Technical Manual
Page 20
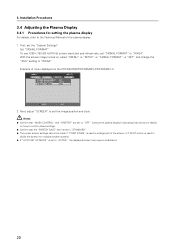
...or if SPLIT button is used to divide the screen into multiple smaller screens. ¶ If "AUTO SET UP MODE" is set to the Technical Manual of menu displayed on , select "MENU" = "SETUP" = "SIGNAL FORMAT" = "SET", and change the "XGA" setting to "ACTIVE", ...First, set the image position and clock. Example of the plasma display. 1. Consult the plasma display's Operating Instructions for setting the plasma display For details, refer to "OFF". With the screen image turned on the PDP-504CMX/PDP-50MXE1/PDP-50MXE1-S MENU INPUT1 PICTURE SCREEN SETUP OPTION POWER MANAGEMENT CLAMP ...
...or if SPLIT button is used to divide the screen into multiple smaller screens. ¶ If "AUTO SET UP MODE" is set to the Technical Manual of menu displayed on , select "MENU" = "SETUP" = "SIGNAL FORMAT" = "SET", and change the "XGA" setting to "ACTIVE", ...First, set the image position and clock. Example of the plasma display. 1. Consult the plasma display's Operating Instructions for setting the plasma display For details, refer to "OFF". With the screen image turned on the PDP-504CMX/PDP-50MXE1/PDP-50MXE1-S MENU INPUT1 PICTURE SCREEN SETUP OPTION POWER MANAGEMENT CLAMP ...


