User manual
Page 5
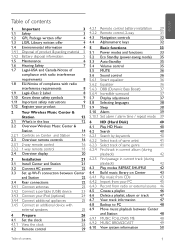
... 1.12 Register your product 11 5.9 Sleep 38 2 Your Wireless Music Center & 5.10 Alarm 39 Station 12 5.10.1 Set alarm / alarm time / repeat mode 39 2.1 What's in the box 12 6 HD (Hard Disk) 40 2.2 Overview Wireless Music Center & 6.1 Play HD Music 40 Station 14 6.2 Search 40 2.2.1 Controls on Center and Station 14... playback) 42 22 6.3 Play modes REPEAT, SHUFFLE 42 3.3 Set up Wi-Fi connection between Center 6.4 Build music library on Center 43 and Station 22 6.4.1 Rip music from CDs 43 3.4 Rear connections 22 6.4.2 Import from your PC 45 3.4.1 Connect antennas 23 ...
... 1.12 Register your product 11 5.9 Sleep 38 2 Your Wireless Music Center & 5.10 Alarm 39 Station 12 5.10.1 Set alarm / alarm time / repeat mode 39 2.1 What's in the box 12 6 HD (Hard Disk) 40 2.2 Overview Wireless Music Center & 6.1 Play HD Music 40 Station 14 6.2 Search 40 2.2.1 Controls on Center and Station 14... playback) 42 22 6.3 Play modes REPEAT, SHUFFLE 42 3.3 Set up Wi-Fi connection between Center 6.4 Build music library on Center 43 and Station 22 6.4.1 Rip music from CDs 43 3.4 Rear connections 22 6.4.2 Import from your PC 45 3.4.1 Connect antennas 23 ...
User manual
Page 6
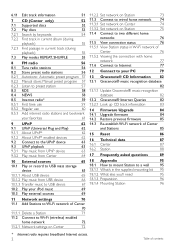
... iPod music 69 10.3 Play external sources 69 11 Network settings 70 11.1 Add Stations to Wi-Fi network of Center 70 11.1.1 Delete a Station 71 11.2 Connect to Wi-Fi (wireless) enabled home network 72 11.2.1 Network settings on Center 72 11.2.2 Set network on Station 73 11.3 Connect to wired home network 74 11.3.1 Set network on Center 74 11.3.2 Set network on Station 75...
... iPod music 69 10.3 Play external sources 69 11 Network settings 70 11.1 Add Stations to Wi-Fi network of Center 70 11.1.1 Delete a Station 71 11.2 Connect to Wi-Fi (wireless) enabled home network 72 11.2.1 Network settings on Center 72 11.2.2 Set network on Station 73 11.3 Connect to wired home network 74 11.3.1 Set network on Center 74 11.3.2 Set network on Station 75...

User manual
Page 14
...polarized or grounding-type plug. as power-supply cord or plug is not used , use attachments/accessories specified by the manufacturer. 12 Use only with the cart, stand, tripod, bracket, or table specified by the manufacturer or sold with one wider than the...purpose of time. 14 Refer all batteries correctly, + and - For disposal or recycling information, please contact your safety. EL 6475-S004: 03/12 10 Impor tant A polarized plug has two blades with the apparatus.When a cart is used for your local authorities or the Electronic Industries Alliance:...
...polarized or grounding-type plug. as power-supply cord or plug is not used , use attachments/accessories specified by the manufacturer. 12 Use only with the cart, stand, tripod, bracket, or table specified by the manufacturer or sold with one wider than the...purpose of time. 14 Refer all batteries correctly, + and - For disposal or recycling information, please contact your safety. EL 6475-S004: 03/12 10 Impor tant A polarized plug has two blades with the apparatus.When a cart is used for your local authorities or the Electronic Industries Alliance:...
User manual
Page 16
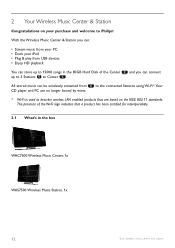
... to Philips! 2 Your Wireless Music Center & Station Congratulations on the IEEE 802.11 standards. With the Wireless Music Center & Station you can connect All stored music can : • Stream music from CD player and PC are based on your iPod • Plug & play from USB devices • Enjoy HD playback You can store up to 5 Stations to 15000 songs in the box WAC7500 Wireless Music Center...
... to Philips! 2 Your Wireless Music Center & Station Congratulations on the IEEE 802.11 standards. With the Wireless Music Center & Station you can connect All stored music can : • Stream music from CD player and PC are based on your iPod • Plug & play from USB devices • Enjoy HD playback You can store up to 5 Stations to 15000 songs in the box WAC7500 Wireless Music Center...
User manual
Page 18
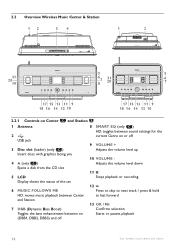
2.2 Overview Wireless Music Center & Station 12 34 1 2 21 20 19 5 5 6 7 8 21 20 6 7 17 15 13 11 9 18 16 14 12 10 17 15 13 11 9 18 16 14 12 10 2.2.1 Controls on Center and Station 1 Antenna 2 USB jack 3 Disc slot (loader) (only ) Insert discs with graphics facing you 4 / (only ) Ejects a disk from the ... VOLUME + Adjusts the volume level up 10 VOLUME Adjusts the volume level down 11 9 Stops playback or recording 12 )K Press to skip to next track / press & hold to fast forward 13 OK / 2; Confirms selection Starts or pauses playback 14 Your wireless music centre and station
2.2 Overview Wireless Music Center & Station 12 34 1 2 21 20 19 5 5 6 7 8 21 20 6 7 17 15 13 11 9 18 16 14 12 10 17 15 13 11 9 18 16 14 12 10 2.2.1 Controls on Center and Station 1 Antenna 2 USB jack 3 Disc slot (loader) (only ) Insert discs with graphics facing you 4 / (only ) Ejects a disk from the ... VOLUME + Adjusts the volume level up 10 VOLUME Adjusts the volume level down 11 9 Stops playback or recording 12 )K Press to skip to next track / press & hold to fast forward 13 OK / 2; Confirms selection Starts or pauses playback 14 Your wireless music centre and station
User manual
Page 20
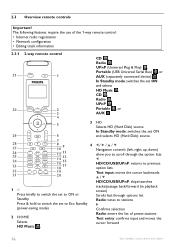
...the 1-way remote control: • Internet radio registration • Network configuration • Editing track information 2.3.1 2-way remote control 31 1 30 2 3 4 5 3 29 6 7 28 27 8 10 9 4 26 25 24 23 12 14 16 18 11 13 15 17 22 19 21 20 1y ...tracks/passage back/forward (in playback screen) Scrolls fast through options list Radio: tunes to stations 2 Confirms selection Radio: enters the list of preset stations Text entry: confirms input and moves the cursor forward 16 Your wireless music centre and station 2.3 Overview remote controls Important!
...the 1-way remote control: • Internet radio registration • Network configuration • Editing track information 2.3.1 2-way remote control 31 1 30 2 3 4 5 3 29 6 7 28 27 8 10 9 4 26 25 24 23 12 14 16 18 11 13 15 17 22 19 21 20 1y ...tracks/passage back/forward (in playback screen) Scrolls fast through options list Radio: tunes to stations 2 Confirms selection Radio: enters the list of preset stations Text entry: confirms input and moves the cursor forward 16 Your wireless music centre and station 2.3 Overview remote controls Important!
User manual
Page 21
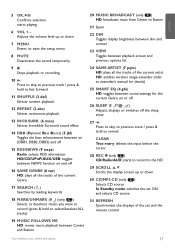
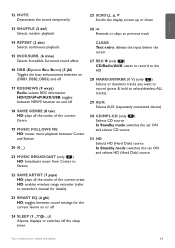
...or recording 10 )K Press to skip to previous track / press & hold to fast forward 11 SHUFFLE (3 def) Selects random playback 12 REPEAT (2 abc) Selects continuous playback 13 INCR.SURR. (6 mno) Selects Incredible Surround sound effect 14 DBB (Dynamic Bass Boost) ...music playback between Center and Station 20 MUSIC BROADCAST (only ) HD: broadcasts music from Center to Station 21 Spare 22 DIM Toggles display brightness between dim and normal 23 VIEW Toggles between playback screen and previous options list 24 SAME ARTIST (7 pqrs) HD: plays all the tracks of the current artist HD: enables wireless...
...or recording 10 )K Press to skip to previous track / press & hold to fast forward 11 SHUFFLE (3 def) Selects random playback 12 REPEAT (2 abc) Selects continuous playback 13 INCR.SURR. (6 mno) Selects Incredible Surround sound effect 14 DBB (Dynamic Bass Boost) ...music playback between Center and Station 20 MUSIC BROADCAST (only ) HD: broadcasts music from Center to Station 21 Spare 22 DIM Toggles display brightness between dim and normal 23 VIEW Toggles between playback screen and previous options list 24 SAME ARTIST (7 pqrs) HD: plays all the tracks of the current artist HD: enables wireless...
User manual
Page 22
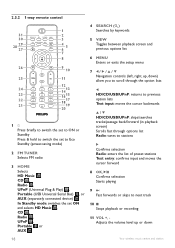
...26 25 24 23 22 21 1 2 3 45 6 7 8 9 10 11 12 13 14 1615 17 18 19 20 1y Press briefly to switch the set ... Portable (USB Universal Serial Bus) , or AUX (separately connected device) In Standby mode: switches the set ON and selects HD Music , CD , Radio , UPnP , Portable , or AUX 4 SEARCH ( ) Searches by keywords 5 VIEW Toggles between playback screen...level up or down 18 Your wireless music centre and station Confirms selection Starts playing 9 )K Fast forwards or skips to stations 2 Confirms selection Radio: enters the list of preset stations Text entry: confirms input...
...26 25 24 23 22 21 1 2 3 45 6 7 8 9 10 11 12 13 14 1615 17 18 19 20 1y Press briefly to switch the set ... Portable (USB Universal Serial Bus) , or AUX (separately connected device) In Standby mode: switches the set ON and selects HD Music , CD , Radio , UPnP , Portable , or AUX 4 SEARCH ( ) Searches by keywords 5 VIEW Toggles between playback screen...level up or down 18 Your wireless music centre and station Confirms selection Starts playing 9 )K Fast forwards or skips to stations 2 Confirms selection Radio: enters the list of preset stations Text entry: confirms input...
User manual
Page 23
ENGLISH 12 MUTE Deactivates the sound temporarily 25 SCROLL 3, 4 Scrolls the ...) HD: plays all the tracks of the current Genre 19 MUSIC FOLLOWS ME HD: moves music playback between Center and Station 20 (0 ) 21 MUSIC BROADCAST (only ) HD: broadcasts music from Center to Station CLEAR Text entry: deletes the input before the cursor 27 REC...wireless range extender (refer to extender's manual for details) 23 SMART EQ (4 ghi) HD: toggles between sound settings for the current Genre on or off 24 SLEEP (1 Adjusts, displays or switches off the sleep timer Your wireless music centre and station...
ENGLISH 12 MUTE Deactivates the sound temporarily 25 SCROLL 3, 4 Scrolls the ...) HD: plays all the tracks of the current Genre 19 MUSIC FOLLOWS ME HD: moves music playback between Center and Station 20 (0 ) 21 MUSIC BROADCAST (only ) HD: broadcasts music from Center to Station CLEAR Text entry: deletes the input before the cursor 27 REC...wireless range extender (refer to extender's manual for details) 23 SMART EQ (4 ghi) HD: toggles between sound settings for the current Genre on or off 24 SLEEP (1 Adjusts, displays or switches off the sleep timer Your wireless music centre and station...

User manual
Page 30
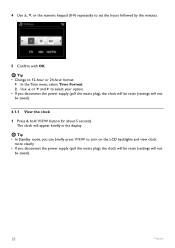
There are two methods to select Auto Time Sync. 26 Prepare RDS auto time sync: If you have preset RDS radio stations, you can set the clock, RDS automatic time synchronization and manual time setup. 4 Prepare 4.1 Set the clock The time can be displayed in 24-hour or 12-hour format.You can synchronize the clock with one of the RDS stations. 1 Press MENU to enter the menu screen. 2 Use 3 or 4 and 2 to select Settings followed by Time. 3 Use 3 or 4 and 2 to set up your clock on or .
There are two methods to select Auto Time Sync. 26 Prepare RDS auto time sync: If you have preset RDS radio stations, you can set the clock, RDS automatic time synchronization and manual time setup. 4 Prepare 4.1 Set the clock The time can be displayed in 24-hour or 12-hour format.You can synchronize the clock with one of the RDS stations. 1 Press MENU to enter the menu screen. 2 Use 3 or 4 and 2 to select Settings followed by Time. 3 Use 3 or 4 and 2 to set up your clock on or .
User manual
Page 32
... plug), the clock will be reset (settings will not be saved). 4.1.1 View the clock 1 Press & hold VIEW button for about 5 seconds. Tip • Change to 12-hour or 24-hour format: 1 In the Time menu, select Time Format. 2 Use 3 or 4 and 2 to set the hours followed by the minutes. 5 Confi...
... plug), the clock will be reset (settings will not be saved). 4.1.1 View the clock 1 Press & hold VIEW button for about 5 seconds. Tip • Change to 12-hour or 24-hour format: 1 In the Time menu, select Time Format. 2 Use 3 or 4 and 2 to set the hours followed by the minutes. 5 Confi...

User manual
Page 47
... switches to standby.While the Center is no infringement of copyrights or any other rights of third parties. • For CDs encoded with the existing tracks in the HD.To update your PC in the HD of .The Gracenote MusicID® enables your set to your music. by some record companies,... permitted only if there is processing the files, you can build a music library in a temporary memory: Do not switch the Center to your Gracenote® Media Database, see the section 12 Connect to standby - You can rip audio CD tracks from your CDs and store them as MP3 files in this...
... switches to standby.While the Center is no infringement of copyrights or any other rights of third parties. • For CDs encoded with the existing tracks in the HD.To update your PC in the HD of .The Gracenote MusicID® enables your set to your music. by some record companies,... permitted only if there is processing the files, you can build a music library in a temporary memory: Do not switch the Center to your Gracenote® Media Database, see the section 12 Connect to standby - You can rip audio CD tracks from your CDs and store them as MP3 files in this...

User manual
Page 49
For details, see the section 12 Connect to your PC and import them into . 2 In the track list screen, ... 4 again. 6 To stop ripping, press STOP 9. 6.4.2 Import from your PC The Wireless Audio Device Manager (WADM) in the supplied PC installer helps you organize music files on your PC in this manual. Album_001 is assigned if the CD track information... cannot be found in the Gracenote® database.) > Center returns to CD mode when ripping is ...
For details, see the section 12 Connect to your PC and import them into . 2 In the track list screen, ... 4 again. 6 To stop ripping, press STOP 9. 6.4.2 Import from your PC The Wireless Audio Device Manager (WADM) in the supplied PC installer helps you organize music files on your PC in this manual. Album_001 is assigned if the CD track information... cannot be found in the Gracenote® database.) > Center returns to CD mode when ripping is ...

User manual
Page 52
...that unit and activate the function. > The icon appears on the destination unit (see the section 12 Connect to your PC in your music playback can be retained on the displays of Center and Station. To view more track information: 1 In HD playback screen, press 2 to display the full... view album art screen. 2 In full view album art screen, press 1 to return to the HD playback screen 6.8 Backup to PC The Wireless Audio...
...that unit and activate the function. > The icon appears on the destination unit (see the section 12 Connect to your PC in your music playback can be retained on the displays of Center and Station. To view more track information: 1 In HD playback screen, press 2 to display the full... view album art screen. 2 In full view album art screen, press 1 to return to the HD playback screen 6.8 Backup to PC The Wireless Audio...

User manual
Page 56
...Player and WM DRM (Windows Media Digital Rights Management). 52 CD Supported formats: • Disc format ISO9660, Joliet, UDF (created on Adaptec Direct CD v5.0 and Nero Burning ROM UDF v5.5) and multi-session CDs • MP3 bit rate (data rate): 32-320 Kbps and variable bit rate. • 8-cm and 12....m4a/.m4b files) Important! About MP3/ WMA The music compression technology MP3 (MPEG1 Audio Layer 3) and WMA (Windows Media Audio) significantly reduces the digital data of Microsoft Corporation. 7 CD (Center only) 7.1 Supported discs You can play or support the following ...
...Player and WM DRM (Windows Media Digital Rights Management). 52 CD Supported formats: • Disc format ISO9660, Joliet, UDF (created on Adaptec Direct CD v5.0 and Nero Burning ROM UDF v5.5) and multi-session CDs • MP3 bit rate (data rate): 32-320 Kbps and variable bit rate. • 8-cm and 12....m4a/.m4b files) Important! About MP3/ WMA The music compression technology MP3 (MPEG1 Audio Layer 3) and WMA (Windows Media Audio) significantly reduces the digital data of Microsoft Corporation. 7 CD (Center only) 7.1 Supported discs You can play or support the following ...

User manual
Page 74
...figuration management Section 12 Connect to internet for Gracenote® internet service Section 13 Advanced network settings Connect to Wi-Fi home network Connect to wired home network Section 11.2 Section 11.3 Expert network setting Connect to two different networks Section 11.4 11.1 Add Stations to Wi-Fi network of Center ( ) You can play the music library of on...
...figuration management Section 12 Connect to internet for Gracenote® internet service Section 13 Advanced network settings Connect to Wi-Fi home network Connect to wired home network Section 11.2 Section 11.3 Expert network setting Connect to two different networks Section 11.4 11.1 Add Stations to Wi-Fi network of Center ( ) You can play the music library of on...

User manual
Page 79
...PC. Applicable if you are using the alphanumeric keys (see section 12 Connect to the external wired network. 6 In Set IP Mode screen: If you already have a wired home network (hub/switch/router). Network settings 75 www Router Wired Tip You can connect or directly to...a network. 11.3.2 Set network on Station ( ) If there is a protocol for Dynamic Host Configuration Protocol. For details, see 4.4 Prepare: Alphanumeric keys). 2 As prompted, select YES to apply the settings. > is connected to your PC using the supplied Ethernet cable and the Wireless Audio Device...
...PC. Applicable if you are using the alphanumeric keys (see section 12 Connect to the external wired network. 6 In Set IP Mode screen: If you already have a wired home network (hub/switch/router). Network settings 75 www Router Wired Tip You can connect or directly to...a network. 11.3.2 Set network on Station ( ) If there is a protocol for Dynamic Host Configuration Protocol. For details, see 4.4 Prepare: Alphanumeric keys). 2 As prompted, select YES to apply the settings. > is connected to your PC using the supplied Ethernet cable and the Wireless Audio Device...

User manual
Page 83
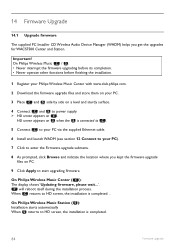
... disk space Install WADM (Philips Wireless Audio Device Manager, see 17 FAQ) 1 Insert the PC Suite CD into the PC. 2 Follow the instructions on the PC to install WADM. 3 When the security alert message (Microsoft Windows Firewall) pops up, press Unblock to allow the WADM application to run . or • Wireless network adapter 802.11...
... disk space Install WADM (Philips Wireless Audio Device Manager, see 17 FAQ) 1 Insert the PC Suite CD into the PC. 2 Follow the instructions on the PC to install WADM. 3 When the security alert message (Microsoft Windows Firewall) pops up, press Unblock to allow the WADM application to run . or • Wireless network adapter 802.11...
User manual
Page 88
...Philips Wireless Music Station ( ): Installation starts automatically When returns to enter the Firmware upgrade submenu. 8 As prompted, click Browse and indicate the location where you get the upgrades for WACS7500 Center and Station. HD screen appears on when the is connected to . 5 Connect to your PC via the supplied Ethernet cable. 6 Install and launch WADM (see section 12...rmware. 14 Firmware Upgrade 14.1 Upgrade firmware The supplied PC Installer CD Wireless Audio Device Manager (WADM) helps you kept the firmware upgrade files on . will reboot itself during...
...Philips Wireless Music Station ( ): Installation starts automatically When returns to enter the Firmware upgrade submenu. 8 As prompted, click Browse and indicate the location where you get the upgrades for WACS7500 Center and Station. HD screen appears on when the is connected to . 5 Connect to your PC via the supplied Ethernet cable. 6 Install and launch WADM (see section 12...rmware. 14 Firmware Upgrade 14.1 Upgrade firmware The supplied PC Installer CD Wireless Audio Device Manager (WADM) helps you kept the firmware upgrade files on . will reboot itself during...

User manual
Page 91
ENGLISH 16 Technical data 16.1 Center General AC Power Voltage information is printed on the back or the underside of the WACS7500. Dimensions (w x h x d) 616x272x172mm Weight (Net) approx. 8.8kg Power consumption Active
ENGLISH 16 Technical data 16.1 Center General AC Power Voltage information is printed on the back or the underside of the WACS7500. Dimensions (w x h x d) 616x272x172mm Weight (Net) approx. 8.8kg Power consumption Active


