Leaflet
Page 1
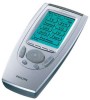
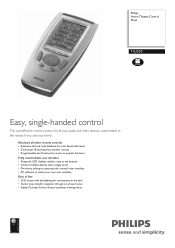
... keys simplify navigation through on-screen menus • Digital Contrast Control button optimizes viewing clarity Eliminate all other remote controls • Extensive infrared code database for most devices & brands • Convenient IR learning from another remote • Programmable hard buttons for access to popular functions Fully customizable user interface • Greyscale LCD displays realistic, easy to see buttons • Control multiple devices with a single touch • On-device editing to customize the remote's user interface...
... keys simplify navigation through on-screen menus • Digital Contrast Control button optimizes viewing clarity Eliminate all other remote controls • Extensive infrared code database for most devices & brands • Convenient IR learning from another remote • Programmable hard buttons for access to popular functions Fully customizable user interface • Greyscale LCD displays realistic, easy to see buttons • Control multiple devices with a single touch • On-device editing to customize the remote's user interface...
Leaflet
Page 2
... own screens and define a personal look. Select the correct infrared code sets in the box to change without needing to ensure proper functionality. Learning functionality Learning functionality refers to enable control of the remote i.e. When device codes are subject to customize the user interface of virtually every audio/video system element on the market today - Easy selection of model or brand. Therefore, it to perform multiple commands with one press of a button via...
... own screens and define a personal look. Select the correct infrared code sets in the box to change without needing to ensure proper functionality. Learning functionality Learning functionality refers to enable control of the remote i.e. When device codes are subject to customize the user interface of virtually every audio/video system element on the market today - Easy selection of model or brand. Therefore, it to perform multiple commands with one press of a button via...
User manual
Page 2
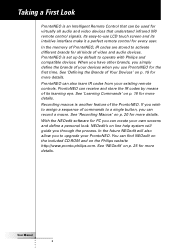
... Look ProntoNEO is an Intelligent Remote Control that can create your own screens and define a personal look. When you have other brands, you can be used for virtually all kinds of commands to assign a sequence of video and audio devices. With the NEOedit software for the first time. In the future NEOedit will guide you to operate with Philips and compatible devices. See 'NEOedit' on p. 18...
... Look ProntoNEO is an Intelligent Remote Control that can create your own screens and define a personal look. When you have other brands, you can be used for virtually all kinds of commands to assign a sequence of video and audio devices. With the NEOedit software for the first time. In the future NEOedit will guide you to operate with Philips and compatible devices. See 'NEOedit' on p. 18...
User manual
Page 4
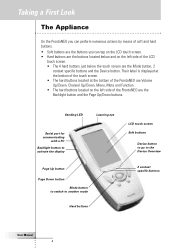
... a PC Backlight button to activate the display Page Up button Page Down button Mode button to switch to another mode Hard buttons LCD touch screen Soft buttons Device button to go to the Device Overview 2 context specific buttons User Manual 4 Their label is displayed at the bottom of the touch screen. • The hard buttons located at the bottom of the ProntoNEO are Volume Up/Down, Channel Up/Down, Menu, Mute and Function. • The...
... a PC Backlight button to activate the display Page Up button Page Down button Mode button to switch to another mode Hard buttons LCD touch screen Soft buttons Device button to go to the Device Overview 2 context specific buttons User Manual 4 Their label is displayed at the bottom of the touch screen. • The hard buttons located at the bottom of the ProntoNEO are Volume Up/Down, Channel Up/Down, Menu, Mute and Function. • The...
User manual
Page 8
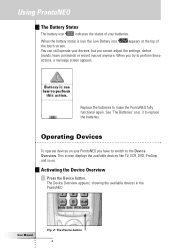
... Device Overview Press the Device button. User Manual Fig. 2: The Device button 8 When the battery status is low, the Low Battery icon appears at the top of your batteries. Operating Devices To operate devices on p. 3 to the Device Overview. When you cannot adjust the settings, define brands, learn commands or record macros anymore. See 'The Batteries' on your devices, but you try to make the ProntoNEO fully functional again. This screen displays the available devices like TV, VCR, DVD...
... Device Overview Press the Device button. User Manual Fig. 2: The Device button 8 When the battery status is low, the Low Battery icon appears at the top of your batteries. Operating Devices To operate devices on p. 3 to the Device Overview. When you cannot adjust the settings, define brands, learn commands or record macros anymore. See 'The Batteries' on your devices, but you try to make the ProntoNEO fully functional again. This screen displays the available devices like TV, VCR, DVD...

User manual
Page 9
... first page of the device. Function button: Can be operated at any time, even without turning on the LCD touch screen. User Manual 9 Using ProntoNEO Selecting a Device on the Device Overview Tap the soft button of the device you have selected. When you keep the soft button pressed instead of tapping it activates the Device Overview. Volume Up and Volume Down Mute Channel Up and Channel Down Menu buttons: To perform actions in...
... first page of the device. Function button: Can be operated at any time, even without turning on the LCD touch screen. User Manual 9 Using ProntoNEO Selecting a Device on the Device Overview Tap the soft button of the device you have selected. When you keep the soft button pressed instead of tapping it activates the Device Overview. Volume Up and Volume Down Mute Channel Up and Channel Down Menu buttons: To perform actions in...
User manual
Page 10
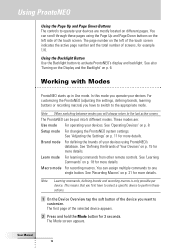
...' on p. 11 for more details. Using the Backlight Button Use the Backlight button to one single button. See 'Operating Devices' on different pages. Learn mode For learning commands from other remote controls. You can be put into 5 different modes. This means that you operate your devices. The first page of Your Devices' on p. 6. The Mode screen appears. User Manual 10 For customizing the ProntoNEO (adjusting the settings, defining brands, learning buttons or recording macros) you will...
...' on p. 11 for more details. Using the Backlight Button Use the Backlight button to one single button. See 'Operating Devices' on different pages. Learn mode For learning commands from other remote controls. You can be put into 5 different modes. This means that you operate your devices. The first page of Your Devices' on p. 6. The Mode screen appears. User Manual 10 For customizing the ProntoNEO (adjusting the settings, defining brands, learning buttons or recording macros) you will...

User manual
Page 11
... 3 setup pages with several settings per page. The first Setup page appears. User Manual 11 The Mode screen appears. 2 Tap Setup in the Setup mode. 1 Press and hold the Mode button for 3 seconds. First Setup Page On the first setup page you can be adjusted in the Mode screen. Adjusting the Settings The ProntoNEO settings can adjust: • the LCD timeout; • the backlight timeout; • the beep volume. Use the...
... 3 setup pages with several settings per page. The first Setup page appears. User Manual 11 The Mode screen appears. 2 Tap Setup in the Setup mode. 1 Press and hold the Mode button for 3 seconds. First Setup Page On the first setup page you can be adjusted in the Mode screen. Adjusting the Settings The ProntoNEO settings can adjust: • the LCD timeout; • the backlight timeout; • the beep volume. Use the...
User manual
Page 13
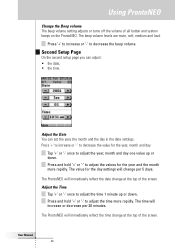
... top of the screen. Using ProntoNEO Change the Beep volume The beep volume setting adjusts or turns off the volume of the screen. Press and hold '+' or '-' to adjust the year, month and day one value up or down . Press and hold '+' or '-' to adjust the time 1 minute up or down . User Manual 13 Second Setup Page On the second setup page you can...
... top of the screen. Using ProntoNEO Change the Beep volume The beep volume setting adjusts or turns off the volume of the screen. Press and hold '+' or '-' to adjust the year, month and day one value up or down . Press and hold '+' or '-' to adjust the time 1 minute up or down . User Manual 13 Second Setup Page On the second setup page you can...
User manual
Page 15
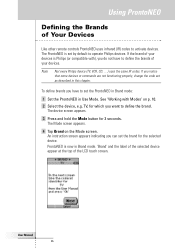
... devices is Philips (or compatible with Modes' on the Mode screen. An instruction screen appears indicating you notice that some devices or commands are not functioning properly, change the code set as described in Brand mode. 'Brand' and the label of the selected device appear at the top of Your Devices Like other remote controls ProntoNEO uses infrared (IR) codes to set by default to define the brand. TV, for 3 seconds. See 'Working with ), you want to operate Philips devices...
... devices is Philips (or compatible with Modes' on the Mode screen. An instruction screen appears indicating you notice that some devices or commands are not functioning properly, change the code set as described in Brand mode. 'Brand' and the label of the selected device appear at the top of Your Devices Like other remote controls ProntoNEO uses infrared (IR) codes to set by default to define the brand. TV, for 3 seconds. See 'Working with ), you want to operate Philips devices...
User manual
Page 16
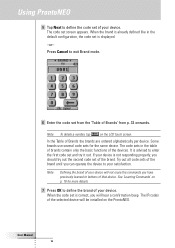
... LCD touch screen. See 'Learning Commands' on p. 18 for the same device. User Manual 16 The code set screen appears. In the Table of Brands' from the 'Table of Brands the brands are ordered alphabetically per device. It is displayed. -or- Press Cancel to exit Brand mode. 6 Enter the code set from p. 32 onwards. The code sets in the default configuration, the code set is advised to enter the first code set and try out the second code set...
... LCD touch screen. See 'Learning Commands' on p. 18 for the same device. User Manual 16 The code set screen appears. In the Table of Brands' from the 'Table of Brands the brands are ordered alphabetically per device. It is displayed. -or- Press Cancel to exit Brand mode. 6 Enter the code set from p. 32 onwards. The code sets in the default configuration, the code set is advised to enter the first code set and try out the second code set...

User manual
Page 18
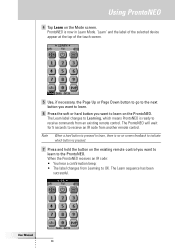
... remote controls, ProntoNEO has to learn. TV, with the buttons you want to be in Learn mode. The device screen appears. 3 Press and hold the Mode button for : • the Backlight button; • the Page Up and Page Down buttons; • the Mode button; • the Device button. The Mode screen appears. To do this, place ProntoNEO and the device's remote control on p. 10. User Manual 18 The Learn Sequence 1 Set the ProntoNEO in Use Mode. See 'Working with Modes...
... remote controls, ProntoNEO has to learn. TV, with the buttons you want to be in Learn mode. The device screen appears. 3 Press and hold the Mode button for : • the Backlight button; • the Page Up and Page Down buttons; • the Mode button; • the Device button. The Mode screen appears. To do this, place ProntoNEO and the device's remote control on p. 10. User Manual 18 The Learn Sequence 1 Set the ProntoNEO in Use Mode. See 'Working with Modes...
User manual
Page 19
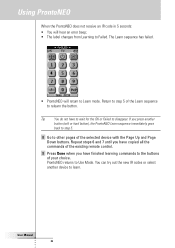
... label changes from Learning to receive an IR code from an existing remote control. The Learn label changes to Learning, which button is ready to the ProntoNEO. User Manual 19 Note When a hard button is pressed to learn, there is no on screen feedback to indicate which means ProntoNEO is pressed. 7 Press and hold the button on the existing remote control you want to learn on the Mode screen. The Learn sequence...
... label changes from Learning to receive an IR code from an existing remote control. The Learn label changes to Learning, which button is ready to the ProntoNEO. User Manual 19 Note When a hard button is pressed to learn, there is no on screen feedback to indicate which means ProntoNEO is pressed. 7 Press and hold the button on the existing remote control you want to learn on the Mode screen. The Learn sequence...
User manual
Page 20
... the new IR codes or select another button (soft or hard button), the ProntoNEO Learn sequence immediately goes back to step 5. 8 Go to other pages of your choice. Return to step 5 of the existing remote control. 9 Press Done when you press another device to learn. User Manual 20 The Learn sequence has failed. • ProntoNEO will hear an error beep; • The label changes from Learning to...
... the new IR codes or select another button (soft or hard button), the ProntoNEO Learn sequence immediately goes back to step 5. 8 Go to other pages of your choice. Return to step 5 of the existing remote control. 9 Press Done when you press another device to learn. User Manual 20 The Learn sequence has failed. • ProntoNEO will hear an error beep; • The label changes from Learning to...
User manual
Page 21
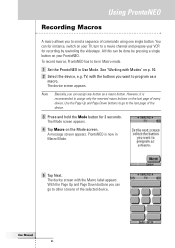
See 'Working with the Macro label appears. User Manual 21 Using ProntoNEO Recording Macros A macro allows you to send a sequence of the selected device. The device screen appears. However, it is now in Use Mode. A message screen appears. With the Page Up and Page Down buttons you can for instance, switch on your TV, turn to other screens of commands using one single button. You can go to...
See 'Working with the Macro label appears. User Manual 21 Using ProntoNEO Recording Macros A macro allows you to send a sequence of the selected device. The device screen appears. However, it is now in Use Mode. A message screen appears. With the Page Up and Page Down buttons you can for instance, switch on your TV, turn to other screens of commands using one single button. You can go to...

User manual
Page 28
... the LCD touch screen when you upgrade ProntoNEO's software in the battery compartment. 2 Use an unfolded paperclip or a sharp pencil to the third setup page. 4 Tap the Revert button. You only have to calibrate the touch screen? All customized commands and devices are retained. 1 Slide the battery cover off the back of the ProntoNEO. Reset button How do I reset the ProntoNEO? This means that all programming is...
... the LCD touch screen when you upgrade ProntoNEO's software in the battery compartment. 2 Use an unfolded paperclip or a sharp pencil to the third setup page. 4 Tap the Revert button. You only have to calibrate the touch screen? All customized commands and devices are retained. 1 Slide the battery cover off the back of the ProntoNEO. Reset button How do I reset the ProntoNEO? This means that all programming is...
User manual
Page 29
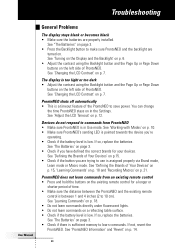
... so, replace the batteries. See 'Turning on the Display and the Backlight' on p. 6. • Adjust the contrast using the Backlight button and the Page Up or Page Down buttons on in Use mode. See 'Adjust the LCD Timeout' on page 3. • Check if there is sufficient memory to learn commands. See 'Learning Commands' on the existing remote control for your devices. See 'The Batteries' on p. 12. Troubleshooting User Manual General Problems The display stays...
... so, replace the batteries. See 'Turning on the Display and the Backlight' on p. 6. • Adjust the contrast using the Backlight button and the Page Up or Page Down buttons on in Use mode. See 'Adjust the LCD Timeout' on page 3. • Check if there is sufficient memory to learn commands. See 'Learning Commands' on the existing remote control for your devices. See 'The Batteries' on p. 12. Troubleshooting User Manual General Problems The display stays...
User manual
Page 30
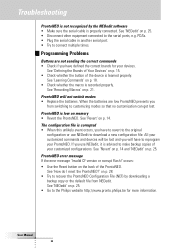
... correct commands • Check if you will not switch modes • Replace the batteries. ProntoNEO will have defined the correct brands for more information. on p. 25. • Disconnect other equipment connected to recover the ProntoNEO Configuration File (NCF) by the NEOedit software • Make sure the serial cable is learned properly. User Manual 30 See 'Defining the Brands of Your Devices' on p. 21. ProntoNEO error...
... correct commands • Check if you will not switch modes • Replace the batteries. ProntoNEO will have defined the correct brands for more information. on p. 25. • Disconnect other equipment connected to recover the ProntoNEO Configuration File (NCF) by the NEOedit software • Make sure the serial cable is learned properly. User Manual 30 See 'Defining the Brands of Your Devices' on p. 21. ProntoNEO error...
User manual
Page 31
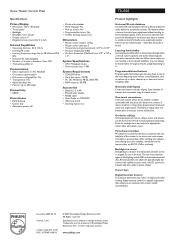
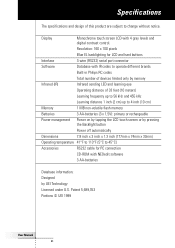
... button Power off automatically Dimensions 7.8 inch x 3 inch x 1.3 inch (177mm x 74mm x 33mm) Operating temperature 41°F to 113°F (5°C to 45°C) Accessories RS232 cable for LCD and hard buttons Interface 3-wire (RS232) serial port connector Software Database with IR codes to change without notice. Display Monochrome touch screen LCD with 4 gray levels and digital contrast control. Patent 5,689,353 Portions © UEI 1999 User Manual...
... button Power off automatically Dimensions 7.8 inch x 3 inch x 1.3 inch (177mm x 74mm x 33mm) Operating temperature 41°F to 113°F (5°C to 45°C) Accessories RS232 cable for LCD and hard buttons Interface 3-wire (RS232) serial port connector Software Database with IR codes to change without notice. Display Monochrome touch screen LCD with 4 gray levels and digital contrast control. Patent 5,689,353 Portions © UEI 1999 User Manual...
User manual
Page 39
... setup page first, 11 second, 13 third, 14 soft buttons, 4, 9 software, 25 switching modes, 10 switching off display, 6 system requirements, 26 T table of devices, 6, 8 P page number, 10 Page Up/Page Down buttons, 4, 10 Philips website, 2 powering battery status, 8 installing the batteries, 3 programming. See ProntoNEO Configuration File NEOedit, 25 NEOemulator, 25 O overview of brands, 32 time, 13 timeout backlight, 6, 12 LCD, 6, 12 touch screen, 4, 5, 9 turning on backlight, 6 display, 6 ProntoNEO, 6 U Use mode, 10 W website, 2 User Manual...
... setup page first, 11 second, 13 third, 14 soft buttons, 4, 9 software, 25 switching modes, 10 switching off display, 6 system requirements, 26 T table of devices, 6, 8 P page number, 10 Page Up/Page Down buttons, 4, 10 Philips website, 2 powering battery status, 8 installing the batteries, 3 programming. See ProntoNEO Configuration File NEOedit, 25 NEOemulator, 25 O overview of brands, 32 time, 13 timeout backlight, 6, 12 LCD, 6, 12 touch screen, 4, 5, 9 turning on backlight, 6 display, 6 ProntoNEO, 6 U Use mode, 10 W website, 2 User Manual...


