Leaflet
Page 1
Philips MCM196D lets you play your digital music Play and charge your iPod You're in any room. Play your iPod content out loud at home • Play and charge your iPod • Single remote control for the system and iPod Enrich your sound experience • Play MP3/WMA-CD, CD and CD-RW... • Autostop stereo cassette deck • Digital Sound Control for optimized music style settings • Dynamic Bass Boost for deep ...
Philips MCM196D lets you play your digital music Play and charge your iPod You're in any room. Play your iPod content out loud at home • Play and charge your iPod • Single remote control for the system and iPod Enrich your sound experience • Play MP3/WMA-CD, CD and CD-RW... • Autostop stereo cassette deck • Digital Sound Control for optimized music style settings • Dynamic Bass Boost for deep ...
Leaflet
Page 3
Specifications are the property of Koninklijke Philips Electronics N.V. or their respective owners. www.philips.com Micro Hi-Fi System Specifications MCM196D/37 Sound • Output Power: 2x4W RMS / 8W Total power • Sound Enhancement: Digital Sound Control 4 modes, Dynamic Bass Boost ... Guarantee booklet, Quick Use Guide • Remote control: 24-key remote with color display, iPod 5th Generation • Issue date 2009-11-06 Version: 1.0.5 12 NC: 8670 000 26951 UPC: 6 09585 12879 8 © 2009 Koninklijke Philips Electronics N.V. All Rights reserved. Packaging: 5.6...
Specifications are the property of Koninklijke Philips Electronics N.V. or their respective owners. www.philips.com Micro Hi-Fi System Specifications MCM196D/37 Sound • Output Power: 2x4W RMS / 8W Total power • Sound Enhancement: Digital Sound Control 4 modes, Dynamic Bass Boost ... Guarantee booklet, Quick Use Guide • Remote control: 24-key remote with color display, iPod 5th Generation • Issue date 2009-11-06 Version: 1.0.5 12 NC: 8670 000 26951 UPC: 6 09585 12879 8 © 2009 Koninklijke Philips Electronics N.V. All Rights reserved. Packaging: 5.6...
User manual
Page 8
English Contents General Information Supplied accessories 9 Environmental information 9 Safety information 9-10 Preparations Rear connections 11-12 Inserting batteries into the remote control . 12 Controls Controls on the system and remote control 13 Controls buttons available on the remote control only 13 Basic Functions Plug and play (for tuner installation 14 Switching the system on 15 Adjusting volume and sound 15...
English Contents General Information Supplied accessories 9 Environmental information 9 Safety information 9-10 Preparations Rear connections 11-12 Inserting batteries into the remote control . 12 Controls Controls on the system and remote control 13 Controls buttons available on the remote control only 13 Basic Functions Plug and play (for tuner installation 14 Switching the system on 15 Adjusting volume and sound 15...
User manual
Page 9
... not be exposed to dripping or splashing. ● Install the unit near the AC outlet and where the AC power plug can be easily reached. 9 remote control - Safety Information ● Before operating the system, check that may cause undesired operation. Should this occur, the CD player would not operate normally. If not...
... not be exposed to dripping or splashing. ● Install the unit near the AC outlet and where the AC power plug can be easily reached. 9 remote control - Safety Information ● Before operating the system, check that may cause undesired operation. Should this occur, the CD player would not operate normally. If not...
User manual
Page 12
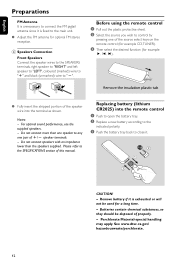
...open the battery tray. 2 Replace a new battery according to the indicated polarity. 3 Push the battery tray back to control by pressing one of the source select keys on the remote control (for example CD,TUNER). 3 Then select the desired function (for example É, í, ë). 1 2 ...antenna for a long time. - For optimal sound performance, use the supplied speakers. - Perchlorate Material-special handling may apply. Before using the remote control 1 Pull out the plastic protective sheet. 2 Select the source you wish to close it is fixed to "-". Do not connect more than...
...open the battery tray. 2 Replace a new battery according to the indicated polarity. 3 Push the battery tray back to control by pressing one of the source select keys on the remote control (for example CD,TUNER). 3 Then select the desired function (for example É, í, ë). 1 2 ...antenna for a long time. - For optimal sound performance, use the supplied speakers. - Perchlorate Material-special handling may apply. Before using the remote control 1 Pull out the plastic protective sheet. 2 Select the source you wish to close it is fixed to "-". Do not connect more than...
User manual
Page 13
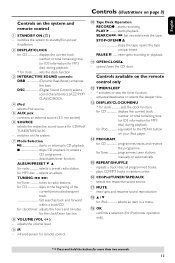
... ^ CD/iPod/TUNER/TAPE/AUX - selects the respective sound source. & MUTE - switches on the system and remote control 1 STANDBY ON (2) - infrared sensor for the clock/timer function 8 VOLUME (VOL -/+ ) - Controls available on your iPod player. $ PROGRAM for MP3 disc ..... TUNING 4 ¢ for Tuner tunes to the ...MENU button on the remote control only @ TIMER/SLEEP - * activates or sets the timer function. - PAUSEÅ ....... OPEN•CLOSE3 - selects the respective sound ...
... ^ CD/iPod/TUNER/TAPE/AUX - selects the respective sound source. & MUTE - switches on the system and remote control 1 STANDBY ON (2) - infrared sensor for the clock/timer function 8 VOLUME (VOL -/+ ) - Controls available on your iPod player. $ PROGRAM for MP3 disc ..... TUNING 4 ¢ for Tuner tunes to the ...MENU button on the remote control only @ TIMER/SLEEP - * activates or sets the timer function. - PAUSEÅ ....... OPEN•CLOSE3 - selects the respective sound ...
User manual
Page 15
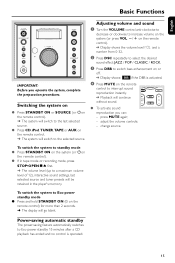
... first. ➜ The volume level (up to Eco power standby 15 minutes after a CD playback has ended and no control is activated. 4 Press MUTE on the remote control. ➜ The system will continue without sound. ● To activate sound reproduction you operate the system, complete the preparation ... switch the system to Eco-power standby mode ● Press and hold STANDBY ON (y on the system (or 2on the remote control). ● If in the player's memory. adjust the volume controls; - English Basic Functions MICRO SYSTEM MCM196D IMPORTANT: Before you can: - press MUTE again; -
... first. ➜ The volume level (up to Eco power standby 15 minutes after a CD playback has ended and no control is activated. 4 Press MUTE on the remote control. ➜ The system will continue without sound. ● To activate sound reproduction you operate the system, complete the preparation ... switch the system to Eco-power standby mode ● Press and hold STANDBY ON (y on the system (or 2on the remote control). ● If in the player's memory. adjust the volume controls; - English Basic Functions MICRO SYSTEM MCM196D IMPORTANT: Before you can: - press MUTE again; -

User manual
Page 16
...OPEN is displayed when you select another source:TAPE, iPod,TUNER or AUX. - To find a passage within a track 1 Press and hold down on the remote control 4 ¢). ➜ Normal playback continues. YY is the total album number and XXX is interrupted. ➜ To resume, press 2; To select a ... MICRO SYSTEM MCM196D IMPORTANT: The lens of the system to close the CD door. ➜ READING is displayed. to select a desired album. you open the CD compartment. 3 Insert a disc with the printed side facing up and press down on TUNING 4 ¢ (on the remote control 4 ¢...
...OPEN is displayed when you select another source:TAPE, iPod,TUNER or AUX. - To find a passage within a track 1 Press and hold down on the remote control 4 ¢). ➜ Normal playback continues. YY is the total album number and XXX is interrupted. ➜ To resume, press 2; To select a ... MICRO SYSTEM MCM196D IMPORTANT: The lens of the system to close the CD door. ➜ READING is displayed. to select a desired album. you open the CD compartment. 3 Insert a disc with the printed side facing up and press down on TUNING 4 ¢ (on the remote control 4 ¢...
User manual
Page 17
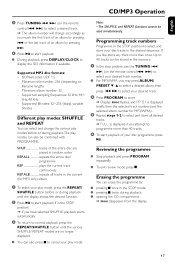
... be used simultaneously. The SHUFFLE and REPEAT functions cannot be stored in the memory. 1 In the stop position, use the TUNING 4 ¢ (on the remote control 4 ¢) to select your desired track number. ● For MP3/WMA, you may press ALBUM/ PRESET 4 3 to select a desired album, then ...you like, store any track more than once. If you attempt to display the ID3 information if available. Maximum title number: 256 (depending on the remote control 4 ¢) to cancel your disc tracks in the STOP mode; ● pressing 9 twice during playback; ● opening the CD compartment; ...
... be used simultaneously. The SHUFFLE and REPEAT functions cannot be stored in the memory. 1 In the stop position, use the TUNING 4 ¢ (on the remote control 4 ¢) to select your desired track number. ● For MP3/WMA, you may press ALBUM/ PRESET 4 3 to select a desired album, then ...you like, store any track more than once. If you attempt to display the ID3 information if available. Maximum title number: 256 (depending on the remote control 4 ¢) to cancel your disc tracks in the STOP mode; ● pressing 9 twice during playback; ● opening the CD compartment; ...
User manual
Page 18
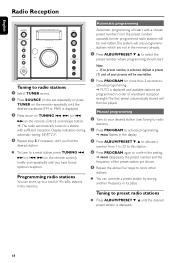
...if necessary until you find the desired station. ● To tune to a weak station, press TUNING 4 ¢ (or 4 ¢ on the remote control) briefly and repeatedly until the desired waveband (FM or MW) is displayed. 3 Press down on TUNING 4 ¢ (or 4 ¢ on the...to activate programming. ➜ AUTO is displayed. 18 Note: - English Radio Reception MICRO SYSTEM MCM196D Tuning to radio stations 1 Select TUNER source. 2 Press SOURCE on the set repeatedly or press TUNER on the remote control) and release button. ➜ The radio automatically tunes to a station with a chosen preset...
...if necessary until you find the desired station. ● To tune to a weak station, press TUNING 4 ¢ (or 4 ¢ on the remote control) briefly and repeatedly until the desired waveband (FM or MW) is displayed. 3 Press down on TUNING 4 ¢ (or 4 ¢ on the...to activate programming. ➜ AUTO is displayed. 18 Note: - English Radio Reception MICRO SYSTEM MCM196D Tuning to radio stations 1 Select TUNER source. 2 Press SOURCE on the set repeatedly or press TUNER on the remote control) and release button. ➜ The radio automatically tunes to a station with a chosen preset...
User manual
Page 21
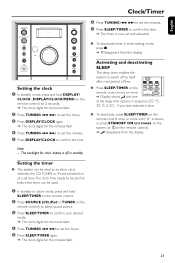
.../TIMER on the remote control) to select sound source. 3 Press SLEEP/TIMER to confirm your desired mode. ➜ The clock digits for the hours flash. 4 Press TUNING 4 ¢ to set the hours. 5 Press SLEEP/TIMER again. ➜ The clock digits for the minutes flash. 21 English Clock/Timer MICRO SYSTEM MCM196D 6 Press TUNING...
.../TIMER on the remote control) to select sound source. 3 Press SLEEP/TIMER to confirm your desired mode. ➜ The clock digits for the hours flash. 4 Press TUNING 4 ¢ to set the hours. 5 Press SLEEP/TIMER again. ➜ The clock digits for the minutes flash. 21 English Clock/Timer MICRO SYSTEM MCM196D 6 Press TUNING...

User manual
Page 23
...play automatically. ● Use MENU, 4/ 3, and OK to the docked player. The buttons ( 2;, ¡1, 2™ and VOLUME ) on the MCM196D and its remote control can charge the iPod in the dock. 3 Connect the cables of the dock to DOCKING IN jacks on the main set is switched to... SOURCE repeatedly or iPod to select iPod source. ● The connected player will switch to MCM196D you can work only with playback of the audio contents stored on the MCM196D and its remote control, the following iPod playback features are available: Play/Pause, selecting next/previous track, fast forwarding...
...play automatically. ● Use MENU, 4/ 3, and OK to the docked player. The buttons ( 2;, ¡1, 2™ and VOLUME ) on the MCM196D and its remote control can charge the iPod in the dock. 3 Connect the cables of the dock to DOCKING IN jacks on the main set is switched to... SOURCE repeatedly or iPod to select iPod source. ● The connected player will switch to MCM196D you can work only with playback of the audio contents stored on the MCM196D and its remote control, the following iPod playback features are available: Play/Pause, selecting next/previous track, fast forwarding...
User manual
Page 25
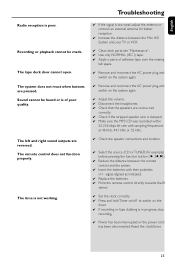
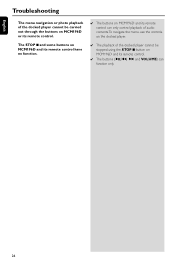
... left and right sound outputs are pressed. The system does not react when buttons are reversed. The tape deck door cannot open. The remote control does not function properly. The time is not working. ✔ If the signal is too weak, adjust the antenna or connect an ...; Use only NORMAL (IEC I) tape. ✔ Apply a piece of poor quality. signs) aligned as indicated. ✔ Replace the batteries. ✔ Point the remote control directly towards the IR sensor. ✔ Set the clock correctly. ✔ Press and hold Timer on/off to switch on the system again. ✔ Adjust...
... left and right sound outputs are pressed. The system does not react when buttons are reversed. The tape deck door cannot open. The remote control does not function properly. The time is not working. ✔ If the signal is too weak, adjust the antenna or connect an ...; Use only NORMAL (IEC I) tape. ✔ Apply a piece of poor quality. signs) aligned as indicated. ✔ Replace the batteries. ✔ Point the remote control directly towards the IR sensor. ✔ Set the clock correctly. ✔ Press and hold Timer on/off to switch on the system again. ✔ Adjust...
User manual
Page 26
... docked player cannot be carried out through the buttons on MCM196D and its remote control. The STOP 9 and some buttons on MCM196D and its remote control have no function. ✔ The buttons on MCM196D and its remote control can only control playback of audio contents.To navigate the menu, use the controls on the docked player. ✔ The playback of the...
... docked player cannot be carried out through the buttons on MCM196D and its remote control. The STOP 9 and some buttons on MCM196D and its remote control have no function. ✔ The buttons on MCM196D and its remote control can only control playback of audio contents.To navigate the menu, use the controls on the docked player. ✔ The playback of the...
Quick start guide (English)
Page 1
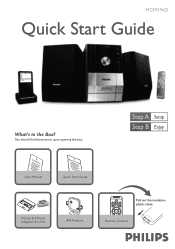
MCM196D Quick Start Guide What's in the Box? User 2 Manual User Manual Quick 1 Start Guide Quick Start Guide 1 Dock & 8 Dock Adapters for iPod AM Antenna Pull out the insulation plastic sheet. You should find these items upon opening the box. Remote Control
MCM196D Quick Start Guide What's in the Box? User 2 Manual User Manual Quick 1 Start Guide Quick Start Guide 1 Dock & 8 Dock Adapters for iPod AM Antenna Pull out the insulation plastic sheet. You should find these items upon opening the box. Remote Control
Quick start guide (English)
Page 2
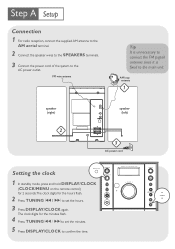
... clock 1 In standby mode, press and hold DISPLAY/CLOCK (CLOCK/MENU on the remote control) for 2 seconds.The clock digits for the minutes flash. 4 Press TUNING ¡1 / 2™ to set the hours. 3 Press DISPLAY/CLOCK again. MICRO SYSTEM MCM196D Connection 1 For radio reception, connect the supplied AM antenna to the AM aerial terminal...
... clock 1 In standby mode, press and hold DISPLAY/CLOCK (CLOCK/MENU on the remote control) for 2 seconds.The clock digits for the minutes flash. 4 Press TUNING ¡1 / 2™ to set the hours. 3 Press DISPLAY/CLOCK again. MICRO SYSTEM MCM196D Connection 1 For radio reception, connect the supplied AM antenna to the AM aerial terminal...

Quick start guide (English)
Page 3
... ALBUM/PRESET 4 3 until the desired preset station is displayed. Notes for example). Then select the desired function ( 2;, í, ë for the remote control: - Tip Detailed playback features and additional functions are described in order of the system to open the CD door. 3 Insert a disc with the printed side... facing up and press down on the remote control (CD or TUNER, for example). - Programming and Listening to radio stations 1 Select TUNER source. 2 Press PROGRAM on the set for more than...
... ALBUM/PRESET 4 3 until the desired preset station is displayed. Notes for example). Then select the desired function ( 2;, í, ë for the remote control: - Tip Detailed playback features and additional functions are described in order of the system to open the CD door. 3 Insert a disc with the printed side... facing up and press down on the remote control (CD or TUNER, for example). - Programming and Listening to radio stations 1 Select TUNER source. 2 Press PROGRAM on the set for more than...


