Leaflet
Page 1
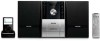
...; Digital Sound Control for optimized music style settings • Dynamic Bass Boost for deep and dramatic sound • 2x4W RMS total output power Start the day your way • Wake-Up and Sleep Timer • Digital tuning with the docking cradle! Philips Micro Hi-Fi System MCM196D Dock & play your iPod music out loud with 40 preset stations for extra convenience Philips MCM196D lets you play your digital music Play and charge your iPod You're in any room. Enjoy great sound in a compact...
...; Digital Sound Control for optimized music style settings • Dynamic Bass Boost for deep and dramatic sound • 2x4W RMS total output power Start the day your way • Wake-Up and Sleep Timer • Digital tuning with the docking cradle! Philips Micro Hi-Fi System MCM196D Dock & play your iPod music out loud with 40 preset stations for extra convenience Philips MCM196D lets you play your digital music Play and charge your iPod You're in any room. Enjoy great sound in a compact...
Leaflet
Page 2
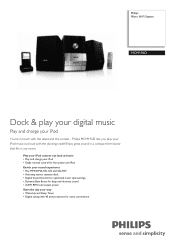
... the most important sound frequencies in your chosen Dynamic Bass Boost maximizes your music enjoyment by emphasizing the bass content of your music by precisely adjusting the sound balance to boost bass levels, so you are playing. Digital Sound Control offers you turn down the volume. Dynamic Bass Boost the music throughout the range of a button! at a low level. Micro Hi-Fi System Highlights MCM196D/37 Digital Sound Control music style. Each mode uses graphic equalizing...
... the most important sound frequencies in your chosen Dynamic Bass Boost maximizes your music enjoyment by emphasizing the bass content of your music by precisely adjusting the sound balance to boost bass levels, so you are playing. Digital Sound Control offers you turn down the volume. Dynamic Bass Boost the music throughout the range of a button! at a low level. Micro Hi-Fi System Highlights MCM196D/37 Digital Sound Control music style. Each mode uses graphic equalizing...
Leaflet
Page 3
.../Transmission • Tuner Bands: FM Stereo, AM • Auto digital tuning • Station presets: 40 • Tuner Enhancements: Auto Store Connectivity • Other connections: FM fixed pigtail antenna, Line out, AM Antenna, Cradle connection • Aux in: 3.5mm • Headphone: 3.5 mm Convenience • Alarms: CD Alarm, Radio Alarm, Sleep timer • Clock: On main display • Display Type: LCD Accessories • Included Accessories: AM/FM Antenna, Guarantee booklet, Quick Use Guide • Remote control: 24-key remote with color display, iPod 5th Generation •...
.../Transmission • Tuner Bands: FM Stereo, AM • Auto digital tuning • Station presets: 40 • Tuner Enhancements: Auto Store Connectivity • Other connections: FM fixed pigtail antenna, Line out, AM Antenna, Cradle connection • Aux in: 3.5mm • Headphone: 3.5 mm Convenience • Alarms: CD Alarm, Radio Alarm, Sleep timer • Clock: On main display • Display Type: LCD Accessories • Included Accessories: AM/FM Antenna, Guarantee booklet, Quick Use Guide • Remote control: 24-key remote with color display, iPod 5th Generation •...
User manual
Page 4
...philips.com/usasupport to ensure: *Proof of the best-built, bestbacked products available today.We'll do not remove product covering. CAUTION RISK OF ELECTRIC SHOCK DO NOT OPEN CAUTION: TO REDUCE THE RISK OF ELECTRIC SHOCK, DO NOT REMOVE COVER (OR BACK). This "bolt of the privileges to come. NO USER-SERVICEABLE PARTS...the rear of the valuable benefits listed below the Serial No. ATTENTION: Pour éviter les choc électriques, introduire la lame la plus easy access to accessories from your household, please do everything in a PHILIPS product. which you 'll receive all ...
...philips.com/usasupport to ensure: *Proof of the best-built, bestbacked products available today.We'll do not remove product covering. CAUTION RISK OF ELECTRIC SHOCK DO NOT OPEN CAUTION: TO REDUCE THE RISK OF ELECTRIC SHOCK, DO NOT REMOVE COVER (OR BACK). This "bolt of the privileges to come. NO USER-SERVICEABLE PARTS...the rear of the valuable benefits listed below the Serial No. ATTENTION: Pour éviter les choc électriques, introduire la lame la plus easy access to accessories from your household, please do everything in a PHILIPS product. which you 'll receive all ...
User manual
Page 8
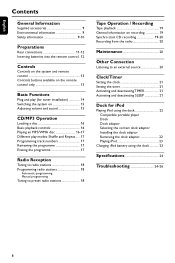
... the system and remote control 13 Controls buttons available on the remote control only 13 Basic Functions Plug and play (for tuner installation 14 Switching the system on 15 Adjusting volume and sound 15 CD/MP3 Operation Loading a disc 16 Basic playback controls 16 Playing an MP3/WMA disc 16-17 Different play modes: Shuffle and Repeat ..... 17 Programming track numbers 17 Reviewing the programme 17 Erasing the programme 17 Radio Reception Tuning to radio stations 18 Programming radio stations 18 Automatic programming Manual programming Tuning to preset radio stations 18 Tape...
... the system and remote control 13 Controls buttons available on the remote control only 13 Basic Functions Plug and play (for tuner installation 14 Switching the system on 15 Adjusting volume and sound 15 CD/MP3 Operation Loading a disc 16 Basic playback controls 16 Playing an MP3/WMA disc 16-17 Different play modes: Shuffle and Repeat ..... 17 Programming track numbers 17 Reviewing the programme 17 Erasing the programme 17 Radio Reception Tuning to radio stations 18 Programming radio stations 18 Automatic programming Manual programming Tuning to preset radio stations 18 Tape...
User manual
Page 9
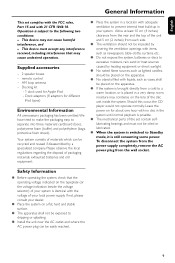
... brought directly from the wall socket. Supplied accessories - 2 speaker boxes - Operation is identical with 21 CFR 1040.10. Allow at least 10 cm (4 inches) clearance from the rear and the top of the disc unit inside the system. To disconnect the system from the power supply completely, remove the AC power plug from a cold to a warm location, or is still consuming some power. This device...
... brought directly from the wall socket. Supplied accessories - 2 speaker boxes - Operation is identical with 21 CFR 1040.10. Allow at least 10 cm (4 inches) clearance from the rear and the top of the disc unit inside the system. To disconnect the system from the power supply completely, remove the AC power plug from a cold to a warm location, or is still consuming some power. This device...
User manual
Page 12
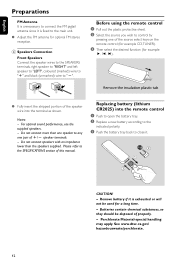
... fixed to control by pressing one of the source select keys on the remote control (for example CD,TUNER). 3 Then select the desired function (for example É, í, ë). 1 2 ● Fully insert the stripped portion of the speaker wire into the remote control 1 Push to open the battery tray. 2 Replace a new battery according to the indicated polarity. 3 Push the battery tray back to the SPECIFICATIONS section of this manual. C Speakers Connection Front Speakers Connect...
... fixed to control by pressing one of the source select keys on the remote control (for example CD,TUNER). 3 Then select the desired function (for example É, í, ë). 1 2 ● Fully insert the stripped portion of the speaker wire into the remote control 1 Push to open the battery tray. 2 Replace a new battery according to the indicated polarity. 3 Push the battery tray back to the SPECIFICATIONS section of this manual. C Speakers Connection Front Speakers Connect...
User manual
Page 13
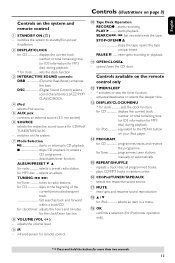
.... 4 iPod - ALBUM/PRESET 4 3 for Tuner tunes to the MENU button on the system. 7 Mode Selection 2 starts or interrupts CD playback. 9 stops CD playback or erases a CD programme deactivates timer function. TUNING 4 ¢ for radio selects a preset radio station. SEARCHà / á fast rewinds/winds the tape. PAUSEÅ ....... interrupts recording or playback. ! for iPod equivalent to radio stations. for CD skips to standby/Eco-power stnadby/on. 2 DISPLAY/CLOCK for CD displays the current track number or total remaining time (or...
.... 4 iPod - ALBUM/PRESET 4 3 for Tuner tunes to the MENU button on the system. 7 Mode Selection 2 starts or interrupts CD playback. 9 stops CD playback or erases a CD programme deactivates timer function. TUNING 4 ¢ for radio selects a preset radio station. SEARCHà / á fast rewinds/winds the tape. PAUSEÅ ....... interrupts recording or playback. ! for iPod equivalent to radio stations. for CD skips to standby/Eco-power stnadby/on. 2 DISPLAY/CLOCK for CD displays the current track number or total remaining time (or...

User manual
Page 14
... radio stations automatically. During Plug and Play, if no stereo frequency is displayed. 2 PressÉÅ on the system to store all the available radio stations are used, the last preset radio station will be played. Plug and Play (for 40 presets are stored or the memory for tuner installlation) Plug and Play allows you turn on the main supply again. PRESS PLAY" is detected during Plug and Play, "CHECK ANTENNA" will be displayed. - English Basic Functions MICRO SYSTEM MCM196D...
... radio stations automatically. During Plug and Play, if no stereo frequency is displayed. 2 PressÉÅ on the system to store all the available radio stations are used, the last preset radio station will be played. Plug and Play (for 40 presets are stored or the memory for tuner installlation) Plug and Play allows you turn on the main supply again. PRESS PLAY" is detected during Plug and Play, "CHECK ANTENNA" will be displayed. - English Basic Functions MICRO SYSTEM MCM196D...
User manual
Page 15
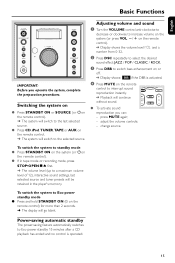
Switching the system on ● Press STANDBY ON or SOURCE (or 2on the remote control). ➜ The system will switch to the last selected source. ● Press CD, iPod, TUNER, TAPE or AUX on the remote control). ➜ Display shows the volume level VOL and a number from 0-32. 2 Press DSC repeatedly to select the desired sound effect: JAZZ / POP / CLASSIC / ROCK. 3 Press DBB to the selected source. Adjusting volume and sound 1 Turn the VOLUME control anti-clockwise to...
Switching the system on ● Press STANDBY ON or SOURCE (or 2on the remote control). ➜ The system will switch to the last selected source. ● Press CD, iPod, TUNER, TAPE or AUX on the remote control). ➜ Display shows the volume level VOL and a number from 0-32. 2 Press DSC repeatedly to select the desired sound effect: JAZZ / POP / CLASSIC / ROCK. 3 Press DBB to the selected source. Adjusting volume and sound 1 Turn the VOLUME control anti-clockwise to...

User manual
Page 16
... source:TAPE, iPod,TUNER or AUX. - the disc has reached the end. - YY is the total album number and XXX is played at high speed and low volume. 2 When you recognise the passage you want, release TUNING 4 ¢ (on the remote control 4 ¢). ➜ Normal playback continues. CD/MP3 Operation English MICRO SYSTEM MCM196D IMPORTANT: The lens of songs compiled into one disc. ➜ "YY XXX" is displayed. Loading a disc...
... source:TAPE, iPod,TUNER or AUX. - the disc has reached the end. - YY is the total album number and XXX is played at high speed and low volume. 2 When you recognise the passage you want, release TUNING 4 ¢ (on the remote control 4 ¢). ➜ Normal playback continues. CD/MP3 Operation English MICRO SYSTEM MCM196D IMPORTANT: The lens of songs compiled into one disc. ➜ "YY XXX" is displayed. Loading a disc...
User manual
Page 17
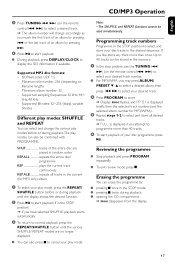
... PROGRAM to store. ➜ Display: PROG flashes, and PR 01 is displayed if you attempt to select and store your disc programme, press 2;. English CD/MP3 Operation 3 Press TUNING 4 ¢ (on the remote control 4 ¢) to select a desired track. ➜ The album number will change the various play modes before or during playback.The play mode, press the REPEAT/ SHUFFLE button before or during playback; ● opening the CD...
... PROGRAM to store. ➜ Display: PROG flashes, and PR 01 is displayed if you attempt to select and store your disc programme, press 2;. English CD/MP3 Operation 3 Press TUNING 4 ¢ (on the remote control 4 ¢) to select a desired track. ➜ The album number will change the various play modes before or during playback.The play mode, press the REPEAT/ SHUFFLE button before or during playback; ● opening the CD...
User manual
Page 19
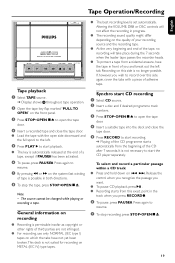
... TAPE source. ➜ Display: shows throughout tape operation. 2 Open the tape key flap marked "PULL TO OPEN" on the front panel. 3 Press STOP•OPENÇ0 to open the tape door. 4 Insert a recorded tape and close the tape door. 5 Press RECORD to start playback. ● The key is automatically released at the end of a tape, except if PAUSE; The source cannot be changed while playing or recording a tape. Synchro start CD recording...
... TAPE source. ➜ Display: shows throughout tape operation. 2 Open the tape key flap marked "PULL TO OPEN" on the front panel. 3 Press STOP•OPENÇ0 to open the tape door. 4 Insert a recorded tape and close the tape door. 5 Press RECORD to start playback. ● The key is automatically released at the end of a tape, except if PAUSE; The source cannot be changed while playing or recording a tape. Synchro start CD recording...

User manual
Page 20
... accumulate at your system's speakers. 1 Select AUX source. 2 Use a line-in cable (not supplied) to connect MCM196D's AUX jack (3.5 mm ) to the sound of tape operation. ● Use a cotton swab slightly moistened with Philips CD Lens Cleaner or any commercially available cleaner. Follow the instructions supplied with a mild detergent solution. English Tape Operation/Recording Other Connection Recording from the centre out. ● Do not use solvents such as CD player, VCR or iPod). Maintenance Cleaning the...
... accumulate at your system's speakers. 1 Select AUX source. 2 Use a line-in cable (not supplied) to connect MCM196D's AUX jack (3.5 mm ) to the sound of tape operation. ● Use a cotton swab slightly moistened with Philips CD Lens Cleaner or any commercially available cleaner. Follow the instructions supplied with a mild detergent solution. English Tape Operation/Recording Other Connection Recording from the centre out. ● Do not use solvents such as CD player, VCR or iPod). Maintenance Cleaning the...
User manual
Page 21
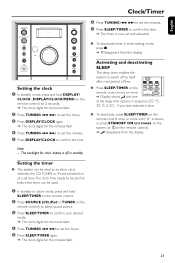
... an alarm clock, whereby the CD,TUNER or iPod is now set period of the sleep time options in sequence: 60, 45, 30,15, 0, 60... English Clock/Timer MICRO SYSTEM MCM196D 6 Press TUNING 4 ¢ to set the minutes. 7 Press SLEEP/TIMER to switch off in standby. Note: - The backlight for the hours flash. 4 Press TUNING 4 ¢ to confirm the time. Setting the timer ● The system can be used . 1 In standby or active mode, press and hold DISPLAY/ CLOCK (DISPLAY/CLOCK/MENU...
... an alarm clock, whereby the CD,TUNER or iPod is now set period of the sleep time options in sequence: 60, 45, 30,15, 0, 60... English Clock/Timer MICRO SYSTEM MCM196D 6 Press TUNING 4 ¢ to set the minutes. 7 Press SLEEP/TIMER to switch off in standby. Note: - The backlight for the hours flash. 4 Press TUNING 4 ¢ to confirm the time. Setting the timer ● The system can be used . 1 In standby or active mode, press and hold DISPLAY/ CLOCK (DISPLAY/CLOCK/MENU...

User manual
Page 23
... switched to the dock mode, if no player is not available to MCM196D you can work only with playback of the audio contents stored on mode of MCM196D. By using the dock Docking your iPod in for iPod Charging iPod battery using the buttons ( 2;, ¡1, 2™ and VOLUME ) on the MCM196D and its remote control can charge the iPod in the standby mode and power-on the docked player. - Stop (Ç) function of disc playback is plugged in the dock. 3 Connect the cables...
... switched to the dock mode, if no player is not available to MCM196D you can work only with playback of the audio contents stored on mode of MCM196D. By using the dock Docking your iPod in for iPod Charging iPod battery using the buttons ( 2;, ¡1, 2™ and VOLUME ) on the MCM196D and its remote control can charge the iPod in the standby mode and power-on the docked player. - Stop (Ç) function of disc playback is plugged in the dock. 3 Connect the cables...
User manual
Page 25
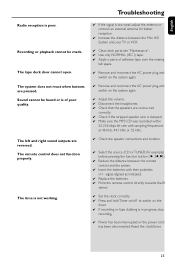
... stripped speaker wire is too weak, adjust the antenna or connect an external antenna for better reception. ✔ Increase the distance between the Mini HiFi System and your TV or VCR. ✔ Clean deck parts, see "Maintenance". ✔ Use only NORMAL (IEC I) tape. ✔ Apply a piece of poor quality. The left and right sound outputs are pressed. Sound cannot be made. Reset the clock/timer. 25 The system does...
... stripped speaker wire is too weak, adjust the antenna or connect an external antenna for better reception. ✔ Increase the distance between the Mini HiFi System and your TV or VCR. ✔ Clean deck parts, see "Maintenance". ✔ Use only NORMAL (IEC I) tape. ✔ Apply a piece of poor quality. The left and right sound outputs are pressed. Sound cannot be made. Reset the clock/timer. 25 The system does...
User manual
Page 27
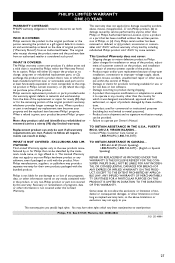
... allow limitations on the product, and installation or repair of antenna systems outside of the product. • Product repair and/or part replacement because of improper installation, connections to improper voltage supply, abuse, neglect, misuse, accident, unauthorized repair or other than Philips or Philips Authorized Service Location, (c) to Philips. • Labor charges for you specific legal rights. You may not apply to operate per Owner's Manual. Philips, P.O. Contact Philips Customer Care Center at no signature...
... allow limitations on the product, and installation or repair of antenna systems outside of the product. • Product repair and/or part replacement because of improper installation, connections to improper voltage supply, abuse, neglect, misuse, accident, unauthorized repair or other than Philips or Philips Authorized Service Location, (c) to Philips. • Labor charges for you specific legal rights. You may not apply to operate per Owner's Manual. Philips, P.O. Contact Philips Customer Care Center at no signature...
Quick start guide (English)
Page 2
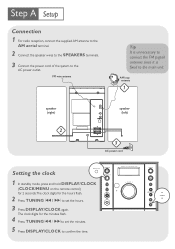
.... MICRO SYSTEM MCM196D The clock digits for the hours flash. 2 Press TUNING ¡1 / 2™ to set the minutes. 5 Press DISPLAY/CLOCK to set the hours. 3 Press DISPLAY/CLOCK again. Connection 1 For radio reception, connect the supplied AM antenna to the AM aerial terminal. 2 Connect the speaker wires to the SPEAKERS terminals. 3 Connect the power cord of the system to the main unit. AM loop antenna 1 speaker (right) FM AERIAL AM AERIAL n speaker (left) 2 3 AC power cord Setting the clock 1 In standby mode, press and hold DISPLAY/CLOCK (CLOCK/MENU...
.... MICRO SYSTEM MCM196D The clock digits for the hours flash. 2 Press TUNING ¡1 / 2™ to set the minutes. 5 Press DISPLAY/CLOCK to set the hours. 3 Press DISPLAY/CLOCK again. Connection 1 For radio reception, connect the supplied AM antenna to the AM aerial terminal. 2 Connect the speaker wires to the SPEAKERS terminals. 3 Connect the power cord of the system to the main unit. AM loop antenna 1 speaker (right) FM AERIAL AM AERIAL n speaker (left) 2 3 AC power cord Setting the clock 1 In standby mode, press and hold DISPLAY/CLOCK (CLOCK/MENU...
Quick start guide (English)
Page 4
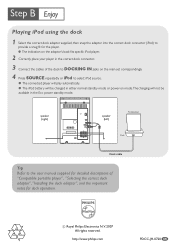
... user manual supplied for detailed descriptions of "Compatible portable player", "Selecting the correct dock adaptor","Installing the dock adaptor", and the important notes for dock operation. speaker (right) FM AERIAL AM AERIAL n speaker (left) Portable player Dock Dock cable Tip Refer to select iPod source. ● The connected player will play automatically. ● The iPod battery will be charged in either normal standby mode or power-on mode.The charging will not be available in the correct dock connector. 3 Connect...
... user manual supplied for detailed descriptions of "Compatible portable player", "Selecting the correct dock adaptor","Installing the dock adaptor", and the important notes for dock operation. speaker (right) FM AERIAL AM AERIAL n speaker (left) Portable player Dock Dock cable Tip Refer to select iPod source. ● The connected player will play automatically. ● The iPod battery will be charged in either normal standby mode or power-on mode.The charging will not be available in the correct dock connector. 3 Connect...


