
User Guide
Page 2
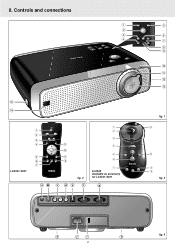
Controls and connections Keystone Volume Lamp RC Stabnyd A MVute OK 1 2 3 4 Menu OK AV Mute Stand by On Source Lamp RC Keystone 5 6 7 8 9 Menu 0 ! @ # @ $ LC4341/4331 1 2 3 4 5 6 7 Stand by On Left MMOouUsSeE Right VVOoLluUmMeE MEenNuU OK... MMUuTteE AAVVMMUuTteE SSOoUuRrcCeE DD-F-FRreEeEzZeE D-ZOooOmM AV MUTE ! 0 9 8 ab fig. 2 c de f 1 2 3 4 5 6 OK Menu Stand by On Volume AV Mute 7 LC4345 Available as accessory for LC4341...
Controls and connections Keystone Volume Lamp RC Stabnyd A MVute OK 1 2 3 4 Menu OK AV Mute Stand by On Source Lamp RC Keystone 5 6 7 8 9 Menu 0 ! @ # @ $ LC4341/4331 1 2 3 4 5 6 7 Stand by On Left MMOouUsSeE Right VVOoLluUmMeE MEenNuU OK... MMUuTteE AAVVMMUuTteE SSOoUuRrcCeE DD-F-FRreEeEzZeE D-ZOooOmM AV MUTE ! 0 9 8 ab fig. 2 c de f 1 2 3 4 5 6 OK Menu Stand by On Volume AV Mute 7 LC4345 Available as accessory for LC4341...
User Guide
Page 3
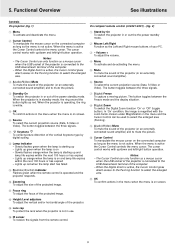
...control 18 Other settings 19 9. For your own protection and prolonged operation of enjoyment. Operation is the following: Philips Consumer Electronics Company One Philips Drive Knoxville, TN 37914 Telephone (1888) 873-4672 Packaging contents Please confirm that , used in accordance with Part...Controls and connections 2 1. Set Up 8-9 Positioning the projector and screen 8 Mains supply 8 Adjusting the focus and size of the image 8 Adjusting the vertical and horizontal angle of the trackball remote control 20 Lamp 21 Lamp replacement 21 Resetting the lamplife time 22 10. Note: ...
...control 18 Other settings 19 9. For your own protection and prolonged operation of enjoyment. Operation is the following: Philips Consumer Electronics Company One Philips Drive Knoxville, TN 37914 Telephone (1888) 873-4672 Packaging contents Please confirm that , used in accordance with Part...Controls and connections 2 1. Set Up 8-9 Positioning the projector and screen 8 Mains supply 8 Adjusting the focus and size of the image 8 Adjusting the vertical and horizontal angle of the trackball remote control 20 Lamp 21 Lamp replacement 21 Resetting the lamplife time 22 10. Note: ...
User Guide
Page 4
... Please read all warnings and instructions marked on a bed, sofa, rug, or other hazards. Save these instructions before cleaning or lamp replacement. 2. This projector has been engineered and manufactured to qualified service personnel. 17. IMPROPER USE CAN RESULT IN POTENTIAL ELECTRICAL SHOCK OR FIRE HAZARDS. In ... and disconnect any cable systems. This will be done with a mounting kit approved by PHILIPS, as this can cause a fire or electric shock. 15. Unplug the projector from the wall outlet and refer servicing to qualified service personnel under the following basic rules...
... Please read all warnings and instructions marked on a bed, sofa, rug, or other hazards. Save these instructions before cleaning or lamp replacement. 2. This projector has been engineered and manufactured to qualified service personnel. 17. IMPROPER USE CAN RESULT IN POTENTIAL ELECTRICAL SHOCK OR FIRE HAZARDS. In ... and disconnect any cable systems. This will be done with a mounting kit approved by PHILIPS, as this can cause a fire or electric shock. 15. Unplug the projector from the wall outlet and refer servicing to qualified service personnel under the following basic rules...
User Guide
Page 5
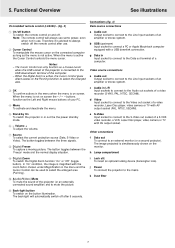
...remote control allows you can be connected to manipulate the mouse cursor on the monitor. 7. High reliability and excellent brightness The Philips UHP lamp guarantees long life, excellent brightness over the entire picture. 5 Adjustable Screen Capability The diagonal picture size of the On Screen Display... Correction A keystoned image (picture top width larger than picture bottom width or vice versa) appears when the relative positions of the projector and the screen are of the projected image can select French, Spanish, German, Italian and Portuguese. Very easy to install and ...
...remote control allows you can be connected to manipulate the mouse cursor on the monitor. 7. High reliability and excellent brightness The Philips UHP lamp guarantees long life, excellent brightness over the entire picture. 5 Adjustable Screen Capability The diagonal picture size of the On Screen Display... Correction A keystoned image (picture top width larger than picture bottom width or vice versa) appears when the relative positions of the projector and the screen are of the projected image can select French, Spanish, German, Italian and Portuguese. Very easy to install and ...
User Guide
Page 6
...on screen. 6 Source To select the current projection source (Data, S-Video or Video). On compact remote control (LC4341/4331) - (fig. 2) 1 Stand by digital scaling. 8 Lamp indicator - When the projector is not active. Volume + To adjust the volume. 4 Menu To activate and de-activating the menu. 5 ...Cursor Control can only function as a mouse cursor when the USB socket of the projector is operated and the projector responds. 0 Zoomring To adjust the size of the computer. - Lights up and lamp life expires within the next 100 hours or has expired - The Cursor Control can...
...on screen. 6 Source To select the current projection source (Data, S-Video or Video). On compact remote control (LC4341/4331) - (fig. 2) 1 Stand by digital scaling. 8 Lamp indicator - When the projector is not active. Volume + To adjust the volume. 4 Menu To activate and de-activating the menu. 5 ...Cursor Control can only function as a mouse cursor when the USB socket of the projector is operated and the projector responds. 0 Zoomring To adjust the size of the computer. - Lights up and lamp life expires within the next 100 hours or has expired - The Cursor Control can...
User Guide
Page 7
... the menu and the Cursor Control can only function as the Left and Right mouse buttons of a video recorder (S-VHS, PAL, NTSC, SECAM). h Lamp compartment 9 D(igital)-Zoom To switch the Digital Zoom function 'On' or 'Off' (toggle button). Therefore it is active, the Cursor Control gives direct... Volume + To adjust the volume. 7 Source To select the current projection source (Data, S-Video or Video). j Power To connect the projector to connect a PC or Apple Macintosh computer equipped with the zoom factor chosen under Magnification in Input socket to connect to always switch off ...
... the menu and the Cursor Control can only function as the Left and Right mouse buttons of a video recorder (S-VHS, PAL, NTSC, SECAM). h Lamp compartment 9 D(igital)-Zoom To switch the Digital Zoom function 'On' or 'Off' (toggle button). Therefore it is active, the Cursor Control gives direct... Volume + To adjust the volume. 7 Source To select the current projection source (Data, S-Video or Video). j Power To connect the projector to connect a PC or Apple Macintosh computer equipped with the zoom factor chosen under Magnification in Input socket to connect to always switch off ...
User Guide
Page 8
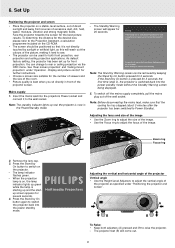
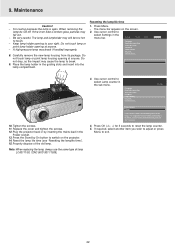
...should be positioned so that the cooling fan has stopped (about 3 minutes after the projector has been switched to switch on the projector. - When the projection lamp is on, the lamp indicator lights up green while the lamp is best when you can switch on a stable, level surface, out of direct...socket. Note: Before disconnecting the mains lead, make sure that it to rear or ceiling projection via the OSD menu. PHILIPS Multimedia Projectors Adjusting the vertical and horizontal angle of the projector Vertical angle • Use the Height/Level Adjusters to adjust the vertical angle of the...
...should be positioned so that the cooling fan has stopped (about 3 minutes after the projector has been switched to switch on the projector. - When the projection lamp is on, the lamp indicator lights up green while the lamp is best when you can switch on a stable, level surface, out of direct...socket. Note: Before disconnecting the mains lead, make sure that it to rear or ceiling projection via the OSD menu. PHILIPS Multimedia Projectors Adjusting the vertical and horizontal angle of the projector Vertical angle • Use the Height/Level Adjusters to adjust the vertical angle of the...
User Guide
Page 9
...the lens. 4. Make sure the lens is accessible through the 'Keystone Correction' option in to prevent damage to put the projector in the compact remote control (LC4341/4331) Push Horizontal angle (horizon) • Adjust or correct a possible tilted picture by internal scaling. Caution! Keystoned Image...m (± 65 feet). Put the lens cap back in 'Display and Picture Control'. Stabnyd A MVute Volume Lamp RC Keystone Menu OK Note: Never place the projector on the side where the connections are not properly placed, the picture will be distorted, producing a keystone image....
...the lens. 4. Make sure the lens is accessible through the 'Keystone Correction' option in to prevent damage to put the projector in the compact remote control (LC4341/4331) Push Horizontal angle (horizon) • Adjust or correct a possible tilted picture by internal scaling. Caution! Keystoned Image...m (± 65 feet). Put the lens cap back in 'Display and Picture Control'. Stabnyd A MVute Volume Lamp RC Keystone Menu OK Note: Never place the projector on the side where the connections are not properly placed, the picture will be distorted, producing a keystone image....
User Guide
Page 15
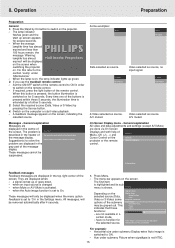
... is Fan error described in the gray part of The projector will be displayed on the screen when switching the projector on the Submenu projector or the remote Submenu highlight control. 8. When the average PHILIPS lamplife time has almost expired and less than 100 hours .... On Screen Display menu - a signal comes up green. 2. Horizontal size under 'Maintenance' - Operation Preparation Preparation General 1. The lamp indicator flashes green and the start video playback. - For this button is pressed, the button illumination is set to switch on the computer...
... is Fan error described in the gray part of The projector will be displayed on the screen when switching the projector on the Submenu projector or the remote Submenu highlight control. 8. When the average PHILIPS lamplife time has almost expired and less than 100 hours .... On Screen Display menu - a signal comes up green. 2. Horizontal size under 'Maintenance' - Operation Preparation Preparation General 1. The lamp indicator flashes green and the start video playback. - For this button is pressed, the button illumination is set to switch on the computer...
User Guide
Page 21
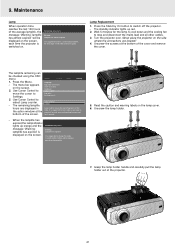
...-up red. 2. Grasp the lamp holder handle and carefully pull the lamp holder out of the lamp. Factory reset... It is inserted. Unscrew the lamp holder. 7. Press the Stand by On button to select Lamp counter. - Never place the projector on the lamp cover. 6. Use Cursor Control ...'Warning: lamplife has almost expired' will be checked using the OSD menu. 1. Audio Settings Lamp counter 5 hours Lamp counter shows the operating hours of the projector. 21 Multimedia projectors Warning: Lamplife has almost expired It is indicated in the action window at the bottom of ...
...-up red. 2. Grasp the lamp holder handle and carefully pull the lamp holder out of the lamp. Factory reset... It is inserted. Unscrew the lamp holder. 7. Press the Stand by On button to select Lamp counter. - Never place the projector on the lamp cover. 6. Use Cursor Control ...'Warning: lamplife has almost expired' will be checked using the OSD menu. 1. Audio Settings Lamp counter 5 hours Lamp counter shows the operating hours of the projector. 21 Multimedia projectors Warning: Lamplife has almost expired It is indicated in the action window at the bottom of ...
User Guide
Page 22
... to switch on the screen. select Settings in the Power socket. 13. Do not touch lamp or point lamp holder opening at anyone . - Plug the projector back in by On button to fall out. Properly dispose of lamp LCA3111/00, 12NC 8670 931 11009). 3. Factory reset... Press OK (-/- -) for 3 ...the mains lead in the - Be very careful. Place the lamp holder in the sub menu. Note: When replacing the lamp, always use the same type of the old lamp. The menu bar appears on the projector. 14. The lamp and lampholder may 2. Replace the cover and tighten the screws....
... to switch on the screen. select Settings in the Power socket. 13. Do not touch lamp or point lamp holder opening at anyone . - Plug the projector back in by On button to fall out. Properly dispose of lamp LCA3111/00, 12NC 8670 931 11009). 3. Factory reset... Press OK (-/- -) for 3 ...the mains lead in the - Be very careful. Place the lamp holder in the sub menu. Note: When replacing the lamp, always use the same type of the old lamp. The menu bar appears on the projector. 14. The lamp and lampholder may 2. Replace the cover and tighten the screws....
User Guide
Page 23
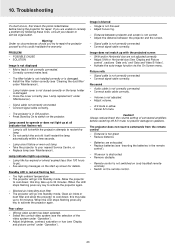
... signal cable correctly. Image does not match up orange - Lamp circuit failure or worn-out lamp. • Take the projector to go into Standby mode. Lamp indicator lights up with the projected screen - Lamp life has expired or almost expired (less than 100 hours to... - No sound - Volume is damaged. • Install the filter holder correctly (see 'Lamp replacement' under 'Maintenance'). - Blocked air inlets/dirty dust filter • The projector will restart the lamp automatically within a few seconds. - Wrong video system has been selected. • Select the...
... signal cable correctly. Image does not match up orange - Lamp circuit failure or worn-out lamp. • Take the projector to go into Standby mode. Lamp indicator lights up with the projected screen - Lamp life has expired or almost expired (less than 100 hours to... - No sound - Volume is damaged. • Install the filter holder correctly (see 'Lamp replacement' under 'Maintenance'). - Blocked air inlets/dirty dust filter • The projector will restart the lamp automatically within a few seconds. - Wrong video system has been selected. • Select the...