Leaflet
Page 3
...respective owners. www.philips.com Specifications are the property of Preset Channels: 20 Dimensions • Set dimensions (W x H x D): 273 x 284 x 144 mm • Set weight: 2.8 kg • Center speaker dimensions (W x H x D): 3139 241 60451 TO JUNCTION BOX SPEAKERS REAR REAR...Playback • Playback Media: Picture CD • Picture Compression Format: JPEG • Picture Enhancement: Slideshow with Neodymium Ribbon Tweeters Specifications HTS9800W/37 Picture/Display • Aspect ratio: 4:3, 16:9 • D/A converter: 12bit, 108MHz • Picture enhancement: High Def (...
...respective owners. www.philips.com Specifications are the property of Preset Channels: 20 Dimensions • Set dimensions (W x H x D): 273 x 284 x 144 mm • Set weight: 2.8 kg • Center speaker dimensions (W x H x D): 3139 241 60451 TO JUNCTION BOX SPEAKERS REAR REAR...Playback • Playback Media: Picture CD • Picture Compression Format: JPEG • Picture Enhancement: Slideshow with Neodymium Ribbon Tweeters Specifications HTS9800W/37 Picture/Display • Aspect ratio: 4:3, 16:9 • D/A converter: 12bit, 108MHz • Picture enhancement: High Def (...

User manual
Page 6
... ...13 Step 2: Positioning for best effect ...13 Placing the speakers ...13 Placing the subwoofer...14 Placing the DVD system...14 Placing the Junction Box...14 Placing the AV wireless receiver box ...14 Step 3: Connecting the DVD system, AV subwoofer and front speakers 15 Step 4 : Connecting the wireless rear speakers 16 Optional Connections 17...
... ...13 Step 2: Positioning for best effect ...13 Placing the speakers ...13 Placing the subwoofer...14 Placing the DVD system...14 Placing the Junction Box...14 Placing the AV wireless receiver box ...14 Step 3: Connecting the DVD system, AV subwoofer and front speakers 15 Step 4 : Connecting the wireless rear speakers 16 Optional Connections 17...

User manual
Page 8
... the product for identification and supply ratings. 8 Accessories supplied - 1 DVD system - 1 AV subwoofer - 1 AV wireless receiver box - 2 center speakers - 2 front speakers + stands - 2 rear speakers + stands - 3 x 1 pair of screws for connecting between the AV subwoofer and Junction Box.) - 4 x speaker cables - 2 x power cable - 1 x micro fiber cleaning cloth (DVD system) - CAUTION! Place the apparatus in a straight...
... the product for identification and supply ratings. 8 Accessories supplied - 1 DVD system - 1 AV subwoofer - 1 AV wireless receiver box - 2 center speakers - 2 front speakers + stands - 2 rear speakers + stands - 3 x 1 pair of screws for connecting between the AV subwoofer and Junction Box.) - 4 x speaker cables - 2 x power cable - 1 x micro fiber cleaning cloth (DVD system) - CAUTION! Place the apparatus in a straight...

User manual
Page 14
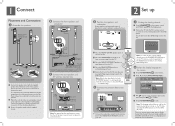
... position until a harmonious sound is not placed in the corner of the AV wireless receiver box (with Philips logo) faces towards the DVD system. - Front View Side View 14 Placing the AV wireless receiver box You may place the Junction box behind the TV/ shelf/ table to the AC outlet where the AC power plug...
... position until a harmonious sound is not placed in the corner of the AV wireless receiver box (with Philips logo) faces towards the DVD system. - Front View Side View 14 Placing the AV wireless receiver box You may place the Junction box behind the TV/ shelf/ table to the AC outlet where the AC power plug...
User manual
Page 15
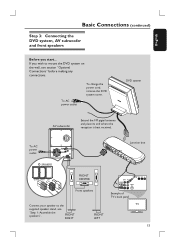
.... To AC power outlet To change the power cord, remove the DVD system cover. FRONT RIGHT FRONT LEFT 15 To AC power outlet To TV Junction box SPEAKERS CENTER RIGHT LEFT FRONT CENTER Front speakers OUT IN VIDEO AUDIO Example of TV's back panel Connect your speaker to mount the DVD system...
.... To AC power outlet To change the power cord, remove the DVD system cover. FRONT RIGHT FRONT LEFT 15 To AC power outlet To TV Junction box SPEAKERS CENTER RIGHT LEFT FRONT CENTER Front speakers OUT IN VIDEO AUDIO Example of TV's back panel Connect your speaker to mount the DVD system...

User manual
Page 19
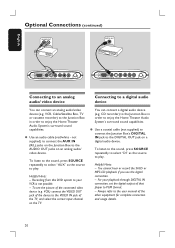
Do not connect the video jack from the Junction Box to a TV, it may affect the picture quality. C Proceed to pages 25~26 for both the HDMI and Y Pb Pr to your TV. A Open the ... and video settings Helpful Hints: - Its plug and play capability requires only one cable for detailed Progressive Scan set -up . not supplied) to connect the Junction Box's Y Pb Pr jacks to the corresponding AUDIO OUT jacks on a HDMI compatible device (eg.; not supplied) to connect the AUX IN jacks to the corresponding...
Do not connect the video jack from the Junction Box to a TV, it may affect the picture quality. C Proceed to pages 25~26 for both the HDMI and Y Pb Pr to your TV. A Open the ... and video settings Helpful Hints: - Its plug and play capability requires only one cable for detailed Progressive Scan set -up . not supplied) to connect the Junction Box's Y Pb Pr jacks to the corresponding AUDIO OUT jacks on a HDMI compatible device (eg.; not supplied) to connect the AUX IN jacks to the corresponding...
User manual
Page 20
... the picture of the TV, and select the correct input channel on the TV. Use a coaxial cable (not supplied) to connect the Junction Box's DIGITAL IN jack to your playback through DIGITAL IN connection, set the digital output of the other equipment for complete connection and usage details....source to enjoy the Home Theater Audio System's surround sound capabilities. CD recorder) to the Junction Box in order to play . Helpful Hints: - not supplied) to connect the AUX IN (R/L) jacks on the Junction Box to the VIDEO IN jack of the connected video device (e.g. VCR,) connect the VIDEO OUT ...
... the picture of the TV, and select the correct input channel on the TV. Use a coaxial cable (not supplied) to connect the Junction Box's DIGITAL IN jack to your playback through DIGITAL IN connection, set the digital output of the other equipment for complete connection and usage details....source to enjoy the Home Theater Audio System's surround sound capabilities. CD recorder) to the Junction Box in order to play . Helpful Hints: - not supplied) to connect the AUX IN (R/L) jacks on the Junction Box to the VIDEO IN jack of the connected video device (e.g. VCR,) connect the VIDEO OUT ...

User manual
Page 25
... TV display Set the aspect ratio of lines, progressive scan offers a higher picture quality and resolution. If it is required. 2) You have connected the Junction Box to your TV using Y Pb Pr (see page 19.) A Turn off your TV and select the correct Video Input channel. C Turn on the TV.... 25 Press SYSTEM MENU to confirm. Video Setup Page TV Type TV Display Progressive Picture Setting Black Level Closed Caption HDMI Setup 4:3 Pan Scan 4:3 Letter Box 16:9 Wide Screen { 4:3 Pan Scan } Select this if you have a conventional TV. In this if you select must ensure: 1) Your TV can ...
... TV display Set the aspect ratio of lines, progressive scan offers a higher picture quality and resolution. If it is required. 2) You have connected the Junction Box to your TV using Y Pb Pr (see page 19.) A Turn off your TV and select the correct Video Input channel. C Turn on the TV.... 25 Press SYSTEM MENU to confirm. Video Setup Page TV Type TV Display Progressive Picture Setting Black Level Closed Caption HDMI Setup 4:3 Pan Scan 4:3 Letter Box 16:9 Wide Screen { 4:3 Pan Scan } Select this if you have a conventional TV. In this if you select must ensure: 1) Your TV can ...

User manual
Page 41
... or decrease this value to the setting that supports progressive video input. It only works when you have connected the Y Pb Pr jacks on the Junction box to your TV that best suit your picture color by adjusting the brightness, contrast, tint and color (saturation.) Use W X keys to adjust to change the...
... or decrease this value to the setting that supports progressive video input. It only works when you have connected the Y Pb Pr jacks on the Junction box to your TV that best suit your picture color by adjusting the brightness, contrast, tint and color (saturation.) Use W X keys to adjust to change the...

User manual
Page 50
...Frequency response 30 Hz - 120 Hz Dimensions 300 x 399 x 300 mm (w x h x d) Weight 12 kg LEFT/ RIGHT SPEAKERS System 2-way, closed box system Impedance 6 Speaker drivers 2 x (3"x3") flat cone woofer + 1 x (1"x 4") ribbon tweeter Frequency response 120 Hz + 20 kHz Dimensions 106 x...x d) (height including stand) Weight 1.5 kg/each (including base) AV WIRELESS RECEIVER BOX Power Supply Rating 120 V; 60 Hz Power Consumption 70 W Dimensions 242.5 x 157 x 117.5 mm (w x h x d) Weight 1.56 kg JUNCTION BOX Dimensions 182 x 35 x 62 mm (w x h x d) Weight 0.27 kg ...
...Frequency response 30 Hz - 120 Hz Dimensions 300 x 399 x 300 mm (w x h x d) Weight 12 kg LEFT/ RIGHT SPEAKERS System 2-way, closed box system Impedance 6 Speaker drivers 2 x (3"x3") flat cone woofer + 1 x (1"x 4") ribbon tweeter Frequency response 120 Hz + 20 kHz Dimensions 106 x...x d) (height including stand) Weight 1.5 kg/each (including base) AV WIRELESS RECEIVER BOX Power Supply Rating 120 V; 60 Hz Power Consumption 70 W Dimensions 242.5 x 157 x 117.5 mm (w x h x d) Weight 1.56 kg JUNCTION BOX Dimensions 182 x 35 x 62 mm (w x h x d) Weight 0.27 kg ...
Quick start guide
Page 1
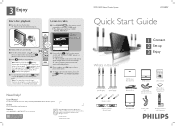
... Power cable x 2 Remote Control and 2 batteries Printed in China 12 NC 3139 246 19272 DVD/ SACD Home Theater System HTS9800W Quick Start Guide What's in the menu and press (PLAY) on the remote control until "PRESET DELETED" appears. Note When...Philips Consumer Electronics A Division of Philips Electronics North America Corp P.O. B Press and hold (STOP) until "INSTALL TUNER" appears on the DVD system panel. Need help? To start playback. Press (PLAY)to stop playback. The display panel will start playback. C Once complete, use this cable to connect the Junction Box...
... Power cable x 2 Remote Control and 2 batteries Printed in China 12 NC 3139 246 19272 DVD/ SACD Home Theater System HTS9800W Quick Start Guide What's in the menu and press (PLAY) on the remote control until "PRESET DELETED" appears. Note When...Philips Consumer Electronics A Division of Philips Electronics North America Corp P.O. B Press and hold (STOP) until "INSTALL TUNER" appears on the DVD system panel. Need help? To start playback. Press (PLAY)to stop playback. The display panel will start playback. C Once complete, use this cable to connect the Junction Box...
Quick start guide
Page 2
... colored sticker on the stand A Base view of the AV Wireless Receiver box (with Philips logo) is important to ensure optimum sound performance. B Place the SUBWOOFER ...FRONT LEFT SPEAKERS CENTER RIGHT LEFT To AC power AV subwoofer VGA cable DVD system (Rear View) Junction box connect cable to the accompanying user manual for the DVD system. B Select the display language on ... are various system setup options (Audio Setup, Video Setup, Preference Setup) available on your HTS9800W speakers or existing wireless network in the menu and press OK to select the correct viewing ...
... colored sticker on the stand A Base view of the AV Wireless Receiver box (with Philips logo) is important to ensure optimum sound performance. B Place the SUBWOOFER ...FRONT LEFT SPEAKERS CENTER RIGHT LEFT To AC power AV subwoofer VGA cable DVD system (Rear View) Junction box connect cable to the accompanying user manual for the DVD system. B Select the display language on ... are various system setup options (Audio Setup, Video Setup, Preference Setup) available on your HTS9800W speakers or existing wireless network in the menu and press OK to select the correct viewing ...


