User manual
Page 5
... speakers to subwoofer 15 Connect subwoofer 15 Connect audio cables/other devices 16 7 Adjust settings 39 Attach table stand to DVD Home General setup 39 Theater unit 18 Audio setup 41 Mount the DVD Home Theater unit 18 Video setup 42 Mount the speakers 19 Preference Setup 44 4 Get started 20 8 Additional information 47 Prepare the...
... speakers to subwoofer 15 Connect subwoofer 15 Connect audio cables/other devices 16 7 Adjust settings 39 Attach table stand to DVD Home General setup 39 Theater unit 18 Audio setup 41 Mount the DVD Home Theater unit 18 Video setup 42 Mount the speakers 19 Preference Setup 44 4 Get started 20 8 Additional information 47 Prepare the...
User manual
Page 7
...highly detailed picture and increased sharpness delivers a more true-to-life picture. Ambisound Philips Ambisound technology reproduces multi-channel surround sound with all HDMI CEC devices. Enjoy the DVD Home Theater with a single remote control. EasyLink EasyLink uses the HDMI CEC (Consumer Electronics ...hassle of delaying the audio output if the video signals that Philips offers, register your home perfectly. Note • Philips does not guarantee 100% interoperability with the video play This DVD Home Theater provides you the feature of setting up to 1080p resolution for ...
...highly detailed picture and increased sharpness delivers a more true-to-life picture. Ambisound Philips Ambisound technology reproduces multi-channel surround sound with all HDMI CEC devices. Enjoy the DVD Home Theater with a single remote control. EasyLink EasyLink uses the HDMI CEC (Consumer Electronics ...hassle of delaying the audio output if the video signals that Philips offers, register your home perfectly. Note • Philips does not guarantee 100% interoperability with the video play This DVD Home Theater provides you the feature of setting up to 1080p resolution for ...
User manual
Page 11
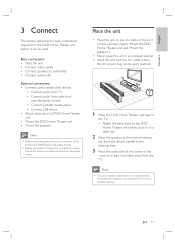
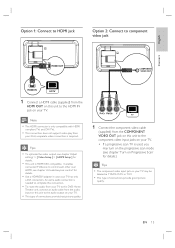
...the type plate at least one meter away from the TV. English Connect 3 Connect This section describes the basic connections required for this DVD Home Theater unit before place it on a table top. 2 Place the speakers at the normal listening ear-level and directly parallel to the ...to the TV. • Attach the table stand to the DVD Home Theater unit before it can be used. Basic connections: • Place the unit • Connect video cables • Connect speakers to DVD Home Theater unit • Mount the DVD Home Theater unit • Mount the speakers. Note • To ...
...the type plate at least one meter away from the TV. English Connect 3 Connect This section describes the basic connections required for this DVD Home Theater unit before place it on a table top. 2 Place the speakers at the normal listening ear-level and directly parallel to the ...to the TV. • Attach the table stand to the DVD Home Theater unit before it can be used. Basic connections: • Place the unit • Connect video cables • Connect speakers to DVD Home Theater unit • Mount the DVD Home Theater unit • Mount the speakers. Note • To ...
User manual
Page 13
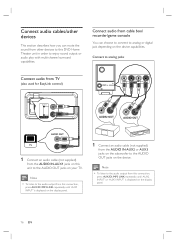
... TV has only a DVI connection. An extra audio connection is needed to complete this connection. • To route the audio from your TV to this DVD Home Theater unit, connect an audio cable from the audio input on this unit to the audio output on your TV. • This type of connections provide...
... TV has only a DVI connection. An extra audio connection is needed to complete this connection. • To route the audio from your TV to this DVD Home Theater unit, connect an audio cable from the audio input on this unit to the audio output on your TV. • This type of connections provide...
User manual
Page 15
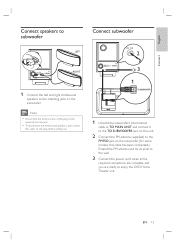
... to the TO SUBWOOFER jack on this unit. 2 Connect the FM antenna (supplied) to the FM75Ω jack on the subwoofer (for some models, this DVD Home Theater unit. English Connect Connect speakers to subwoofer Connect subwoofer LEFT 2 RIGHT 1 Connect the left and right Ambisound speakers to enjoy this cable has been connected...
... to the TO SUBWOOFER jack on this unit. 2 Connect the FM antenna (supplied) to the FM75Ω jack on the subwoofer (for some models, this DVD Home Theater unit. English Connect Connect speakers to subwoofer Connect subwoofer LEFT 2 RIGHT 1 Connect the left and right Ambisound speakers to enjoy this cable has been connected...
User manual
Page 16
... section describes how you can choose to connect to analog or digital jack depending on the device capabilities. Connect audio cables/other devices to this DVD Home Theater unit in order to enjoy sound output or audio play with multi-channel surround capabilities.
... section describes how you can choose to connect to analog or digital jack depending on the device capabilities. Connect audio cables/other devices to this DVD Home Theater unit in order to enjoy sound output or audio play with multi-channel surround capabilities.
User manual
Page 18
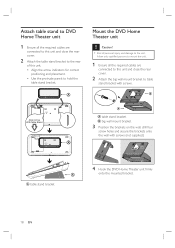
...for correct positioning and placement. • Use the protrude panels to table stand bracket with screws (not supplied.) A A table stand bracket 4 Hook the DVD Home Theater unit firmly onto the mounted bracket. 18 EN B Align Arrow With table Stand Align Arrow With table Stand Align Arrow With table Stand A A... close the rear cover. 2 Attach the table stand bracket to the rear of personal injury and damage to the unit. A Mount the DVD Home Theater unit Caution! • Risk of this unit and close the rear cover. 2 Attach the big wall mount bracket to hold the table stand ...
...for correct positioning and placement. • Use the protrude panels to table stand bracket with screws (not supplied.) A A table stand bracket 4 Hook the DVD Home Theater unit firmly onto the mounted bracket. 18 EN B Align Arrow With table Stand Align Arrow With table Stand Align Arrow With table Stand A A... close the rear cover. 2 Attach the table stand bracket to the rear of personal injury and damage to the unit. A Mount the DVD Home Theater unit Caution! • Risk of this unit and close the rear cover. 2 Attach the big wall mount bracket to hold the table stand ...
User manual
Page 19
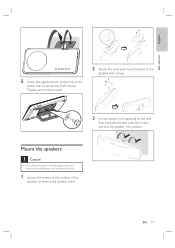
Allow only qualified persons to mount the unit. 1 Loosen the screws at the center rear to secure the DVD Home Theater unit to the bracket. 2 Attach the small wall mount bracket to the speaker with screws. 3 Fix two screws (not supplied) to the wall, then hook the bracket onto the screws and lock the speaker into position. EN 19 English Get started 5 Screw the supplied knob to the hole at the bottom of personal injury and damage to the unit. Mount the speakers Caution! • Risk of the speaker to remove the speaker stand.
Allow only qualified persons to mount the unit. 1 Loosen the screws at the center rear to secure the DVD Home Theater unit to the bracket. 2 Attach the small wall mount bracket to the speaker with screws. 3 Fix two screws (not supplied) to the wall, then hook the bracket onto the screws and lock the speaker into position. EN 19 English Get started 5 Screw the supplied knob to the hole at the bottom of personal injury and damage to the unit. Mount the speakers Caution! • Risk of the speaker to remove the speaker stand.
User manual
Page 21
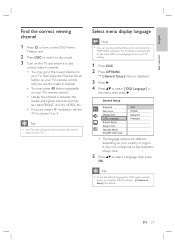
...Standby Mode DivX(R) VOD Code Auto English Espanõl Français • The language options are using a RF modulator, set the default language for DVD audio and disc menu, see the Video In channel. • You may press ° button repeatedly on your TVs remote control. • Usually ... shown here. 5 Press vV to select a language, then press OK. English Get started Find the correct viewing channel 1 Press 2 to turn on the DVD Home Theater unit. 2 Press DISC to switch to disc mode 3 Turn on the TV and switch it to the correct video-in the menu, then press B. Select...
...Standby Mode DivX(R) VOD Code Auto English Espanõl Français • The language options are using a RF modulator, set the default language for DVD audio and disc menu, see the Video In channel. • You may press ° button repeatedly on your TVs remote control. • Usually ... shown here. 5 Press vV to select a language, then press OK. English Get started Find the correct viewing channel 1 Press 2 to turn on the DVD Home Theater unit. 2 Press DISC to switch to disc mode 3 Turn on the TV and switch it to the correct video-in the menu, then press B. Select...
User manual
Page 22
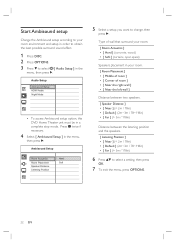
...) • [ Far ] (> 3m / 118in) 6 Press vV to change, then press B. Audio Setup Ambisound Setup HDMI Audio Night Mode • To access Ambisound setup option, this DVD Home Theater unit must be in the menu, then press B. Ambisound Setup Room Acoustics Room Placement Speaker Distance Listening Position Hard Soft 5 Select a setup you want to...
...) • [ Far ] (> 3m / 118in) 6 Press vV to change, then press B. Audio Setup Ambisound Setup HDMI Audio Night Mode • To access Ambisound setup option, this DVD Home Theater unit must be in the menu, then press B. Ambisound Setup Room Acoustics Room Placement Speaker Distance Listening Position Hard Soft 5 Select a setup you want to...
User manual
Page 26
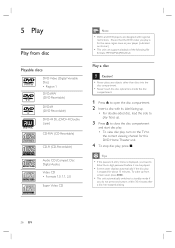
...up. • For double-sided disc, load the side to play faces up from disc Playable discs DVD Video (Digital Versatile Disc) • Region 1 DVD±RW (DVD Rewritable) DVD±R (DVD Recordable) DVD+R DL (DVD+R Double Layer) ReWritable Recordable CD-RW (CD-Rewritable) CD-R (CD-Recordable) Audio CD (Compact Disc...from screen saver, press DISC. • This unit automatically switches to standby mode if you have to the correct viewing channel for this DVD Home Theater unit. 4 To stop disc play is stopped for the same region zone as your player (indicated on the TV to Enter the 6-...
...up. • For double-sided disc, load the side to play faces up from disc Playable discs DVD Video (Digital Versatile Disc) • Region 1 DVD±RW (DVD Rewritable) DVD±R (DVD Recordable) DVD+R DL (DVD+R Double Layer) ReWritable Recordable CD-RW (CD-Rewritable) CD-R (CD-Recordable) Audio CD (Compact Disc...from screen saver, press DISC. • This unit automatically switches to standby mode if you have to the correct viewing channel for this DVD Home Theater unit. 4 To stop disc play is stopped for the same region zone as your player (indicated on the TV to Enter the 6-...
User manual
Page 33
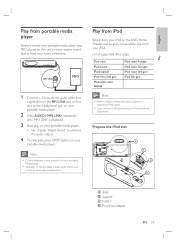
... 2nd gen iPod with color display iPod nano 1st gen iPod nano 2nd gen iPod nano 3rd gen iPod 5th gen Note • Refer to Philips website for latest updates on your portable media player. • Stop play on the portable media player before you switch to enjoy music/video play... POSITION SWITCH A C B D A 'slide' B 'support' C 'holder' D iPod dock adaptor EN 33 English Play Play from portable media player Simply connect your iPod. MP3 player) to this DVD Home Theater unit to other play from your portable media player (e.g.
... 2nd gen iPod with color display iPod nano 1st gen iPod nano 2nd gen iPod nano 3rd gen iPod 5th gen Note • Refer to Philips website for latest updates on your portable media player. • Stop play on the portable media player before you switch to enjoy music/video play... POSITION SWITCH A C B D A 'slide' B 'support' C 'holder' D iPod dock adaptor EN 33 English Play Play from portable media player Simply connect your iPod. MP3 player) to this DVD Home Theater unit to other play from your portable media player (e.g.
User manual
Page 49
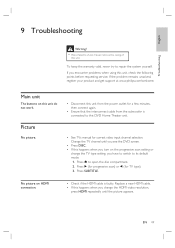
... mode: 1. Replace a new HDMI cable. • If this happens when you change the TV type setting, you have to switch to this DVD Home Theater unit. • See TVs manual for correct video input channel selection. English Troubleshooting 9 Troubleshooting Warning! • Risk of this unit. Change the...the warranty valid, never try to open the disc compartment. 2. If the problem remains unsolved, register your product and get support at www.philips.com/welcome. Picture No picture. • Disconnect this unit from the power outlet for TV type). 3. EN 49 Main unit The buttons...
... mode: 1. Replace a new HDMI cable. • If this happens when you change the TV type setting, you have to switch to this DVD Home Theater unit. • See TVs manual for correct video input channel selection. English Troubleshooting 9 Troubleshooting Warning! • Risk of this unit. Change the...the warranty valid, never try to open the disc compartment. 2. If the problem remains unsolved, register your product and get support at www.philips.com/welcome. Picture No picture. • Disconnect this unit from the power outlet for TV type). 3. EN 49 Main unit The buttons...


