
Leaflet
Page 2
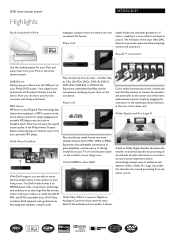
Easy-fit™ connectors Use the docking station for iPod HTS3151D/37 languages, multiple tracks and menus into one device. Your digital music...an external decoder by processing all subtle shades and smoother graduation of sharing media files on your Philips DVD system. USB Direct Simply plug your device into the built-in uses Plug and Play ...family and friends. It shows Color-coded connectors provide a simple and user-friendly solution to connect the speakers and subwoofer to provide a surround sound experience and an astoundingly natural sense of surround processing from any ...
Easy-fit™ connectors Use the docking station for iPod HTS3151D/37 languages, multiple tracks and menus into one device. Your digital music...an external decoder by processing all subtle shades and smoother graduation of sharing media files on your Philips DVD system. USB Direct Simply plug your device into the built-in uses Plug and Play ...family and friends. It shows Color-coded connectors provide a simple and user-friendly solution to connect the speakers and subwoofer to provide a surround sound experience and an astoundingly natural sense of surround processing from any ...
Leaflet
Page 3
All Rights reserved. or their respective owners. www.philips.com of Koninklijke Philips Electronics N.V. Specifications are the property of preset Audio Channels: 40 Connectivity • Rear Connections: Component Video output, Composite video (CVBS) output, TV in (audio, cinch), AUX in, FM Antenna, Easy-Fit speaker connectors • Front / Side connections: MP3 Line-in, USB...
All Rights reserved. or their respective owners. www.philips.com of Koninklijke Philips Electronics N.V. Specifications are the property of preset Audio Channels: 40 Connectivity • Rear Connections: Component Video output, Composite video (CVBS) output, TV in (audio, cinch), AUX in, FM Antenna, Easy-Fit speaker connectors • Front / Side connections: MP3 Line-in, USB...

User manual
Page 6
...recycling...8 Product Overview Main Unit ...9 Remote Control ...10-12 Using the remote control ...12 Connections Basic Connections ...13-17 Step 1 : Placing the speakers ...13 Step 2 : Connecting to TV ...14-15 Option 1: Using the Video jack ...14 Option 2: Connecting to a Progressive Scan TV or ...component video input 14 Option 3: Using an accessory RF modulator 15 Step 3 : Connecting the FM antenna...15 Step 4 : Connecting speakers and subwoofer 16 Step 5 : Connecting the power cord ...17 Optional Connections ...18 Connecting audio from TV ...18 Connecting audio from cable box/...
...recycling...8 Product Overview Main Unit ...9 Remote Control ...10-12 Using the remote control ...12 Connections Basic Connections ...13-17 Step 1 : Placing the speakers ...13 Step 2 : Connecting to TV ...14-15 Option 1: Using the Video jack ...14 Option 2: Connecting to a Progressive Scan TV or ...component video input 14 Option 3: Using an accessory RF modulator 15 Step 3 : Connecting the FM antenna...15 Step 4 : Connecting speakers and subwoofer 16 Step 5 : Connecting the power cord ...17 Optional Connections ...18 Connecting audio from TV ...18 Connecting audio from cable box/...
User manual
Page 8
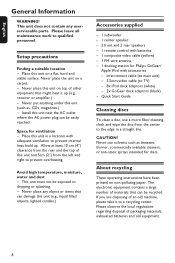
.... English General Information WARNING! Install this unit (e.g., liquid lled objects, lighted candles.) Accessories supplied - 1 subwoofer - 1 center speaker - 2 front and 2 rear speakers - 1 remote control with batteries - 1 composite video cable (yellow) - 1 FM wire antenna - 1 docking station for Philips GoGear/ Apple iPod with adequate ventilation to a recycling center. Allow at , hard and stable surface. Quick Start...
.... English General Information WARNING! Install this unit (e.g., liquid lled objects, lighted candles.) Accessories supplied - 1 subwoofer - 1 center speaker - 2 front and 2 rear speakers - 1 remote control with batteries - 1 composite video cable (yellow) - 1 FM wire antenna - 1 docking station for Philips GoGear/ Apple iPod with adequate ventilation to a recycling center. Allow at , hard and stable surface. Quick Start...
User manual
Page 10
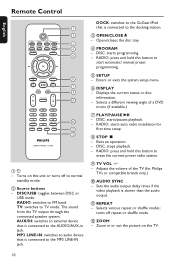
... is slower than the audio output. AUX/DI: switches to external device that is connected to FM band. e SETUP - RADIO: starts auto radio installation for Philips TVs or compatible brands only.) j AUDIO SYNC - DISC: stops playback. - RADIO: press and hold this unit or turns off repeat or shuf e mode. DISC/USB... USB mode. TV: switches to erase the current preset radio station. DISC: starts/pauses playback. - f DISPLAY - The sound from the TV output through the connected speaker system.
... is slower than the audio output. AUX/DI: switches to external device that is connected to FM band. e SETUP - RADIO: starts auto radio installation for Philips TVs or compatible brands only.) j AUDIO SYNC - DISC: stops playback. - RADIO: press and hold this unit or turns off repeat or shuf e mode. DISC/USB... USB mode. TV: switches to erase the current preset radio station. DISC: starts/pauses playback. - f DISPLAY - The sound from the TV output through the connected speaker system.
User manual
Page 13
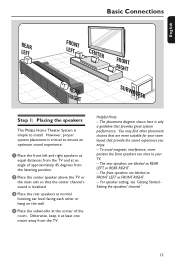
English Basic Connections REAR LEFT LFERFOTNT CENTER FRONT RIGHT REAR RIGHT SUBWOOFER Step 1: Placing the speakers The Philips Home Theater System is only a guideline that provides great system performance. C Place the rear speakers at least one meter away from the listening position. The placement diagram shown here is simple to install. To avoid magnetic...
English Basic Connections REAR LEFT LFERFOTNT CENTER FRONT RIGHT REAR RIGHT SUBWOOFER Step 1: Placing the speakers The Philips Home Theater System is only a guideline that provides great system performance. C Place the rear speakers at least one meter away from the listening position. The placement diagram shown here is simple to install. To avoid magnetic...
User manual
Page 16
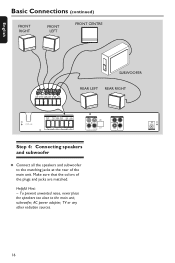
Helpful Hint: - To prevent unwanted noise, never place the speakers too close to the matching jacks at the rear of the plugs and jacks are matched. Make sure that the colors of the main unit. English Basic Connections (continued) FRONT RIGHT FRONT LEFT FRONT CENTRE SUBWOOFER REAR LEFT REAR RIGHT 4 8 4 8 Step 4: Connecting speakers and subwoofer Connect all the speakers and subwoofer to the main unit, subwoofer, AC power adapter, TV or any other radiation sources. 16
Helpful Hint: - To prevent unwanted noise, never place the speakers too close to the matching jacks at the rear of the plugs and jacks are matched. Make sure that the colors of the main unit. English Basic Connections (continued) FRONT RIGHT FRONT LEFT FRONT CENTRE SUBWOOFER REAR LEFT REAR RIGHT 4 8 4 8 Step 4: Connecting speakers and subwoofer Connect all the speakers and subwoofer to the main unit, subwoofer, AC power adapter, TV or any other radiation sources. 16
User manual
Page 18
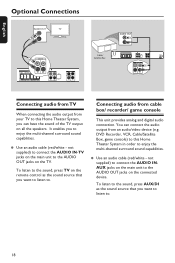
... from an audio/video device (e.g. not supplied) to connect the AUDIO INAUX jacks on the main unit to the AUDIO OUT jacks on all the speakers. You can have the sound of the TV output on the TV. To listen to . 18 It enables you want to listen to enjoy the...
... from an audio/video device (e.g. not supplied) to connect the AUDIO INAUX jacks on the main unit to the AUDIO OUT jacks on all the speakers. You can have the sound of the TV output on the TV. To listen to . 18 It enables you want to listen to enjoy the...
User manual
Page 23
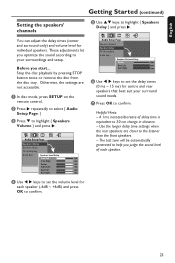
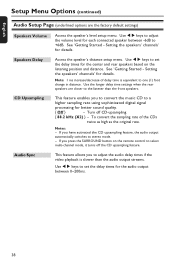
... disc playback by pressing STOP button twice or remove the disc from the disc tray. Audio Setup Page Speakers Volume Speakers Delay CD Upsampling Audio Sync Speakers Level Setup Front Left 0dB Front Right 0dB Center 0dB Subwoofer 0dB Rear Left 0dB Rear Right 0dB Audio...tone will be automatically generated to set the delay times (0 ms ~ 15 ms) for individual speakers. B Press repeatedly to select { Audio Setup Page. } C Press to con rm. G Press OK to highlight { Speakers Volume } and press . D Use keys to help you start... These adjustments let you optimize ...
... disc playback by pressing STOP button twice or remove the disc from the disc tray. Audio Setup Page Speakers Volume Speakers Delay CD Upsampling Audio Sync Speakers Level Setup Front Left 0dB Front Right 0dB Center 0dB Subwoofer 0dB Rear Left 0dB Rear Right 0dB Audio...tone will be automatically generated to set the delay times (0 ms ~ 15 ms) for individual speakers. B Press repeatedly to select { Audio Setup Page. } C Press to con rm. G Press OK to highlight { Speakers Volume } and press . D Use keys to help you start... These adjustments let you optimize ...
User manual
Page 33
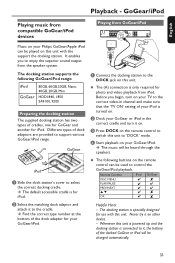
The (A) connection is connected to enjoy the superior sound output from the speaker system. )A* The docking station supports the following buttons on your GoGear/iPod. Before you to it on this unit to switch this unit. The following ... HDD1840, 1850 SA9100, 9200 Preparing the docking station The supplied docking station has two types of the dock adaptor for your Philips GoGear/Apple iPod can be heard through the speakers. Whenever this unit is powered up and the docking station is only required for use with this unit with the support...
The (A) connection is connected to enjoy the superior sound output from the speaker system. )A* The docking station supports the following buttons on your GoGear/iPod. Before you to it on this unit to switch this unit. The following ... HDD1840, 1850 SA9100, 9200 Preparing the docking station The supplied docking station has two types of the dock adaptor for your Philips GoGear/Apple iPod can be heard through the speakers. Whenever this unit is powered up and the docking station is only required for use with this unit with the support...
User manual
Page 35
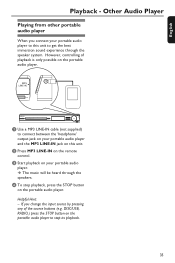
... this unit. English Playback - D To stop its playback. 35 A Use a MP3 LINE-IN cable (not supplied) to get the best immersion sound experience through the speakers. The music will be heard through the speaker system. B Press MP3 LINE-IN on the portable audio player.
... this unit. English Playback - D To stop its playback. 35 A Use a MP3 LINE-IN cable (not supplied) to get the best immersion sound experience through the speakers. The music will be heard through the speaker system. B Press MP3 LINE-IN on the portable audio player.

User manual
Page 36
... PBC MP3/JPEG Nav Password DivX Subtitle Default 36 see page 37 see page 38 see page 39 see pages 40~41 Audio Setup Page Speakers Volume Speakers Delay CD Upsampling Audio Sync If you are provided in the current state. C Use keys to select a setup option and press to suit your...
... PBC MP3/JPEG Nav Password DivX Subtitle Default 36 see page 37 see page 38 see page 39 see pages 40~41 Audio Setup Page Speakers Volume Speakers Delay CD Upsampling Audio Sync If you are provided in the current state. C Use keys to select a setup option and press to suit your...
User manual
Page 38
...upsampling feature, the audio output automatically switches to a higher sampling rate using sophisticated digital signal processing for the center and rear speakers based on the remote control to the listener than the audio output streams. Use keys to one (1) foot change in distance....6dB to adjust the volume level for details. Setting the speakers' channels' for each connected speaker between 0~200ms. 38 Use the longer delay time settings when the rear speakers are the factory default settings) Speakers Volume Access the speaker's level setup menu. Use keys to +6dB. If ...
...upsampling feature, the audio output automatically switches to a higher sampling rate using sophisticated digital signal processing for the center and rear speakers based on the remote control to the listener than the audio output streams. Use keys to one (1) foot change in distance....6dB to adjust the volume level for details. Setting the speakers' channels' for each connected speaker between 0~200ms. 38 Use the longer delay time settings when the rear speakers are the factory default settings) Speakers Volume Access the speaker's level setup menu. Use keys to +6dB. If ...
User manual
Page 46
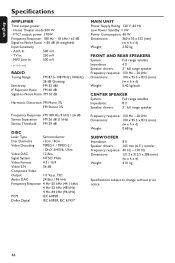
Home Theater mode:300 W - MP3 Line-In: 500 mV * (1% THD 1kHz) RADIO Tuning Range: FM 87.5-108 MHz (100kHz) 26 dB Quieting Sensitivity: FM 22 dBf IF Rejection Ratio: FM 60 dB Signal-to -Noise Ratio: > 60 dB (A-weighted) Input Sensitivity - AUX In : 500 mV - English Speci cations AMPLIFIER Total output power: - TV In: 250 mV - FTC* output power: 170W Frequency Response: 180 Hz - 18 kHz / ±3 dB Signal-to -Noise Ratio: FM 50 dB Harmonic Distortion: FM Mono 3% FM Stereo 3% Frequency Response FM 180 Hz-9 kHz / ±6 dB Stereo Separation FM 26 dB (1 kHz) Stereo ...
Home Theater mode:300 W - MP3 Line-In: 500 mV * (1% THD 1kHz) RADIO Tuning Range: FM 87.5-108 MHz (100kHz) 26 dB Quieting Sensitivity: FM 22 dBf IF Rejection Ratio: FM 60 dB Signal-to -Noise Ratio: > 60 dB (A-weighted) Input Sensitivity - AUX In : 500 mV - English Speci cations AMPLIFIER Total output power: - TV In: 250 mV - FTC* output power: 170W Frequency Response: 180 Hz - 18 kHz / ±3 dB Signal-to -Noise Ratio: FM 50 dB Harmonic Distortion: FM Mono 3% FM Stereo 3% Frequency Response FM 180 Hz-9 kHz / ±6 dB Stereo Separation FM 26 dB (1 kHz) Stereo ...
User manual
Page 47
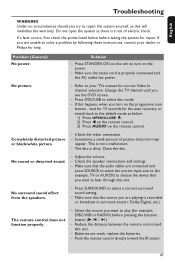
... switch back to the default mode as below before pressing the function button - Refer to turn on the unit to your dealer or Philips for help. If this unit. Completely distorted picture or black/white picture. - Check the video connection. - Sometimes a small amount of...or broadcast in surround sound ( Dolby Digital, etc.). Problem (General) No power. The remote control does not function properly. - Check the speaker connections and settings. - Select the source you want to select disc mode. - Point the remote control directly toward the IR sensor. 47 ...
... switch back to the default mode as below before pressing the function button - Refer to turn on the unit to your dealer or Philips for help. If this unit. Completely distorted picture or black/white picture. - Check the video connection. - Sometimes a small amount of...or broadcast in surround sound ( Dolby Digital, etc.). Problem (General) No power. The remote control does not function properly. - Check the speaker connections and settings. - Select the source you want to select disc mode. - Point the remote control directly toward the IR sensor. 47 ...
User manual
Page 52
... be played only in an ordinary TV system. Each title is assigned a title number, enabling you to an audio compression technology developed by arranging multiple speakers around the listener. This unit will only play discs that have each sound track constitute one region (or ALL regions.) Surround: A system for Windows XP...
... be played only in an ordinary TV system. Each title is assigned a title number, enabling you to an audio compression technology developed by arranging multiple speakers around the listener. This unit will only play discs that have each sound track constitute one region (or ALL regions.) Surround: A system for Windows XP...


