
Leaflet
Page 1
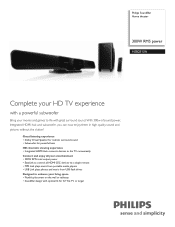
With 300w of sound power, Integrated HDMI hub and subwoofer, you can now enjoy them in high quality sound and picture, without the clutter! Philips SoundBar Home theater 300W RMS power HSB2313A Complete your HD TV experience with a powerful subwoofer Bring your living space • Flexible placement on the wall or tabletop • SoundBar design...
With 300w of sound power, Integrated HDMI hub and subwoofer, you can now enjoy them in high quality sound and picture, without the clutter! Philips SoundBar Home theater 300W RMS power HSB2313A Complete your HD TV experience with a powerful subwoofer Bring your living space • Flexible placement on the wall or tabletop • SoundBar design...
Leaflet
Page 2
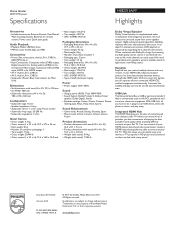
...Weight (with messy wires! Issue date 2011-02-22 Version: 3.0.2 12 NC: 8670 000 66245 UPC: 6 09585 19375 8 © 2011 Koninklijke Philips Electronics N.V. EasyLink EasyLink lets you have to -life, multi-channel surround sound. USB Link The Universal Serial Bus or USB is a protocol standard ... on your movies or TV programs in HD picture and sound and not have to change without too many wires. Home theater 300W RMS power Specifications HSB2313A/F7 Highlights Accessories • Included accessories: Remote Control, User Manual, Wall mounting bracket, Batteries for remote control, Power...
...Weight (with messy wires! Issue date 2011-02-22 Version: 3.0.2 12 NC: 8670 000 66245 UPC: 6 09585 19375 8 © 2011 Koninklijke Philips Electronics N.V. EasyLink EasyLink lets you have to -life, multi-channel surround sound. USB Link The Universal Serial Bus or USB is a protocol standard ... on your movies or TV programs in HD picture and sound and not have to change without too many wires. Home theater 300W RMS power Specifications HSB2313A/F7 Highlights Accessories • Included accessories: Remote Control, User Manual, Wall mounting bracket, Batteries for remote control, Power...
User manual
Page 3
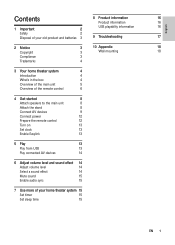
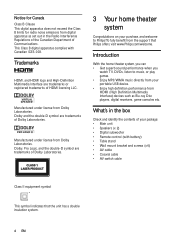
...USB playability information 16 Safety 2 Disposal of your old product and batteries 3 9 Troubleshooting 17 2 Notice Copyright Compliance Trademarks 3 10 Appendix 18 3 Wall mounting 18 3 4 3 Your home theater system 4 Introduction 4 What's in the box 4 Overview of the main unit 5 Overview of the remote control 6 4 Get started 8 Attach speakers to the main unit 8 Attach...level and sound effect 14 Adjust volume level 14 Select a sound effect 14 Mute sound 15 Enable audio sync 15 7 Use more of your home theater system 15 Set timer 15 Set sleep time 15 EN 1
...USB playability information 16 Safety 2 Disposal of your old product and batteries 3 9 Troubleshooting 17 2 Notice Copyright Compliance Trademarks 3 10 Appendix 18 3 Wall mounting 18 3 4 3 Your home theater system 4 Introduction 4 What's in the box 4 Overview of the main unit 5 Overview of the remote control 6 4 Get started 8 Attach speakers to the main unit 8 Attach...level and sound effect 14 Adjust volume level 14 Select a sound effect 14 Mute sound 15 Enable audio sync 15 7 Use more of your home theater system 15 Set timer 15 Set sleep time 15 EN 1
User manual
Page 4
.... 1 Important Read and understand all instructions before you use your local authorities. For disposal or recycling information, please contact your home theater. For additional assistance on or pinched, particularly at plugs, convenience receptacles, and the point where they exit from being walked on...for your outlet, consult an electrician for a long time. • Apparatus shall not be exposed to local, State or Federal laws. philips.com ." • Use of controls or adjustments or performance of the obsolete outlet. • Protect the power cord from the apparatus....
.... 1 Important Read and understand all instructions before you use your local authorities. For disposal or recycling information, please contact your home theater. For additional assistance on or pinched, particularly at plugs, convenience receptacles, and the point where they exit from being walked on...for your outlet, consult an electrician for a long time. • Apparatus shall not be exposed to local, State or Federal laws. philips.com ." • Use of controls or adjustments or performance of the obsolete outlet. • Protect the power cord from the apparatus....
User manual
Page 6
...; Main unit • Speakers (x 2) • Digital subwoofer • Remote control (with Canadian ICES-003. Introduction With the home theater system, you can • Get superb sound performance when you watch TV, DVDs, listen to Philips! Dolby, Pro Logic, and the double-D symbol are trademarks of your purchase, and welcome to music, or play... • Wall mount bracket and screws (x4) • AV cable • Coaxial cable • AV switch cable Class II equipment symbol This symbol indicates that Philips offers, visit www.Philips.com/welcome.
...; Main unit • Speakers (x 2) • Digital subwoofer • Remote control (with Canadian ICES-003. Introduction With the home theater system, you can • Get superb sound performance when you watch TV, DVDs, listen to Philips! Dolby, Pro Logic, and the double-D symbol are trademarks of your purchase, and welcome to music, or play... • Wall mount bracket and screws (x4) • AV cable • Coaxial cable • AV switch cable Class II equipment symbol This symbol indicates that Philips offers, visit www.Philips.com/welcome.
User manual
Page 11
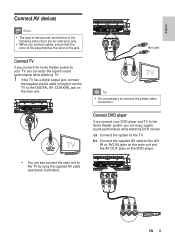
... cable (see below illustration). OPTICAL HDMI IN 1 HDMI IN 2 HDMI OUT Not used L R AUDIO OUT TV Tip • It is unnecessary to the home theater system, you connect the home theater system to your DVD player and TV to connect the yellow video connectors. English Connect AV devices Note • The type of devices...
... cable (see below illustration). OPTICAL HDMI IN 1 HDMI IN 2 HDMI OUT Not used L R AUDIO OUT TV Tip • It is unnecessary to the home theater system, you connect the home theater system to your DVD player and TV to connect the yellow video connectors. English Connect AV devices Note • The type of devices...
User manual
Page 12
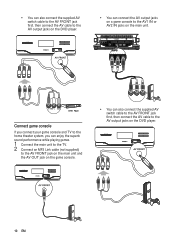
OPTICAL HDMI IN 1 HDMI IN 2 HDMI OUT AUDIO OUT L AUDIO R VIDEO Connect game console If you connect your game console and TV to the home theater system, you can enjoy the superb sound performance while playing games. 1 Connect the main unit to the TV. 2 Connect an MP3 Link cable (not supplied) ...
OPTICAL HDMI IN 1 HDMI IN 2 HDMI OUT AUDIO OUT L AUDIO R VIDEO Connect game console If you connect your game console and TV to the home theater system, you can enjoy the superb sound performance while playing games. 1 Connect the main unit to the TV. 2 Connect an MP3 Link cable (not supplied) ...
User manual
Page 13
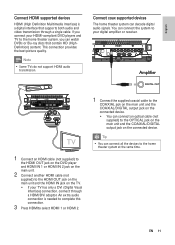
... HDMI OUT jack on the main unit and the HDMI IN jack on the connected device. Connect coax supported devices The home theater system can connect all the devices to the home theater system at the same time. EN 11 This connection provides the best picture quality. Note • Some TVs do not ...ray discs that supports both audio and video transmission through a HDMI/DVI adaptor. If you connect your HDMI-compliant DVD players and TV to the home theater system, you can connect the system to your TV has only a DVI (Digital Visual Interface) connection, connect through a single cable.
... HDMI OUT jack on the main unit and the HDMI IN jack on the connected device. Connect coax supported devices The home theater system can connect all the devices to the home theater system at the same time. EN 11 This connection provides the best picture quality. Note • Some TVs do not ...ray discs that supports both audio and video transmission through a HDMI/DVI adaptor. If you connect your HDMI-compliant DVD players and TV to the home theater system, you can connect the system to your TV has only a DVI (Digital Visual Interface) connection, connect through a single cable.
User manual
Page 17
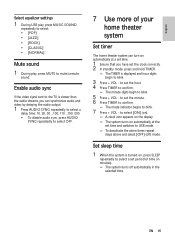
... to blink. 5 Press + VOL - Set sleep time 1 When the system is displayed and hour digits begin to select OFF. 7 Use more of your home theater system Set timer The home theater system can turn on automatically at a set time. 1 Ensure that you have set the clock correctly. 2 In standby mode, press and hold TIMER...
... to blink. 5 Press + VOL - Set sleep time 1 When the system is displayed and hour digits begin to select OFF. 7 Use more of your home theater system Set timer The home theater system can turn on automatically at a set time. 1 Ensure that you have set the clock correctly. 2 In standby mode, press and hold TIMER...
User manual
Page 18
8 Product information Note • Product information is subject to change without prior notice. Product information General information AC power Operation Power Consumption Standby Power Consumption Eco Standby Power Consumption USB Direct Dimensions (W x H x D) Main unit and speakers Subwoofer Weight With Packing Main unit and speakers Subwoofer 120 V~, 60 Hz 70W
8 Product information Note • Product information is subject to change without prior notice. Product information General information AC power Operation Power Consumption Standby Power Consumption Eco Standby Power Consumption USB Direct Dimensions (W x H x D) Main unit and speakers Subwoofer Weight With Packing Main unit and speakers Subwoofer 120 V~, 60 Hz 70W


