Leaflet
Page 2
... DIN connection, Subwoofer out, FM Antenna, AM Antenna • Aux in: Line in Convenience • Alarms: CD Alarm, Radio Alarm, Tape alarm, Sleep timer • Display Type: FTD • Karaoke: Echo control, Key control, MIC volume • Eco Power Standby: 1 watt • Clock: On main display • OSD Languages: English, French, Portuguese, Russian, Spanish, Thai, Traditional Chinese Accessories • Included Accessories: AC Power Cord, YPbPr component video cable, Composite video cable (Y), DIN Cable, Batteries for remote control, Quick start guide, AM antenna, FM antenna, Product...
... DIN connection, Subwoofer out, FM Antenna, AM Antenna • Aux in: Line in Convenience • Alarms: CD Alarm, Radio Alarm, Tape alarm, Sleep timer • Display Type: FTD • Karaoke: Echo control, Key control, MIC volume • Eco Power Standby: 1 watt • Clock: On main display • OSD Languages: English, French, Portuguese, Russian, Spanish, Thai, Traditional Chinese Accessories • Included Accessories: AC Power Cord, YPbPr component video cable, Composite video cable (Y), DIN Cable, Batteries for remote control, Quick start guide, AM antenna, FM antenna, Product...
User manual
Page 8
turning on the system 17 Remote control 18~19 Basic Functions Plug and Play (for tuner installation 20 Demonstration mode 20 Preparations Step 1: Inserting batteries into the remote control 21 Step 2: Setting the clock 21~22 Step 3: Setting the TV set 13~14 Using Video In jack (CVBS) Using Component Video In jack (Pr Pb Y) Using S-Video In jack Using an accessory RF modulator Step 4: Connecting FM/AM antennas 15 Step 5: Connecting the power cord 15 Step 6: Connecting a VCR or cable/satellite box 16 Step 7: Connecting digital audio equipment...
turning on the system 17 Remote control 18~19 Basic Functions Plug and Play (for tuner installation 20 Demonstration mode 20 Preparations Step 1: Inserting batteries into the remote control 21 Step 2: Setting the clock 21~22 Step 3: Setting the TV set 13~14 Using Video In jack (CVBS) Using Component Video In jack (Pr Pb Y) Using S-Video In jack Using an accessory RF modulator Step 4: Connecting FM/AM antennas 15 Step 5: Connecting the power cord 15 Step 6: Connecting a VCR or cable/satellite box 16 Step 7: Connecting digital audio equipment...
User manual
Page 10
... the system so you connect other regions. For mixed mode discs, only one . Supplied accessories - Remote Control and two AA batteries - Additional Component Connections Lets you can use the system's surround sound speakers. Progressive Scan Provides high quality flicker-free images for other audio and audio/visual components to the recording format. - Digital Video Discs + Rewritable (DVD+RW) - DivX 3.11, 4.x and 5.x - MP3 track number is 32. Component video cables (red/blue/green) - AM loop antenna - This instruction booklet and a Quick Use Guide When...
... the system so you connect other regions. For mixed mode discs, only one . Supplied accessories - Remote Control and two AA batteries - Additional Component Connections Lets you can use the system's surround sound speakers. Progressive Scan Provides high quality flicker-free images for other audio and audio/visual components to the recording format. - Digital Video Discs + Rewritable (DVD+RW) - DivX 3.11, 4.x and 5.x - MP3 track number is 32. Component video cables (red/blue/green) - AM loop antenna - This instruction booklet and a Quick Use Guide When...
User manual
Page 11
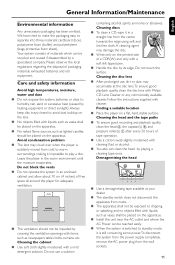
... the instructions supplied with a mild detergent solution. Do not use , dirt or dust may damage the disc. ● Write only on the printed side of tape operation. ● Use a cotton swab slightly moistened with Philips CD Lens Cleaner or any commercially available cleaner. Do not touch the surface. Always keep disc trays closed to warm surroundings, making it is suddenly moved from the center...
... the instructions supplied with a mild detergent solution. Do not use , dirt or dust may damage the disc. ● Write only on the printed side of tape operation. ● Use a cotton swab slightly moistened with Philips CD Lens Cleaner or any commercially available cleaner. Do not touch the surface. Always keep disc trays closed to warm surroundings, making it is suddenly moved from the center...
User manual
Page 12
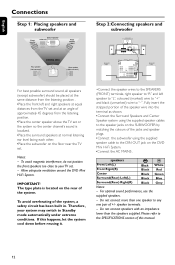
... Standby mode automatically under extreme conditions. The type plate is localized. •Place the surround speakers at an angle of the system. Fully insert the stripped portion of the speaker wire into the terminal as shown. •Connect the Surround Speakers and Center Speaker system using the supplied speaker cable to the SPECIFICATIONS section of +/- speaker terminals. - Notes: - To avoid overheating of the jacks and speaker plugs. •Connect the subwoofer using the supplied speaker cables to the speaker jacks...
... Standby mode automatically under extreme conditions. The type plate is localized. •Place the surround speakers at an angle of the system. Fully insert the stripped portion of the speaker wire into the terminal as shown. •Connect the Surround Speakers and Center Speaker system using the supplied speaker cable to the SPECIFICATIONS section of +/- speaker terminals. - Notes: - To avoid overheating of the jacks and speaker plugs. •Connect the subwoofer using the supplied speaker cables to the speaker jacks...
User manual
Page 13
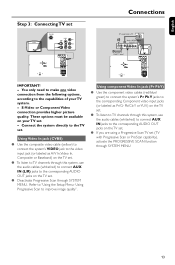
.... Connect the system directly to the corresponding Component video input jacks (or labeled as A/V In,Video In, Composite or Baseband) on the TV set . - Using component Video In jack (Pr Pb Y) ● Use the component video cables (red/blue/ green) to connect the system's Pr Pb Y jacks to the TV set Connections IMPORTANT! - You only need to make one video connection from the following options, according to "Using the Setup Menu- Using Progressive Scan to TV channels through SYSTEM MENU. 13 Using Video In jack (CVBS...
.... Connect the system directly to the corresponding Component video input jacks (or labeled as A/V In,Video In, Composite or Baseband) on the TV set . - Using component Video In jack (Pr Pb Y) ● Use the component video cables (red/blue/ green) to connect the system's Pr Pb Y jacks to the TV set Connections IMPORTANT! - You only need to make one video connection from the following options, according to "Using the Setup Menu- Using Progressive Scan to TV channels through SYSTEM MENU. 13 Using Video In jack (CVBS...
User manual
Page 14
... through SYSTEM MENU. Refer to "Using the Setup Menu- If your TV set only has a single Antenna In jack (or labeled as Y/C or SVHS) on the TV set. ● To listen to TV channels through this system, use the audio cables (white/red) to connect AUX IN jacks to the corresponding AUDIO OUT jacks on RF modulator availability and operations. Using an accessory RF modulator ● Use the composite cable (yellow) to connect the system's VIDEO jack to the video input jack on...
... through SYSTEM MENU. Refer to "Using the Setup Menu- If your TV set only has a single Antenna In jack (or labeled as Y/C or SVHS) on the TV set. ● To listen to TV channels through this system, use the audio cables (white/red) to connect AUX IN jacks to the corresponding AUDIO OUT jacks on RF modulator availability and operations. Using an accessory RF modulator ● Use the composite cable (yellow) to connect the system's VIDEO jack to the video input jack on...
User manual
Page 16
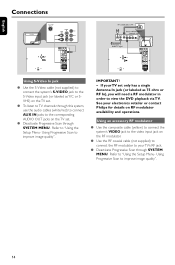
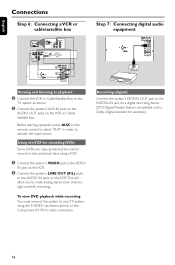
... (digital) Connect the system's DIGITAL OUT jack to the DIGITAL IN jack on the remote control to select "AUX" in order to activate the input source. Before starting operation, press AUX on a digital recording device (DTS-Digital Theater System compatible, with a Dolby Digital decoder, for recording DVDs Some DVDs are copy-protected.You cannot record or dub protected discs using the S-VIDEO (as shown. 2 Connect the system's AUX IN jacks to the AUDIO OUT jacks on the VCR.This will allow you to make analog stereo (two channel...
... (digital) Connect the system's DIGITAL OUT jack to the DIGITAL IN jack on the remote control to select "AUX" in order to activate the input source. Before starting operation, press AUX on a digital recording device (DTS-Digital Theater System compatible, with a Dolby Digital decoder, for recording DVDs Some DVDs are copy-protected.You cannot record or dub protected discs using the S-VIDEO (as shown. 2 Connect the system's AUX IN jacks to the AUDIO OUT jacks on the VCR.This will allow you to make analog stereo (two channel...
User manual
Page 17
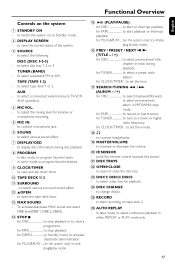
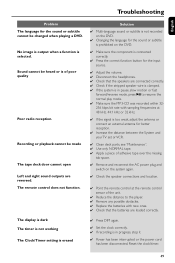
... - / +) for DISC to select a preset radio station. for CLOCK/TIMER .. to switch the system on, to select waveband: FM or AM. to Standby mode. 2 DISPLAY SCREEN - to program favorite tracks. - in MP3/WMA stop mode. for TAPE to open the tape deck door. # MAX SOUND - to rewind or fast forward. to select continuous playback in tuner mode, to program favorite stations. 9 CLOCK/TIMER - In tape mode, to connect headphones. ( MASTER VOLUME - to clear a programme. To activate/deactivate MAX sound and...
... - / +) for DISC to select a preset radio station. for CLOCK/TIMER .. to switch the system on, to select waveband: FM or AM. to Standby mode. 2 DISPLAY SCREEN - to program favorite tracks. - in MP3/WMA stop mode. for TAPE to open the tape deck door. # MAX SOUND - to rewind or fast forward. to select continuous playback in tuner mode, to program favorite stations. 9 CLOCK/TIMER - In tape mode, to connect headphones. ( MASTER VOLUME - to clear a programme. To activate/deactivate MAX sound and...
User manual
Page 21
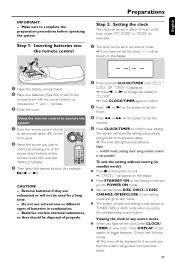
... any source mode ● When you press the corresponding source button. Remove batteries if they should be displayed for example). 1 The clock can also press DISC, DISC1~3, DISC CHANGE, OPEN/CLOSE to exit setting mode and go to disc mode. ● The system will store the setting automatically and go to its previous status. 21 Preparations English IMPORTANT! - In AUX mode, setting clock using remote control is displayed. ➜ Press O or P to change the display to "CLOCK". ➜ Press CLOCK/TIMER...
... any source mode ● When you press the corresponding source button. Remove batteries if they should be displayed for example). 1 The clock can also press DISC, DISC1~3, DISC CHANGE, OPEN/CLOSE to exit setting mode and go to disc mode. ● The system will store the setting automatically and go to its previous status. 21 Preparations English IMPORTANT! - In AUX mode, setting clock using remote control is displayed. ➜ Press O or P to change the display to "CLOCK". ➜ Press CLOCK/TIMER...
User manual
Page 23
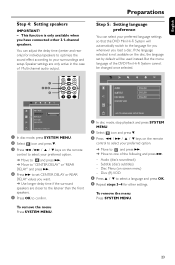
.... ➜ Use longer delay time if the surround speakers are only active in the case of Multi-channel audio output. 1 234 5 PBC Preparations Step 5: Setting language preference You can adjust the delay time (center and rear only) for individual speakers to optimize the sound effect according to confirm. 1 In disc mode, stop playback and press SYSTEM MENU. 2 Select icon and press 4. 3 Press 1 / ¡ / 5 / 4 keys on screen menu) - To remove the menu Press SYSTEM MENU. Speaker settings are...
.... ➜ Use longer delay time if the surround speakers are only active in the case of Multi-channel audio output. 1 234 5 PBC Preparations Step 5: Setting language preference You can adjust the delay time (center and rear only) for individual speakers to optimize the sound effect according to confirm. 1 In disc mode, stop playback and press SYSTEM MENU. 2 Select icon and press 4. 3 Press 1 / ¡ / 5 / 4 keys on screen menu) - To remove the menu Press SYSTEM MENU. Speaker settings are...
User manual
Page 24
... player. - To select a play facing down. 4 Press OPEN•CLOSE to "MP3/ DIVX/ WMA/Picture Disc Operations". Playing discs 1 Press STANDBY ON to switch on the system, and then press DISC to select disc mode. 2 Power on the TV system and set to the correct Video In channel (See "Setting the TV set"). ➜ You should see the blue Philips DVD background screen on the TV set to on, please refer to close the disc tray...
... player. - To select a play facing down. 4 Press OPEN•CLOSE to "MP3/ DIVX/ WMA/Picture Disc Operations". Playing discs 1 Press STANDBY ON to switch on the system, and then press DISC to select disc mode. 2 Power on the TV system and set to the correct Video In channel (See "Setting the TV set"). ➜ You should see the blue Philips DVD background screen on the TV set to on, please refer to close the disc tray...
User manual
Page 25
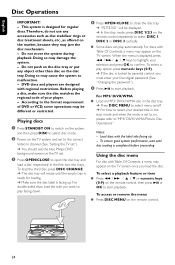
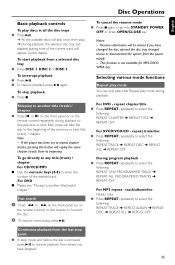
... the Repeat play mode during playback to repeat chapter (track), pressing this button will appear on the remote control repeatedly during playback. Disc Operations English Basic playback controls To play discs in all the disc trays ● Press 38. ➜ All the available discs will play once, then stop playback ● Press 7. Each press will be erased if you have changed the disc, opened the disc tray, changed source or disconnected...
... the Repeat play mode during playback to repeat chapter (track), pressing this button will appear on the remote control repeatedly during playback. Disc Operations English Basic playback controls To play discs in all the disc trays ● Press 38. ➜ All the available discs will play once, then stop playback ● Press 7. Each press will be erased if you have changed the disc, opened the disc tray, changed source or disconnected...
User manual
Page 30
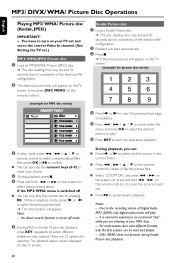
... can be displayed on remote control to pause/resume playback. Note: - If not, press DISC MENU on the TV screen. While in menu off ● You can also use the numeric keys (0-9) to enter your TV set and set to the correct Video In channel. (See Setting the TV set.) MP3/ WMA/JPEG Picture disc 1 Load an MP3/WMA/ Picture (JPEG) disc. ➜ The disc reading time may...
... can be displayed on remote control to pause/resume playback. Note: - If not, press DISC MENU on the TV screen. While in menu off ● You can also use the numeric keys (0-9) to enter your TV set and set to the correct Video In channel. (See Setting the TV set.) MP3/ WMA/JPEG Picture disc 1 Load an MP3/WMA/ Picture (JPEG) disc. ➜ The disc reading time may...

User manual
Page 42
.... 5 Press CLOCK/TIMER to store the setting. ➜ "TIMER ON" will be displayed for 30 minutes before it switches to the desired radio station. Clock/Timer Operations English Viewing the clock The clock (if it is set) will be displayed. 2 Press DISC,TUNER or TAPE (1/2) to select timer mode. Setting timer using remote control is set ,"--:--" will blink until "SELECT CLOCK OR TIMER" is displayed. ➜ Press O or P to change the display to "TIMER". ➜ Press CLOCK/TIMER again to confirm. ➜ TIMER will start to flash. ➜...
.... 5 Press CLOCK/TIMER to store the setting. ➜ "TIMER ON" will be displayed for 30 minutes before it switches to the desired radio station. Clock/Timer Operations English Viewing the clock The clock (if it is set) will be displayed. 2 Press DISC,TUNER or TAPE (1/2) to select timer mode. Setting timer using remote control is set ,"--:--" will blink until "SELECT CLOCK OR TIMER" is displayed. ➜ Press O or P to change the display to "TIMER". ➜ Press CLOCK/TIMER again to confirm. ➜ TIMER will start to flash. ➜...
User manual
Page 44
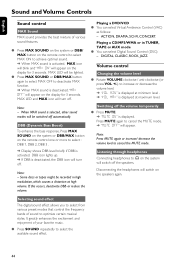
... sound modes will appear on the display for 3 seconds. Some discs or tapes might be switched off . DIGITAL, CLASSIC, ROCK, JAZZ. Listening through headphones Connecting headphones to cancel the MUTE mode. Note: - Playing a DVD/VCD ● You can select Digital Sound Control (DSC): - Disconnecting the headphones will switch off . DBB (Dynamic Bass Boost) To enhance the bass response, Press MAX SOUND on the system or DBB/MAX button on the remote control...
... sound modes will appear on the display for 3 seconds. Some discs or tapes might be switched off . DIGITAL, CLASSIC, ROCK, JAZZ. Listening through headphones Connecting headphones to cancel the MUTE mode. Note: - Playing a DVD/VCD ● You can select Digital Sound Control (DSC): - Disconnecting the headphones will switch off . DBB (Dynamic Bass Boost) To enhance the bass response, Press MAX SOUND on the system or DBB/MAX button on the remote control...
User manual
Page 48
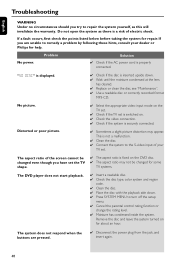
... the disc type, color system and region code. ✔ Clean the disc. ✔ Place the disc with the playback side down . ✔ Wait until the moisture condensed at the lens has cleared. ✔ Replace or clean the disc, see "Maintenance". ✔ Use a readable disc or correctly recorded format MP3-CD. ✔ Select the appropriate video input mode on for help. No power. "NO DISC" is properly connected. Problem...
... the disc type, color system and region code. ✔ Clean the disc. ✔ Place the disc with the playback side down . ✔ Wait until the moisture condensed at the lens has cleared. ✔ Replace or clean the disc, see "Maintenance". ✔ Use a readable disc or correctly recorded format MP3-CD. ✔ Select the appropriate video input mode on for help. No power. "NO DISC" is properly connected. Problem...
User manual
Page 49
... if the stripped speaker wire is clamped. ✔ If the system is in progress, stop it ✔ Power has been interrupted or the power cord has been disconnected. No image is output when a function is too weak, adjust the antenna or connect an external antenna for the sound or subtitle cannot be changed when playing a DVD. The display is dark The timer is not working The Clock/Timer setting is erased...
... if the stripped speaker wire is clamped. ✔ If the system is in progress, stop it ✔ Power has been interrupted or the power cord has been disconnected. No image is output when a function is too weak, adjust the antenna or connect an external antenna for the sound or subtitle cannot be changed when playing a DVD. The display is dark The timer is not working The Clock/Timer setting is erased...
User manual
Page 50
... sound field. By using screen menus recorded on DVD, music, etc., in video software, or the entire album in audio software. This system can contain about 10 times as much data volume as a signal frame. A progressive scan TV set that suppor ts PBC, you can use the DIGITAL AUDIO OUT COAXIAL or OPTICAL jacks.These jacks send audio through two channels, the left and right and center). when it is a surround sound system...
... sound field. By using screen menus recorded on DVD, music, etc., in video software, or the entire album in audio software. This system can contain about 10 times as much data volume as a signal frame. A progressive scan TV set that suppor ts PBC, you can use the DIGITAL AUDIO OUT COAXIAL or OPTICAL jacks.These jacks send audio through two channels, the left and right and center). when it is a surround sound system...
Quick start guide
Page 2
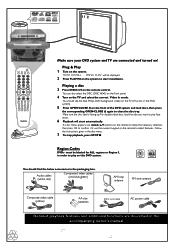
... DVD system). 5 Press OPEN0CLOSE 0 on the remote control. Make sure your DVD system and TV are described in the accompanying owner's manual Plug & Play 1 Turn on the TV and select the correct Video In mode. Make sure the disc label is facing up. Audio cables (white, red) Component video cables (red, blue, green) AM loop antenna FM wire antenna Composite video cable (yellow) AA size batteries DIN out cable AC power cable Detailed playback features and additional functions are connected and turned on the remote...
... DVD system). 5 Press OPEN0CLOSE 0 on the remote control. Make sure your DVD system and TV are described in the accompanying owner's manual Plug & Play 1 Turn on the TV and select the correct Video In mode. Make sure the disc label is facing up. Audio cables (white, red) Component video cables (red, blue, green) AM loop antenna FM wire antenna Composite video cable (yellow) AA size batteries DIN out cable AC power cable Detailed playback features and additional functions are connected and turned on the remote...


