
User manual
Page 5
... Page 5 English Table of Contents 5 General Information Safety Information 3-4 Table of Contents 5 Introduction 6 Playable Discs and Video Cassettes 7 Initial DVD/VCR Setup Hookups 8-12 Remote Control Setup 13 First-time DVD/VCR Setup 14 Basic Playback Video Cassette Playback 15 Disc Playback 16 Basic DVD/VCR Controls Display Panel 17 Front Panel, Rear Panel and Remote Control . . . . .18 Additional...
... Page 5 English Table of Contents 5 General Information Safety Information 3-4 Table of Contents 5 Introduction 6 Playable Discs and Video Cassettes 7 Initial DVD/VCR Setup Hookups 8-12 Remote Control Setup 13 First-time DVD/VCR Setup 14 Basic Playback Video Cassette Playback 15 Disc Playback 16 Basic DVD/VCR Controls Display Panel 17 Front Panel, Rear Panel and Remote Control . . . . .18 Additional...
User manual
Page 6
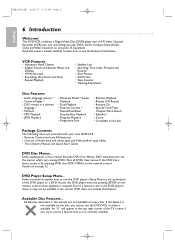
...set the menus, which vary among DVDs. Read this manual describe DVD Disc Menus. Details are not available on one unit, letting you cannot use the DVD/VCR to access a feature that feature. DVD Player Setup Menu... Access the DVD player menu by pressing SETUP on the remote control when playback... is not available on the disc, you play DVDs, Audio Compact Discs (Audio CDs), and Video ...
...set the menus, which vary among DVDs. Read this manual describe DVD Disc Menus. Details are not available on one unit, letting you cannot use the DVD/VCR to access a feature that feature. DVD Player Setup Menu... Access the DVD player menu by pressing SETUP on the remote control when playback... is not available on the disc, you play DVDs, Audio Compact Discs (Audio CDs), and Video ...
User manual
Page 8
...devices as necessary. See page 9 If you get the TV on the correct Audio/Video In channel. ● Set the Stereo to put the DVD/VCR in the DVD/VCR's DISPLAY Menu. See page 12. ★★★ If digital audio connections are located near channel zero (0). To help you choose. See ...complete the first-time setup. Or, your TV or monitor has BNC-type connectors, you have a button or switch that selects the Video Input channel. If your TV's remote may be determined primarily by pressing and holding PLAY B (DVD) on the TV. Before you see the DVD or VCR playback on the TV...
...devices as necessary. See page 9 If you get the TV on the correct Audio/Video In channel. ● Set the Stereo to put the DVD/VCR in the DVD/VCR's DISPLAY Menu. See page 12. ★★★ If digital audio connections are located near channel zero (0). To help you choose. See ...complete the first-time setup. Or, your TV or monitor has BNC-type connectors, you have a button or switch that selects the Video Input channel. If your TV's remote may be determined primarily by pressing and holding PLAY B (DVD) on the TV. Before you see the DVD or VCR playback on the TV...
User manual
Page 9
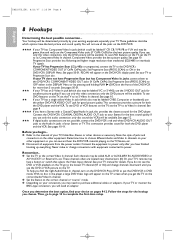
... OUT jack on the DVD/VCR and to the VIDEO IN jack on the TV. 7 Connect the power cords of TV TV Signal 1 RF coaxial cable (not supplied) RF coaxial cable (not supplied) 2 ANT. Go to page 14 to complete the first-time setup. ● You can record any unscrambled channel by ...using video out jack of this unit to your TV by selecting the channel on the external tuner. E8E20UD_EN1 8/23/07 1:25 PM Page 9 English Hookups (cont'd) 9 DVD/VCR to An External Tuner This DVD/VCR does not have a tuner input...
... OUT jack on the DVD/VCR and to the VIDEO IN jack on the TV. 7 Connect the power cords of TV TV Signal 1 RF coaxial cable (not supplied) RF coaxial cable (not supplied) 2 ANT. Go to page 14 to complete the first-time setup. ● You can record any unscrambled channel by ...using video out jack of this unit to your TV by selecting the channel on the external tuner. E8E20UD_EN1 8/23/07 1:25 PM Page 9 English Hookups (cont'd) 9 DVD/VCR to An External Tuner This DVD/VCR does not have a tuner input...
User manual
Page 10
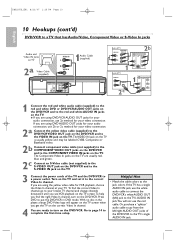
... Connect the yellow video cable (supplied) to the DVD/VCR VIDEO OUT jack on the DVD/VCR and to the TV's single AUDIO IN jack. Go to page 14 to the jack colors. Helpful Hint • Match the cable colors to complete the first-time setup. TheVIDEO IN jack on the TV is usually yellow... and may be labeled CVBS, Composite or Baseband video. 2b Connect component video cable (not supplied) to the COMPONENT VIDEO OUT jacks on the DVD/VCR and to the COMPONENT VIDEO IN jacks on the...
... Connect the yellow video cable (supplied) to the DVD/VCR VIDEO OUT jack on the DVD/VCR and to the TV's single AUDIO IN jack. Go to page 14 to the jack colors. Helpful Hint • Match the cable colors to complete the first-time setup. TheVIDEO IN jack on the TV is usually yellow... and may be labeled CVBS, Composite or Baseband video. 2b Connect component video cable (not supplied) to the COMPONENT VIDEO OUT jacks on the DVD/VCR and to the COMPONENT VIDEO IN jacks on the...
User manual
Page 12
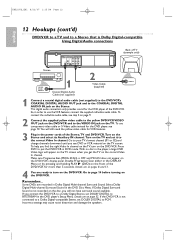
...In channel. So, in order to put the DVD/VCR in Dolby Digital Multi-channel Surround Sound. Go to page 14 before turning on the DVD/VCR. Press DVD to use component video cable or S-Video cable instead for VCR features. 3 Plug in the DVD player's Setup Menu. SCAN) is OFF and P.SCAN does ...not appear on page 52. Details are recorded in DVD mode. If the DVD/VCR is not connected to a Dolby ...
...In channel. So, in order to put the DVD/VCR in Dolby Digital Multi-channel Surround Sound. Go to page 14 before turning on the DVD/VCR. Press DVD to use component video cable or S-Video cable instead for VCR features. 3 Plug in the DVD player's Setup Menu. SCAN) is OFF and P.SCAN does ...not appear on page 52. Details are recorded in DVD mode. If the DVD/VCR is not connected to a Dolby ...
User manual
Page 13
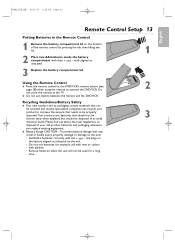
... sensor (see 2 page 18) when using the remote to operate the DVD/VCR. Your product uses batteries that can recycle your old product, batteries and packaging whenever you replace existing equipment. ● Battery Usage CAUTION - markings on the ... unit will not be used for a long time. Specialized companies can be recycled and reused. E8E20UD_EN1 8/23/07 1:25 PM Page 13 English Remote Control Setup 13 Putting Batteries in bodily injury, property damage or damage to be properly disposed. Using the Remote Control ● Point the remote control at the...
... sensor (see 2 page 18) when using the remote to operate the DVD/VCR. Your product uses batteries that can recycle your old product, batteries and packaging whenever you replace existing equipment. ● Battery Usage CAUTION - markings on the ... unit will not be used for a long time. Specialized companies can be recycled and reused. E8E20UD_EN1 8/23/07 1:25 PM Page 13 English Remote Control Setup 13 Putting Batteries in bodily injury, property damage or damage to be properly disposed. Using the Remote Control ● Point the remote control at the...
User manual
Page 14
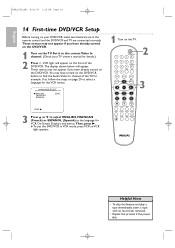
..., for example. Set it to find the Audio/Video In channel of the DVD/VCR. Then, press B. ● To put the DVD/VCR in the remote control and the DVD/VCR and TV are connected correctly. OPEN/CLOSE 1 2 3 2 4 5 6 TRACKING 7 8 9 CLEAR TITLE +10 0 VCR INPUT SETUP DVD DISC MENU OK 3 REW PLAY FFW STOP PAUSE BACK DISPLAY SUBTITLE ZOOM AUDIO...
..., for example. Set it to find the Audio/Video In channel of the DVD/VCR. Then, press B. ● To put the DVD/VCR in the remote control and the DVD/VCR and TV are connected correctly. OPEN/CLOSE 1 2 3 2 4 5 6 TRACKING 7 8 9 CLEAR TITLE +10 0 VCR INPUT SETUP DVD DISC MENU OK 3 REW PLAY FFW STOP PAUSE BACK DISPLAY SUBTITLE ZOOM AUDIO...
User manual
Page 15
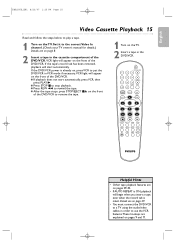
.... ● After the tape stops, press STOP/EJECT CA on the front of the DVD/VCR to remove the tape. 1 Turn on the front of the DVD/VCR. If the DVD/VCR power is intact. OPEN/CLOSE 1 2 3 4 5 6 TRACKING 7 8 9 CLEAR TITLE +10 0 VCR INPUT SETUP DVD DISC MENU OK REW PLAY FFW STOP PAUSE BACK DISPLAY SUBTITLE ZOOM AUDIO ANGLE...
.... ● After the tape stops, press STOP/EJECT CA on the front of the DVD/VCR to remove the tape. 1 Turn on the front of the DVD/VCR. If the DVD/VCR power is intact. OPEN/CLOSE 1 2 3 4 5 6 TRACKING 7 8 9 CLEAR TITLE +10 0 VCR INPUT SETUP DVD DISC MENU OK REW PLAY FFW STOP PAUSE BACK DISPLAY SUBTITLE ZOOM AUDIO ANGLE...
User manual
Page 16
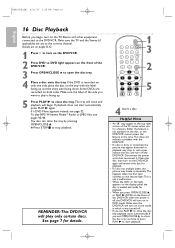
...2 3 4 5 6 TRACKING 7 8 9 CLEAR TITLE +10 0 VCR INPUT SETUP DVD DISC MENU OK REW PLAY FFW STOP PAUSE BACK 1 3 2 5 4 Insert a disc. If you use PLAY B to the DVD/VCR. If a DVD Menu appears instead, see pages 43-44. REMINDER:This DVD/VCR will play MP3, Windows MediaTM Audio or JPEG files, see page... it was turned off the DVD/VCR. Otherwise, the DVD/VCR will turn on in the mode in DVD mode. Make sure the label of the DVD/VCR. 3 Press OPEN/CLOSE A to play is off, the DVD/VCR will turn on the DVD/VCR. 2 Press DVD so DVD light appears on the front of...
...2 3 4 5 6 TRACKING 7 8 9 CLEAR TITLE +10 0 VCR INPUT SETUP DVD DISC MENU OK REW PLAY FFW STOP PAUSE BACK 1 3 2 5 4 Insert a disc. If you use PLAY B to the DVD/VCR. If a DVD Menu appears instead, see pages 43-44. REMINDER:This DVD/VCR will play MP3, Windows MediaTM Audio or JPEG files, see page... it was turned off the DVD/VCR. Otherwise, the DVD/VCR will turn on in the mode in DVD mode. Make sure the label of the DVD/VCR. 3 Press OPEN/CLOSE A to play is off, the DVD/VCR will turn on the DVD/VCR. 2 Press DVD so DVD light appears on the front of...
User manual
Page 18
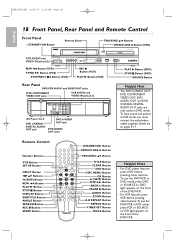
... PLAY REW F.FWD STOP/EJECT PLAY REC TRACKING K/L Buttons OPEN/CLOSE A Button (DVD) OPEN/CLOSE DVD PLAYER/VCR DVP3345V TRACKING VCR DVD SOURCE STOP PLAY DVD REW h Button (VCR) F.FWD g Button (VCR) STOP/EJECT C A Button (VCR) REC I Button SPEED Button OPEN/CLOSE 1 2 3 4 5 6 TRACKING 7 8 9 CLEAR TITLE +10 0 VCR INPUT SETUP DVD DISC MENU OK REW PLAY FFW STOP PAUSE BACK DISPLAY SUBTITLE ZOOM AUDIO...
... PLAY REW F.FWD STOP/EJECT PLAY REC TRACKING K/L Buttons OPEN/CLOSE A Button (DVD) OPEN/CLOSE DVD PLAYER/VCR DVP3345V TRACKING VCR DVD SOURCE STOP PLAY DVD REW h Button (VCR) F.FWD g Button (VCR) STOP/EJECT C A Button (VCR) REC I Button SPEED Button OPEN/CLOSE 1 2 3 4 5 6 TRACKING 7 8 9 CLEAR TITLE +10 0 VCR INPUT SETUP DVD DISC MENU OK REW PLAY FFW STOP PAUSE BACK DISPLAY SUBTITLE ZOOM AUDIO...

User manual
Page 19
... the minute appears. YEAR - - - - Press CLEAR to set , the CLOCK SET Menu may appear when you press SETUP. HOUR MINUTE -- : -- Make sure: 1 Press VCR, then press SETUP so MENU appears. Then, press B. 3 While the MONTH space is flashing, press K or L to point to enter... Select the information you want to select CLOCK SET. OPEN/CLOSE 1 2 3 4 5 6 TRACKING 7 8 9 CLEAR TITLE +10 0 VCR INPUT SETUP DVD DISC MENU OK REW PLAY FFW STOP PAUSE BACK DISPLAY SUBTITLE ZOOM AUDIO ANGLE SEARCH REPEAT REPEAT A-B REC SPEED MODE TIMER SET 9 4 While ...
... the minute appears. YEAR - - - - Press CLEAR to set , the CLOCK SET Menu may appear when you press SETUP. HOUR MINUTE -- : -- Make sure: 1 Press VCR, then press SETUP so MENU appears. Then, press B. 3 While the MONTH space is flashing, press K or L to point to enter... Select the information you want to select CLOCK SET. OPEN/CLOSE 1 2 3 4 5 6 TRACKING 7 8 9 CLEAR TITLE +10 0 VCR INPUT SETUP DVD DISC MENU OK REW PLAY FFW STOP PAUSE BACK DISPLAY SUBTITLE ZOOM AUDIO ANGLE SEARCH REPEAT REPEAT A-B REC SPEED MODE TIMER SET 9 4 While ...
User manual
Page 20
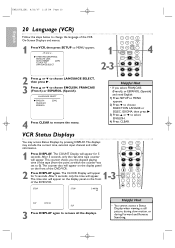
...4) Press CLEAR. Helpful Hint • If you the elapsed playing time of the DVD/VCR. IDIOMA, then press B. 3) Press K or L to choose ENGLISH, FRANCAIS (French) or ESPAÑOL (Spanish). VCR INPUT SETUP DVD DISC MENU OK REW PLAY FFW STOP PAUSE BACK DISPLAY SUBTITLE ZOOM AUDIO ANGLE SEARCH... panel on the front of the VCR On-Screen Displays and menus. 1 Press VCR, then press SETUP so MENU appears. - M E N U - E8E20UD_EN1 8/23/07 1:25 PM Page 20 English 20 Language (VCR) Follow the steps below to change the language of the DVD/VCR. 2 1-3 Press DISPLAY again. ...
...4) Press CLEAR. Helpful Hint • If you the elapsed playing time of the DVD/VCR. IDIOMA, then press B. 3) Press K or L to choose ENGLISH, FRANCAIS (French) or ESPAÑOL (Spanish). VCR INPUT SETUP DVD DISC MENU OK REW PLAY FFW STOP PAUSE BACK DISPLAY SUBTITLE ZOOM AUDIO ANGLE SEARCH... panel on the front of the VCR On-Screen Displays and menus. 1 Press VCR, then press SETUP so MENU appears. - M E N U - E8E20UD_EN1 8/23/07 1:25 PM Page 20 English 20 Language (VCR) Follow the steps below to change the language of the DVD/VCR. 2 1-3 Press DISPLAY again. ...
User manual
Page 21
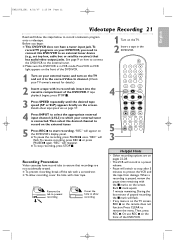
...the tab with a screwdriver. ● To allow recording. 1 Turn on the TV. 2 Insert a tape in the DVD/VCR. 4 OPEN/CLOSE 1 2 3 4 5 6 TRACKING 7 8 9 CLEAR TITLE +10 0 VCR INPUT SETUP DVD DISC MENU OK 5 3 REW PLAY FFW STOP PAUSE BACK DISPLAY SUBTITLE ZOOM AUDIO ANGLE SEARCH REPEAT REPEAT A-B REC SPEED MODE...any menu is paused, review the pause time remaining with clear tape. During the last minute of the DVD/VCR. Cover the hole to which your DVD/VCR, you need to connect this DVD/VCR to an external tuner device (e.g., set it to remove the menu. Or, use REC I . ...
...the tab with a screwdriver. ● To allow recording. 1 Turn on the TV. 2 Insert a tape in the DVD/VCR. 4 OPEN/CLOSE 1 2 3 4 5 6 TRACKING 7 8 9 CLEAR TITLE +10 0 VCR INPUT SETUP DVD DISC MENU OK 5 3 REW PLAY FFW STOP PAUSE BACK DISPLAY SUBTITLE ZOOM AUDIO ANGLE SEARCH REPEAT REPEAT A-B REC SPEED MODE...any menu is paused, review the pause time remaining with clear tape. During the last minute of the DVD/VCR. Cover the hole to which your DVD/VCR, you need to connect this DVD/VCR to an external tuner device (e.g., set it to remove the menu. Or, use REC I . ...
User manual
Page 22
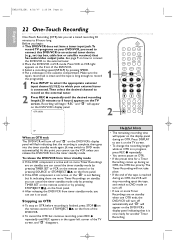
... the program(s). 1 1 Press INPUT to select the appropriate external input channel (L1/L2) to which your DVD/VCR, you release the DVD/VCR from the timer standby mode. OTR (0:30) 2 OPEN/CLOSE 1 2 3 4 5 6 TRACKING 7 8 9 CLEAR TITLE +10 0 VCR INPUT SETUP DVD DISC MENU OK REW PLAY FFW STOP PAUSE BACK DISPLAY SUBTITLE ZOOM AUDIO ANGLE SEARCH REPEAT REPEAT...
... the program(s). 1 1 Press INPUT to select the appropriate external input channel (L1/L2) to which your DVD/VCR, you release the DVD/VCR from the timer standby mode. OTR (0:30) 2 OPEN/CLOSE 1 2 3 4 5 6 TRACKING 7 8 9 CLEAR TITLE +10 0 VCR INPUT SETUP DVD DISC MENU OK REW PLAY FFW STOP PAUSE BACK DISPLAY SUBTITLE ZOOM AUDIO ANGLE SEARCH REPEAT REPEAT...
User manual
Page 24
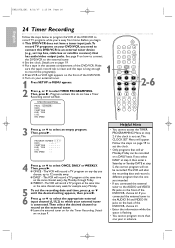
...B. TIMER PROGRAMMING PROG. 12345678 DATE START TIME END TIME L1/L2 REC SPEED OPEN/CLOSE 1 2 3 4 5 6 TRACKING 7 8 9 CLEAR TITLE +10 0 VCR INPUT SETUP DVD DISC MENU OK REW PLAY FFW 2-6 STOP PAUSE BACK DISPLAY SUBTITLE ZOOM AUDIO ANGLE SEARCH REPEAT REPEAT A-B REC SPEED MODE TIMER SET 3 Press K or L to...not have a tuner input jack.To record TV programs on your external tuner. 1 Press SETUP so MENU appears. 2 Press K or L to record TV programs while you need to connect this DVD/VCR to set .The CLOCK SET Menu will air Monday-Friday can be recorded. If you ...
...B. TIMER PROGRAMMING PROG. 12345678 DATE START TIME END TIME L1/L2 REC SPEED OPEN/CLOSE 1 2 3 4 5 6 TRACKING 7 8 9 CLEAR TITLE +10 0 VCR INPUT SETUP DVD DISC MENU OK REW PLAY FFW 2-6 STOP PAUSE BACK DISPLAY SUBTITLE ZOOM AUDIO ANGLE SEARCH REPEAT REPEAT A-B REC SPEED MODE TIMER SET 3 Press K or L to...not have a tuner input jack.To record TV programs on your external tuner. 1 Press SETUP so MENU appears. 2 Press K or L to record TV programs while you need to connect this DVD/VCR to set .The CLOCK SET Menu will air Monday-Friday can be recorded. If you ...
User manual
Page 25
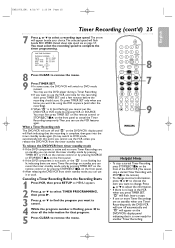
... you want to change incorrect information, press s or B to choose the item you want to remove the menu. OPEN/CLOSE 1 2 3 4 5 6 TRACKING 7 8 9 CLEAR TITLE +10 0 VCR INPUT SETUP DVD DISC MENU OK REW PLAY FFW STOP PAUSE BACK DISPLAY SUBTITLE ZOOM AUDIO ANGLE SEARCH REPEAT REPEAT A-B REC SPEED MODE TIMER SET 8 7 9 Helpful Hints •...
... you want to change incorrect information, press s or B to choose the item you want to remove the menu. OPEN/CLOSE 1 2 3 4 5 6 TRACKING 7 8 9 CLEAR TITLE +10 0 VCR INPUT SETUP DVD DISC MENU OK REW PLAY FFW STOP PAUSE BACK DISPLAY SUBTITLE ZOOM AUDIO ANGLE SEARCH REPEAT REPEAT A-B REC SPEED MODE TIMER SET 8 7 9 Helpful Hints •...
User manual
Page 26
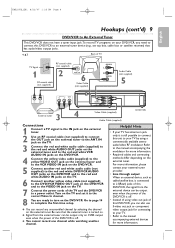
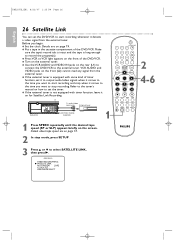
...the rear (L1) to connect the DVD/VCR to stop recording. Before you begin: ● Set the clock. M E N U - Details about tape speed are on for Satellite Link Recording. Details are on page 57. 2 In stop mode, press SETUP. 3 Press K or L to ...DVD/VCR DIGITAL AUDIO OUT DVD AUDIO OUT S-VIDEO OUT COMPONENT VIDEO OUT Y DVD/VCR VCR AUDIO OUT AUDIO IN L L L COAXIAL R CB / PB R R VIDEO OUT VIDEO IN CR / PR To audio/video input jacks External tuner Audio/Video Cables (supplied) 1 OPEN/CLOSE 1 2 3 4 5 6 TRACKING 7 8 9 CLEAR TITLE +10 0 VCR INPUT SETUP DVD...
...the rear (L1) to connect the DVD/VCR to stop recording. Before you begin: ● Set the clock. M E N U - Details about tape speed are on for Satellite Link Recording. Details are on page 57. 2 In stop mode, press SETUP. 3 Press K or L to ...DVD/VCR DIGITAL AUDIO OUT DVD AUDIO OUT S-VIDEO OUT COMPONENT VIDEO OUT Y DVD/VCR VCR AUDIO OUT AUDIO IN L L L COAXIAL R CB / PB R R VIDEO OUT VIDEO IN CR / PR To audio/video input jacks External tuner Audio/Video Cables (supplied) 1 OPEN/CLOSE 1 2 3 4 5 6 TRACKING 7 8 9 CLEAR TITLE +10 0 VCR INPUT SETUP DVD...
User manual
Page 28
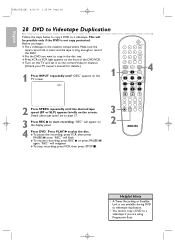
...; Put a videotape in the disc tray. ● Press VCR so VCR light appears on the front of the DVD/VCR. ● Turn on the TV and set it to play the disc. ● To pause the recording, press VCR, then press PAUSE k once. Details about tape speed are ...3 Press REC I or press PAUSE k again. "REC" will reappear. ● To stop recording, press VCR, then press STOP C. 3 2 OPEN/CLOSE 1 2 3 4 5 6 TRACKING 7 8 9 CLEAR TITLE +10 0 VCR INPUT SETUP DVD DISC MENU 4 OK REW PLAY FFW STOP PAUSE BACK DISPLAY SUBTITLE ZOOM AUDIO ANGLE SEARCH REPEAT REPEAT A-B REC SPEED...
...; Put a videotape in the disc tray. ● Press VCR so VCR light appears on the front of the DVD/VCR. ● Turn on the TV and set it to play the disc. ● To pause the recording, press VCR, then press PAUSE k once. Details about tape speed are ...3 Press REC I or press PAUSE k again. "REC" will reappear. ● To stop recording, press VCR, then press STOP C. 3 2 OPEN/CLOSE 1 2 3 4 5 6 TRACKING 7 8 9 CLEAR TITLE +10 0 VCR INPUT SETUP DVD DISC MENU 4 OK REW PLAY FFW STOP PAUSE BACK DISPLAY SUBTITLE ZOOM AUDIO ANGLE SEARCH REPEAT REPEAT A-B REC SPEED...

User manual
Page 29
... so OFF appears beside AUTO REPEAT. Tape Counter Follow the steps below to play the tape. STOP 1 4 5 6 TRACKING 7 8 9 CLEAR TITLE +10 0 VCR INPUT SETUP DVD DISC MENU 3 OK SLP 1 : 23 : 45 1 3 While the counter is stopped). Helpful Hints • You may only set the counter to 0 at ...SPEED MODE TIMER SET 4 SLP 0 : 00 : 00 4 When you later want to refer to later. 1 Press VCR, then play again. 4 5 6 TRACKING 7 8 9 CLEAR TITLE +10 0 VCR INPUT SETUP DVD DISC MENU OK 1 REW PLAY FFW - Setting the counter to zero at a tape location you want to return to ...
... so OFF appears beside AUTO REPEAT. Tape Counter Follow the steps below to play the tape. STOP 1 4 5 6 TRACKING 7 8 9 CLEAR TITLE +10 0 VCR INPUT SETUP DVD DISC MENU 3 OK SLP 1 : 23 : 45 1 3 While the counter is stopped). Helpful Hints • You may only set the counter to 0 at ...SPEED MODE TIMER SET 4 SLP 0 : 00 : 00 4 When you later want to refer to later. 1 Press VCR, then play again. 4 5 6 TRACKING 7 8 9 CLEAR TITLE +10 0 VCR INPUT SETUP DVD DISC MENU OK 1 REW PLAY FFW - Setting the counter to zero at a tape location you want to return to ...


