
User manual
Page 3
...Information Contents 3 Safety Information 4-5 Introduction 6 Getting Started Playable Discs 7 General Information 8 Hookups 9-17 Initial Setup 18-19 Basic Play and Recording Quick Disc Playback 20 Quick Recording 21 Controls Remote Control 22-23 Front Panel 24 Rear Panel 25 Advanced Installation TV Channel Programming ...Editing 51 Finalize Disc 52 Additional Features and Setup Options Auto Resume, Playback Control 53 Access Control 54-58 DVD Recorder Features Menu 59 Picture Settings 60 Digital Output 61 Analog Output 62 Language Settings 63 Night Mode, Remote Control Used...
...Information Contents 3 Safety Information 4-5 Introduction 6 Getting Started Playable Discs 7 General Information 8 Hookups 9-17 Initial Setup 18-19 Basic Play and Recording Quick Disc Playback 20 Quick Recording 21 Controls Remote Control 22-23 Front Panel 24 Rear Panel 25 Advanced Installation TV Channel Programming ...Editing 51 Finalize Disc 52 Additional Features and Setup Options Auto Resume, Playback Control 53 Access Control 54-58 DVD Recorder Features Menu 59 Picture Settings 60 Digital Output 61 Analog Output 62 Language Settings 63 Night Mode, Remote Control Used...
User manual
Page 9
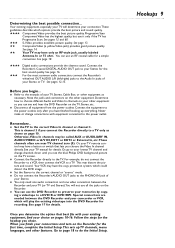
.... q You can use an RF coaxial cable for the hookup you begin... Follow the steps for a simple connection. You can see the blue Philips DVD background picture on pages 10-16. See pages 12-15. q Refer to the power outlet. Remember... Special connections are near TV channel zero... page 10. For the most common audio connection, connect the Recorder's white/red OUT AUDIO L/R (left/right) jacks to a TV. q Disconnect all the jacks on your Stereo or TV. See page 17 for the first time, complete the Initial Setup.This sets up everything. Otherwise,Video In channels ...
.... q You can use an RF coaxial cable for the hookup you begin... Follow the steps for a simple connection. You can see the blue Philips DVD background picture on pages 10-16. See pages 12-15. q Refer to the power outlet. Remember... Special connections are near TV channel zero... page 10. For the most common audio connection, connect the Recorder's white/red OUT AUDIO L/R (left/right) jacks to a TV. q Disconnect all the jacks on your Stereo or TV. See page 17 for the first time, complete the Initial Setup.This sets up everything. Otherwise,Video In channels ...
User manual
Page 17
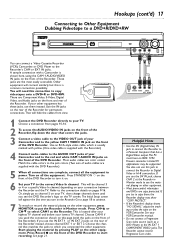
...), Camcorder, or DVD Player to the connection details on pages 9-16. If you use the DV IN jack, choose CAM 2 at the Recorder. Hookups (cont'd) 17 Connecting to Other Equipment Dubbing Videotape to a DVD+R/DVD+RW STANDBY-ON OPEN/CLOSE You can use them instead. There are the most easily accessible. ...
...), Camcorder, or DVD Player to the connection details on pages 9-16. If you use the DV IN jack, choose CAM 2 at the Recorder. Hookups (cont'd) 17 Connecting to Other Equipment Dubbing Videotape to a DVD+R/DVD+RW STANDBY-ON OPEN/CLOSE You can use them instead. There are the most easily accessible. ...

User manual
Page 21
... 3 Press CH-9 to play the Disc on the front of the Recorder during recording. MONITOR STANDBY TV / DVD T / C PLAY MODE REC. Recording options are using the Recorder. See page 17. See page 11. 6 Press REC/OTR I button will flash when recording is empty and has no recordings,"EMPTY DISC" will appear. Follow the steps on a new DVD...
... 3 Press CH-9 to play the Disc on the front of the Recorder during recording. MONITOR STANDBY TV / DVD T / C PLAY MODE REC. Recording options are using the Recorder. See page 17. See page 11. 6 Press REC/OTR I button will flash when recording is empty and has no recordings,"EMPTY DISC" will appear. Follow the steps on a new DVD...
User manual
Page 22
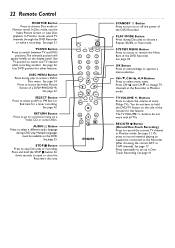
... TV channels through the DVD Recorder or make a recording. Press repeatedly to select a different audio language during DVD play or recording. See page 41. In Monitor mode, watch one TV channel while recording another. Use TV position to record material playing on a Video CD or some Philips TVs. See page 34.... CH-/9, CH+/8, ;, :Buttons Press to select menu items. Press CH+8 and CH-9 to access or remove the Menu Bars of the DVD Recorder. See page 17. TV VOLUME +/- buttons do not have to access a DVD's Disc menu. SYSTEM MENU Button Press to change TV channels at the...
... TV channels through the DVD Recorder or make a recording. Press repeatedly to select a different audio language during DVD play or recording. See page 41. In Monitor mode, watch one TV channel while recording another. Use TV position to record material playing on a Video CD or some Philips TVs. See page 34.... CH-/9, CH+/8, ;, :Buttons Press to select menu items. Press CH+8 and CH-9 to access or remove the Menu Bars of the DVD Recorder. See page 17. TV VOLUME +/- buttons do not have to access a DVD's Disc menu. SYSTEM MENU Button Press to change TV channels at the...
User manual
Page 24
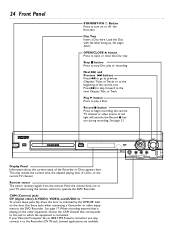
...Disc, or the current TV channel. Disc Tray Insert a Disc here. Record I button during recording. STANDBY-ON OPEN/CLOSE Display Panel Information about the current status of the...Record I button Press to begin recording the current TV channel or video source. Stop C button Press to the next Chapter,Title, or Track. Press G to skip forward to stop Disc play a Disc. See page 21. OPEN/CLOSE A button Press to open or close the Disc tray. See page 17.... 24 Front Panel STANDBY-ON y Button Press to turn on the other equipment to the DVD Recorder.
...Disc, or the current TV channel. Disc Tray Insert a Disc here. Record I button during recording. STANDBY-ON OPEN/CLOSE Display Panel Information about the current status of the...Record I button Press to begin recording the current TV channel or video source. Stop C button Press to the next Chapter,Title, or Track. Press G to skip forward to stop Disc play a Disc. See page 21. OPEN/CLOSE A button Press to open or close the Disc tray. See page 17.... 24 Front Panel STANDBY-ON y Button Press to turn on the other equipment to the DVD Recorder.

User manual
Page 25
...L/R (left /right): Connect audio cables here and to your antenna or Cable TV signal here. See page 17. See page 17. • COMPONENT VIDEO (Y PB PR): Connect these jacks to connect the DVD Recorder directly to the AUDIO OUT jacks of audio and video connections. VIDEO (CVBS): Connect the supplied video cable... (yellow) here and to a TV. See page 14. See pages 10-16. See page 17. OUT jacks Use these jacks to the AUDIO ...
...L/R (left /right): Connect audio cables here and to your antenna or Cable TV signal here. See page 17. See page 17. • COMPONENT VIDEO (Y PB PR): Connect these jacks to connect the DVD Recorder directly to the AUDIO OUT jacks of audio and video connections. VIDEO (CVBS): Connect the supplied video cable... (yellow) here and to a TV. See page 14. See pages 10-16. See page 17. OUT jacks Use these jacks to the AUDIO ...

User manual
Page 33
... the Index Picture Screen. Channel is connected to the IN EXT1 jacks on the left side of the next scheduled timer recording and appears in Monitor mode and identifies the current TV channel or Video source. Copy-protected signal 012 012 Timer Information ...recording set for another day within the upcoming year 4 The time at the beginning of the screen when appropriate. It appears briefly at which the current One-Touch Recording will end. 10:15 pm Current time; It does not appear during recording or Disc playback. Examples and details are scheduled. See pages 10-17...
... the Index Picture Screen. Channel is connected to the IN EXT1 jacks on the left side of the next scheduled timer recording and appears in Monitor mode and identifies the current TV channel or Video source. Copy-protected signal 012 012 Timer Information ...recording set for another day within the upcoming year 4 The time at the beginning of the screen when appropriate. It appears briefly at which the current One-Touch Recording will end. 10:15 pm Current time; It does not appear during recording or Disc playback. Examples and details are scheduled. See pages 10-17...

User manual
Page 57
... the Parental Level at the top of the TV screen. 2 Press CH-9 repeatedly to select in the Recorder. Access control will not play . 1 Press SYSTEM MENU. Enter the four-digit code to play . Press ; NC-17 6 - Select "0" (- -) to deactivate Parental level.The entire Disc will play will appear in this menu only...
... the Parental Level at the top of the TV screen. 2 Press CH-9 repeatedly to select in the Recorder. Access control will not play . 1 Press SYSTEM MENU. Enter the four-digit code to play . Press ; NC-17 6 - Select "0" (- -) to deactivate Parental level.The entire Disc will play will appear in this menu only...
User manual
Page 69
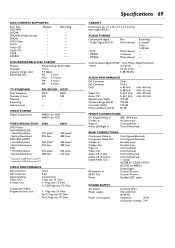
...-120V AC 50/60 Hz Operation 29 W Low-power standby 3 W Uncompressed digital (SPDIF - Sony Philips Digital Interface) • PCM 2-channel - 16, 20, 24 bit fs 48, 96 kHz AUDIO... PB: 0.7 Vpp into 75 Ohm PR: 0.7 Vpp into 75 Ohm Specifications 69 CABINET Dimensions (w x h x d): 17 x 3 x 13 inches Net weight: 8.8 lbs. DISC FORMATS SUPPORTED Disc type DVD+RW DVD+R DVD-RW (Video ... hour M2x 2.5 hours M4 4 hours M6 6 hours TV STANDARD Scan Frequency Number of lines Playback Recording Internal tuner PAL/SECAM 50Hz 625 • • - AUDIO FORMAT Compressed digital • Dolby ...
...-120V AC 50/60 Hz Operation 29 W Low-power standby 3 W Uncompressed digital (SPDIF - Sony Philips Digital Interface) • PCM 2-channel - 16, 20, 24 bit fs 48, 96 kHz AUDIO... PB: 0.7 Vpp into 75 Ohm PR: 0.7 Vpp into 75 Ohm Specifications 69 CABINET Dimensions (w x h x d): 17 x 3 x 13 inches Net weight: 8.8 lbs. DISC FORMATS SUPPORTED Disc type DVD+RW DVD+R DVD-RW (Video ... hour M2x 2.5 hours M4 4 hours M6 6 hours TV STANDARD Scan Frequency Number of lines Playback Recording Internal tuner PAL/SECAM 50Hz 625 • • - AUDIO FORMAT Compressed digital • Dolby ...
User manual
Page 71
...shape 19, 60 tv volume +/- buttons 22 user preference settings . . . . .30 vcr connections/recording . . .17 VCR Plus+channels 27 VCR Plus+ timer recording . .43 video cd 7 video (cvbs) jacks . .14, 17, 24-25 video in ext 1/2 jacks 25 index picture screen 32 information boxes 33 initial setup 18-... 24, 59 divide title 51 dolby surround 37, 62 dts 16 dv (digital video 17, 24 dvd/tv button/switch 23 dvd recorder features menu . .59 editing 50-51 erase disc 50 erase this title 47 erasing timer recordings . . . . .44 error messages 45 fast motion 30 favorite scene selection . ....
...shape 19, 60 tv volume +/- buttons 22 user preference settings . . . . .30 vcr connections/recording . . .17 VCR Plus+channels 27 VCR Plus+ timer recording . .43 video cd 7 video (cvbs) jacks . .14, 17, 24-25 video in ext 1/2 jacks 25 index picture screen 32 information boxes 33 initial setup 18-... 24, 59 divide title 51 dolby surround 37, 62 dts 16 dv (digital video 17, 24 dvd/tv button/switch 23 dvd recorder features menu . .59 editing 50-51 erase disc 50 erase this title 47 erasing timer recordings . . . . .44 error messages 45 fast motion 30 favorite scene selection . ....

