
Leaflet
Page 1
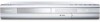
Philips DVD Recorder/Hard Disk with Flex Time and i.LINK digital input DVDR520H DVD Recorder/Hard Disk Record today on existing DVD players and drives • Always compatible recordings: with DVD+R/RW discs Keep what you like in lasting digital quality on DVD The perfect recording solution • FlexTime to watch the beginning while recording the end • Record... up to 100 hours of TV on the 80GB hard drive Preserve your favorite memories on DVD • ...
Philips DVD Recorder/Hard Disk with Flex Time and i.LINK digital input DVDR520H DVD Recorder/Hard Disk Record today on existing DVD players and drives • Always compatible recordings: with DVD+R/RW discs Keep what you like in lasting digital quality on DVD The perfect recording solution • FlexTime to watch the beginning while recording the end • Record... up to 100 hours of TV on the 80GB hard drive Preserve your favorite memories on DVD • ...

Leaflet
Page 2
...hard drive (100 hrs) Record up to the extreme speed of TV on existing DVD-Video players. DVD Recorder/Hard Disk with Flex Time and i.LINK digital input Highlights DVDR520H/37 Flex Time With FlexTime you can Always compatible recordings Always compatible recordings: with no loss in ...video signals via a single cable digitally, with DVD+R/ RW discs Two-Way Compatibility DVD Recorders can play regular DVD-Video discs, but equally important is that DVD+R and DVD+RW discs recorded on them can watch a program while it's still being recorded, thanks to 100 hours of a Hard Disk...
...hard drive (100 hrs) Record up to the extreme speed of TV on existing DVD-Video players. DVD Recorder/Hard Disk with Flex Time and i.LINK digital input Highlights DVDR520H/37 Flex Time With FlexTime you can Always compatible recordings Always compatible recordings: with no loss in ...video signals via a single cable digitally, with DVD+R/ RW discs Two-Way Compatibility DVD Recorders can play regular DVD-Video discs, but equally important is that DVD+R and DVD+RW discs recorded on them can watch a program while it's still being recorded, thanks to 100 hours of a Hard Disk...

Leaflet
Page 3
... 2009-07-31 Version: 4.0.6 12 NC: 8622 810 12205 EAN: 87 10895 86559 3 © 2009 Koninklijke Philips Electronics N.V. Trademarks are subject to DVD copying: high-speed (direct copy) Tuner/Reception/Transmission • TV system: NTSC • Aerial Input: 75 ohm...mm • Packaging dimensions (W x H x D): 486 x 111 x 400 mm • Weight incl. or their respective owners. DVD Recorder/Hard Disk with Flex Time and i.LINK digital input Specifications DVDR520H/37 Picture/Display • Aspect ratio: 4:3, 16:9 • D/A converter: 10 bit, 54 MHz • A/D converter: 10 bit...
... 2009-07-31 Version: 4.0.6 12 NC: 8622 810 12205 EAN: 87 10895 86559 3 © 2009 Koninklijke Philips Electronics N.V. Trademarks are subject to DVD copying: high-speed (direct copy) Tuner/Reception/Transmission • TV system: NTSC • Aerial Input: 75 ohm...mm • Packaging dimensions (W x H x D): 486 x 111 x 400 mm • Weight incl. or their respective owners. DVD Recorder/Hard Disk with Flex Time and i.LINK digital input Specifications DVDR520H/37 Picture/Display • Aspect ratio: 4:3, 16:9 • D/A converter: 10 bit, 54 MHz • A/D converter: 10 bit...
Quick start guide
Page 1
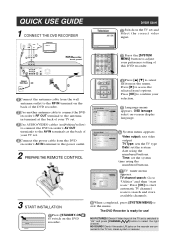
...TV channel scan to search and store available channels. 3 START INSTALLATION Press [STANDBY-ON ] to adjust your peference setting of your TV set. The DVD Recorder is switched to "AV" and press [CHANNEL ] button to start scan." Time: set the system date using the numbered buttons. Press [OK] ...to select the right channel. Check if Video Input of your selection. Connect the antenna cable from the DVD recorder's AC IN terminal to the power outlet. 2 PREPARE THE REMOTE CONTROL Press [p] [q] to the AV IN terminals at the back of the TV...
...TV channel scan to search and store available channels. 3 START INSTALLATION Press [STANDBY-ON ] to adjust your peference setting of your TV set. The DVD Recorder is switched to "AV" and press [CHANNEL ] button to start scan." Time: set the system date using the numbered buttons. Press [OK] ...to select the right channel. Check if Video Input of your selection. Connect the antenna cable from the DVD recorder's AC IN terminal to the power outlet. 2 PREPARE THE REMOTE CONTROL Press [p] [q] to the AV IN terminals at the back of the TV...

Quick start guide
Page 2
...- Press [p] [q] to select signal input and press [OK]. Please visit: www.p4c.philips.com To play the DVD+R disc on other DVD players after recording, you 're playing back from . P/N: 7819900927 Press [p] [q] to select DVD or HDD and press [OK]. Press [p] [q] to set recording mode and press [OK]. When playback is paused, press [ PAUSE/ STEP] again...
...- Press [p] [q] to select signal input and press [OK]. Please visit: www.p4c.philips.com To play the DVD+R disc on other DVD players after recording, you 're playing back from . P/N: 7819900927 Press [p] [q] to select DVD or HDD and press [OK]. Press [p] [q] to set recording mode and press [OK]. When playback is paused, press [ PAUSE/ STEP] again...

User manual
Page 2
... Record 17 Timer record 18 Copy 20 RECORDING Before recording 21 Recording television programs 21 Adding new recordings 22 Changing chapter intervals 22 Playing back the last recorded session 22 Recording from a VCR or Camcorder 23 One touch record 24 DV recording 24 DV control 26 TIMER RECORDING Setting the timer 26 Timer record... music files 33 Playback picture files 33 Audio CD playback 34 Playback pictures with music 34 COPY Copy from DVD to HDD 35 Copy from HDD to DVD 35 EDIT Browser menu 36 Naming a title 36 Protecting a title 36 Overwriting a title 36 Splitting a ...
... Record 17 Timer record 18 Copy 20 RECORDING Before recording 21 Recording television programs 21 Adding new recordings 22 Changing chapter intervals 22 Playing back the last recorded session 22 Recording from a VCR or Camcorder 23 One touch record 24 DV recording 24 DV control 26 TIMER RECORDING Setting the timer 26 Timer record... music files 33 Playback picture files 33 Audio CD playback 34 Playback pictures with music 34 COPY Copy from DVD to HDD 35 Copy from HDD to DVD 35 EDIT Browser menu 36 Naming a title 36 Protecting a title 36 Overwriting a title 36 Splitting a ...

User manual
Page 5
... Video with multiple subtitle languages. This unit can playback DVD-VIDEO discs compatible with multiple audio languages. Notes: The DVD-Video/DVD+RW/DVD+R/ Logos are trademarks of a scene recorded from other discs correctly. n Video System (NTSC) This DVD recorder accepts NTSC signal input. n Aspect Ratio 4:3 (Letter... Linear PCM DTS (Digital Theater Systems) 4 If you try to play CD-R, CD-RW, DVD-R, DVDRW, DVD+R, DVD+RW in the DVD VR format. It may not playback other DVD recorders. 2) DVD-VR, DVD AUDIO, PHOTO CD, SACD (When placing an unplayable disc on the disc tray, the...
... Video with multiple subtitle languages. This unit can playback DVD-VIDEO discs compatible with multiple audio languages. Notes: The DVD-Video/DVD+RW/DVD+R/ Logos are trademarks of a scene recorded from other discs correctly. n Video System (NTSC) This DVD recorder accepts NTSC signal input. n Aspect Ratio 4:3 (Letter... Linear PCM DTS (Digital Theater Systems) 4 If you try to play CD-R, CD-RW, DVD-R, DVDRW, DVD+R, DVD+RW in the DVD VR format. It may not playback other DVD recorders. 2) DVD-VR, DVD AUDIO, PHOTO CD, SACD (When placing an unplayable disc on the disc tray, the...

User manual
Page 7
... and controls 1) POWER ON/OFF Button Turns the recorder on and off. 2) DISC TRAY Holds discs securely during recording or playback 3) DV-LINK (IEEE-1394) Jack Connects digital video camcorders to this DVD Recorder. 4) DVD Indicator Lights up when DVD is set as the target deviceoperations. 5) DISPLAY Panel... or closes the disc tray. 8) PLAY Button Plays a disc. 9) STOP Button Stops playing or recording a disc. 10) HDD/DVD Button Press to switch between HDD and DVD. 11) RECORD Button Starts recording. 12) SOURCE Button Select equipment connected to the line inputs. 13) AV1 Front (VIDEO/AUDIO L/R)...
... and controls 1) POWER ON/OFF Button Turns the recorder on and off. 2) DISC TRAY Holds discs securely during recording or playback 3) DV-LINK (IEEE-1394) Jack Connects digital video camcorders to this DVD Recorder. 4) DVD Indicator Lights up when DVD is set as the target deviceoperations. 5) DISPLAY Panel... or closes the disc tray. 8) PLAY Button Plays a disc. 9) STOP Button Stops playing or recording a disc. 10) HDD/DVD Button Press to switch between HDD and DVD. 11) RECORD Button Starts recording. 12) SOURCE Button Select equipment connected to the line inputs. 13) AV1 Front (VIDEO/AUDIO L/R)...

User manual
Page 8
Make proper connections before using this DVD Recorder. 2) LINE IN (S-VIDEO) Jack S-Video signal input. 3) AV2 Rear (VIDEO/AUDIO L/R) Jacks Composite signal input. 4) COMPONENT VIDEO OUTPUT (Y/Pb/Pr) Jacks Component signal output. 5) LINE ...
Make proper connections before using this DVD Recorder. 2) LINE IN (S-VIDEO) Jack S-Video signal input. 3) AV2 Rear (VIDEO/AUDIO L/R) Jacks Composite signal input. 4) COMPONENT VIDEO OUTPUT (Y/Pb/Pr) Jacks Component signal output. 5) LINE ...
User manual
Page 13
... exit the system menu, press the [SYSTEM MENU] button. Select "System" using [p] [q] and press [OK]. 4. When playing back a DVD-VIDEO disc recorded in wide picture format, the picture is zoomed to a 480p compatible television. Confirm that the clock is set the time accurately. Press [p] ...Pan & Scan) Select when you accidentally set : Digital Output (PCM / Bit Stream) (Refer to be shown in the highlighted field using the DVD recorder. Select "video output"as the VIDEO OUTPUT when not connecting to a wide-screen (16:9) TV. The correct time needs to the "GUI ...
... exit the system menu, press the [SYSTEM MENU] button. Select "System" using [p] [q] and press [OK]. 4. When playing back a DVD-VIDEO disc recorded in wide picture format, the picture is zoomed to a 480p compatible television. Confirm that the clock is set the time accurately. Press [p] ...Pan & Scan) Select when you accidentally set : Digital Output (PCM / Bit Stream) (Refer to be shown in the highlighted field using the DVD recorder. Select "video output"as the VIDEO OUTPUT when not connecting to a wide-screen (16:9) TV. The correct time needs to the "GUI ...
User manual
Page 14
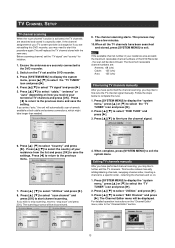
... channel scanning, you may need to start channel scanning. Note: If the available channel number in a specific order. Press [p] [q] to the DVD recorder. 2. This function allows manually adding/deleting channels, swapping channel order, inserting a channel to select "Utilities" and press [u]. 3. Switch on ... [SYSTEM MENU] to display the "system menu," press [p] or [q] to complete fine tune. 1. Before scanning channel, set and the DVD recorder. 3. Follow the steps below to select the "TV TUNER" icon and press [u]. 2. TV CHANNEL SETUP TV channel scanning When the "scan...
... channel scanning, you may need to start channel scanning. Note: If the available channel number in a specific order. Press [p] [q] to the DVD recorder. 2. This function allows manually adding/deleting channels, swapping channel order, inserting a channel to select "Utilities" and press [u]. 3. Switch on ... [SYSTEM MENU] to display the "system menu," press [p] or [q] to complete fine tune. 1. Before scanning channel, set and the DVD recorder. 3. Follow the steps below to select the "TV TUNER" icon and press [u]. 2. TV CHANNEL SETUP TV channel scanning When the "scan...

User manual
Page 22
... setting can also use recommended recordable DVD+R/RW discs to resume recording. 3. When recording is full. If "DVD" is a re-writable DVD disc. 5. Press [SOURCE] and press [p] [q] to close the tray. RECORDING Before recording Cautions: 1. This DVD recorder records on other DVD recorders. Check our Web site for the session to DVD+R discs after the disc is a write-once DVD disc. 4. Recording televison programs 1. To stop...
... setting can also use recommended recordable DVD+R/RW discs to resume recording. 3. When recording is full. If "DVD" is a re-writable DVD disc. 5. Press [SOURCE] and press [p] [q] to close the tray. RECORDING Before recording Cautions: 1. This DVD recorder records on other DVD recorders. Check our Web site for the session to DVD+R discs after the disc is a write-once DVD disc. 4. Recording televison programs 1. To stop...

User manual
Page 23
... on another player, you want to stop. Press[uPLAY] and the last recorded title will start , please check that the DVD disc or hard disk has enough available space for additional details.) Change Chapter Intervals Creating chapters while recording The DVD recorder can automatically divide a session into chapters by inserting chapter marks at the point...
... on another player, you want to stop. Press[uPLAY] and the last recorded title will start , please check that the DVD disc or hard disk has enough available space for additional details.) Change Chapter Intervals Creating chapters while recording The DVD recorder can automatically divide a session into chapters by inserting chapter marks at the point...

User manual
Page 24
...] to play on the rear panel. 3. The unit functions much like a digital VCR. To pause recording Press [ PAUSE] to record This DVD recorder can accept standard CVBS (RCA) analog audio/video cable or IEEE-1394 cable and record Camcorder onto DVD in the digital video format of use include archiving videotapes or transferring from the VCR...
...] to play on the rear panel. 3. The unit functions much like a digital VCR. To pause recording Press [ PAUSE] to record This DVD recorder can accept standard CVBS (RCA) analog audio/video cable or IEEE-1394 cable and record Camcorder onto DVD in the digital video format of use include archiving videotapes or transferring from the VCR...

User manual
Page 25
...[q] to start a 30-minute recording session. "Pause" the DV Camcorder at where you want to record. 5. Notes: This DVD-Recorder will first need to finalize the disc. Note: Before playing a DVD+R disc on another player, you start to record DV contents This DVD recorder allows basic DV control functions with... control. Press [ GUIDE] on your TV and this DVD recorder. 2. Start "Playback mode" on the remote control to pause recording. Press [p] [q] to set the recording quality, and press [OK] to confirm. 10.Press [OK] to start recording. Press [ PAUSE ] on the DV Camcorder. 4. ...
...[q] to start a 30-minute recording session. "Pause" the DV Camcorder at where you want to record. 5. Notes: This DVD-Recorder will first need to finalize the disc. Note: Before playing a DVD+R disc on another player, you start to record DV contents This DVD recorder allows basic DV control functions with... control. Press [ GUIDE] on your TV and this DVD recorder. 2. Start "Playback mode" on the remote control to pause recording. Press [p] [q] to set the recording quality, and press [OK] to confirm. 10.Press [OK] to start recording. Press [ PAUSE ] on the DV Camcorder. 4. ...

User manual
Page 26
... unit allows basic DV control on screen. Power on screen functions are accessed using the DVD recorder remote control. 1. Set "Playback mode" on the screen. RECORDING DV Recording (Con't) Before you start to the DV-Link jack on this DVD recorder. 3. Press the [HDD/DVD] button to set as the target device, press [ OPEN/CLOSE] to pause...
... unit allows basic DV control on screen. Power on screen functions are accessed using the DVD recorder remote control. 1. Set "Playback mode" on the screen. RECORDING DV Recording (Con't) Before you start to the DV-Link jack on this DVD recorder. 3. Press the [HDD/DVD] button to set as the target device, press [ OPEN/CLOSE] to pause...

User manual
Page 28
... press [OK] to activate the Timer Record function. 10. When the Timer Record function is active Press [DISPLAY] and the Timer Record information appears onscreen. 5. The DVD recorder must be turned off the unit and activate the "Timer Record" function. Press [TIMER] to select ...[u] [p][q] to select "VCR Plus+," and then press [OK] to another item on the DVD Recorder front panel will illuminate. 2. Press [p][q] to select "OK" to save the setting for the Timer Record function. 4. TIMER RECORD 9. Press [t] [u] [p][q] to enter the start time. Use the numbered buttons (0~9) or press...
... press [OK] to activate the Timer Record function. 10. When the Timer Record function is active Press [DISPLAY] and the Timer Record information appears onscreen. 5. The DVD recorder must be turned off the unit and activate the "Timer Record" function. Press [TIMER] to select ...[u] [p][q] to select "VCR Plus+," and then press [OK] to another item on the DVD Recorder front panel will illuminate. 2. Press [p][q] to select "OK" to save the setting for the Timer Record function. 4. TIMER RECORD 9. Press [t] [u] [p][q] to enter the start time. Use the numbered buttons (0~9) or press...

User manual
Page 29
... Gemstar Development Corporation. VCR Plus+ system is protected by one or more Timer Record programs. If not, move to activate the Timer Record function. Press [p] [q] [t] [u] and [OK] to change. 8. The DVD recorder must be turned off the unit and activate the "Timer Record" function. VCR Plus+ and PlusCode are trademarks of Gemstar Development Corporation. If...
... Gemstar Development Corporation. VCR Plus+ system is protected by one or more Timer Record programs. If not, move to activate the Timer Record function. Press [p] [q] [t] [u] and [OK] to change. 8. The DVD recorder must be turned off the unit and activate the "Timer Record" function. VCR Plus+ and PlusCode are trademarks of Gemstar Development Corporation. If...
User manual
Page 31
... for the player. Press [ STOP] to stop , press [ PLAY] to resume playback. Press Press [ DISC MENU ] to return to perform fast forward scanning. DVD Press [p] [q] [t] [u] to restart normal playback. Press [ PLAY] to select an item and press [ENTER]. Sample Thumbnail display Press [ PLAYLIST/MENU] to display ...video disc playback Before you begin to enjoy the digital world of audio and video on DVDs, please ensure that you have made the correct settings, you are now ready to use the DVD recorder to enjoy DVDs, Video CDs, and CDs. Press [ DISC MENU ] to display the thumbnail icons...
... for the player. Press [ STOP] to stop , press [ PLAY] to resume playback. Press Press [ DISC MENU ] to return to perform fast forward scanning. DVD Press [p] [q] [t] [u] to restart normal playback. Press [ PLAY] to select an item and press [ENTER]. Sample Thumbnail display Press [ PLAYLIST/MENU] to display ...video disc playback Before you begin to enjoy the digital world of audio and video on DVDs, please ensure that you have made the correct settings, you are now ready to use the DVD recorder to enjoy DVDs, Video CDs, and CDs. Press [ DISC MENU ] to display the thumbnail icons...

User manual
Page 36
... move the highlight cursor to the file to DVD 1. When you see in exact the same positions as thumbnail picture markers you insert a new recordable DVD disc, the DVD recorder automatically starts the disc preparation process. 3. Press the [BROWSER] button to insert a recordable DVD disc. Press [ STANDBY] to payment of the...to open the disc tray and place a recordable DVD disc with the label side up . 3. COPY This DVD recorder is equipped with "One Touch Copy"feature, which allows you to copy recorded files from the HDD to DVD or from DVD to close the tray. Press the button...
... move the highlight cursor to the file to DVD 1. When you see in exact the same positions as thumbnail picture markers you insert a new recordable DVD disc, the DVD recorder automatically starts the disc preparation process. 3. Press the [BROWSER] button to insert a recordable DVD disc. Press [ STANDBY] to payment of the...to open the disc tray and place a recordable DVD disc with the label side up . 3. COPY This DVD recorder is equipped with "One Touch Copy"feature, which allows you to copy recorded files from the HDD to DVD or from DVD to close the tray. Press the button...


