
Leaflet
Page 3
DVD Recorder/Hard Disk with Flex Time and i.LINK digital input Specifications DVDR520H/37 Picture/Display • Aspect ratio: 4:3, 16:9 • D/A converter: 10 bit, 54 MHz • A/D converter: 10 bit, 54 MHz •... antenna cable, Quick start guide, User Manual, Remote Control, Audio/Video cable, Batteries for remote control Dimensions • Set weight: 4.3 kg • Set dimensions (W x H x D): 430 x 66 x 285 mm • Packaging dimensions (W x H x D): 486 x 111 x 400 mm • Weight incl. or their respective owners. www.philips.com All Rights reserved. Packaging: 4.5 kg ...
DVD Recorder/Hard Disk with Flex Time and i.LINK digital input Specifications DVDR520H/37 Picture/Display • Aspect ratio: 4:3, 16:9 • D/A converter: 10 bit, 54 MHz • A/D converter: 10 bit, 54 MHz •... antenna cable, Quick start guide, User Manual, Remote Control, Audio/Video cable, Batteries for remote control Dimensions • Set weight: 4.3 kg • Set dimensions (W x H x D): 430 x 66 x 285 mm • Packaging dimensions (W x H x D): 486 x 111 x 400 mm • Weight incl. or their respective owners. www.philips.com All Rights reserved. Packaging: 4.5 kg ...
Quick start guide
Page 1
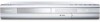
Connect the antenna cable from the DVD recorder's AC IN terminal to the power outlet. 2 PREPARE THE REMOTE CONTROL Press [p] [q] to "Utilities" and then "start automatic TV channel scan to search and store available channels. 3 START INSTALLATION Press [STANDBY-ON ] to the RF IN ...
Connect the antenna cable from the DVD recorder's AC IN terminal to the power outlet. 2 PREPARE THE REMOTE CONTROL Press [p] [q] to "Utilities" and then "start automatic TV channel scan to search and store available channels. 3 START INSTALLATION Press [STANDBY-ON ] to the RF IN ...

User manual
Page 2
TABLE OF CONTENTS GETTING STARTED Accessories 1 Important safety instructions 2 Warnings, cautions and others 3 Disc information 4 CONTROLS AND DISPLAYS Remote control 5 Front panel connections 6 Display window 6 Rear panel connections 7 CONNECTIONS Connecting the antenna cable and television 8 For better video quality 9 S-Video out...22 Playing back the last recorded session 22 Recording from a VCR or Camcorder 23 One touch record 24 DV recording 24 DV control 26 TIMER RECORDING Setting the timer 26 Timer record using the VCR Plus+® system 27 FLEX TIME Pausing Live TV 29...
TABLE OF CONTENTS GETTING STARTED Accessories 1 Important safety instructions 2 Warnings, cautions and others 3 Disc information 4 CONTROLS AND DISPLAYS Remote control 5 Front panel connections 6 Display window 6 Rear panel connections 7 CONNECTIONS Connecting the antenna cable and television 8 For better video quality 9 S-Video out...22 Playing back the last recorded session 22 Recording from a VCR or Camcorder 23 One touch record 24 DV recording 24 DV control 26 TIMER RECORDING Setting the timer 26 Timer record using the VCR Plus+® system 27 FLEX TIME Pausing Live TV 29...

User manual
Page 4
... a personal computer or a CD Recorder may be determined by turning the equipment off completely. " Manufactured under license from the remote. The lighting flash with arrowhead symbol, within the product's enclosure that to which can be of sufficient magnitude to constitute a risk...or an experienced radio/TV technician for home and other intellectual property rights. REFER SERVICING TO QUALIFIED SERVICE PERSONNEL. USE OF CONTROLS OR ADJUSTMENTS OR PERFORMANCE OF PROCEDURES OTHER THAN THOSE SPECIFIED HEREIN MAY RESULT IN HAZARDOUS RADIATION EXPOSURE. REFER SERVICING TO QUALIFIED ...
... a personal computer or a CD Recorder may be determined by turning the equipment off completely. " Manufactured under license from the remote. The lighting flash with arrowhead symbol, within the product's enclosure that to which can be of sufficient magnitude to constitute a risk...or an experienced radio/TV technician for home and other intellectual property rights. REFER SERVICING TO QUALIFIED SERVICE PERSONNEL. USE OF CONTROLS OR ADJUSTMENTS OR PERFORMANCE OF PROCEDURES OTHER THAN THOSE SPECIFIED HEREIN MAY RESULT IN HAZARDOUS RADIATION EXPOSURE. REFER SERVICING TO QUALIFIED ...
User manual
Page 6
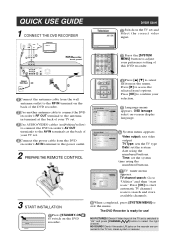
... 3m and works best when pointed directly at the unit horizontally at angles up to 30° from the front of batteries in combination - The Remote Control 1) Open/Close button ( OPEN/CLOSE) 2) Numeric buttons (0, 1~9) 3) Skip buttons ( PREVIOUS/ NEXT ) 4) Play button ( PLAY) 5) Stop button ( STOP)... unit. Batteries contain chemical substances, so they are exhausted or if the Remote Control will not be disposed properly. Open the battery compartment and insert the batteries. CONTROLS AND DISPLAYS Remote Control To install batteries - Remove batteries of they should be used for a ...
... 3m and works best when pointed directly at the unit horizontally at angles up to 30° from the front of batteries in combination - The Remote Control 1) Open/Close button ( OPEN/CLOSE) 2) Numeric buttons (0, 1~9) 3) Skip buttons ( PREVIOUS/ NEXT ) 4) Play button ( PLAY) 5) Stop button ( STOP)... unit. Batteries contain chemical substances, so they are exhausted or if the Remote Control will not be disposed properly. Open the battery compartment and insert the batteries. CONTROLS AND DISPLAYS Remote Control To install batteries - Remove batteries of they should be used for a ...
User manual
Page 13
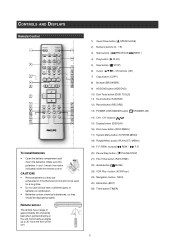
...connect the component output on your television. When all settings are correct, press [t] to return to the main level. 6. SYSTEM MENU Remote Control & System menu Follow the steps below to reset personal preferences for detailed menu) 5. Press [p] [q] to select "System," "Language,"... "Playback," "Record," "Audio," "TV Tuner" or "EXIT" and press [t] [u] to return to suit your remote control. 5. When playing back a DVD-VIDEO disc recorded in PLAYBACK category) Select "4:3"(regular) or "16:9"(widescreen) to the previous menu. 4. To ...
...connect the component output on your television. When all settings are correct, press [t] to return to the main level. 6. SYSTEM MENU Remote Control & System menu Follow the steps below to reset personal preferences for detailed menu) 5. Press [p] [q] to select "System," "Language,"... "Playback," "Record," "Audio," "TV Tuner" or "EXIT" and press [t] [u] to return to suit your remote control. 5. When playing back a DVD-VIDEO disc recorded in PLAYBACK category) Select "4:3"(regular) or "16:9"(widescreen) to the previous menu. 4. To ...

User manual
Page 24
.... 2. If "DVD" is set the target device for the recording. Start to open the disc tray and insert a recordable DVD disc with the DVD Recorder's remote control when connected via the DV Link. To start recording 1. RECORDING Recording from a VCR or Camcorder Before starting to record This DVD recorder can accept standard...
.... 2. If "DVD" is set the target device for the recording. Start to open the disc tray and insert a recordable DVD disc with the DVD Recorder's remote control when connected via the DV Link. To start recording 1. RECORDING Recording from a VCR or Camcorder Before starting to record This DVD recorder can accept standard...

User manual
Page 25
...the "Disc Tools" section for additional information. 24 Reference the "finalize" function in HDD, the length of time available on the remote control to stop recording. RECORDING One-touch recording Use "One-touch recording" to finalize the disc. Pressing [RECORD] when the timed ... recording"off. DV recording Before you want to start recording. 3. Press [ GUIDE] on the DV Camcorder. 4. Start "Playback mode" on the remote control. "Pause" the DV Camcorder at where you start recording immediately in 30minute blocks. Press [ PAUSE ] on the disc. Press [ ] to pause...
...the "Disc Tools" section for additional information. 24 Reference the "finalize" function in HDD, the length of time available on the remote control to stop recording. RECORDING One-touch recording Use "One-touch recording" to finalize the disc. Pressing [RECORD] when the timed ... recording"off. DV recording Before you want to start recording. 3. Press [ GUIDE] on the DV Camcorder. 4. Start "Playback mode" on the remote control. "Pause" the DV Camcorder at where you start recording immediately in 30minute blocks. Press [ PAUSE ] on the disc. Press [ ] to pause...

User manual
Page 26
... DV Camcorder. ) to both the DV Camcorder and this DVD recorder. 3. Only DV signals can be input to pause recording. Press [ PAUSE ] on the remote control to the DV-Link jack on this DVD recorder. 4. Press [ ] to change the "Signal-Input source" and select "DV." 7. Press [SOURCE] to stop... DVD disc with DV compatible camcorders only. 2. The DV-Link input jack on screen functions are accessed using the DVD recorder remote control. 1. If "DVD" is stopped, a DV control bar will appear on the DV Camcorder. 5. Resume DV Camcorder playback and press [RECORD] on screen. DV...
... DV Camcorder. ) to both the DV Camcorder and this DVD recorder. 3. Only DV signals can be input to pause recording. Press [ PAUSE ] on the remote control to the DV-Link jack on this DVD recorder. 4. Press [ ] to change the "Signal-Input source" and select "DV." 7. Press [SOURCE] to stop... DVD disc with DV compatible camcorders only. 2. The DV-Link input jack on screen functions are accessed using the DVD recorder remote control. 1. If "DVD" is stopped, a DV control bar will appear on the DV Camcorder. 5. Resume DV Camcorder playback and press [RECORD] on screen. DV...

User manual
Page 30
... playback of interruption, at your TV and must stop recording, press [ STOP] for a second time. Playback will be made with the recorder's remote control. Press [ STOP] to viewing live TV broadcast. Press [FLEX TIME] to turn the audio volume up and down, use the TV...choose to end. 1. Note: "Pause Live TV" is the last picture shown when you to resume viewing. Press [ CH+] [CH-] buttons on the recorder's remote control to pause viewing. forward or fast rewind scanning. Press [ PAUSE ] to select the desired channel. Press [ PAUSE ] again if you want to stop watching,...
... playback of interruption, at your TV and must stop recording, press [ STOP] for a second time. Playback will be made with the recorder's remote control. Press [ STOP] to viewing live TV broadcast. Press [FLEX TIME] to turn the audio volume up and down, use the TV...choose to end. 1. Note: "Pause Live TV" is the last picture shown when you to resume viewing. Press [ CH+] [CH-] buttons on the recorder's remote control to pause viewing. forward or fast rewind scanning. Press [ PAUSE ] to select the desired channel. Press [ PAUSE ] again if you want to stop watching,...
User manual
Page 37
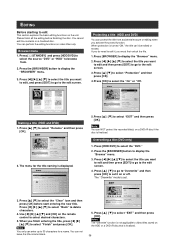
... menu 1. Protecting a title (HDD and DVD) You can enter up to select "Finish" and press [OK]. If you do need to edit it on the remote control to display the "Browse" menu. 3. Naming a title (HDD and DVD) 1. Press the [BROWSER] button to select desired characters. 5. Press [p] [q] to go to set . 3. Press [t] [u] [p] [q] to...
... menu 1. Protecting a title (HDD and DVD) You can enter up to select "Finish" and press [OK]. If you do need to edit it on the remote control to display the "Browse" menu. 3. Naming a title (HDD and DVD) 1. Press the [BROWSER] button to select desired characters. 5. Press [p] [q] to go to set . 3. Press [t] [u] [p] [q] to...


