
Leaflet
Page 2
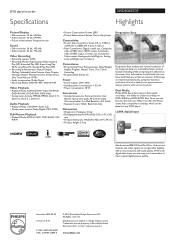
... Philips Electronics N.V. DVD player/recorder Specifications DVDR3475/37 Highlights Picture/Display • D/A converter: 10 bit, 54 MHz • A/D converter: 10 bit, 54 MHz • Picture enhancement: Progressive scan Sound • D/A converter: 24 bit, 192 kHz • A/D converter: 24 bit, 192 kHz Video Recording • Recording system: NTSC • Recording Modes: High Quality (HQ), Standard Play (SP), Extended Play (EP), Super Long Play (SLP), Long Play (LP), Standard Play Plus (SPP) • Recording enhancements: Manual Chapter Marking, Selectable Index Pictures, Auto...
... Philips Electronics N.V. DVD player/recorder Specifications DVDR3475/37 Highlights Picture/Display • D/A converter: 10 bit, 54 MHz • A/D converter: 10 bit, 54 MHz • Picture enhancement: Progressive scan Sound • D/A converter: 24 bit, 192 kHz • A/D converter: 24 bit, 192 kHz Video Recording • Recording system: NTSC • Recording Modes: High Quality (HQ), Standard Play (SP), Extended Play (EP), Super Long Play (SLP), Long Play (LP), Standard Play Plus (SPP) • Recording enhancements: Manual Chapter Marking, Selectable Index Pictures, Auto...
User manual
Page 3
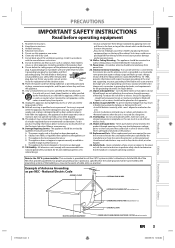
... - Never spill liquid of the polarized or grounding type plug. National Electric Code GROUND CLAMP ANTENNA LEAD IN WIRE Recording Playback Editing Function Setup E7E4AUD.indd 3 ELECTRIC SERVICE EQUIPMENT ANTENNA DISCHARGE UNIT (NEC SECTION 810-20) GROUNDING CONDUCTORS (NEC SECTION 810-21) GROUND CLAMPS POWER SERVICE GROUNDING ELECTRODE SYSTEM (NEC ART 250, PART H) EN 3 2007/05/16 14:56:04 Others...
... - Never spill liquid of the polarized or grounding type plug. National Electric Code GROUND CLAMP ANTENNA LEAD IN WIRE Recording Playback Editing Function Setup E7E4AUD.indd 3 ELECTRIC SERVICE EQUIPMENT ANTENNA DISCHARGE UNIT (NEC SECTION 810-20) GROUNDING CONDUCTORS (NEC SECTION 810-21) GROUND CLAMPS POWER SERVICE GROUNDING ELECTRODE SYSTEM (NEC ART 250, PART H) EN 3 2007/05/16 14:56:04 Others...
User manual
Page 5
...-in camera of the laser optical pickup unit. Introduction Connections Basic Setup Recording Playback PRECAUTIONS Supplied Accessories remote control with batteries (AAAx2) user manual RCA audio/video cables quick start guide Installation Location For safety and optimum performance of the unit. Do not wipe in a circular motion. • Do not use this unit: • Install the unit in its inside the unit when it with stereo sound on recordable DVD discs. Press a button on remote control. HDMI, the HDMI logo and HighDefinition Multimedia...
...-in camera of the laser optical pickup unit. Introduction Connections Basic Setup Recording Playback PRECAUTIONS Supplied Accessories remote control with batteries (AAAx2) user manual RCA audio/video cables quick start guide Installation Location For safety and optimum performance of the unit. Do not wipe in a circular motion. • Do not use this unit: • Install the unit in its inside the unit when it with stereo sound on recordable DVD discs. Press a button on remote control. HDMI, the HDMI logo and HighDefinition Multimedia...
User manual
Page 6
... Panel 9 Remote Control 10 Front Panel Display 12 Connections CONNECTION TO AN EXTERNAL TUNER 13 SETTINGS FOR THE VIDEO INPUT 14 CONNECTION TO A TV 15 CONNECTION TO A TV WITH AN HDMI COMPATIBLE PORT 16 CONNECTION TO AN AUDIO SYSTEM 18 Basic Setup GUIDE TO ON-SCREEN DISPLAYS AND MENUS . . . . 19 On-Screen Display / Menu 19 Main Menu 21 INITIAL SETTING 22 SETTING THE CLOCK 23 Clock Setting 23 Recording INFORMATION ON DVD RECORDING 24 BEFORE RECORDING 25 Make Recording Compatible 25 Setting for Auto Chapter 25 BASIC RECORDING & ONE-TOUCH TIMER RECORDING 26 TIMER RECORDING...
... Panel 9 Remote Control 10 Front Panel Display 12 Connections CONNECTION TO AN EXTERNAL TUNER 13 SETTINGS FOR THE VIDEO INPUT 14 CONNECTION TO A TV 15 CONNECTION TO A TV WITH AN HDMI COMPATIBLE PORT 16 CONNECTION TO AN AUDIO SYSTEM 18 Basic Setup GUIDE TO ON-SCREEN DISPLAYS AND MENUS . . . . 19 On-Screen Display / Menu 19 Main Menu 21 INITIAL SETTING 22 SETTING THE CLOCK 23 Clock Setting 23 Recording INFORMATION ON DVD RECORDING 24 BEFORE RECORDING 25 Make Recording Compatible 25 Setting for Auto Chapter 25 BASIC RECORDING & ONE-TOUCH TIMER RECORDING 26 TIMER RECORDING...
User manual
Page 7
... ON DISC EDITING 60 Guide to a Title List 60 Editing Discs 60 EDITING DISCS 61 Deleting Titles 61 Putting Names on Titles 62 Setting Chapter Marks 63 Clearing Chapter Marks 64 Hiding Chapters 66 Setting Pictures for Thumbnails 67 Dividing a Title 68 Putting Name on Disc 69 Setting or Releasing Disc Protect 70 Erasing Disc 71 Making Edits Compatible 72 Function Setup LIST OF SETTINGS 73 SETUPS 75 Playback 75 Display 79 Video 81 DivX 83 HDMI 84 Reset All 86 Others TROUBLESHOOTING 87 Frequently Asked Questions 91 LANGUAGE CODE...
... ON DISC EDITING 60 Guide to a Title List 60 Editing Discs 60 EDITING DISCS 61 Deleting Titles 61 Putting Names on Titles 62 Setting Chapter Marks 63 Clearing Chapter Marks 64 Hiding Chapters 66 Setting Pictures for Thumbnails 67 Dividing a Title 68 Putting Name on Disc 69 Setting or Releasing Disc Protect 70 Erasing Disc 71 Making Edits Compatible 72 Function Setup LIST OF SETTINGS 73 SETUPS 75 Playback 75 Display 79 Video 81 DivX 83 HDMI 84 Reset All 86 Others TROUBLESHOOTING 87 Frequently Asked Questions 91 LANGUAGE CODE...
User manual
Page 8
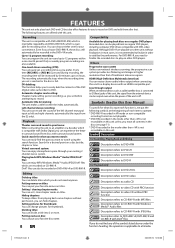
... available. Editing Deleting titles: You can enjoy MP3/Windows Media™ Audio/JPEG/DivX® files which you do not find the part you want to watch using the search function. DV dubbing: This function helps you to easily dub the contents of the DVC (digital video camcorder) to DVD. Virtual surround system: You can be output even when the power of the unit is compatible with PBC...
... available. Editing Deleting titles: You can enjoy MP3/Windows Media™ Audio/JPEG/DivX® files which you do not find the part you want to watch using the search function. DV dubbing: This function helps you to easily dub the contents of the DVC (digital video camcorder) to DVD. Virtual surround system: You can be output even when the power of the unit is compatible with PBC...
User manual
Page 15
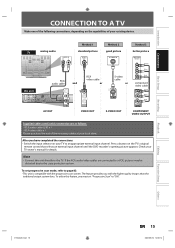
... audio cable (L/R) x 1 • RCA video cable x 1 Please purchase the rest of your local store. To set "Progressive Scan" to the copy protection system. The feature provides you must set progressive scan mode, refer to an appropriate external input channel. To utilize this feature, you with the progressive scan system. Press a button on the TV's original remote control that selects an external input channel until the DVD recorder's opening picture appears. Check your TV to page 82 • This unit...
... audio cable (L/R) x 1 • RCA video cable x 1 Please purchase the rest of your local store. To set "Progressive Scan" to the copy protection system. The feature provides you must set progressive scan mode, refer to an appropriate external input channel. To utilize this feature, you with the progressive scan system. Press a button on the TV's original remote control that selects an external input channel until the DVD recorder's opening picture appears. Check your TV to page 82 • This unit...
User manual
Page 18
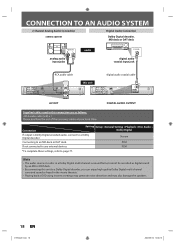
.../CR OUT S-VIDEO AV OUT COMPONENT VIDEO OUTPUT S-VIDEO HDMI OUT COAXIAL DIGITAL AUDIO OUTPUT PCM / BITSTREAM COAXIAL DIGITAL AUDIO OUTPUT PCM / BITSTREAM DIGITAL AUDIO OUTPUT Supplied cables used in this unit to a Dolby Digital decoder, you can enjoy high-quality Dolby Digital multi channel surround sound as heard in a Dolby Digital multi channel surround format cannot be recorded as digital sound by an MD or DAT deck. • By connecting this connection are as follows: • RCA audio cable (L/R) x 1 Please purchase...
.../CR OUT S-VIDEO AV OUT COMPONENT VIDEO OUTPUT S-VIDEO HDMI OUT COAXIAL DIGITAL AUDIO OUTPUT PCM / BITSTREAM COAXIAL DIGITAL AUDIO OUTPUT PCM / BITSTREAM DIGITAL AUDIO OUTPUT Supplied cables used in this unit to a Dolby Digital decoder, you can enjoy high-quality Dolby Digital multi channel surround sound as heard in a Dolby Digital multi channel surround format cannot be recorded as digital sound by an MD or DAT deck. • By connecting this connection are as follows: • RCA audio cable (L/R) x 1 Please purchase...
User manual
Page 19
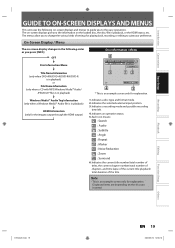
...; Audio file is an example screen only for the images output through the HDMI output) 1. Indicates a recording mode and possible recording time left. 4. Note • This is in the following on the loaded disc, the disc/file in playback) HDMI Information (only for explanation. Indicates the selected external input position. 3. On-Screen Display / Menu The on the disc you inserted. Indicates the current title number/total number of titles, the current chapter number/total number of chapters, and time lapse...
...; Audio file is an example screen only for the images output through the HDMI output) 1. Indicates a recording mode and possible recording time left. 4. Note • This is in the following on the loaded disc, the disc/file in playback) HDMI Information (only for explanation. Indicates the selected external input position. 3. On-Screen Display / Menu The on the disc you inserted. Indicates the current title number/total number of titles, the current chapter number/total number of chapters, and time lapse...
User manual
Page 21
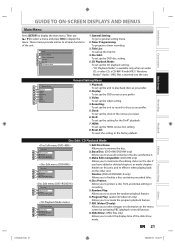
... to the factory default. Slide Show: (JPEG files only) Allows you prefer. 3. Timer Programming: To program a timer recording. 3. DivX: To set up the clock of the unit as you to finalize a disc containing recorded titles. 4. Disc Edit / CD Playback Mode Disc Edit 1 2 Edit Disc Name Erase Disc 3 Make Edits Compatible 4 Disc Protect OFF ON Disc Edit 1 2 Edit Disc Name Erase Disc 3 Finalize 4 Disc Protect OFF ON Disc Edit 1 23 Edit Disc Name Finalize 34 Disc Protect OFF ON CD Playback Mode 15 26 Random Play Program Play 37 PBC (Video CD only...
... to the factory default. Slide Show: (JPEG files only) Allows you prefer. 3. Timer Programming: To program a timer recording. 3. DivX: To set up the clock of the unit as you to finalize a disc containing recorded titles. 4. Disc Edit / CD Playback Mode Disc Edit 1 2 Edit Disc Name Erase Disc 3 Make Edits Compatible 4 Disc Protect OFF ON Disc Edit 1 2 Edit Disc Name Erase Disc 3 Finalize 4 Disc Protect OFF ON Disc Edit 1 23 Edit Disc Name Finalize 34 Disc Protect OFF ON CD Playback Mode 15 26 Random Play Program Play 37 PBC (Video CD only...
User manual
Page 30
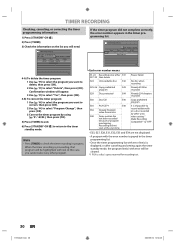
... 1/1 4-A) To delete the timer program: 1 Use [K / L] to select the program you cannot select any other E41 E37-39 than below E24 Unrecordable disc E42 E25-26 Copy prohibited E43 program E29 Disc protected E44 E30 Disc full E45 E35 PCA full *1 E46 E36 Already finalized video format disc E40 Some portion has not been recorded because of program overlapping. Power failed No disc when recording Already 49 titles recorded Already 254 chapters recorded Copy prohibited program It is...
... 1/1 4-A) To delete the timer program: 1 Use [K / L] to select the program you cannot select any other E41 E37-39 than below E24 Unrecordable disc E42 E25-26 Copy prohibited E43 program E29 Disc protected E44 E30 Disc full E45 E35 PCA full *1 E46 E36 Already finalized video format disc E40 Some portion has not been recorded because of program overlapping. Power failed No disc when recording Already 49 titles recorded Already 254 chapters recorded Copy prohibited program It is...
User manual
Page 31
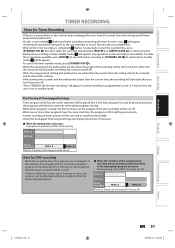
... the timer program list, and be given priority over the programs with error number E40 in the timer programming list. A PROG. In some cases, will appear momentarily around the start time of the subsequent program are the same, the length of the recording will be set previously (PROG. To play back or eject the recorded disc, press [STANDBY-ON y] first, then select the recorded title and press [PLAY B], or [OPEN/CLOSE A] to record. When the starting time...
... the timer program list, and be given priority over the programs with error number E40 in the timer programming list. A PROG. In some cases, will appear momentarily around the start time of the subsequent program are the same, the length of the recording will be set previously (PROG. To play back or eject the recorded disc, press [STANDBY-ON y] first, then select the recorded title and press [PLAY B], or [OPEN/CLOSE A] to record. When the starting time...
User manual
Page 40
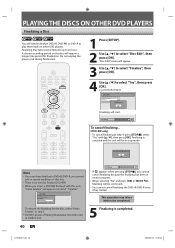
...:32 Finalizing 5% • If appears when pressing [STOP C], you cannot cancel finalizing because the finalizing has been in stop mode. Finalizing may take several minutes up to select "Yes", then press [OK]. A shorter recording period on other DVD players. PLAYING THE DISCS ON OTHER DVD PLAYERS Finalizing a Disc You will need to finalize DVD+RW. • When you insert a DVD-RW finalized with [K / L], then press [OK]. e.g.) DVD+R, DVD-R Disc Edit Edit Disc Name Finalize Disc Protect OFF ON Finalize disc? This operation may...
...:32 Finalizing 5% • If appears when pressing [STOP C], you cannot cancel finalizing because the finalizing has been in stop mode. Finalizing may take several minutes up to select "Yes", then press [OK]. A shorter recording period on other DVD players. PLAYING THE DISCS ON OTHER DVD PLAYERS Finalizing a Disc You will need to finalize DVD+RW. • When you insert a DVD-RW finalized with [K / L], then press [OK]. e.g.) DVD+R, DVD-R Disc Edit Edit Disc Name Finalize Disc Protect OFF ON Finalize disc? This operation may...
User manual
Page 49
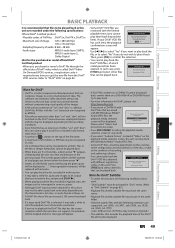
... files. • Some DivX® files cannot be played back on this unit, it is shown on the previous page. EN 49 Function Setup Others E7E4AUD.indd 49 2007/05/16 14:56:43 Unrecognizable characters will be played back. playback media selection screen will be replaced with different registration codes on page 83.) - Video Audio & Picture Please select "Video" and proceed to next step. • Press [DISC MENU...
... files. • Some DivX® files cannot be played back on this unit, it is shown on the previous page. EN 49 Function Setup Others E7E4AUD.indd 49 2007/05/16 14:56:43 Unrecognizable characters will be played back. playback media selection screen will be replaced with different registration codes on page 83.) - Video Audio & Picture Please select "Video" and proceed to next step. • Press [DISC MENU...

User manual
Page 73
.... Disc Menu Language English French Spanish Other Set the language for subtitles. TV Aspect 4:3 Letter Box 4:3 Pan & Scan 16:9 Wide Set a picture size according to the following table is the default) Contents Playback Parental Lock Pages 75-78 OFF Set the parental level for DVD disc playback. S-Video In E2(Front) Video In S-Video In Recording Auto Chapter Page 25 OFF 5 minutes 10 minutes Insert chapter marks at even time interval. 15 minutes 30 minutes 60 minutes Auto Finalize Disc Full...
.... Disc Menu Language English French Spanish Other Set the language for subtitles. TV Aspect 4:3 Letter Box 4:3 Pan & Scan 16:9 Wide Set a picture size according to the following table is the default) Contents Playback Parental Lock Pages 75-78 OFF Set the parental level for DVD disc playback. S-Video In E2(Front) Video In S-Video In Recording Auto Chapter Page 25 OFF 5 minutes 10 minutes Insert chapter marks at even time interval. 15 minutes 30 minutes 60 minutes Auto Finalize Disc Full...
User manual
Page 87
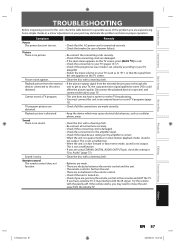
... TV. Playback picture is noisy. This is not a malfunction. • If you are using COAXIAL DIGITAL AUDIO OUTPUT jack, check the setting in "Disc Audio" (page 77). • Clean the disc with a cleaning cloth. • If the picture output signal from the external devices passes through this unit to get to your TV, the copy protection signal applied to record TV programs (page 13). • Check if all connections securely. • Check if the connecting cord is...
... TV. Playback picture is noisy. This is not a malfunction. • If you are using COAXIAL DIGITAL AUDIO OUTPUT jack, check the setting in "Disc Audio" (page 77). • Clean the disc with a cleaning cloth. • If the picture output signal from the external devices passes through this unit to get to your TV, the copy protection signal applied to record TV programs (page 13). • Check if all connections securely. • Check if the connecting cord is...

User manual
Page 89
... recognized after connection, turn on the power supplies for analog connection via audio/video cables. • DVC control may not be switched. The disc canceled during recording, finalizing, formatting or editing (even after "Repairing" disappears), a repairing process will not operate. • If the DVC is a power failure or unplugging during the repairing process MAY NOT work. There is no sound or the sound is adding disc data to this unit (HDMI FORMAT) matches the supported input format of other connected device. •...
... recognized after connection, turn on the power supplies for analog connection via audio/video cables. • DVC control may not be switched. The disc canceled during recording, finalizing, formatting or editing (even after "Repairing" disappears), a repairing process will not operate. • If the DVC is a power failure or unplugging during the repairing process MAY NOT work. There is no sound or the sound is adding disc data to this unit (HDMI FORMAT) matches the supported input format of other connected device. •...
User manual
Page 90
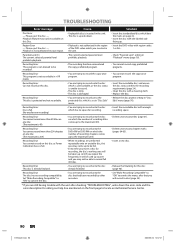
... cannot record copy prohibited programs. Recording Error This program is already finalized. • You are trying to record onto the disc already finalized. • Release the finalizing for recording. • Insert the recordable disc with enough recording space. Recording Error This disc is set in "Disc Edit" menu. • Release the disc protect setting in the region of the DVD-video which the number of recording titles comes up to the maximum (254). • Delete unnecessary chapter marks (pages 64-65). Please eject the disc. - Playback...
... cannot record copy prohibited programs. Recording Error This program is already finalized. • You are trying to record onto the disc already finalized. • Release the finalizing for recording. • Insert the recordable disc with enough recording space. Recording Error This disc is set in "Disc Edit" menu. • Release the disc protect setting in the region of the DVD-video which the number of recording titles comes up to the maximum (254). • Delete unnecessary chapter marks (pages 64-65). Please eject the disc. - Playback...

Quick start guide
Page 1
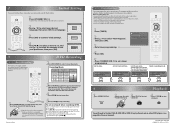
... VIDEO OUTPUT S-VIDEO S-video cable VIDEO VIDEO IN OUT Y L PB/CB L R AV IN IN R PR/CR OUT S-VIDEO AV OUT COMPONENT VIDEO OUTPUT S-VIDEO RCA audio cable HDMI OUT COAXIAL DIGITAL AUDIO OUTPUT PCM / BITSTREAM 3) Plug in the disc (see those effects on the DVD+RW DVD+R 8cm/12cm, single-sided, single layer disc media condition the unit may not read the disc properly. Settings For the Video Input You must perform "Make Edits Compatible" before making a recording. 1Press [SETUP] and use [K//L] to select "General Setting...
... VIDEO OUTPUT S-VIDEO S-video cable VIDEO VIDEO IN OUT Y L PB/CB L R AV IN IN R PR/CR OUT S-VIDEO AV OUT COMPONENT VIDEO OUTPUT S-VIDEO RCA audio cable HDMI OUT COAXIAL DIGITAL AUDIO OUTPUT PCM / BITSTREAM 3) Plug in the disc (see those effects on the DVD+RW DVD+R 8cm/12cm, single-sided, single layer disc media condition the unit may not read the disc properly. Settings For the Video Input You must perform "Make Edits Compatible" before making a recording. 1Press [SETUP] and use [K//L] to select "General Setting...
Quick start guide
Page 2
... select the appropriate external input position (E1/E2) to which the unit is compatible with enough recordable space. 1Press [TIMER]. 2Use [K / L] to select "New Program", then press [OK]. 3Set a timer programming. 4Press [OK]. Press [REC I] repeatedly until the desired recording time (30 minutes to 6 hours) appears on the external tuner. 4Press [RECI] to start its label facing up. Mode SP End - - : - - Initial Setup Clock Setting -- : -- -- Set start recording. • Do not change the external tuner's channel...
... select the appropriate external input position (E1/E2) to which the unit is compatible with enough recordable space. 1Press [TIMER]. 2Use [K / L] to select "New Program", then press [OK]. 3Set a timer programming. 4Press [OK]. Press [REC I] repeatedly until the desired recording time (30 minutes to 6 hours) appears on the external tuner. 4Press [RECI] to start its label facing up. Mode SP End - - : - - Initial Setup Clock Setting -- : -- -- Set start recording. • Do not change the external tuner's channel...


