
Leaflet
Page 3
... 50 W • Standby power consumption: 3 Accessories • Included Accessories: AC Power Cord, Audio/ Video cable, Batteries for remote control, Coax RF antenna cable, Quick start guide, Remote Control, User Manual • Remote Control 12NC: 242254900665 Dimensions • Set dimensions (W x H x D): 435 x 65 x 340 mm • Set weight: ...08-06 Version: 3.0.6 12 NC: 8622 810 12619 UPC: 0 37849 96561 0 © 2009 Koninklijke Philips Electronics N.V. Hard disk/DVD recorder Specifications DVDR3350H/37 Picture/Display • D/A converter: 10 bit, 54 MHz • A/D converter: 10 bit, ...
... 50 W • Standby power consumption: 3 Accessories • Included Accessories: AC Power Cord, Audio/ Video cable, Batteries for remote control, Coax RF antenna cable, Quick start guide, Remote Control, User Manual • Remote Control 12NC: 242254900665 Dimensions • Set dimensions (W x H x D): 435 x 65 x 340 mm • Set weight: ...08-06 Version: 3.0.6 12 NC: 8622 810 12619 UPC: 0 37849 96561 0 © 2009 Koninklijke Philips Electronics N.V. Hard disk/DVD recorder Specifications DVDR3350H/37 Picture/Display • D/A converter: 10 bit, 54 MHz • A/D converter: 10 bit, ...

User manual
Page 6
... Disk Drive) handling care...10 General Information 11 Introduction ...11 Accessories supplied...11 Region codes ...11 Copyright notice ...11 Product Overview Remote Control ...12 Inserting Batteries ...14 Main Unit...15 Connections Step 1: Basic Recorder Connections 16 Connecting the antenna cables...16 Connecting the video... settings...25 Setting the language...26 Setting the time & date...26 LANGUAGE settings ...27 DATE/ TIME settings...27 Watching TV Control TV programs 28 Switching on to TV program ...28 Pause live TV function ...28 FlexTime function ...28 Recording Before Recording...29...
... Disk Drive) handling care...10 General Information 11 Introduction ...11 Accessories supplied...11 Region codes ...11 Copyright notice ...11 Product Overview Remote Control ...12 Inserting Batteries ...14 Main Unit...15 Connections Step 1: Basic Recorder Connections 16 Connecting the antenna cables...16 Connecting the video... settings...25 Setting the language...26 Setting the time & date...26 LANGUAGE settings ...27 DATE/ TIME settings...27 Watching TV Control TV programs 28 Switching on to TV program ...28 Pause live TV function ...28 FlexTime function ...28 Recording Before Recording...29...
User manual
Page 8
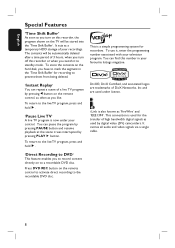
You can pause the program by pressingÑbutton on the remote control, as often as you like. To return to the live TV program by pressing PAUSE button...;. i.Link is used for recording to prevent them from being deleted. 'Instant Replay' You can find this number in your control. To use it was interrupted by digital video (DV) camcorders. The contents will be automatically deleted after a time period of... single cable. 'Direct Recording to DVD' This feature enables you to record content directly on the remote control to activate direct recording to a recordable DVD disc.
You can pause the program by pressingÑbutton on the remote control, as often as you like. To return to the live TV program by pressing PAUSE button...;. i.Link is used for recording to prevent them from being deleted. 'Instant Replay' You can find this number in your control. To use it was interrupted by digital video (DV) camcorders. The contents will be automatically deleted after a time period of... single cable. 'Direct Recording to DVD' This feature enables you to record content directly on the remote control to activate direct recording to a recordable DVD disc.

User manual
Page 11
... keep recordings on this recorder, complete the basic connections and set -up (pages 24~27) Please take advantage of the recorder. General Information Accessories supplied - Remote control and batteries - If you need further assistance, please call the customer support service for more information.
... keep recordings on this recorder, complete the basic connections and set -up (pages 24~27) Please take advantage of the recorder. General Information Accessories supplied - Remote control and batteries - If you need further assistance, please call the customer support service for more information.

User manual
Page 12
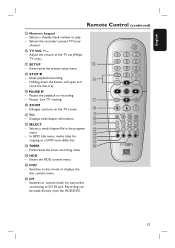
... recording the current TV channel or the current video input source. Select to jump backward by 10 seconds. : Cursor buttons for moving up/down. English Remote Control a b c d e f g h i j k l m n a STANDBY-ON 2 - Confirms a selection. 12 d - Plays a disc...
... recording the current TV channel or the current video input source. Select to jump backward by 10 seconds. : Cursor buttons for moving up/down. English Remote Control a b c d e f g h i j k l m n a STANDBY-ON 2 - Confirms a selection. 12 d - Plays a disc...
User manual
Page 13
... content menu. Adjust the volume of the TV set (Philips TV only.) q SETUP o - q t ZOOM - w - p TV VOL +/ - - Stops playback/recording. Enters the HDD content menu. Enters/exits the system setup menu. Holding down the button will open and close the disc tray. English Remote Control (continued) o Numeric keypad - t v SELECT u - Selects the recorder's preset TV...
... content menu. Adjust the volume of the TV set (Philips TV only.) q SETUP o - q t ZOOM - w - p TV VOL +/ - - Stops playback/recording. Enters the HDD content menu. Enters/exits the system setup menu. Holding down the button will open and close the disc tray. English Remote Control (continued) o Numeric keypad - t v SELECT u - Selects the recorder's preset TV...
User manual
Page 14
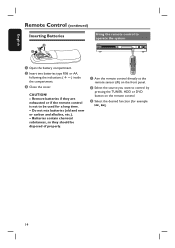
... not mix batteries (old and new or carbon and alkaline, etc.). - Remove batteries if they should be used for example , .) 14 English Remote Control (continued) Inserting Batteries 3 1 2 Using the remote control to control by pressing the TUNER, HDD or DVD button on the front panel. B Select the source you want to operate the system A Open...
... not mix batteries (old and new or carbon and alkaline, etc.). - Remove batteries if they should be used for example , .) 14 English Remote Control (continued) Inserting Batteries 3 1 2 Using the remote control to control by pressing the TUNER, HDD or DVD button on the front panel. B Select the source you want to operate the system A Open...

User manual
Page 15
... to select 'CAM2' when using this input source. 15 i VIDEO - In tuner mode, press SOURCE on the remote control repeatedly to select 'CAM1' when using this input source. Opens/closes the disc tray. Input for camcorders or video recorders. Starts ... behind the flap Flip down the button to the S-VIDEO or VIDEO jack. e iR - h S-VIDEO - b Disc tray c OPEN CLOSE ç - Turns on the remote control when using this sensor f HDD Active indicator - g - S-video input for camcorder or the audio/ video device which is connected to make a reverse/forward search. - j ...
... to select 'CAM2' when using this input source. 15 i VIDEO - In tuner mode, press SOURCE on the remote control repeatedly to select 'CAM1' when using this input source. Opens/closes the disc tray. Input for camcorders or video recorders. Starts ... behind the flap Flip down the button to the S-VIDEO or VIDEO jack. e iR - h S-VIDEO - b Disc tray c OPEN CLOSE ç - Turns on the remote control when using this sensor f HDD Active indicator - g - S-video input for camcorder or the audio/ video device which is connected to make a reverse/forward search. - j ...
User manual
Page 23
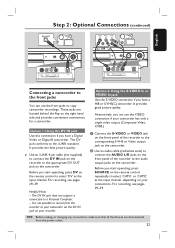
... connection if you have a Digital Video or Digital 8 camcorder. It provides good picture quality. Before you start operating, press SOURCE on the remote control repeatedly to select 'CAM1' or 'CAM2' as the input channel. TIPS: Before making or changing any connections, make sure that all the ...devices are located behind the flap on the camcorder. Before you start operating, press DV on the remote control to select 'DV' as the input channel, depending on your connections. Option 1: Using the DV IN jack Use this connection if ...
... connection if you have a Digital Video or Digital 8 camcorder. It provides good picture quality. Before you start operating, press SOURCE on the remote control repeatedly to select 'CAM1' or 'CAM2' as the input channel. TIPS: Before making or changing any connections, make sure that all the ...devices are located behind the flap on the camcorder. Before you start operating, press DV on the remote control to select 'DV' as the input channel, depending on your connections. Option 1: Using the DV IN jack Use this connection if ...

User manual
Page 24
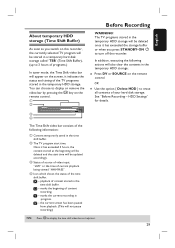
... channel 3 or 4 if you have successfully made all the required connections to program TV channels, menu language and system clock settings. Or, the TV remote control may go access the options of this recorder. TIPS: 24 Press to highlight { SETUP MENU - B Turn on the recorder for the first time, ... on using a RF modulator. Usually this channel is not playing or recording. GENERAL } and and press . The setup menu appears on the remote control. English Step 3: Installation and Setup IMPORTANT! When you need to the correct video-in this recorder considerably.
... channel 3 or 4 if you have successfully made all the required connections to program TV channels, menu language and system clock settings. Or, the TV remote control may go access the options of this recorder. TIPS: 24 Press to highlight { SETUP MENU - B Turn on the recorder for the first time, ... on using a RF modulator. Usually this channel is not playing or recording. GENERAL } and and press . The setup menu appears on the remote control. English Step 3: Installation and Setup IMPORTANT! When you need to the correct video-in this recorder considerably.

User manual
Page 25
... to be displayed. to go access the options of the options and press . { Name } - Select OK OK and press OK on the remote control exit to confirm the setting. { Fine tuning } - Manual Program Manual Program Name Frequency Fine tuning Skip C h 0 0 1 0 7 ...Yes OK OK CANOCKEL Select to make automatic TV channel programming. TIPS: Press to select by pressing the corresponding number button on the remote control to the previous screen. English Step 3: Installation and Setup (continued) GENERAL settings (underlined options are the factory default settings) Auto...
... to be displayed. to go access the options of the options and press . { Name } - Select OK OK and press OK on the remote control exit to confirm the setting. { Fine tuning } - Manual Program Manual Program Name Frequency Fine tuning Skip C h 0 0 1 0 7 ...Yes OK OK CANOCKEL Select to make automatic TV channel programming. TIPS: Press to select by pressing the corresponding number button on the remote control to the previous screen. English Step 3: Installation and Setup (continued) GENERAL settings (underlined options are the factory default settings) Auto...

User manual
Page 28
...will appear on the TV to the correct program number for instant replay. This information is shown on the remote control to jump back 10 seconds upon every single press for the recorder (e.g. 'EXT', '0', 'AV'). To display...video bar. Pause live TV function You may be stored automatically to the temporary HDD storage in control of the program at the scene it was interrupted. TIPS: Press m to select a TV ... TUNER A Turn on the status window. B Press STANDBY-ON 2 to turn on the remote control. If no TV program appears on the screen, press TUNER on the recorder. to display the...
...will appear on the TV to the correct program number for instant replay. This information is shown on the remote control to jump back 10 seconds upon every single press for the recorder (e.g. 'EXT', '0', 'AV'). To display...video bar. Pause live TV function You may be stored automatically to the temporary HDD storage in control of the program at the scene it was interrupted. TIPS: Press m to select a TV ... TUNER A Turn on the status window. B Press STANDBY-ON 2 to turn on the remote control. If no TV program appears on the screen, press TUNER on the recorder. to display the...
User manual
Page 29
... mode, the Time Shift video bar will not pause recording.) TIPS: Press m to display or remove the video bar by pressing the m key on the remote control. c Status of source of content recording. - marks the current recording in the temporary HDD storage: Press DV or SOURCE on the... remote control. OR Use the option { Delete HDD } to erase all contents of current playback being viewed "HH:MM:SS". "LIVE" or the time of your hard ...
... mode, the Time Shift video bar will not pause recording.) TIPS: Press m to display or remove the video bar by pressing the m key on the remote control. c Status of source of content recording. - marks the current recording in the temporary HDD storage: Press DV or SOURCE on the... remote control. OR Use the option { Delete HDD } to erase all contents of current playback being viewed "HH:MM:SS". "LIVE" or the time of your hard ...

User manual
Page 32
... OK to access its options. TIPS: Press to go back to exit the menu. 32 D To exit, press SETUP. The setup menu appears on the remote control. Press SETUP to previous menu item. A Press SETUP on the TV. A Use keys to highlight { Auto Chapter Marker } and press to confirm. SP Search Edit...
... OK to access its options. TIPS: Press to go back to exit the menu. 32 D To exit, press SETUP. The setup menu appears on the remote control. Press SETUP to previous menu item. A Press SETUP on the TV. A Use keys to highlight { Auto Chapter Marker } and press to confirm. SP Search Edit...

User manual
Page 34
.... Unrecordable pictures Television programs, films, video tapes, discs, and other materials may be copy-protected and therefore cannot be recorded on the remote control. STOP PAUSE CH REC DV IMPORTANT! - TIPS: 34 Set the appropriate mode of the scene in the temporary HDD storage where you ...future viewing or copy to a recordable DVD if required. D To stop recording, press STOPÇon this recorder. English Record on the remote control, the unmarked contents in the TSB will be transferred from a connected DV camcorder onto the HDD, where you can edit it easily and...
.... Unrecordable pictures Television programs, films, video tapes, discs, and other materials may be copy-protected and therefore cannot be recorded on the remote control. STOP PAUSE CH REC DV IMPORTANT! - TIPS: 34 Set the appropriate mode of the scene in the temporary HDD storage where you ...future viewing or copy to a recordable DVD if required. D To stop recording, press STOPÇon this recorder. English Record on the remote control, the unmarked contents in the TSB will be transferred from a connected DV camcorder onto the HDD, where you can edit it easily and...

User manual
Page 35
... to start recording and press the PLAY button on the front. To resume recording, press PLAY again. C Press STANDBY-ON 2 to turn on the remote control. C Turn on the TV to the correct program number for the recorder (e.g. 'EXT', '0', 'AV'.) D Turn on the recorder and press DV ...will be transferred from and set the camcorder to pause mode. PAUSE REC SOURCE TUNER A Connect the external device to this recorder. B Turn on the remote control. TIPS: Set the appropriate mode of record quality for the recorder (e.g. 'EXT', '0', 'AV'). Record on Hard Disk (continued) English A Connect the...
... to start recording and press the PLAY button on the front. To resume recording, press PLAY again. C Press STANDBY-ON 2 to turn on the remote control. C Turn on the TV to the correct program number for the recorder (e.g. 'EXT', '0', 'AV'.) D Turn on the recorder and press DV ...will be transferred from and set the camcorder to pause mode. PAUSE REC SOURCE TUNER A Connect the external device to this recorder. B Turn on the remote control. TIPS: Set the appropriate mode of record quality for the recorder (e.g. 'EXT', '0', 'AV'). Record on Hard Disk (continued) English A Connect the...

User manual
Page 38
... Press [SHUFFLE] to mark or unmark recordings. 2. Press [SELECT] to sort by title. F To stop recording, press STOPÇ on the remote control. English Record on DVD Recordable Disc (continued) Recording from various sources You can be played on the record quality that there is sufficient space available... on the DVD±R before it can choose to copy your recordings from the HDD A Turn on the remote control to sort according to the DVD recordable disc will not be displayed at the bottom right corner of recording. C Press HDD on ...
... Press [SHUFFLE] to mark or unmark recordings. 2. Press [SELECT] to sort by title. F To stop recording, press STOPÇ on the remote control. English Record on DVD Recordable Disc (continued) Recording from various sources You can be played on the record quality that there is sufficient space available... on the DVD±R before it can choose to copy your recordings from the HDD A Turn on the remote control to sort according to the DVD recordable disc will not be displayed at the bottom right corner of recording. C Press HDD on ...

User manual
Page 39
... 1 2 2.5 3 4 6 Values are estimates only. E Press SELECT to the DV IN jack on the front panel. F Press RECâon the remote control. You have to finalize the DVD±R before recording. English Record on DVD Recordable Disc (continued) Recording from the device connected to the VIDEO (CVBS... 1 } Input source from an external device/ VCR/ DV Camcorder A Turn on the screen. G To stop recording, press STOPÇ on the remote control. B Insert a DVD recordable disc into the recorder. An information box will be displayed on the TV to direct recording mode. OR Press DV to record...
... 1 2 2.5 3 4 6 Values are estimates only. E Press SELECT to the DV IN jack on the front panel. F Press RECâon the remote control. You have to finalize the DVD±R before recording. English Record on DVD Recordable Disc (continued) Recording from the device connected to the VIDEO (CVBS... 1 } Input source from an external device/ VCR/ DV Camcorder A Turn on the screen. G To stop recording, press STOPÇ on the remote control. B Insert a DVD recordable disc into the recorder. An information box will be displayed on the TV to direct recording mode. OR Press DV to record...

User manual
Page 40
... menu appears. Enter the PlusCode programming number for manual timer recording. The start and stop time of record quality, see page 33. A Turn on the remote control. B Press TIMER on the TV power. The timer schedule list appears. With this number in the programming number. To make the recording. - The recording input...
... menu appears. Enter the PlusCode programming number for manual timer recording. The start and stop time of record quality, see page 33. A Turn on the remote control. B Press TIMER on the TV power. The timer schedule list appears. With this number in the programming number. To make the recording. - The recording input...

User manual
Page 42
... appears. Timer Schedule Source Rec Mode Date 1 2 3 4 5 6 Start End Rec To C Use keys to step B. Timer Recording (continued) English Timer recording (manually) A Turn on the remote control. Use keys or the numeric keypad 0-9 to select an entry in the menu and press OK. Use keys or the numeric keypad 0-9 to record. If...
... appears. Timer Schedule Source Rec Mode Date 1 2 3 4 5 6 Start End Rec To C Use keys to step B. Timer Recording (continued) English Timer recording (manually) A Turn on the remote control. Use keys or the numeric keypad 0-9 to select an entry in the menu and press OK. Use keys or the numeric keypad 0-9 to record. If...


