
Leaflet
Page 2
Philips DVD-Video/VCR Combi DVD750VR Technical specifications DVD 750VR Playback system • DVD-Video • MP3-CD • CD (CD-R and CD-RW) • VHS • DVD+RW • DVD+R ..., 60 Hz 24 watt Carton • Dimensions • Weight DVD/VCR combi • Dimensions • Weight • UPC Code 21.2 x 7.3 x 13.5 inch (w x h x d) Approx 10.1 lbs 17.1 x 3.9 x 8.6 inch (w x h x d) Approx 8.2 lbs 0 37849 93587 3 General functionality • Stop/ play/ pause • Fast forward/ backward2 • Step forward/ backward2 • Slow motion • Title / chapter...
Philips DVD-Video/VCR Combi DVD750VR Technical specifications DVD 750VR Playback system • DVD-Video • MP3-CD • CD (CD-R and CD-RW) • VHS • DVD+RW • DVD+R ..., 60 Hz 24 watt Carton • Dimensions • Weight DVD/VCR combi • Dimensions • Weight • UPC Code 21.2 x 7.3 x 13.5 inch (w x h x d) Approx 10.1 lbs 17.1 x 3.9 x 8.6 inch (w x h x d) Approx 8.2 lbs 0 37849 93587 3 General functionality • Stop/ play/ pause • Fast forward/ backward2 • Step forward/ backward2 • Slow motion • Title / chapter...
User manual
Page 1
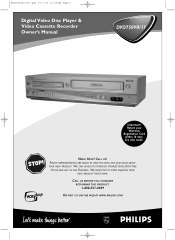
... WE CAN GUIDE YOU THROUGH CONNECTIONS, FIRST-TIME SETUP, AND ANY OF THE FEATURES. Return your Warranty Registration Card within 10 days. See why inside. PHILIPS REPRESENTATIVES ARE READY TO HELP YOU WITH ANY QUESTIONS ABOUT YOUR NEW PRODUCT. WE WANT YOU TO START ENJOYING YOUR NEW PRODUCT RIGHT AWAY. H9420UD...
... WE CAN GUIDE YOU THROUGH CONNECTIONS, FIRST-TIME SETUP, AND ANY OF THE FEATURES. Return your Warranty Registration Card within 10 days. See why inside. PHILIPS REPRESENTATIVES ARE READY TO HELP YOU WITH ANY QUESTIONS ABOUT YOUR NEW PRODUCT. WE WANT YOU TO START ENJOYING YOUR NEW PRODUCT RIGHT AWAY. H9420UD...
User manual
Page 3
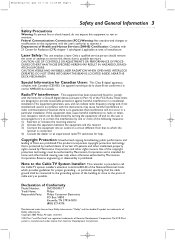
...Corporation. Copyright Protection: Unauthorized copying, broadcasting, public performance, and lending of Discs are trademarks of Dolby Laboratories. Copyright 2003 Philips.All rights reserved. DO NOT STARE INTO BEAM.THE BEAM IS LOCATED INSIDE, NEAR THE DECK MECHANISM. Special Information for ...and other rights owners. Reverse engineering or disassembly is protected by method claims of Conformity Model Number: DVD750VR/17 Trade Name: Philips Responsible Party: Philips Consumer Electronics P.O. If this equipment to rain or moisture. H9420UD(p1-51).QX4 03.7.18 11:59...
...Corporation. Copyright Protection: Unauthorized copying, broadcasting, public performance, and lending of Discs are trademarks of Dolby Laboratories. Copyright 2003 Philips.All rights reserved. DO NOT STARE INTO BEAM.THE BEAM IS LOCATED INSIDE, NEAR THE DECK MECHANISM. Special Information for ...and other rights owners. Reverse engineering or disassembly is protected by method claims of Conformity Model Number: DVD750VR/17 Trade Name: Philips Responsible Party: Philips Consumer Electronics P.O. If this equipment to rain or moisture. H9420UD(p1-51).QX4 03.7.18 11:59...

User manual
Page 4
... Information 3 Table of Contents 4 Introduction 5 Playable Discs and Video Cassettes 6 Initial DVD/VCR Setup Hookups 7-15 Remote Control Setup 16 First-time DVD/VCR Setup 17 Basic Playback Video Cassette Playback 18 Disc Playback 19 Basic DVD/VCR Controls Display Panel (DVD 20 Display Panel (VCR 21 Front Panel 22 Rear...
... Information 3 Table of Contents 4 Introduction 5 Playable Discs and Video Cassettes 6 Initial DVD/VCR Setup Hookups 7-15 Remote Control Setup 16 First-time DVD/VCR Setup 17 Basic Playback Video Cassette Playback 18 Disc Playback 19 Basic DVD/VCR Controls Display Panel (DVD 20 Display Panel (VCR 21 Front Panel 22 Rear...

User manual
Page 7
..., find the right Audio/Video In channel, turn on pages 11-14. Once you turn off. Set your choice on the TV, go to page 17 to channel 3 or 4 - Set the INTERLACE/PROGRESSIVE SCAN SELECTOR to the power outlets only after you are not possible, connect the DVD/VCR's red and...
..., find the right Audio/Video In channel, turn on pages 11-14. Once you turn off. Set your choice on the TV, go to page 17 to channel 3 or 4 - Set the INTERLACE/PROGRESSIVE SCAN SELECTOR to the power outlets only after you are not possible, connect the DVD/VCR's red and...

User manual
Page 8
Go to start playback. Insert a videotape and press PLAY B to page 17 before turning on the TV. Press STOP C to stop play and cancel manual tracking, then press PLAY B to resume play and change the DVD/VCR's ...
Go to start playback. Insert a videotape and press PLAY B to page 17 before turning on the TV. Press STOP C to stop play and cancel manual tracking, then press PLAY B to resume play and change the DVD/VCR's ...

User manual
Page 11
... the TV and the DVD/VCR to a power outlet.Turn on the TV and set it to complete the first-time setup. Go to page 17 to the correct Audio/Video In channel. If the TV has a single AUDIO IN jack, use the white audio cable to connect the DVD/VCR...
... the TV and the DVD/VCR to a power outlet.Turn on the TV and set it to complete the first-time setup. Go to page 17 to the correct Audio/Video In channel. If the TV has a single AUDIO IN jack, use the white audio cable to connect the DVD/VCR...
User manual
Page 12
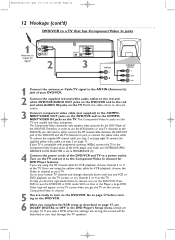
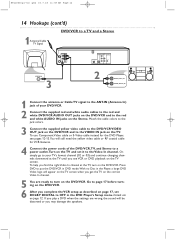
... the TV speakers. The Component Video connection only supplies video (picture) for DVD Player features. If you complete the VCR setup as described on page 17, set DOLBY DIGITAL to turn on the TV. Press DVD to put the DVD/VCR in DVD mode.With no Disc in order to use... TV. Turn on the TV and set to PROGRESSIVE (P). 4 Connect the power cords of the DVD/VCR and TV to a power outlet. Go to page 17 before turning on the TV screen, or try channel 3 or 4 at the DVD/VCR, you are using the RF coaxial cable for VCR playback, choose...
... the TV speakers. The Component Video connection only supplies video (picture) for DVD Player features. If you complete the VCR setup as described on page 17, set DOLBY DIGITAL to turn on the TV. Press DVD to put the DVD/VCR in DVD mode.With no Disc in order to use... TV. Turn on the TV and set to PROGRESSIVE (P). 4 Connect the power cords of the DVD/VCR and TV to a power outlet. Go to page 17 before turning on the TV screen, or try channel 3 or 4 at the DVD/VCR, you are using the RF coaxial cable for VCR playback, choose...

User manual
Page 13
... connect the supplied RF coaxial cable, see step 2 on page eight.To connect the supplied yellow video cable, see VCR or DVD playback on page 17, set it to the S-Video In channel for VCR playback, choose channel 3 or 4 at the TV. If you complete the VCR setup as described on...
... connect the supplied RF coaxial cable, see step 2 on page eight.To connect the supplied yellow video cable, see VCR or DVD playback on page 17, set it to the S-Video In channel for VCR playback, choose channel 3 or 4 at the TV. If you complete the VCR setup as described on...
User manual
Page 14
....Turn on the TV and set DOLBY DIGITAL to turn on the DVD/VCR. To help you complete the VCR setup as described on page 17, set it to the red and white AUDIO IN jacks on the Stereo. Press DVD to put the DVD/VCR in DVD mode.With no... Disc in the DVD Player's Setup menu. Go to page 17 before turning on the DVD/VCR. 6 After you find the right Video In channel at the TV until you may damage the speakers.
....Turn on the TV and set DOLBY DIGITAL to turn on the DVD/VCR. To help you complete the VCR setup as described on page 17, set it to the red and white AUDIO IN jacks on the Stereo. Press DVD to put the DVD/VCR in DVD mode.With no... Disc in the DVD Player's Setup menu. Go to page 17 before turning on the DVD/VCR. 6 After you find the right Video In channel at the TV until you may damage the speakers.

User manual
Page 15
... TV, turn on page 72. If Dolby Digital Surround is not connected to a Dolby Digital-compatible Stereo, set DOLBY DIGITAL to OFF. Go to page 17 before turning on the DVD/VCR. If you connect the DVD/VCR to a Dolby Digital Stereo, set it to the correct Video In channel. H9420UD...
... TV, turn on page 72. If Dolby Digital Surround is not connected to a Dolby Digital-compatible Stereo, set DOLBY DIGITAL to OFF. Go to page 17 before turning on the DVD/VCR. If you connect the DVD/VCR to a Dolby Digital Stereo, set it to the correct Video In channel. H9420UD...
User manual
Page 17
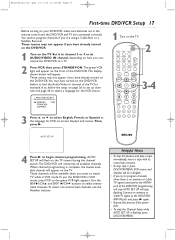
... and the DVD/VCR and TV are using a Cable Box or a Satellite Receiver. H9420UD(p1-51).QX4 03.7.18 11:59 AM Page 17 First-time DVD/VCR Setup 17 Before turning on -screen displays and menus. Set it to channel 3 or 4 or its record tab removed. • To skip step 3, press...
... and the DVD/VCR and TV are using a Cable Box or a Satellite Receiver. H9420UD(p1-51).QX4 03.7.18 11:59 AM Page 17 First-time DVD/VCR Setup 17 Before turning on -screen displays and menus. Set it to channel 3 or 4 or its record tab removed. • To skip step 3, press...
User manual
Page 54
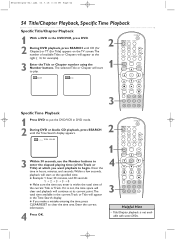
... DVD/VCR, press DVD. 2 During DVD playback, press SEARCH until the Time Search display appears. The selected Title or Chapter will start to play. 2 1 12/17 4 / 4 3 STANDBY-ON SEARCH MODE DISPLAY REPEAT REPEAT AUDIO A-B SUBTITLE ZOOM ANGLE SKIP / CH RETURN TITLE CLEAR/RESET SLOW DVD SYSTEM MENU VCR/TV VCR DISC...
... DVD/VCR, press DVD. 2 During DVD playback, press SEARCH until the Time Search display appears. The selected Title or Chapter will start to play. 2 1 12/17 4 / 4 3 STANDBY-ON SEARCH MODE DISPLAY REPEAT REPEAT AUDIO A-B SUBTITLE ZOOM ANGLE SKIP / CH RETURN TITLE CLEAR/RESET SLOW DVD SYSTEM MENU VCR/TV VCR DISC...
User manual
Page 61
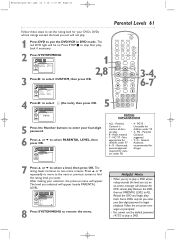
... an on -screen messages as prompted. • You cannot use the default password (4737) to ALL. NC-17 - Restricted; parental approval required for viewers under 17 • 6 - The rating levels continue on . The level you enter your four-digit password. 6 Press ...Reload the DVD and begin playback. Press STOP C to select a level, then press OK. R - Parental Guidance suggested. • 1- PARENTAL PARENTAL LEVEL ALL 8 7 [NC-17] 6 [R] OK 5 4 [PG13] 3 [PG] 8 Press SYSTEM/MENU to select CUSTOM, then press OK. PG13 Unsuitable for children under 13 • 3 - G ...
... an on -screen messages as prompted. • You cannot use the default password (4737) to ALL. NC-17 - Restricted; parental approval required for viewers under 17 • 6 - The rating levels continue on . The level you enter your four-digit password. 6 Press ...Reload the DVD and begin playback. Press STOP C to select a level, then press OK. R - Parental Guidance suggested. • 1- PARENTAL PARENTAL LEVEL ALL 8 7 [NC-17] 6 [R] OK 5 4 [PG13] 3 [PG] 8 Press SYSTEM/MENU to select CUSTOM, then press OK. PG13 Unsuitable for children under 13 • 3 - G ...
User manual
Page 77
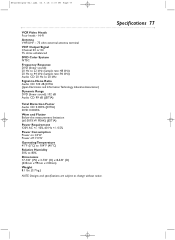
...%, 60 Hz +/- 0.5% Power Consumption Power on: 24 W Power off: 7.0 W Operating Temperature 41°F (5°C) to 104°F (40°C) Relative Humidity 30% to 80% Dimensions 17-1/8" (W) x 3-7/8" (H) x 8-5/8" (D) (435mm x 99mm x 218mm) Weight 8.1 lbs. (3.7 kg.) NOTE: Designs and specifications are subject to change without notice. Specifications 77 H9420UD(p52-84).QX4 03.7.18 0:07...
...%, 60 Hz +/- 0.5% Power Consumption Power on: 24 W Power off: 7.0 W Operating Temperature 41°F (5°C) to 104°F (40°C) Relative Humidity 30% to 80% Dimensions 17-1/8" (W) x 3-7/8" (H) x 8-5/8" (D) (435mm x 99mm x 218mm) Weight 8.1 lbs. (3.7 kg.) NOTE: Designs and specifications are subject to change without notice. Specifications 77 H9420UD(p52-84).QX4 03.7.18 0:07...
User manual
Page 83
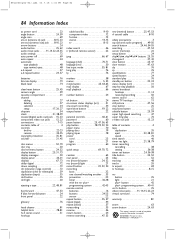
...-rate display 73 black level 74 clear/reset button 25, 45 camera angle 59 cassette compartment 21 channel adding 27 deleting 27 selection 24 setup 17, 26, 27 chapters 54 clock 21, 28-29 coaxial (digital audio out) jack . .15, 23 component video out jacks . . . .12, 23 connections 7-15 contents, table...
...-rate display 73 black level 74 clear/reset button 25, 45 camera angle 59 cassette compartment 21 channel adding 27 deleting 27 selection 24 setup 17, 26, 27 chapters 54 clock 21, 28-29 coaxial (digital audio out) jack . .15, 23 component video out jacks . . . .12, 23 connections 7-15 contents, table...


